TL;DR
- A miter in stone countertop work is an angled cut, almost always 45 degrees, made on two pieces of stone so they meet at a corner with no visible cut face.
- Fabricators use it to build thick waterfall edges, wrap islands, and fake the look of a 6cm slab from 3cm material.
- Expect to pay $50 to $150 per linear foot over a standard edge, depending on stone and shop.
What is a miter cut in stone countertop fabrication?
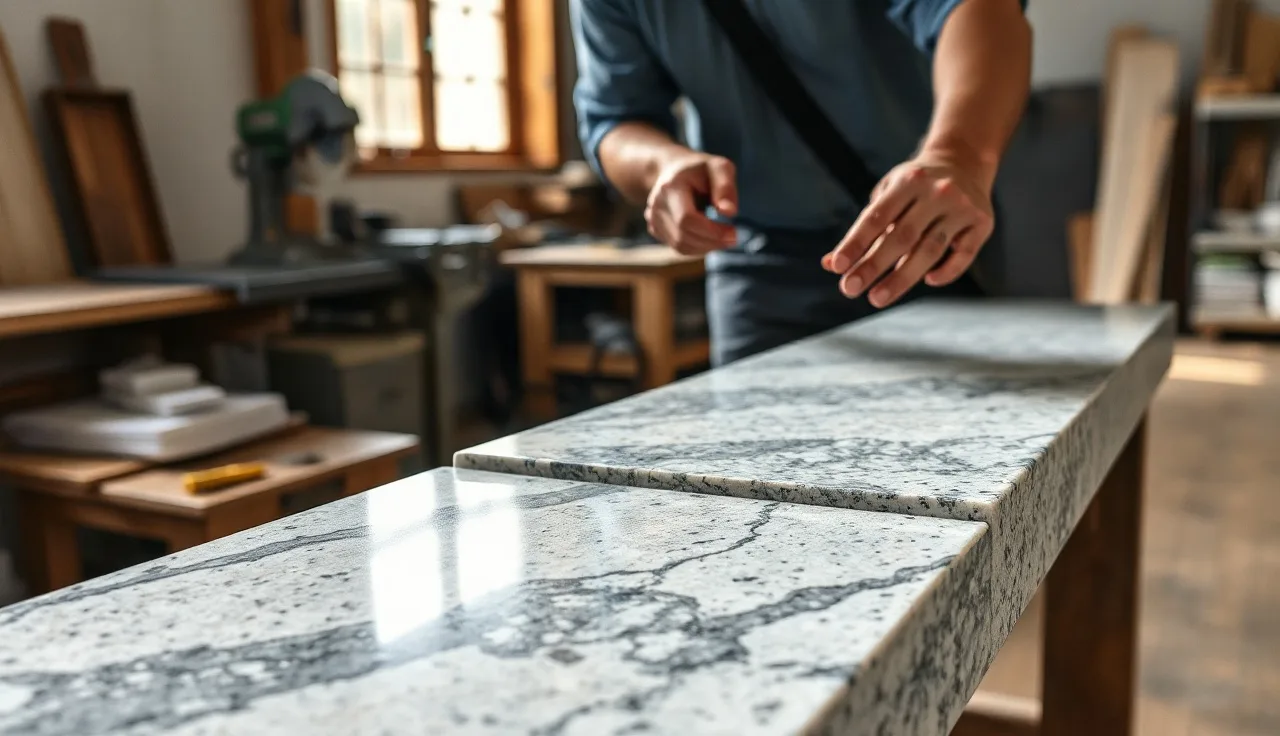
A miter cut is an angled cut across the face of a stone slab, almost always 45 degrees, so two pieces meet at a corner with both cut faces hidden inside the joint. In countertop work the word means one of two things. A laminated edge miter glues a strip of stone under the front edge to fake a thicker slab. A waterfall miter carries the top down the side of an island in one continuous visual line.
The difference from a plain butt joint is the whole point. A butt joint stacks one piece on another, so you see the raw slab thickness at the edge. A mitered joint buries both thicknesses inside the glue line and reads as one solid piece. On a 3cm slab (roughly 1.25 inches), a mitered lamination looks like a 6cm or even 8cm slab without the weight, the cost, or the structural headache of using double material everywhere.
Miters are old. Stone fabricators have cut them for decades on fireplace surrounds, window sills, and monumental work. What changed in the last fifteen years is the CNC bridge saw and the 5-axis waterjet, which hold tolerances tight enough to make a glued miter joint nearly invisible on polished stone. A hand-cut miter from the 1980s showed a gap or a seam. On a well-cut CNC miter today, you have to know where to look to find the joint.
What are the main types of mitered edges used on stone countertops?
Four situations send a fabricator to the tilt head in everyday shop work.
Laminated (built-up) edge. This is the workhorse miter. Rip a strip from a 3cm slab, miter both pieces at 45 degrees, glue the strip under the front edge, and the visible face jumps to roughly 4.5 to 5cm before you profile it. Designers spec this on modern kitchens constantly because it buys the monolithic look without paying for 6cm slab.
Waterfall edge. The top wraps over the side of an island and appears to pour down to the floor. You miter the top piece and a vertical side piece at 45 degrees so the veining runs (or tries to run) across the joint. This is the most demanding miter in a residential shop. The two pieces have to be bookmatched or slip-matched from the same slab, and any angle error is visible from across the room.
Inside corner miter. When two sections meet at an inside corner, some designers want the joint to read as one surface instead of two pieces butted side by side. A 45-degree inside miter does that. It is rare in residential kitchens and more common on bathroom vanities and high-end commercial work.
Apron and furniture-style fronts. Thick apron-front islands, quartz or natural stone, often use a mitered return at the top edge so the thick front panel tucks up under the top cleanly. The miter hides the substrate and the glue line and gives the piece a furniture look.
Each type demands different tolerances. A laminated edge miter can hide a small gap under color-matched epoxy and a good polish. A waterfall miter on bookmatched Calacatta has nowhere to hide. That gap in difficulty is exactly why fabricators price them differently.
How does a fabricator actually cut and join a mitered stone edge?
It starts at the saw. On a CNC bridge saw the blade tilts to 45 degrees (some machines reach 60 for bevel work) and makes one clean pass along the slab edge. On a manual bridge saw the operator tilts the head and guides the cut by hand. Either way the target is a flat, consistent 45-degree face with no chipping on the polished surface.
Tolerance rules everything here. Shops typically aim for a gap of 0.5mm or less across the full length of a miter joint before any epoxy goes on [1]. On a 10-foot waterfall run, holding that is genuinely hard. A slight bow in the slab, a blade sitting 0.2 degrees off true, or a support table that is not dead flat will each open the gap. That is why experienced fabricators dry-fit every miter before mixing a drop of adhesive.
The glue-up uses a two-part polyester or epoxy tinted to the stone. The most common products in North American shops are from Akemi and Tenax, both of which publish technical data sheets with open times and cure schedules [2]. Fabricators coat both miter faces, close the joint, and clamp or strap it while it cures. The clamping setup for a waterfall miter is awkward work, since you are holding a heavy vertical piece against a horizontal one at a corner.
After cure, squeeze-out gets ground flush with an angle grinder and diamond pads, then the edge is refinished to match the top. On a honed or leathered finish this is easy. On a high-gloss polish, matching the factory sheen takes real skill and time. Some shops run the finished joint back through a polishing line. Others do it by hand.
For volume work, software that tracks miter cuts as distinct operations in the quote changes your job costing. Quote a waterfall island by hand and it is easy to undercount saw time, adhesive, and finishing labor. SlabWise handles a mitered edge as its own line item so the cost lands on the customer instead of your margin.
What tolerances and equipment do shops need to cut miters accurately?
You need a CNC bridge saw with a tilting head, a flat and level surface to assemble on, and the discipline to dry-fit every joint before you commit to epoxy. That is the honest short list.
Most U.S. production shops run bridge saws from Park Industries, Donatoni, or GMM. These tilt the blade head in 0.1-degree steps and carry digital angle readouts, which pulls most guesswork out of the cut itself [3]. The real variable is the slab. Natural stone is not flat. A 3cm granite slab can bow 3 to 5mm across its length, so the miter face reads accurate at the machine but the assembly sits proud once you lay it on the cabinet.
Shops that do a lot of waterfall work keep a dedicated flat assembly table with vacuum cups or mechanical clamps to force the slab geometry during glue-up. Some run the miter faces across a polishing line before glue-up to make sure both surfaces are truly coplanar.
For inside corner miters and lamination strips, the strip pieces are short enough that slab bow is not a practical problem. The enemy there is a blade that is not exactly at 45 degrees. Even 0.3 degrees off means the two faces will not close, and you get a visible line on one side of the joint.
CNC waterjet and 5-axis routers cut miters too, faster and more consistent than a saw on complex shapes. They are rare in small and mid shops because a capable 5-axis machine runs $250,000 and up [4]. Most shops under 10,000 square feet cut miters on the bridge saw and polish by hand.
How much does a mitered stone countertop edge cost?
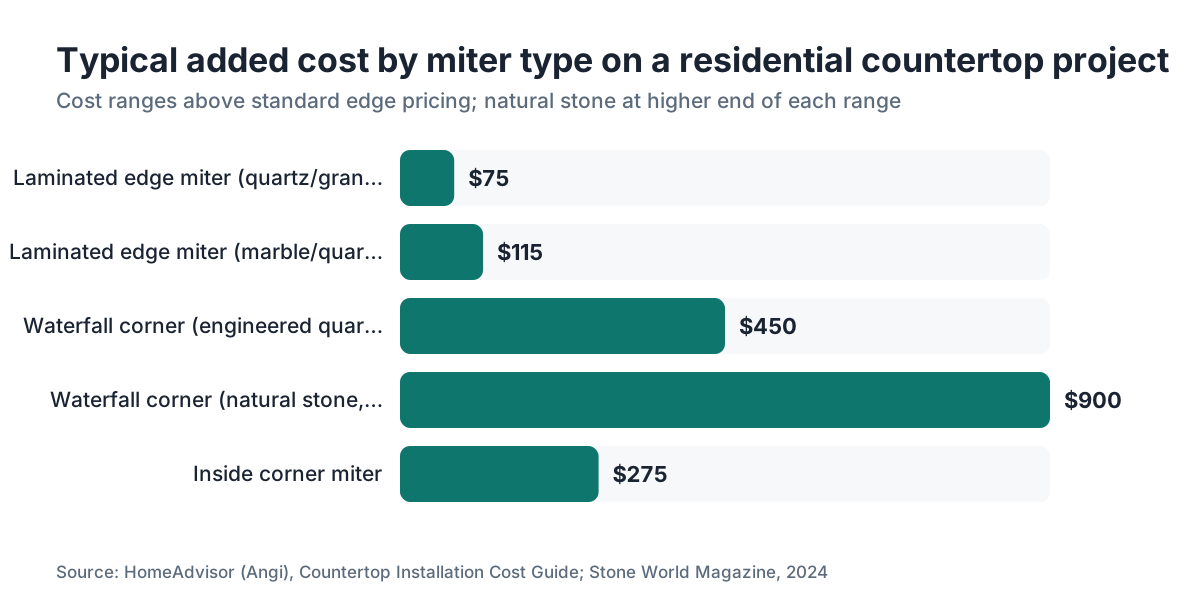
A laminated edge miter runs $50 to $150 per linear foot over the base edge price, and a waterfall corner runs $300 to $1,200 as a lump sum, with natural stone landing at the top of both ranges. Region, stone type, and complexity move the number. Here are ranges you can actually plan around.
A laminated (built-up) mitered edge on quartz or granite typically costs $50 to $100 per linear foot above the base edge, based on fabricator pricing discussions and industry price surveys [5]. That covers the extra saw time, the strip material (usually cut from the same slab or a remnant), adhesive, and polishing.
A waterfall miter gets priced differently, usually as a lump sum per corner rather than per foot. A single waterfall corner on a residential island runs roughly $300 to $800 depending on the stone and how carefully the seam has to be matched. Bookmatched corners on a rare marble can push past $1,000 each at high-end shops.
Inside corner miters in kitchens run $150 to $400 per corner. Most of that is precision fitting and finishing, not the cut.
On marble or quartzite, expect the high end of every range. Quartzite is hard, wears blades fast, and chips more readily on miter cuts. On marble countertops, the cost driver is matching the veining, not hardness, and matching takes time. On engineered quartz like Cambria countertops, the material is uniform so matching is trivial, but the hardness sits near granite and blade wear is a real line on the cost sheet.
Here is the honest homeowner advice. Get at least two quotes and ask each shop to break out the miter as its own line. If a fabricator buries it in a single square-foot price with no explanation, you have no way to know whether the number is fair.
When is a miter worth the money and when should you skip it?
A laminated edge miter is almost always worth it if you want a thick edge. The alternative is buying 6cm slab, which can cost two to three times more per square foot and weighs a ton. A clean mitered lamination is structurally sound and looks identical to a true 6cm slab from any normal viewing distance.
The waterfall miter is where you slow down and think. It is beautiful when it is done right, and it has become a signature move in contemporary kitchens. It is also expensive, it needs careful stone selection (bookmatched from one slab or a matched pair), and it reveals a fabrication error faster than any other countertop detail. Put dramatic directional veining on a shop that has not done many waterfalls and you can end up with a very expensive joint that just looks wrong. Ask your fabricator for photos of finished waterfall jobs, not renderings.
The inside corner miter is mostly a design preference. In most kitchens a standard inside corner seam is barely visible and costs nothing extra. The miter adds cost with no structural payoff. I would spec it only on a high-visibility vanity or a commercial job where the finish detail earns its keep.
For fabricators the math flips. A laminated edge miter is one of the higher-margin operations in the shop when you quote it right. Saw time is short, the strip often comes from drops, and the skill required is modest after your team has cut a few dozen. Waterfall miters take longer but carry fat margins because customers read them as premium work. The one real risk is underquoting, because you forgot to price the matching and fitting labor.
What stone materials work best (and worst) for miter cuts?
Granite and engineered quartz are the most forgiving stones for miter work. Granite is hard but predictable, and most blade systems are tuned for it [6]. Engineered quartz is uniform in density, so blade wear stays consistent and chipping stays manageable.
Quartzite is harder and more abrasive than granite and chips badly at the miter face if the blade is worn or the feed rate is too fast. Fabricators cutting quartzite miters run a fresh (or freshly dressed) blade and slow the cut. Our notes on how to clean quartzite countertops cover its hardness, which is the same trait that makes it demanding to cut.
Marble is softer and easier to cut, but it chips on the polished surface more readily than granite, and the miter face can show micro-fractures if the blade speed is wrong. The bigger marble problem is veining. Dramatic veins that run at an angle mean the waterfall joint will never look perfectly continuous unless the two pieces come from an exact bookmatched pair cut from adjacent slabs.
Soapstone is soft (Mohs 1 to 2), cuts easily, and mills a simple miter edge. But soapstone almost never shows up in waterfall applications because its matte, workshop look does not fit that design language. See how to clean soapstone countertops for a feel of the material.
Porcelain slabs (large-format porcelain used as a countertop surface) are showing up more often and miter beautifully because the material is consistent and dense. The catch is that porcelain is brittle, and a 45-degree miter edge on a 12mm panel is thin and fragile until it is fully supported and glued. Shops new to porcelain miters chip their first few pieces before the technique clicks.
For granite countertops or kitchen countertops generally, a miter is a mature, well-understood technique. The stone mostly changes the blade spec and the finishing time, not the basic approach.
How do fabricators match stone veining across a miter joint?
Matching veining across a miter is the hardest part of waterfall work. The method depends on what the designer and homeowner want and what the slab allows.
True bookmatch: cut two adjacent pieces from a slab like opening a book, so one piece mirrors the other. Mitered and joined at a corner, the veins appear to flow from horizontal to vertical as one continuous pattern. This needs two sequential slabs from the same block, coordinated at the yard, and careful layout at the shop. Not every stone comes in matched pairs, and not every slab looks good bookmatched.
Slip match: both pieces come from the same slab in sequence, so the veining is similar but not mirrored. The joint reads as the stone continuing around the corner. This is easier to pull off and looks good on stones with flowing, directional veins.
Random match: no attempt to line up veining, just continuous stone. This works on small, busy patterns like most granites. It fails loudly on dramatic marbles.
The practical limit is that matching has to happen before you buy the slab. If a homeowner decides on a waterfall after the countertop is already cut, you are usually stuck with whatever remnant is left, and the odds of a good vein match drop hard. Have this conversation at the design stage, not after templating.
What are common mistakes fabricators make when cutting stone miters?
The most common mistake is not dry-fitting before glue-up. Every experienced fabricator knows to dry-fit. Shops that skip it to save time spend far longer grinding and filling than they ever saved.
The second is a blade that is not exactly at 45 degrees. A 0.5-degree error means neither face meets correctly, and you open a gap on one side of the joint. Checking blade angle with a precision digital protractor, not the machine readout, takes two minutes before a miter run and saves hours.
Underpolishing the miter face before glue-up is another repeat offender. Some fabricators skip finishing the mating faces because they will be glued together anyway. Any saw marks or rough texture there create air pockets in the glue line, which can let the joint fail over time, especially on a waterfall edge under shear.
The wrong epoxy tint is a visible, embarrassing error. On white or light stones, a faintly gray tint reads clearly as a glue line. Mix several tint ratios on scrap and let them cure before you commit to the job.
Failing to account for the miter in the template trips up shops that write templates by hand or use basic software. The lamination strip is a separate piece with its own dimensions and waste factor. Leave it out of the nest and you may not have enough material to cut it from the same slab, and a remnant-sourced strip rarely matches.
How should fabricators price and quote miter work to stay profitable?
Treat each miter type as its own operation with its own time study. Do not fold it into a generic edge surcharge. That single habit is the difference between charging for miter work and eating it.
For a laminated edge miter, time the real process in your shop: saw setup, the miter cut on the main piece, cutting the strip, dry fit, glue-up, clamp time, grinding, and polishing. In most shops that runs 30 to 60 minutes of labor per linear foot across all steps [7]. At a shop labor rate of $65 to $90 per hour (a fair range for skilled stone fabrication in 2024), that is $32 to $90 in labor per foot before material. Add the strip material (assign it a value even if it came from a drop) and adhesive, and $50 to $100 per foot stops looking like padding.
For waterfall corners, shops with good production data use a flat rate per corner that reflects their average glue-up and fitting time. A reasonable starting point is 3 to 5 hours of skilled labor per corner, all-in.
Job costing software that treats a miter as a distinct operation helps enormously. Quote by hand or on a basic spreadsheet and miters are exactly the detail that vanishes into overhead instead of getting recovered from the customer. Tools like SlabWise let you build miter operations into your pricing templates so the cost appears automatically every time you spec a waterfall or laminated edge.
On the quote itself, always itemize miters as a named line. A customer who sees "waterfall corner miter, 2 corners" understands what they are buying. A customer staring at a mystery total with no breakdown negotiates it down, never guessing there is real labor and material inside the number.
Do building codes or OSHA rules affect miter cutting in a stone shop?
OSHA's silica standard is the main regulatory issue for any stone cutting, miters included. The rule (29 CFR 1910.1053 for general industry, 29 CFR 1926.1153 for construction) caps worker exposure to respirable crystalline silica at an action level of 25 micrograms per cubic meter (25 µg/m3) as an 8-hour TWA and a permissible exposure limit of 50 µg/m3 [8]. OSHA's construction rule requires that employers "use engineering and work practice controls to limit worker exposure" during cutting operations [10].
Miter cuts throw a lot of silica dust because the saw runs a long, continuous cut along the slab edge instead of a short through-cut. Shops have to use wet cutting, integrated water on CNC saws, or local exhaust ventilation during miter work. Dry cutting without controls is a direct violation and a real health hazard.
Engineered quartz raises the stakes. Many quartz products run 90 percent or more crystalline silica by weight, one reason Australia banned dry fabrication of engineered stone outright in 2024 [9]. U.S. shops are not under that ban, but quartz miter work deserves the same controls you use on natural stone, or better.
Building codes (IBC, IRC) say nothing about miter geometry. There is no code requirement to miter a countertop corner. It is purely a fabrication and design choice. If a waterfall miter ever became part of a load-bearing element (countertops rarely are), the joint strength and adhesive spec would need to meet whatever structural standard applied. For residential countertops that case is basically theoretical.
How long does a mitered stone countertop joint last?
A miter joint done right, with clean surface prep, the correct adhesive, and proper support, should last the life of the countertop, which for stone is measured in decades. There is nothing to service if the glue-up was solid.
Miter joints fail in three ways: adhesive failure from moisture, mechanical failure from impact, and slab movement from a substrate that shifts or deflects. Adhesive failure is rare on indoor countertop miters when a quality two-part epoxy meets clean, dry surfaces. Impact failure, someone driving a heavy object into a waterfall edge, is the more realistic risk, especially on brittle stones like marble.
Support matters. A waterfall edge held only at the top hangs the vertical panel in shear on the glue line. Good practice adds mechanical support for that panel, from the cabinet it leans against or a metal bracket hidden inside the joint. This is not optional on heavy stone. A 3cm granite panel 18 inches tall and 4 feet wide weighs roughly 90 to 100 pounds, and you do not want all of that riding on a bead of epoxy.
For homeowners the maintenance question is basically moot if the joint was built right. There is nothing to do beyond the same stone care you give the rest of the surface. See how to clean stone countertops for guidance that applies to mitered areas exactly as it does everywhere else.
Frequently asked questions
What angle is a stone countertop miter cut?
Almost always 45 degrees. Two 45-degree faces join into a 90-degree corner, which is what a right-angle waterfall or laminated edge needs. A few specialty jobs use other angles (22.5 degrees for an octagonal column wrap, for example), but those are rare in residential countertop work. If your designer asks for anything other than 45 degrees, confirm the geometry before your fabricator cuts anything.
Can you miter quartz countertops the same way as natural stone?
Yes. Engineered quartz cuts with the same diamond blade equipment as natural stone, and the process is essentially identical. The material is uniform, so vein-matching is a non-issue and the adhesive approach stays the same. Quartz is dense and can wear blades faster than softer stones, so blade condition matters. Chipping at the miter face is the main risk, and a sharp blade with a controlled feed rate keeps it in check.
What is the difference between a mitered edge and a laminated edge?
A laminated edge is the goal; the miter is the technique that gets you there. You laminate a strip of stone under the front edge to make the top look thicker. The miter is how the main piece and the strip join so the seam hides at the inside corner instead of showing on the front face. You can laminate with a butt joint, but the mitered version looks far cleaner on polished stone.
How thick does a countertop look with a mitered laminated edge?
On a 3cm slab with a mitered lamination strip, the visible front face is typically 4.5 to 5cm (roughly 1.75 to 2 inches). The exact look depends on how much of the strip shows below the main slab. Most designers spec this to mimic a 5cm or 6cm profile. The seam hides inside the joint, so from the front it reads as one thick piece of stone.
How do you fix a gap in a stone miter joint?
Small gaps under 1mm fill with color-matched two-part epoxy or polyester, then grind and polish flush. Gaps over 1mm that show in the finished joint usually mean cutting the pieces apart, re-cutting the miter faces, and re-gluing. Prevention beats repair: dry-fit before any adhesive, and check blade angle before every miter run. A visible gap on a polished miter is hard to hide well.
Do I need a special blade to cut stone miters?
You need a diamond blade rated for the stone you are cutting, and a bridge saw with a tilting head that sets accurately to 45 degrees. There is no special 'miter blade'; the blades you use for straight countertop cuts work fine. What matters is blade sharpness and correct feed rate. A worn blade on a miter cut raises chipping risk on the polished surface a lot.
Is a waterfall countertop miter structurally strong enough?
The glue joint, done right with two-part epoxy and clean surface prep, is very strong in compression and moderate in tension. The risk is shear: a heavy vertical panel hanging on a glue line alone. Best practice adds mechanical support for the panel (a cabinet side, a bracket, or a recessed angle) so the glue line is not carrying all the weight. On heavy natural stone this is essentially mandatory.
What adhesive do fabricators use for stone miter joints?
The two most common brands in North American shops are Akemi and Tenax, both of which make two-part polyester and epoxy adhesives built for stone. The adhesive gets tinted to match the stone. Open time varies by product and temperature; most fabricators work with a 5 to 15 minute window. The manufacturer's technical data sheet spells out surface prep, cure time, and minimum bonding temperature.
Can laminate or butcher block countertops be mitered the same way?
Laminate countertops can be mitered, but the technique is different: a router with a miter strip or a post-form bending approach, not a stone saw. Butcher block miters on a standard woodworking miter saw. Neither material needs diamond blades or the same surface prep as stone. In stone fabrication, 'miter' means the diamond-blade process on hard stone or engineered quartz specifically. See our laminate and butcher block guides for detail.
How much does a waterfall countertop miter add to the total project cost?
A waterfall island with two mitered corners typically adds $600 to $2,400, depending on stone type, how much material the side panels need, and local labor rates. You also need enough slab to cut the vertical panels, which often means a second slab or a large remnant. For a bookmatched waterfall on a premium marble, the added cost can top $3,000 above a standard countertop price.
Does OSHA require specific controls when cutting stone miters?
Yes. OSHA's silica standard (29 CFR 1910.1053) sets a permissible exposure limit of 50 µg/m3 for respirable crystalline silica. Miter cutting throws significant dust. Shops must use wet cutting, local exhaust ventilation, or other engineering controls during all cutting, miters included. Respiratory protection is also required in many scenarios. Dry cutting without controls violates the standard and poses serious long-term health risks.
Can a homeowner tell if a miter was done poorly before installation?
Sometimes. Before install, look at the front face for a visible glue line, check that the edge profile runs continuously across the joint, and confirm the two pieces sit flush with no step between the slab top and the lamination strip. After install, a mismatched tint or a gap that opens over time are the common tells. Ask to see the completed work before the installer leaves.
What is the difference between a mitered seam and a standard countertop seam?
A standard seam joins two pieces edge to edge, both straight vertical faces butted together, so the seam shows from above and from the side. A mitered seam puts the joint at a 45-degree angle so both cut faces tuck inside the corner, hidden from normal viewing. Mitered seams are for waterfall edges and laminated edges specifically. They are not used for field seams where two sections meet end to end.
Sources
- Natural Stone Institute, Dimension Stone Design Manual: Industry fabrication tolerance guidance for miter and seam gaps in polished stone joints.
- Akemi GmbH, Product Technical Data Sheets for Stone Adhesives: Open time, cure schedules, and surface preparation requirements for two-part stone adhesives used in miter glue-ups.
- Park Industries, CNC Bridge Saw Technical Specifications: CNC bridge saw blade tilt capability and digital angle readout precision for miter cuts.
- Stone World Magazine, Equipment Cost Coverage: 5-axis CNC waterjet and router capital costs of $250,000 and up for capable shop-grade machines.
- HomeAdvisor (Angi), Countertop Installation Cost Guide: Consumer-facing price ranges for specialty countertop edge work including laminated and waterfall miters.
- Natural Stone Institute, Fabrication Best Practices for Granite: Granite cutting blade specifications and recommended practices for edge and miter cuts.
- Stone World Magazine, Fabrication Labor and Shop Operations Coverage: Labor time ranges for built-up laminated edge fabrication including saw, glue-up, and finishing steps.
- U.S. Occupational Safety and Health Administration, Silica Standard for General Industry (29 CFR 1910.1053): OSHA permissible exposure limit of 50 µg/m3 and action level of 25 µg/m3 for respirable crystalline silica in stone fabrication.
- U.S. Occupational Safety and Health Administration, Silica Standard for Construction (29 CFR 1926.1153): OSHA silica construction standard requiring engineering and work practice controls during stone cutting operations.
- Tenax USA, Technical Product Guide for Stone Adhesives and Resins: Tenax two-part polyester and epoxy adhesive specifications for stone miter and seam bonding.
- Natural Stone Institute, Countertop Fabrication Tolerances and Standards: Published fabrication tolerance standards for stone countertop seam flatness, lippage, and joint width.
Last updated 2026-07-09