TL;DR
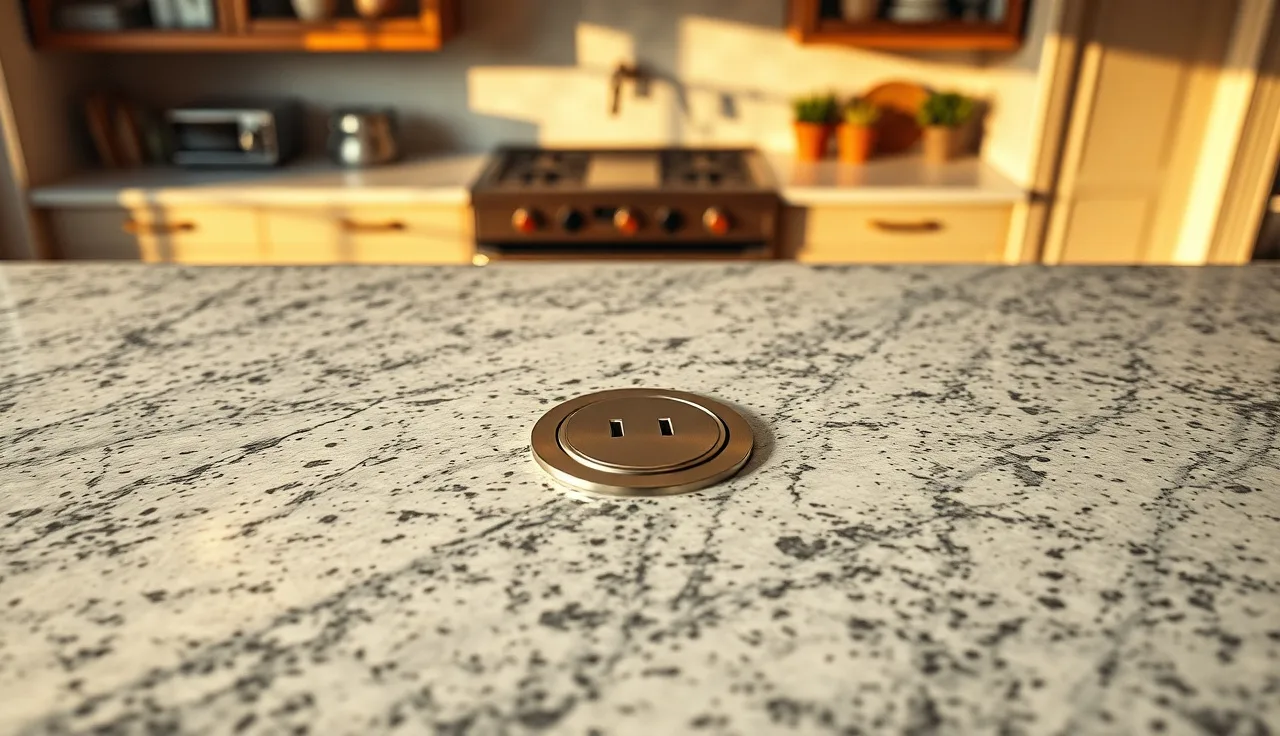
- A pop-up outlet is a retractable electrical receptacle that installs flush inside a countertop cutout, usually a 3.5-inch or 4-inch round or rectangular hole.
- When idle, a spring-loaded cap sits level with the surface.
- Press or twist it and the outlet rises for use.
- Fabricators cut the hole with a diamond hole saw or a router jig, depending on the material.
What exactly is a pop-up outlet and what does it do?
A pop-up outlet is an electrical receptacle that lives inside a precisely cut hole in your countertop and hides until you need it. You'll also hear it called a countertop outlet, an in-counter power module, or a pop-up power grommet. The whole unit sits below or flush with the surface when idle. Press the top, and it springs up to expose one or more standard receptacles, sometimes USB-A or USB-C ports, and occasionally a wireless charging pad.
The appeal is mostly visual. A wall outlet bolted to the back of an island looks clumsy, and the cord drapes everywhere. A pop-up outlet disappears when you're done and puts power exactly where you're standing. For kitchen islands, home bars, craft tables, and office counters, that's genuinely useful.
Most residential round units are 3.5 inches in diameter. Rectangular models range from roughly 3.25 by 4.5 inches to 4.75 by 3 inches depending on brand. The electrical box drops below the countertop and ties into your home's wiring. Countertop depth matters here: you need at least 1.75 to 2 inches of clearance under the stone surface to house the unit before you hit a cabinet shelf or drawer box. Measure that before you order anything. [1]
This is not a substitute for a properly planned circuit. A pop-up outlet is just an access point. The circuit, breaker rating, and wire gauge all have to meet the National Electrical Code whether the outlet pops up or bolts to a wall. The unit itself has to be listed by a recognized testing laboratory, usually UL, to pass inspection. [2]
Where should a pop-up outlet be placed on a countertop?
Placement comes down to four things: where you actually work, what the cabinet framing allows below, how far from the edge you need to stay, and where your electrician can run a circuit. Get those four to agree and the location picks itself.
For kitchen islands, the most common spot is centered on the long axis, set back at least 6 to 8 inches from the nearest edge. That keeps the unit away from where someone leans and gives cords clearance without the plug dangling over the side. If the island runs longer than 6 feet, two units spaced evenly beat one in the middle, since a blender or stand mixer cord won't reach far.
For a peninsula or desk, one unit at the dominant working position, roughly where a seated person's hands rest, handles most needs.
Code has something direct to say here. The 2023 National Electrical Code Section 210.52(C) governs receptacle placement on kitchen countertops, and 210.52(C)(2) and (C)(3) cover islands and peninsulas. Under the 2020 NEC revision, an island or peninsula countertop at least 12 inches wide and 24 inches long must have at least one receptacle, and it can go in the countertop surface itself. A pop-up outlet satisfies that requirement if it meets the location rules. [2]
Keep pop-up outlets away from the sink. NEC 210.8(A)(6) requires GFCI protection for countertop receptacles within 6 feet of a sink, but you want more separation than code's floor between water and open power ports. Most electricians and fabricators push for at least 18 inches from any sink or cooktop edge, for both code margin and plain safety.
Below the surface, check for cabinet face frames, drawer slides, and any existing plumbing or wiring before you mark the cut. A pencil probe through the layout hole is faster than cutting into a $3,000 slab and hitting a drawer box.
What are the different types of pop-up outlets available?
The market has grown a lot in the last decade. Four categories cover almost everything you'll see.
Round pop-up outlets are the common residential pick. They use a 3.5-inch or 4-inch hole, which is manageable in most materials including granite, quartz, and solid surface. Legrand, Hubbell, and others make UL-listed round units. Count is usually two to three standard 15A or 20A receptacles per unit.
Rectangular pop-up outlets carry a larger footprint (often 3.25 by 4.75 inches) and can pack two duplex outlets plus two to four USB ports. The hole is a rectangle with radiused corners, which takes more setup to cut accurately but stays within reach of a competent fabricator running a template jig.
Wireless charging pop-ups add a Qi pad. They work fine on solid surface and thin laminates. In stone, the Qi pad needs the material under about 10 mm to charge reliably, and most granite or quartz slabs run 20 to 30 mm thick, so wireless charging through stone is poor at best. The Wireless Power Consortium's Qi specifications describe how charging efficiency drops as the gap between coil and device grows, which is exactly what thick stone creates. Worth knowing before you spec it. [10]
Drawer-style power modules slide out horizontally from the countertop edge or cabinet face instead of popping up. They aren't cut into the countertop surface, so they skip the fabrication challenge, but they eat drawer or cabinet space.
| Type | Typical hole size | Works in stone | USB ports | Approx. unit cost |
|---|---|---|---|---|
| Round pop-up | 3.5" or 4" diameter | Yes | Some models | $40-$150 |
| Rectangular pop-up | ~3.25" x 4.75" | Yes | Yes, most | $60-$200 |
| Wireless charging pop-up | 3.5"-4" round | Poor in thick stone | Yes | $80-$250 |
| Drawer/slide-out module | No countertop cut | N/A | Yes | $50-$180 |
Prices are retail ranges as of mid-2025 and shift with outlet count and USB spec. [3]
What does it cost to add a pop-up outlet to a countertop?
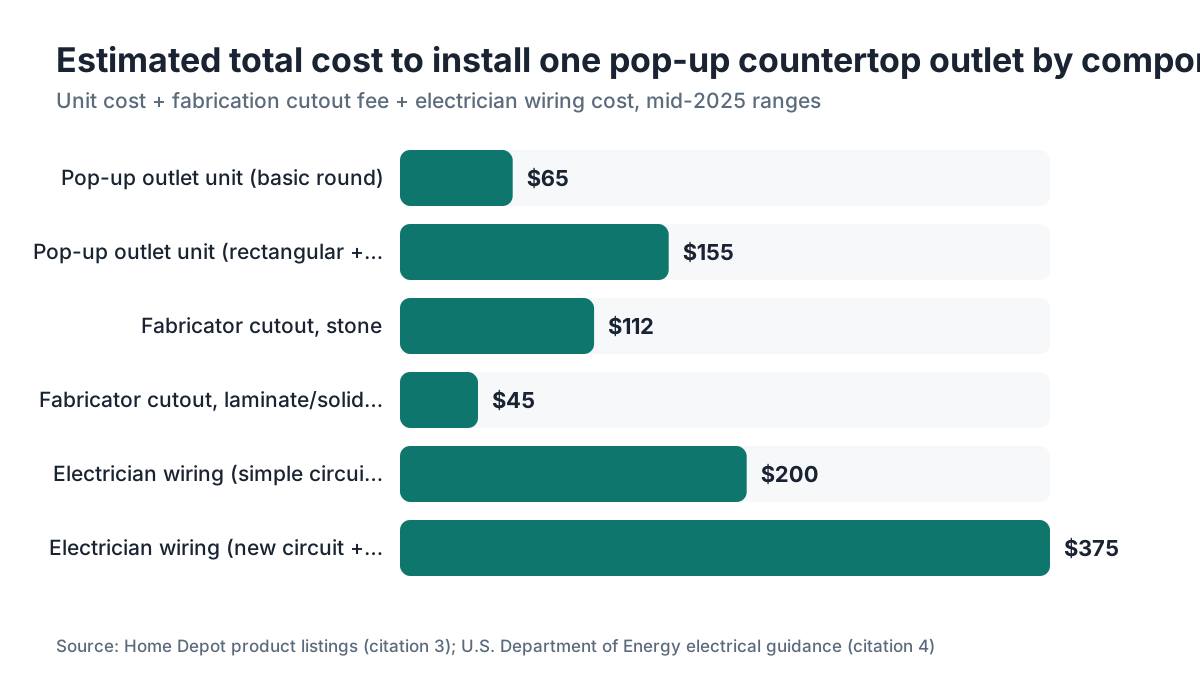
A single pop-up outlet, installed and wired, typically costs $275 to $900. That number splits three ways: the unit, the fabricator's cutting fee, and the electrician's wiring cost. Each part moves with your material and local labor market, which is why the range is wide.
The unit runs $40 to $250 depending on features. A basic two-outlet round model from Legrand or Hubbell lands around $60 to $90 at retail. A loaded rectangular unit with four USB-C ports and two 20A receptacles can push $180 to $250. [3]
Fabricators charge separately for the cutout because a precise hole in stone takes real time and carries breakage risk. A round hole in granite or quartz runs roughly $75 to $150 per opening at most shops, depending on stone type, thickness, and how many other cutouts share the job. Laminate and solid surface cost less, often $30 to $60, because the material is easier on tooling and cracks less. Some shops bundle one cutout into the job price and bill for extras. Ask before you assume.
The electrician's portion covers running a new circuit or extending an existing one, pulling a permit, and connecting the outlet. That runs $150 to $500 depending on distance to the panel, whether the circuit already exists, and local permit fees. A kitchen already roughed in with a homerun waiting for the new island lands at the low end. A full new circuit with a permit in a finished kitchen lands high. [4]
So the all-in $275 to $900 spread is honest, not lazy. Material, labor, and complexity swing it hard by location.
What tools do fabricators use to cut a pop-up outlet hole in a countertop?
The tool depends on the material. Stone (granite, quartzite, quartz, marble) needs diamond-tipped tooling. Laminate, solid surface, and wood cut fine with carbide. Get that split wrong and you either burn up a bit or crack a slab.
Round holes in stone: A diamond core bit, also called a diamond hole saw, is the standard. Common diameters are 3.5 inch and 4 inch to match the housing. The bit runs on an angle grinder or drill, wet with water cooling or dry on some newer bits, and bores through in a few passes. Feed rate matters. Push too hard and you crack the slab. Go too slow and you glaze the diamonds. Most experienced fabricators drop the speed and let the bit do the work.
Rectangular holes in stone: A router with a diamond bit traces the shape against a template jig. Some shops use a plunge router with a straight diamond bit, run a series of plunge cuts around the perimeter, then knock out the center core. Corners are the tricky part. You want radiused corners matching the housing, never sharp 90-degree corners, because sharp inside corners concentrate stress and crack stone. A minimum inside corner radius of 3/16 inch is a standard shop rule.
Laminate countertops: A jigsaw with a fine-tooth blade for rectangles, or a hole saw for round holes. Laminate chips if you rush or use a coarse blade, so slow down, keep the blade sharp, and cut from the face side. [5]
Solid surface (Corian and similar): A router with a carbide spiral bit and a template is the cleanest method. Solid surface cuts predictably and sands smooth at the edge afterward. [6]
Butcher block: Same as solid surface. Router and template, then sand and refinish the cut edge to keep out moisture. Sealing the cut edge on butcher block countertops is not optional. An unsealed hole in wood around an outlet that sees condensation will eventually rot.
Wear eye protection and an N95 respirator any time you cut stone. Silica dust from granite and quartz is a serious occupational hazard. OSHA's permissible exposure limit for respirable crystalline silica is 50 micrograms per cubic meter of air as an 8-hour time-weighted average, and dry cutting without controls blows past that fast. [7]
How do you cut a pop-up outlet hole in a countertop, step by step?
This is aimed at fabricators cutting in-shop or on-site. Homeowners should read it to understand the process, but cutting stone without proper tooling and dust control is a bad idea.
Step 1: Confirm the unit dimensions. Measure the housing diameter or width and length, not the flange. The housing is what has to fit through the hole. Add about 1/16 inch of clearance all around so the unit drops in without forcing. Write the final hole size on your template.
Step 2: Mark the location. Use a pencil or china marker on the surface. Double-check the spot against the cabinet framing below by probing with a thin rod or looking up with a flashlight. Confirm you have at least 1.75 to 2 inches of below-surface clearance for the housing depth.
Step 3: Make a template (rectangular) or set a circle guide (round). Some hole saw bits are self-guiding. For rectangular holes, cut a template from 3/4-inch MDF or plywood with the exact interior shape, clamp it down, and use it to guide the router.
Step 4: Start the cut. For stone with a diamond hole saw, use light downward pressure and let the bit find its groove before you lean in. Keep water flowing at the cut. For router work in stone, take multiple passes at increasing depth instead of plunging full depth at once. A 3/4-inch plunge per pass is common.
Step 5: Break out the core and clean the edge. On a round hole, the core usually pops out clean. On a rectangle, the center piece may need scoring and snapping or careful breaking. Clean the cut edge with a diamond hand pad or sanding block. A polished or eased edge inside the hole looks finished and keeps the flange from rocking on rough stone.
Step 6: Test-fit the housing before install, if you can. Adjusting a hole in the shop beats adjusting it on an installed slab every time.
Step 7: Install the countertop, wire the outlet through a licensed electrician, and seat the housing. Most housings secure with a retaining ring threaded from below or set screws that grip the underside. Follow the manufacturer's sheet exactly.
If you quote jobs with multiple specialty cutouts, tracking outlet holes alongside sink cutouts, cooktop openings, and edge profiles in one place saves real time. SlabWise's quoting software lets you add outlet cutout line items with your shop's per-opening pricing, so nothing falls out of the bid.
Can a homeowner cut a pop-up outlet hole themselves?
Technically yes. Practically it depends on the material, and the honest answer flips hard once you reach stone.
In laminate, a homeowner with a jigsaw, a fine-tooth blade, a careful template, and patience can cut a round or rectangular hole without wrecking the surface. Tape the cut line with painter's tape to cut chipping. Practice on scrap first. Post-form laminate edges are the hardest part, since the laminate wraps over particleboard and you have to work the profile, so a flat cutout in the middle of the counter is the easier case. See more on laminate countertops for material-specific tips.
In solid surface, a confident DIYer with a router and a template can pull it off. Solid surface forgives you. Small mistakes sand out.
In granite, quartz, quartzite, or marble: please don't. The diamond tooling costs money, the dust is a silica hazard, and an off-center or ragged hole in a $200 to $500 per square foot slab is not recoverable. Cracks run from bad cuts. This is exactly the job where the fabricator's $75 to $150 fee earns every dollar. If you're planning granite countertops or marble countertops, budget the fabricator cut from the start.
For any material, the wiring inside the housing has to be done by a licensed electrician in most places. Some states allow homeowner electrical work in owner-occupied single-family homes, but the receptacle still has to be GFCI-protected and the work still has to pass inspection. Check your local authority having jurisdiction before you pick up wire. [4]
What are the electrical code requirements for pop-up countertop outlets?
The governing document in the US is the National Electrical Code, published by the National Fire Protection Association and adopted, sometimes with amendments, by nearly every state and municipality. Most jurisdictions run the 2020 or 2023 edition. Four rules apply directly to pop-up outlets. [2]
GFCI protection. NEC 210.8(A)(6) requires GFCI protection for all 125-volt, 15A and 20A receptacles installed within 6 feet of a sink. Kitchen countertop outlets almost always fall inside that range. The protection can come from a GFCI breaker at the panel, a GFCI outlet upstream on the circuit, or a GFCI device built into the pop-up unit. Many units ship with built-in GFCI. Verify before installation. [2]
Island and peninsula receptacles. NEC 210.52(C)(2) and (C)(3) set the island and peninsula rules. The 2020 NEC revised them: islands and peninsulas with a long dimension of at least 24 inches and a short dimension of at least 12 inches must have at least one receptacle, and it may sit in the countertop surface or on the wall or base. [2]
Listing requirement. The unit must be listed by a nationally recognized testing laboratory such as UL, ETL, or CSA. An unlisted pop-up outlet is a code violation and a fire risk. Look for the mark before you buy. OSHA describes a nationally recognized testing laboratory as an organization it recognizes "to test and certify products to applicable product safety standards." [11]
Tamper-resistant receptacles. NEC 406.12 requires tamper-resistant receptacles in dwelling units for all 125-volt, 15A and 20A receptacles. Residential pop-up units should include them. [2]
State and local codes sometimes stack requirements on top of the NEC. California, for one, has adopted Title 24 energy rules that interact with kitchen circuits. Verify with your local authority having jurisdiction or a licensed electrician in your area.
Does a pop-up outlet work in every countertop material?
It works in almost every material, but each one carries its own catch.
Granite and natural stone: Works well. The cutout needs diamond tooling. Standard slab thickness (3/4 inch, sometimes 1.25 inch on thicker profiles) suits most housings. The cutting is the hard part. Once it's done, the outlet seats clean. See how to clean stone countertops if you're worried about sealing the hole edge.
Quartz (engineered stone): Cuts like granite. Quartz is harder on tooling than most natural stones, so diamond bits dull faster. High-volume shops should budget for bit replacement.
Marble: Works, but marble is more brittle than granite and chips more easily at the cut edge. Slow, wet cutting with a sharp bit is non-negotiable.
Laminate (Formica and similar): Cuts easily. The real concern is moisture, since laminate over particleboard swells if water reaches an unsealed cut edge. Seal the interior of the hole with a bead of caulk or silicone before seating the housing. Formica countertops and laminate countertops both need this step.
Solid surface (Corian, similar): A great match. The material cuts clean, the edge sands smooth, and it's non-porous, so moisture around the hole matters less than in laminate.
Butcher block: Works, but seal the cut edge right after cutting. Wood movement with humidity can loosen the retaining ring on some models over time, so check the fit once a year.
Quartzite: Handled like granite. Very hard stone, dulls tooling quickly.
Ultra-compact surfaces (Dekton, Neolith): Dense and brittle. Cutting needs diamond tooling and tightly controlled speed. Cracking at corners is a known risk. Some fabricators add a small epoxy fill around the hole perimeter before seating the flange. Check manufacturer guidelines before cutting.
What can go wrong when cutting a pop-up outlet hole, and how do you avoid it?
Cracking is the big one in stone. It usually starts at a corner of a rectangular cut, or it radiates from a round cut when the bit is dull or the feed pressure is too high. Prevention is simple to say and harder to do: sharp tooling, wet cut, no rushing, and generous inside corner radii (at least 3/16 inch, ideally 1/4 inch).
Off-center cuts happen when someone marks the hole on top without checking what's below. You drill through the slab and hit the center rail of a face-frame cabinet. The fix hurts. You either relocate the outlet if there's room, or rework the cabinet. Verify cabinet interior clearance from below before cutting.
A wobbling or loose housing after install means the hole was cut too large or the retaining ring couldn't grip the countertop thickness. Most housings specify a minimum thickness for the ring to work, often 3/4 inch. A standard 3/4-inch stone slab sits right at that minimum on some units. Thicker slabs (1.25 or 1.5 inch) anchor easier. If the fit is sloppy, a bead of construction adhesive around the flange before seating is a common field fix.
Electrical trouble after install almost always traces back to the connection work, not the fabricator. But fabricators sometimes nick the wire by running a screw through it during the retaining ring step. Slow down there and know where the wire runs.
Chipping at the top edge of the hole is mostly a laminate and quartzite problem. Tape the surface, use a sharp blade or bit, and start the entry cut carefully. On laminate, cutting from the decorative face upward with a blade designed for laminates (teeth angled to cut on the downstroke) knocks the chipping way down.
How does a pop-up outlet affect countertop resale value or design?
Buyers notice pop-up outlets positively at a showing. An island with no accessible power feels unfinished to a lot of buyers, and a clean pop-up unit reads as intentional in a way a cord dangling to a wall outlet never will. That's a real perception effect, not a measured dollar figure.
I'm not aware of any independent study that isolates pop-up outlets as a value driver. The broader kitchen-remodel research points the general direction. The National Association of Realtors' 2023 Remodeling Impact Report ranks kitchen upgrades among the features buyers value most in resale, and it found homeowners themselves report a strong "Joy Score" for kitchen work. [8] Remodeling Magazine's Cost vs. Value data shows kitchen remodels recouping roughly 30 to 80 percent of cost depending on scope and market. [9] A pop-up outlet is a small line item inside all of that. Treat it as a quality-of-life feature, not a value play.
Design risk lives mostly in placement. A pop-up outlet too close to the edge, or off-center on a symmetrical island, looks like an afterthought. Mark the location on a paper template or a drawing before you commit. Most designers put the outlet off-center toward the prep end rather than the seating end, since that's where appliances actually run.
If you're speccing Cambria countertops or other premium quartz, check whether the warranty covers post-fabrication cutouts. Some quartz makers void coverage for any field modification, including outlet holes cut after initial fabrication. The safe play is to order the outlet cutout as part of the original fabrication.
Fabricators juggling several jobs with custom cutouts can track outlet openings as their own line item in estimating software. SlabWise's quoting module includes per-cutout pricing, so outlet holes get quoted the same way every time without manual math on each job.
How do pop-up countertop outlets compare to other countertop power solutions?
There are a few real alternatives, and each wins in a different situation.
Under-cabinet outlets: Strip outlets mounted under the upper cabinets, above the counter. They keep the surface clean and install without any stone cutting. The catch is that cords from island appliances still have to reach a wall. Useless for islands or peninsulas with no upper cabinets.
Backsplash outlets: Standard duplex outlets set into the backsplash at counter level. Everywhere, code-simple, and cheap. They need drilling into tile or backsplash material, and they stay visible. For a working kitchen where looks come second, this is usually the right call.
Countertop surface-mount power strips: Adhesive or screw-mounted strips that sit on the surface. No stone cutting, but they stand proud permanently and read as an afterthought on a finished island.
In-cabinet power: Outlets inside upper cabinets, handy for appliances stored behind closed doors like coffee machines. Not relevant for island power.
Pop-up outlets: The only option that leaves the surface fully clear when idle and puts power right at the work position. The tradeoff is cost, higher than backsplash outlets, plus the fabrication cut, which adds risk in stone.
For a minimal island design with frequent appliance use, the pop-up outlet is the right choice. For a simpler kitchen chasing code compliance and function, a backsplash outlet costs less and puts zero stone at risk.
Frequently asked questions
What size hole do I need to cut for a pop-up countertop outlet?
Most round pop-up outlets need a 3.5-inch or 4-inch diameter hole. Rectangular models vary, but a common size is roughly 3.25 by 4.75 inches with radiused corners. Always measure the housing body, not the decorative flange, and add about 1/16 inch of clearance so the unit drops in without forcing it. Check the manufacturer spec sheet before you mark anything on the stone.
Does a pop-up outlet need GFCI protection?
Yes. NEC 210.8(A)(6) requires GFCI protection for receptacles within 6 feet of a kitchen sink, which covers nearly all countertop locations. Many pop-up units include built-in GFCI protection. Verify the unit you buy has it, or confirm that an upstream GFCI outlet or GFCI breaker covers the circuit. An unlisted or non-GFCI unit on a countertop is a code violation.
Can I install a pop-up outlet myself without an electrician?
The cutting part is doable for a confident DIYer in softer materials like laminate or solid surface. The wiring and connection to your home's circuit is a different matter. Most states require a licensed electrician or a permit for new circuit work. Even in states that allow homeowner electrical work in owner-occupied homes, the install must pass inspection. Don't skip the permit.
How deep does a cabinet need to be below the countertop to fit a pop-up outlet housing?
Most pop-up housings need 1.75 to 2.5 inches of clearance between the underside of the countertop and the top of any cabinet shelf or drawer box. Some compact models fit in as little as 1.5 inches. Measure your actual clearance before ordering. If a drawer or shelf is in the way, the outlet location has to move or the cabinet interior needs modifying.
Will a pop-up outlet crack my granite or quartz countertop?
Not if the cut is done right with sharp diamond tooling, water cooling, and controlled feed pressure. Cracks come from dull bits, dry cutting, or rushing. Rectangular holes are riskier than round ones because inside corners concentrate stress. An experienced fabricator with proper tooling cuts these routinely. Trying to cut stone yourself without the right equipment is where the damage happens.
What is the rough cost to add a pop-up outlet to a kitchen island?
All in, expect $275 to $900 for a single pop-up outlet installed and wired. That breaks down as $40 to $250 for the unit, $75 to $150 for the fabricator's stone cutout fee, and $150 to $500 for the electrician's wiring and permit. Laminate runs less on the fabrication side, often $30 to $60. Costs swing hard by location and how complex the circuit run is.
How many pop-up outlets should I put in a kitchen island?
One outlet is the code minimum for islands at least 24 inches long and 12 inches wide under the 2020 NEC. For practical use, one unit handles most single-appliance needs. If the island runs longer than 6 feet or serves multiple work zones, two units spaced along the long axis is better. Don't overcrowd. Each opening adds fabrication risk and cost, and more than two on most islands looks cluttered.
Do pop-up outlets work with thick countertops like 1.5-inch or mitered-edge stone?
Yes, thicker slabs actually give the retaining ring more material to grip, which makes for a more secure install. The housing depth is the variable to watch. Confirm the unit's housing fits within your available below-surface clearance. A mitered or laminated edge doesn't affect the flat field where the outlet sits. It only changes the edge profile, which is typically far from the outlet location.
Can a pop-up outlet be installed after a countertop is already installed?
Yes, though it's harder than cutting before installation. The fabricator has to work in place, which means awkward positioning, tougher dust containment, and limited water cooling for wet cutting. It's possible in most materials, but expect to pay more than the standard shop rate. In stone, an experienced fabricator with an angle grinder, diamond hole saw, and vacuum dust shroud can do it cleanly.
What is the difference between a pop-up outlet and a countertop power strip?
A countertop power strip sits on the surface permanently and plugs into an existing outlet. A pop-up outlet wires directly into your home's electrical system and sits flush with or below the surface until you need it. Pop-up outlets are cleaner and bring dedicated circuit power to the island. Power strips cost less and need no fabrication, but they stay visible and rely on an existing receptacle nearby.
Do quartz countertop warranties cover pop-up outlet cutouts?
Some quartz manufacturers, including certain Cambria and Silestone policies, exclude post-fabrication modifications from warranty coverage. The safest approach is to specify the outlet cutout as part of the original fabrication order before the countertop ships. If the countertop is already installed, contact the manufacturer directly to learn what a retrofit cutout does to your warranty before proceeding.
What is the silica dust risk when cutting a countertop for a pop-up outlet?
Real and significant. OSHA's permissible exposure limit for respirable crystalline silica is 50 micrograms per cubic meter of air as an 8-hour time-weighted average. Dry-cutting granite or quartz without controls can blow past that in seconds. Use wet cutting, local exhaust ventilation, and an N95 or better respirator. OSHA's Respirable Crystalline Silica standard for construction (29 CFR 1926.1153) applies to workers making these cuts professionally.
Can I use a pop-up outlet on a butcher block or wood countertop?
Yes, with one step you can't skip: seal the interior edge of the cut hole right after cutting and before installing the housing. Wood absorbs moisture, and an unsealed hole around an outlet that sees kitchen condensation will eventually swell or rot. Use a penetrating oil or polyurethane finish rated for the specific species, let it cure fully, then seat the housing with a silicone bead around the flange.
What tools do I need to cut a pop-up outlet hole in granite?
For a round hole: a diamond core bit in the right diameter, an angle grinder or drill that can run it, and a water source for cooling. For a rectangular hole: a router with a diamond straight bit and a precisely made MDF template. In both cases, eye protection and an N95 respirator are mandatory. Dry-cutting stone without respiratory protection is a serious health hazard under OSHA standards.
Sources
- Legrand, Pop-Up Outlet Product Specifications: Pop-up outlet housing dimensions and below-surface clearance requirements for residential countertop installations
- NFPA, National Electrical Code (NFPA 70): NEC 210.8(A)(6) GFCI requirements, 210.52(C) island/peninsula receptacle placement, and 406.12 tamper-resistant receptacle requirements for dwelling units
- Home Depot, Countertop Pop-Up Outlet Product Listings: Retail price range for pop-up countertop outlet units from $40 to $250 depending on outlet count and USB port specifications, as of mid-2025
- U.S. Department of Energy, Home Electrical System Guidance: New circuit installation and permitting considerations for residential kitchen electrical work
- Formica Corporation, Laminate Fabrication Guidelines: Cutting laminate countertops with a fine-tooth blade and surface tape to minimize chipping during cutouts
- Corian Design (DuPont), Solid Surface Fabrication Manual: Router with carbide spiral bit and template is recommended for cutting solid surface countertops; edges can be sanded smooth after cutting
- OSHA, Respirable Crystalline Silica Standard for Construction (29 CFR 1926.1153): OSHA permissible exposure limit for respirable crystalline silica is 50 micrograms per cubic meter of air as an 8-hour time-weighted average; applies to stone countertop cutting operations
- National Association of Realtors, 2023 Remodeling Impact Report: Kitchen upgrades rank among the top features buyers value in resale, with high homeowner Joy Scores reported for kitchen renovation work
- Remodeling Magazine, Cost vs. Value Report 2024: Kitchen remodels recoup roughly 30 to 80 percent of their cost depending on scope and local market, from Remodeling Magazine's Cost vs. Value national data
- Wireless Power Consortium, Qi Standard Specifications: Qi wireless charging efficiency drops as the gap between charging coil and device grows, which limits charging through stone countertops of 20-30 mm thickness
- OSHA, Nationally Recognized Testing Laboratory (NRTL) Program: OSHA recognizes nationally recognized testing laboratories to test and certify products to applicable product safety standards, which is the basis for UL, ETL, and CSA listing marks
Last updated 2026-07-11