
TL;DR
- Templating for a built-in outlet box means capturing the exact centerline location, the required cutout dimensions (typically 3.5" x 4.75" for a standard pop-up unit, but always verify with the manufacturer's spec sheet), and any NEC-required clearances from water sources.
- Get all three right before cutting stone.
- Errors here waste slabs.
What is a built-in countertop outlet box, and why does it make templating harder?
A built-in countertop outlet box, sometimes called a pop-up outlet or in-counter power strip, is an electrical box that mounts flush with or slightly below the countertop surface and pops up when you press or lift the lid. Brands like Legrand, Leviton, ThinBox, and Hubbell all make versions. Some retract completely flush; others sit proud of the surface by 1/8" or so. The difference matters for your template.
For a standard countertop without cutouts, templating is mostly about edges and seams. Add an outlet box and you now have a precision rectangular hole in the middle of the slab, often on an island, that must land within 1/16" of the target location. Stone does not forgive you. You can't patch a granite island because someone shifted the outlet cutout two inches to avoid a vein. The cutout is permanent.
The templating difficulty comes from two directions at once. You need exact geometry from the electrician's rough-in (because the outlet sits in the cabinet below and its flange has to register to the stone from underneath), and you need the manufacturer's exact cutout template, which varies by product. A Legrand Wiremold WSBMKIT has different cutout specs than a ThinBox TB-525. There is no universal size [1].
Get the outlet box in hand before you template. That single habit prevents most errors.
What NEC electrical code rules apply to countertop outlets?
The National Electrical Code (NEC) Article 210.52(C) governs receptacle placement on kitchen countertop surfaces. The 2023 NEC requires receptacles for countertop spaces, and in-counter pop-up outlets can count toward that requirement if they are listed for countertop use [2].
The code section most relevant to templating is NEC 406.5(E), which was added in the 2014 NEC cycle: "Receptacles shall not be installed in a face-up position in the work surfaces or countertops of kitchens or dining rooms." This rule banned traditional face-up receptacles in countertops. The exception, added in later NEC cycles, allows listed countertop power assemblies that meet UL 498 or are otherwise specifically listed for in-counter use [2]. That means pop-up outlet boxes from reputable manufacturers are allowed; random floor-box hardware installed upside-down is not.
The NEC also sets a 6-foot rule for proximity to water sources in 210.52 and references GFCI protection requirements under 210.8(A). Any countertop receptacle within 6 feet of a sink needs GFCI protection [2]. Most pop-up outlet boxes include a built-in GFCI module, but the electrician is responsible for confirming this before trim-out.
As a fabricator, your job is geometry, not electrical inspection. But knowing the 6-foot GFCI rule lets you flag a questionable outlet location to the homeowner before the stone is cut, which saves everyone trouble later.
What tools and materials do you need before you start templating?
You need the outlet box unit itself, or at minimum its manufacturer cutout template sheet. Do not template from memory or from a spec sheet you found online unless you have confirmed it matches the exact model number the electrician is installing. Models change. Cutout dimensions are not standardized across the industry.
Beyond that, the standard digital or physical templating kit applies:
- Laser measurer or Proliner/Slabsmith digital templater
- Straightedge and story sticks if templating by hand
- Thin cardboard or 1/8" luan for a physical proof template
- Fine-tip marker or scribe
- Tape measure with a hook that lies flat (a bent hook introduces cumulative error)
- The outlet box or its paper cutout template from the manufacturer
- A photo of the rough-in electrical box location in the cabinet
For digital templating systems like a Proliner, you can capture the outlet centerpoint as a reference point and build the cutout rectangle around it in software. That is the cleanest workflow. For hand templating on luan, you'll cut an actual test hole in scrap first. Either way, the physical outlet box needs to fit the hole before you bring the template to the shop [3].
How do you find and record the outlet box location during templating?
The electrician should have left a rough-in box in the cabinet below the countertop location. Your first step is to find the centerline of that box, both in the X axis (left to right along the counter run) and the Y axis (front to back, measuring from the cabinet face or the front edge of the substrate).
Drop a plumb bob or use a laser level to transfer the center of the rough-in box upward to the substrate surface. Mark it clearly. Then measure from two fixed reference points: the nearest cabinet wall and the front edge of the substrate. Write both measurements on your template and in your job notes. If you are using a digital templater, add the center point as a named reference marker.
The Y-axis dimension is the one fabricators most often get wrong. The outlet box manufacturer will specify a minimum distance from the front edge of the cutout to the front edge of the stone. Violate that and the pop-up lid hits the front edge or the stone cracks from insufficient material. A common spec is 1.5" to 2" of stone between the front of the cutout and the front finished edge, but check your specific product [1].
If the homeowner has not yet decided where the outlet should go, this is the moment to have that conversation. Islands typically place pop-up outlets on the cooking side or the prep side, 12 to 18 inches from the sink, centered on the island length. Once you commit the location to the template, moving it means a new slab.
How do you measure and mark the cutout dimensions correctly?
Every outlet box manufacturer publishes a cutout template, either as a paper insert in the box or as a PDF on their website. Pull it up. The cutout has four dimensions: length, width, corner radius, and in some cases a minimum stone thickness the unit can accommodate. A thinner slab (2cm instead of 3cm) can affect which mounting collar to use.
A representative example: the Legrand Wiremold WSBMKIT calls for a rectangular cutout of approximately 4.75" x 4.75" with 3/8" corner radii, but verify this against the current spec sheet because Legrand revises these products [1]. A ThinBox TB-525 has a narrower footprint. The Hubbell UPC series runs longer. None of them share a cutout spec.
From the centerpoint you marked, measure out half the cutout length in each X direction and half the cutout width in each Y direction. Mark all four corners. Confirm the corner radius requirement. On a physical luan template, drill a small pilot hole at each corner at the radius dimension, then connect them with a jigsaw or router. Test-fit the outlet box in the luan cutout before it goes to the shop.
A fabricator using CNC will enter these coordinates into the CNC program. Programs like Slabwise let you attach cutout specs directly to the job, so the CNC operator has the geometry alongside the full job layout without hunting through email for the spec sheet. That kind of documentation discipline matters when you run multiple jobs a day.
For waterjet or bridge saw cutting, the shop will cut the hole slightly undersize and grind to final dimension. Mark the target dimension, not the cut-in-from dimension, on the template to avoid confusion.
What are the most common templating mistakes with outlet box cutouts?
Centering error is the most frequent problem. A fabricator measures from the cabinet wall to locate the outlet center, then forgets that the cabinet wall is not square to the slab edge. The resulting cutout is fine relative to the cabinet but skewed relative to the slab edges. The outlet lid then looks crooked. Fix: always tie your outlet location to the slab geometry (front edge, a seam, a sink centerline) as a cross-check.
Wrong model cutout specs. Someone orders the outlet box after templating and buys a different model than specified. The cutout is now 1/4" too small in one direction, and you're grinding an island on-site. Fix: confirm the model number on the purchase order before you template, or cut to the larger spec if two candidate models are in play.
Insufficient stone at the edges. Pop-up outlet boxes put mechanical stress on the stone when someone presses the lid open. A cutout that leaves less than 1.5" of stone from the cutout edge to any finished edge or another cutout risks cracking, especially in natural stone. Granite is more forgiving than marble here, but neither material wants thin bridges [4].
Ignoring the substrate. The stone spans the cutout, but the substrate below has to be cut too. A fabricator who templates perfectly but forgets to note "remove 6" x 6" of substrate at this location" creates a problem for the installer who arrives with the slab and finds solid plywood blocking the outlet. Mark substrate cutouts on your template separately from stone cutouts.
Not accounting for the collar height. Pop-up outlet boxes have a collar that registers to the underside of the stone. The collar height is set at the factory for a specific stone thickness range. If you are using 3cm stone and the collar is preset for 2cm, the unit will sit too low and the lid will not seal flush. Check this in the spec sheet.
How do you handle the outlet cutout differently for different countertop materials?
Material choice changes the cutting method and the minimum edge distances, not the templating geometry. But knowing the material tells you how cautious to be at the template stage.
Granite and quartzite are brittle at thin sections but cut cleanly with a diamond blade or waterjet. Leave at least 1.5" of material around the cutout perimeter. Marble is softer but chips more aggressively during cutting, so clean corner radii matter more. Quartz (engineered stone) is homogenous and handles cutouts well, though manufacturers like Cambria publish their own minimum edge distances in their fabrication guidelines [5].
Butcher block and wood countertops accept outlet cutouts with a jigsaw or router and tolerate tighter margins than stone, but wood moves with humidity, so a tight fit today can bind the outlet lid in winter. Give wood an extra 1/16" of clearance on each side.
Laminate countertops, including Formica-type postform, are the easiest to cut but the least forgiving of visible gaps, because the core is particleboard and any exposed edge will swell if it gets wet. Seal cut edges immediately with laminate edge strips or silicone.
Corian and other solid surface materials route cleanly, and seams around the outlet can be thermally welded for a factory-finish look. Solid surface also allows shallow-routed channels for cord management, which is a common upsell with pop-up outlets on islands.
For any material, note the required corner radius in your template. A square corner in stone is a stress concentrator and a crack waiting to happen under repeated mechanical load [4].
How do you coordinate between the fabricator, electrician, and homeowner to avoid cutout problems?
The worst outcome is a finished slab with a cutout that does not line up with the electrical rough-in. That means cutting on-site in finished stone, which almost always looks bad and sometimes cracks the slab. Preventing this is a coordination problem, not a templating problem.
The fabricator should not template until the electrician has set the rough-in box. Full stop. If the homeowner wants to template early, explain that the outlet location cannot be confirmed until the rough-in is done. A 30-minute delay is far cheaper than a misaligned island.
Get the outlet model number in writing from the electrician or homeowner before templating. Email works. The paper trail matters if there's a dispute later.
Provide the homeowner with a simple sketch showing the outlet centerpoint location relative to the slab edges after templating. This is their one chance to say "actually, can we move it six inches toward the sink?" Once the stone is cut, the answer is no.
For commercial or multifamily projects, the general contractor usually coordinates this, but verify. On GC-run jobs, fabricators sometimes receive a template scope that leaves out the outlet cutout entirely because the GC assumed someone else would handle it. Ask explicitly: "Are there any in-counter outlet boxes on this job?"
If you use a shop management or quoting platform to run your jobs, attach the outlet box spec sheet to the job record at template time. That way the shop sees it when they program the CNC, not when the slab is already on the table.
What does the on-site installation process look like once the stone is fabricated?
When the installer arrives, the stone already has the cutout. The sequence from there is:
- Set the slab and dry-fit everything before applying adhesive or epoxy.
- Check that the cutout lines up with the rough-in box below. The outlet box collar should drop through the stone cutout from above or mount from below, depending on the product design.
- Have the electrician or homeowner test-fit the outlet box unit in the cutout before the slab is glued down. If there's a fit problem, it is much easier to address with the slab sitting loose.
- Apply silicone around the cutout perimeter per the outlet manufacturer's instructions. Most manufacturers specify a bead of neutral-cure silicone between the outlet flange and the stone to keep water out of the cabinet below [1].
- Connect the wiring. This step is done by the electrician, not the fabricator. The fabricator's job ends when the stone is set and the outlet box is physically fit-tested.
On site, you may find that the substrate cutout is too small or was not cut at all. Keep a jigsaw in the install van. It is common. Mark the substrate cut location during templating so your installer expects it, but the rough-in situation on-site rarely matches the plan exactly.
After installation, the homeowner should test the outlet under normal use before the fabricator leaves the job. Press the lid, plug in a device, confirm the GFCI trips correctly if tripped. That takes 90 seconds and prevents a callback.
How much does adding a built-in outlet box cutout add to countertop cost?
Fabrication shops typically charge a cutout fee for any hole in the stone beyond the sink and cooktop. An outlet box cutout is a small precision hole, and the charge reflects CNC programming time, careful handling, and the risk of cracking thin stone bridges.
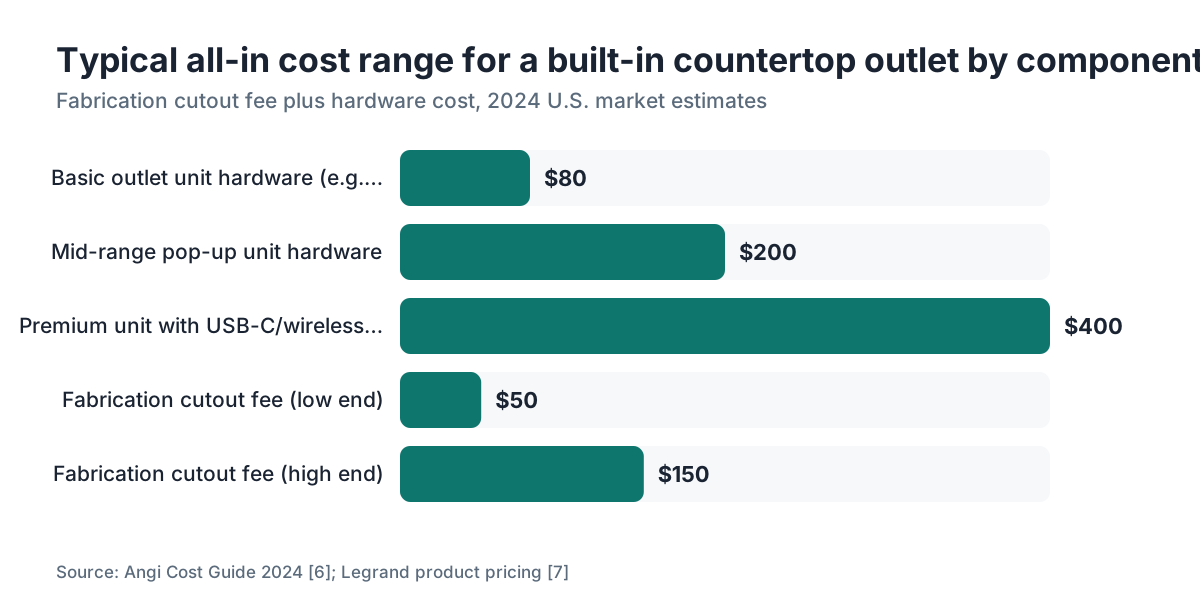
Typical outlet cutout charges in 2024 run $50 to $150 per cutout at most U.S. shops, separate from the outlet hardware itself [6]. The outlet box hardware ranges from about $80 for a basic Leviton unit to $400 or more for a Legrand Wiremold assembly with USB-C and wireless charging [7]. That puts all-in cost for a single pop-up outlet at roughly $130 to $550 depending on hardware selection and local shop rates.
If you are a homeowner budgeting for a kitchen remodel, this is not where to cut corners. A $50 upgrade to a better outlet box at the hardware stage avoids a cheap-feeling unit in an expensive stone island. The fabrication charge is the same either way.
If you are a fabricator, pricing outlet cutouts below $75 is likely leaving money on the table. The CNC setup time alone is often 15 to 20 minutes per unique cutout because the coordinates have to be entered and verified separately from the slab outline. If you run a quoting tool that auto-prices cutout types, make sure outlet box cutouts are coded as precision cutouts, not generic rectangular holes.
Are there code or safety considerations specific to island countertop outlets?
Islands get special attention in NEC 210.52(C)(2), which requires at least one receptacle for islands with a long dimension of 24 inches or more and a short dimension of 12 inches or more [2]. A pop-up outlet box counts toward this requirement if it is a listed countertop power assembly.
The GFCI requirement under NEC 210.8(A)(6) applies to all kitchen countertop receptacles regardless of distance from a sink, as of the 2020 NEC cycle [2]. This is a change from earlier cycles. Fabricators working in jurisdictions that have not adopted the 2020 or 2023 NEC may run into older local codes with different thresholds; the AHJ (authority having jurisdiction) is the final word.
For outdoor kitchen islands or wet bar countertops, NEC 210.8(A) extends GFCI requirements broadly, and weatherproof covers are required. This changes the outlet box selection, which changes the cutout spec, which changes the template. Outdoor pop-up outlets have larger footprints and different collar heights than indoor units.
Another island-specific issue: islands often have waterfall edges or overhangs that reduce effective stone thickness near the cutout. A 3cm slab with a 2cm mitered waterfall edge at the same end as the outlet cutout can create a geometry conflict. Catch this during template review, not after fabrication.
The International Residential Code (IRC) Section E3901 references NEC 210.52 for residential countertop receptacle requirements, so IRC-jurisdiction jobs carry the same basic rules [8].
Can you template for a pop-up outlet in a backsplash or vertical surface instead?
Technically yes, but it is uncommon and most pop-up outlet boxes are designed for horizontal countertop installation. Installing one vertically in a stone backsplash would require a different product category (a standard wall outlet box with a matching stone surround, not a pop-up unit) and a different templating approach.
For backsplash electrical cutouts, fabricators deal with standard rectangular switch and outlet openings. These are templated the same way as any backsplash cutout: measure from the finished floor to the center of the rough-in box, measure from the nearest wall or tile edge to the center of the box, apply the device plate rough opening dimensions (typically 1.75" x 2.75" for a single-gang opening, but this varies by the cover plate the homeowner selects), and mark the template accordingly [9].
For a stone backsplash, the fabricator should always template outlet locations with the actual outlet box and cover plate in hand, because decorative cover plates in particular can vary by 1/4" or more from standard dimensions. A stone tile cutter who guesses the opening size based on a standard spec will often be slightly off.
This is one area where communication between the tile setter, the stone fabricator, and the electrician tends to break down on remodel jobs. The sequence should be: electrician sets rough-in, stone fabricator templates with rough-in visible and cover plate in hand, stone is cut, electrician trims out after stone installation.
Frequently asked questions
What is the standard cutout size for a pop-up countertop outlet?
There is no single standard. Cutout dimensions vary by brand and model. A Legrand Wiremold WSBMKIT requires approximately 4.75" x 4.75" with 3/8" corner radii; a ThinBox TB-525 has a smaller footprint. Always use the manufacturer's spec sheet for the exact model being installed. Templating from a generic number is the leading cause of outlet cutout mismatches.
How close can an outlet cutout be to the edge of the countertop?
Most manufacturers specify a minimum of 1.5" to 2" of stone between the cutout edge and any finished edge of the stone. Check the spec sheet for your specific unit. Going tighter than 1.5" in natural stone risks cracking under the mechanical stress of pressing the outlet lid open and closed repeatedly. Engineered quartz tolerates slightly tighter margins.
Does the electrician or the fabricator locate the outlet box position?
The electrician sets the rough-in box and owns the electrical code compliance. The fabricator templates the countertop cutout based on that rough-in location. The homeowner or designer decides where the outlet should be. All three need to agree before templating. The fabricator should never template an outlet cutout location without confirming the electrician's rough-in is complete.
Do pop-up countertop outlets need GFCI protection?
Yes. Under NEC 210.8(A)(6), as adopted in the 2020 NEC, all kitchen countertop receptacles require GFCI protection regardless of distance from a sink. Most listed pop-up outlet units include a built-in GFCI module. The electrician is responsible for verifying this and for confirming the local jurisdiction has adopted the applicable NEC cycle.
Can you add an outlet cutout to a countertop after it's already installed?
It is possible but risky and expensive. A fabricator would need to core-drill corner radii and grind a rectangular cutout in installed stone using an angle grinder, wet saw, or router, often in a kitchen that is already finished. Vibration can crack the slab or disturb adjacent areas. Most shops charge two to three times the normal cutout fee for in-place work, and some refuse to do it at all.
What corner radius is required for a countertop outlet cutout?
Corner radius requirements come from the outlet box manufacturer, not a universal code. Most units specify 3/8" to 1/2" radius corners. In natural stone, square corners are stress concentrators and can crack under load. Even if the manufacturer spec allows square corners, most experienced fabricators cut a minimum 3/8" radius on all interior stone cutout corners as a standard practice.
How do you template an outlet cutout with a digital templating system like a Proliner?
Capture the centerpoint of the electrical rough-in box as a named reference in the digital template. Then offset outward by half the cutout length and width dimensions from the manufacturer spec to define the four corners. Enter corner radii as arc segments. Export the DXF to your CNC software and verify the cutout geometry against the spec sheet before programming the cut path.
Does the substrate under the countertop need to be cut too?
Yes. The pop-up outlet box collar mounts from below the stone through the stone cutout, and the rough-in wiring runs through the cabinet below. The substrate (plywood, cement board, or whatever the base is) needs a corresponding opening, usually slightly larger than the stone cutout. Note the substrate cutout location on your template so the installer does not arrive to a blocked rough-in.
What is the minimum stone thickness for a countertop with a built-in outlet box?
The outlet box manufacturer specifies acceptable stone thickness ranges for their mounting collar. Most units accommodate 3/4" (2cm) through 1-1/4" (3cm) stone, sometimes with an adjustable collar. Verify before templating, especially if the job uses a non-standard thickness like 2cm stone or a thickened edge lamination that changes the effective deck thickness at the cutout.
How do you handle a pop-up outlet on a countertop with an undermount sink nearby?
Keep at least 6" of solid stone between the sink cutout and the outlet cutout. Less than that creates a thin bridge prone to cracking during fabrication or installation. Also confirm GFCI compliance, since any outlet within 6 feet of a sink in older NEC versions, and all kitchen countertop outlets in the 2020+ NEC, require GFCI protection. Mark both cutouts on the template and check spacing before you cut.
What silicone should be used to seal a countertop outlet box?
Most outlet box manufacturers specify a neutral-cure silicone sealant applied between the outlet flange and the stone surface. Avoid acetoxy-cure (acetic acid) silicones on natural stone because they can etch polished surfaces and discolor light-colored stones. Use a neutral-cure, kitchen-grade silicone rated for wet areas. The electrician or installer applies this at trim-out, not during fabrication.
How do you quote an outlet box cutout as a fabricator?
Price outlet box cutouts as precision rectangular cutouts with CNC programming time included. Typical U.S. shop rates in 2024 run $50 to $150 per cutout, separate from the hardware. If the cutout lands near a seam, a sink, or a thin stone bridge, apply a surcharge for elevated risk. Make sure your quoting software codes these as a distinct line item so the pricing is not buried in generic cutout fees.
Can you template for a countertop outlet box in a waterfall island?
Yes, but check for geometry conflicts first. A waterfall edge involves mitering the slab at the island end, which reduces effective material thickness near the miter. If the outlet cutout is too close to the waterfall end, you may have insufficient stone depth for the outlet collar, or the miter operation may interfere with the cutout. Keep the outlet cutout at least 8" from any miter or waterfall transition as a safe starting point.
Sources
- Legrand, Wiremold WSBMKIT Countertop Power Strip Installation Instructions: Pop-up outlet box cutout dimensions and minimum stone edge distances are product-specific and published by each manufacturer; there is no universal cutout size.
- NFPA, National Electrical Code (NEC) 2023, Articles 210.52, 210.8, and 406.5: NEC 406.5(E) restricts face-up receptacle installation in countertop work surfaces, with exceptions for listed countertop power assemblies; NEC 210.8(A)(6) requires GFCI protection for all kitchen countertop receptacles under the 2020 and 2023 cycles.
- Marble Institute of America (MIA+BSI), Dimension Stone Design Manual, Version IX: Interior cutout corners in stone countertops require a minimum radius to prevent stress concentration and cracking under load; minimum stone bridge widths between cutouts are specified in the MIA design guidelines.
- Cambria, Cambria Care and Installation Guidelines for Fabricators: Cambria publishes minimum edge and cutout distances for engineered quartz countertop fabrication that fabricators must follow to maintain warranty compliance.
- HomeAdvisor / Angi, Countertop Cutout Cost Guide 2024: Outlet box cutout fees at U.S. fabrication shops typically range from $50 to $150 per cutout in 2024, separate from hardware costs.
- Legrand, In-Counter Pop-Up Outlet Product Line Pricing (Wiremold series): Pop-up countertop outlet hardware ranges from approximately $80 for basic units to $400 or more for premium assemblies with USB-C and wireless charging.
- International Code Council, International Residential Code (IRC) 2021, Section E3901: IRC Section E3901 references NEC 210.52 for residential countertop receptacle requirements, extending the same placement and GFCI rules to IRC-jurisdiction projects.
- Leviton, Wallplate and Device Box Specifications, Standard Single-Gang Dimensions: Standard single-gang device rough opening for backsplash outlet templating is typically 1.75 inches by 2.75 inches, though decorative cover plates vary.
- U.S. Consumer Product Safety Commission, Electrical Safety Guidelines for Home Renovations: GFCI protection is required for kitchen countertop receptacles to reduce electric shock hazards near water sources.
- Natural Stone Institute (NSI), Fabrication and Installation Standards for Natural Stone: NSI standards address minimum stone thickness and edge distances for countertop cutouts to prevent cracking during and after installation.
Last updated 2026-07-11