TL;DR
- A mitered edge countertop joins two pieces of stone at a 45-degree angle along the front edge, making a thin slab look 2 to 4 inches thick without solid material underneath.
- Fabrication needs precise CNC or hand-ground 45-degree bevels, strong epoxy bonding, and careful seam finishing.
- Expect to pay $25 to $60 per linear foot over a standard eased edge.
What exactly is a mitered edge countertop?
A mitered edge countertop fakes a thick, solid slab. Two pieces of stone are cut to 45 degrees along the front face and glued together, so the seam runs diagonally through the thickness instead of showing as a flat line on the front. The horizontal top and a vertical drop piece meet at a clean outside corner that reads as one block of stone.
The finished edge looks 2 to 4 inches thick even though each slab might be only 3/4 inch or 1.2 inches thick (2 cm or 3 cm). That matters. Full-thickness stone at that scale would weigh a fortune and cost even more.
People choose mitered edges for looks, almost always. They fit contemporary and transitional kitchens where a thick, sculptural edge signals money and care. You see them most on waterfall islands, where the counter runs down the side of the cabinet and both the top and the side panel have to appear as one unbroken piece.
The word "miter" comes from woodworking, where a miter joint is any joint between two pieces cut at matching angles so they meet cleanly. In stone the angle is almost always 45 degrees, though 22.5-degree stacked miters exist for very thick layered profiles.
How does a mitered edge differ from a laminated edge?
People confuse these two all the time. A laminated edge also adds apparent thickness, but it works by gluing a strip of the same material flat under the front edge, so the seam runs horizontally and shows as a line on the face. A mitered edge hides that seam inside the 45-degree joint.
A laminated edge is cheaper and faster because neither piece needs a precision angle cut. A miter needs both surfaces ground to exactly 45 degrees so they mate flush. Any deviation shows as a gap, a ridge, or a color shift at the seam.
The two edges add thickness differently. A laminated strip sits below the top slab and can be thin, say 3/4 inch under 3/4 inch for a 1.5-inch apparent thickness. A full miter usually targets 2 inches or more, which is why it became the default look for high-end islands.
Here's the honest part. On heavily veined stone like marble or quartzite, a laminated edge shows a hard seam line that chops the veining in two. A mitered edge can be book-matched at the corner so the vein flows around the edge without a break. That book-match alignment is hard to pull off and adds labor cost, but on a statement stone it earns its keep.
What materials can be fabricated with a mitered edge?
Any material you can cut and grind to a clean 45-degree angle works in theory. In practice, stiffness and brittleness decide how practical it is.
Quartz and granite are the most common. Both are dense and predictable under a CNC router or a bridge saw. Kitchen countertops made from engineered quartz like Cambria miter well because the material is consistent and color-matched throughout, so seams nearly disappear [1].
Marble and quartzite miter fine but demand more care because natural stone can hide soft spots, fissures, or cleavage planes that chip during the angle cut. A good fabricator inspects the slab for fissures before committing to a miter on expensive marble [2].
Porcelain and sintered stone (Neolith, Dekton) show up in ultramodern kitchens. These slabs come as thin as 6 mm (about 1/4 inch), and a miter is often the only way to build any apparent thickness at all. The catch: porcelain chips easily at the thin tip of a 45-degree cut. Fabricators use diamond blades rated for porcelain and tape the face before cutting [3].
Solid-surface materials like Corian miter well and then sand flush because the material is thermoplastic and bondable. Corian countertops go one better, since the seam can be chemically welded until it vanishes.
Laminate and butcher block don't get mitered in the stone sense. Laminate countertops use a post-formed or self-edge profile, and butcher block countertops are thick enough that a miter is pointless. Miter butcher block anyway and wood movement will eventually pry the joint open unless it's a very stable species with plenty of glue area.
How is a mitered edge countertop actually fabricated, step by step?
This is where the craft lives. Shops vary, but the sequence below is standard practice at a professional stone fabrication shop.
Step 1: Template and layout. Before anyone cuts, a templater measures the cabinets and marks the slab layout. For a mitered waterfall island, two orientations have to line up: the horizontal top and the vertical side panel. If the customer wants book-matched veining at the corner, the fabricator locates matching areas on the slab (or on a book-matched slab pair) during layout. That adds real complexity and sometimes means buying extra material.
Step 2: Rough cutting. A bridge saw breaks out the top slab and the drop piece to rough size, leaving a few millimeters of extra material on every finished edge.
Step 3: The 45-degree miter cuts. The precision step. Most modern shops use a CNC bridge saw or a tilting bridge saw for the mating 45-degree angles. The blade tilts to 45 degrees and the slab feeds through. The cut has to be dead flat and exactly 45 degrees or the joint shows a gap or a ridge. Tolerances are tight: most fabricators target under 0.5 mm of variation across the length of the joint [4].
Step 4: Edge grinding and polishing. The 45-degree face gets ground flat on a CNC edge polisher or by hand with diamond pads, working from coarse (60 or 120 grit) to fine (1500 or 3000 grit) to match the top finish. The outside visible corner of the miter is profiled here too: left sharp (knife edge), slightly eased, or given a small radius.
Step 5: Dry fit. Before any glue, the two pieces are dry-fitted on a flat surface to confirm the joint closes fully with no rocking and no gaps. High spots get marked and lightly re-ground.
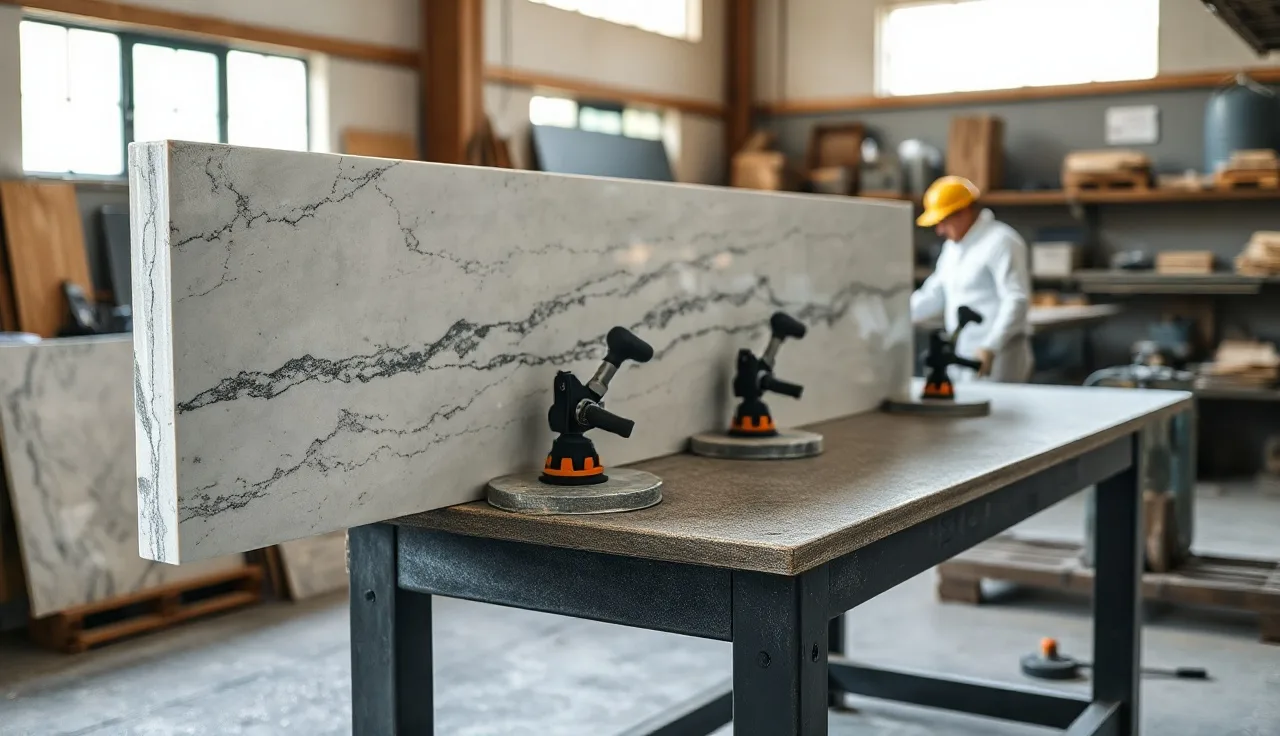
Step 6: Bonding. A two-part epoxy or color-matched polyester adhesive goes on one mating surface. The pieces are drawn together with suction cups along the length, then checked against a laser level or straightedge before the adhesive sets. Working time for most stone epoxies is 15 to 45 minutes depending on temperature [5].
Step 7: Seam cleanup. Squeeze-out comes off before it cures, then the seam line is sanded flush with the face. On polished stone, the seam area gets re-polished to match the surrounding surface.
Step 8: Rodding or fiber reinforcement (sometimes). On long spans, some fabricators embed fiberglass rods in channels routed into the back of the joint for extra strength before bonding. This is common on marble and on counters that span unsupported distances over 24 inches [6].
What does a mitered edge countertop cost compared to other edge profiles?
Edge profiles get priced per linear foot on top of the base slab and fabrication cost. A simple eased or straight edge is almost always baked into the base price. Everything past that costs extra.
A mitered edge runs roughly $25 to $60 per linear foot in added labor at most U.S. shops, though prices swing by region and material. High-complexity work on veined marble or porcelain can push past $80 per linear foot [7].
For a waterfall island you also pay for extra slab material (at least one more panel) and the fabrication time on it. A typical 4-foot waterfall island with two sides might add $800 to $2,500 to the project versus a standard island with a simple edge, depending on the material and whether you're book-matching.
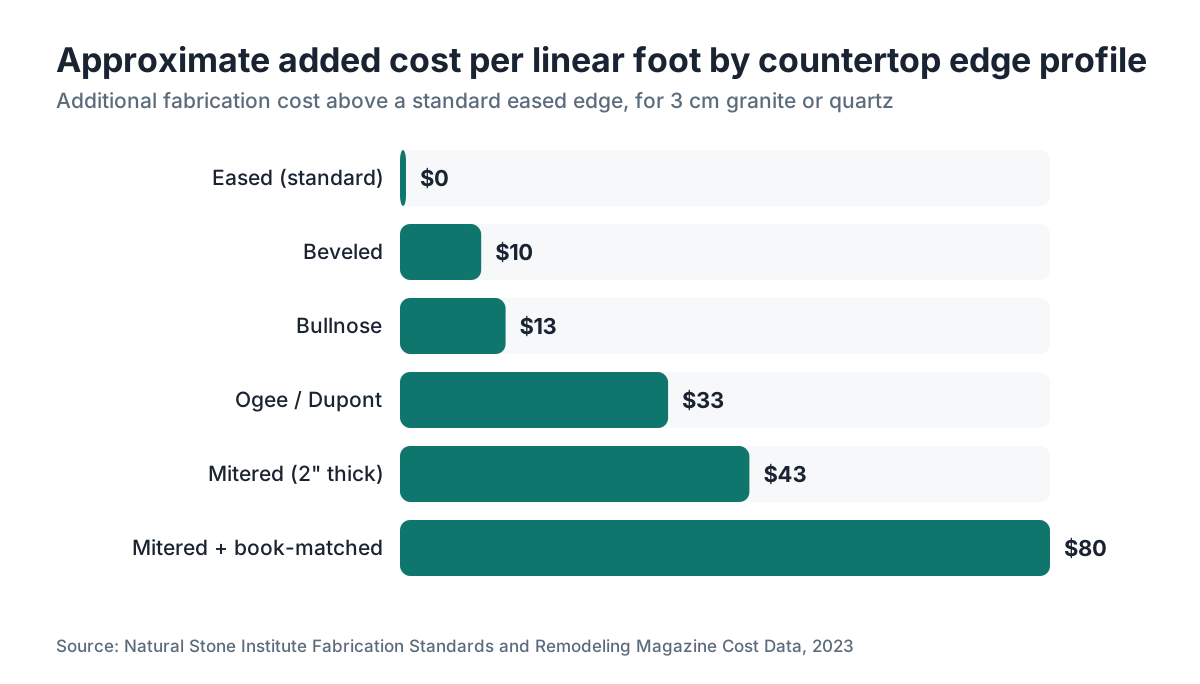
The table below shows approximate added cost by edge type, relative to a base eased edge, for standard 3 cm granite or quartz:
| Edge Profile | Approx. Added Cost (per lin. ft.) | Complexity |
|---|---|---|
| Eased (standard) | $0 (included) | Low |
| Beveled | $5-$15 | Low |
| Bullnose | $5-$20 | Low-Medium |
| Ogee / Dupont | $20-$45 | Medium |
| Mitered (2" thick) | $25-$60 | High |
| Mitered + book-matched | $60-$100+ | Very High |
These are ballpark figures. Regional labor rates, material type, and shop overhead all move the numbers. A fabricator in New York City charges more than one in rural Tennessee. No one has published a full national survey of edge-profile pricing; the numbers above match what fabricators discuss in trade forums and what estimating guides show [7][8].
If you're a fabricator pricing miter work, the cost drivers are grinding time (roughly proportional to linear footage), adhesive and clamp setup, and the re-polish step. Shops that track labor with quoting software can see exactly where the hours go, which helps you price the next job.
What are the most common problems with mitered edges, and how do fabricators prevent them?
Visible seam gap. If the 45-degree cuts aren't perfectly flat and matched, you get a gap or a step at the seam line. Fix: slow down on the grinding step, dry-fit religiously, and don't rush the bond.
Color mismatch at the seam. Even on engineered quartz, small lot variations can make the two pieces look off in color or pattern at the corner. On natural stone it's worse. Fix: cut both pieces from the same slab when you can, and orient them so the pattern flows.
Chipping at the thin tip of the 45-degree cut. The point of a miter on a 3 cm slab is paper-thin and fragile before bonding. Fix: sharp, properly tensioned blades, slow feed, and full support under the slab during the cut. Tape on the face cuts down on spalling.
Open joint after installation. A joint that looked perfect in the shop can open slightly during transport or install if the slab flexes. Fix: fiberglass rodding on long spans, foam-padded transport, and no cantilevered loading on the joint before the adhesive fully cures (full cure for most epoxies is 24 hours at room temperature) [5].
Water getting into the joint over time. If the exterior seam line isn't sealed with color-matched caulk at installation, water can wick into the joint and cause staining, or cracking in freeze-thaw climates. This bites harder outdoors but can happen in kitchens too. Seal the exterior seam line during installation, not later.
The honest reality: a badly done miter looks worse than a well-done laminated edge. It's a high-skill operation that rewards careful shops and punishes rushed ones.
Is a mitered edge stronger or weaker than a laminated edge?
The answer has some nuance. The bonded surface area of a 45-degree miter joint on 3 cm stone is roughly 42% larger than the bond area of a flat laminated strip at the same thickness (basic trig: the hypotenuse of a 45-degree right triangle with 3 cm legs is about 4.24 cm). More bond area usually means a stronger joint in shear.
But that assumes the surfaces mate perfectly. A laminated edge with a flat-to-flat bond is easy to mate. A miter depends on both faces being ground to exactly 45 degrees. Any deviation cuts effective contact area and concentrates stress at the high spots.
In normal kitchen use, neither joint fails from ordinary loading. The risk is impact. A sharp blow to the corner of a miter, say from a dropped pot, concentrates force at the thin tip of the cut. A laminated edge takes the same hit differently because its outer corner is thicker (full slab plus the laminate strip).
Bottom line: a properly fabricated and rodded miter on quartz or granite is strong enough for any kitchen. On outdoor counters, thin porcelain, or spots with regular impact risk, a laminated edge is more forgiving.
When does a mitered edge make sense, and when should you skip it?
A miter makes sense when the look justifies the cost. The clearest cases: waterfall islands where the top and side panel have to read as one piece of stone, contemporary kitchens where a thick dramatic edge is the whole point, and high-visibility stone (book-matched marble, dramatic quartzite) where a laminated seam would chop up the pattern.
Skip it when the budget is tight and the counter won't be seen from the side. A standard eased edge on a run of perimeter counter against a wall looks perfectly good and costs a fraction of a miter. On granite countertops with busy, random patterns, nobody will notice whether the edge is mitered or laminated.
Also skip it on materials that chip easily unless your fabricator has real experience with them. Thin porcelain miters done by inexperienced shops fail at a high rate.
The upgrade costs real money, so weigh it against the whole project. If a customer is already spending $8,000 on a statement marble island, adding $600 to $1,200 for a proper mitered waterfall is a reasonable slice. If the whole project is $3,000, a $1,000 miter premium is harder to defend.
For fabricators, miter work is also a margin play. It takes skill not every shop has, so shops that nail it can charge premium rates and stand apart from commodity competitors. Tracking actual time per linear foot on miter jobs (something quoting and job-costing software like SlabWise makes easy) helps you price right and stop undercutting yourself.
How long does it take to fabricate a mitered edge countertop?
Fabrication takes meaningfully longer than a straight or eased edge. The exact time depends on shop equipment, material, and the length of the mitered run.
For a typical 4-foot mitered waterfall panel in quartz, a skilled fabricator with a CNC bridge saw and edge polisher spends roughly 2 to 4 extra hours versus the same job with a standard edge. That covers the miter cuts, grinding, dry-fit, bonding, and seam cleanup [4].
Book-matched miters on natural stone take longer, 4 to 8 extra hours, because of the layout and alignment work. Jobs that need hand-polishing the seam on dark granite (where every scratch shows) or re-polishing marble to a high gloss take the most time of all.
Shop throughput matters here. Most shops schedule miter island jobs as full-day projects, not half-day ones, to allow adhesive cure time before moving the piece. Homeowners asking about lead time: add one to two weeks to typical countertop lead times (already 2 to 4 weeks at most shops) for complex mitered waterfall projects [8].
Installation of a mitered waterfall also takes longer. The top and side panels may be transported and bonded on-site, which needs a clean workspace, careful leveling, and cure time before anyone loads the surface.
How should you care for and clean a mitered edge countertop?
The seam line is the one spot that deserves special attention. The bonded joint is usually a touch more porous than the surrounding stone because adhesive fills the gap instead of solid material. On polished stone this rarely shows, but it means you want the seam sealed.
For everyday cleaning, treat the surface like any stone counter: mild pH-neutral soap, warm water, a soft cloth. Skip acidic cleaners (vinegar, citrus-based) on any stone, mitered or not. For marble countertops especially, acid etches the surface regardless of edge profile.
Seal the counter (not only the seam) on a schedule that fits the material. Most granite and natural stone needs resealing every 1 to 3 years depending on the stone's porosity and the sealer [9]. Engineered quartz doesn't need sealing.
If the exterior seam at the corner ever opens slightly (rare, but it happens), have a fabricator re-inject color-matched epoxy and re-polish. Don't let an open seam sit. Water gets in behind it, stains the joint, and is much harder to fix after the fact.
For the full routine, how to clean stone countertops covers stone care in detail.
What should homeowners ask a fabricator before ordering a mitered edge countertop?
Before you commit, ask these specific questions.
First: do you cut the miter in-house, or send it out? Some smaller shops outsource miter cuts to a larger facility. That's fine, but it affects lead time and means the seam grinding and bonding might happen at a different shop from the rest of the work.
Second: can I see finished miter work you've done, especially on this material? A shop should have photos or actual pieces to show. If they hedge, that's a signal.
Third: how do you handle book-match alignment if I want veining to flow around the corner? Ask them to walk you through slab selection. If they look confused, they probably haven't done it.
Fourth: what adhesive do you use, and what's the cure time before I can load the counter? A two-part epoxy at room temperature usually reaches handling strength in 20 to 45 minutes and full cure in 24 hours [5]. If a fabricator says they load heavy objects an hour after bonding, that's a problem.
Fifth: will the seam be reinforced with fiberglass rods? For spans over 24 inches and for natural stone, rodding is standard best practice [6].
For early-stage pricing, an online quote tool gives you a ballpark before you call a shop. Countertop installation covers the full install process, including what to expect on install day.
Frequently asked questions
What is the difference between a mitered edge and a waterfall edge?
A waterfall edge is a design choice where the countertop material runs vertically down the side of the cabinet to the floor. A mitered edge is the fabrication technique used to make that corner joint cleanly. Most waterfall countertops use a mitered edge at the top corner, but a mitered edge can also go on a standard countertop front edge with no waterfall at all.
Can a mitered edge be done on 2 cm (3/4 inch) stone?
Yes, but it's trickier. The 45-degree tip of a 2 cm miter is only about 14 mm thick, which is fragile before bonding and easy to chip during cutting. Most fabricators prefer 3 cm (1.2 inch) for miters. If you use 2 cm material, expect higher chip risk and plan for a slightly smaller apparent thickness at the finished corner.
How thick does a mitered edge countertop appear?
The apparent thickness comes from the drop piece height, not the slab thickness. A miter with a 2-inch drop piece looks 2 inches thick even if the slab is 3 cm (about 1.2 inches). Designers commonly specify 2-inch, 3-inch, or 4-inch apparent thickness. The drop piece height is a design decision made during templating, not a fixed result of fabrication.
Is a mitered edge more expensive than a bullnose edge?
Yes, by a lot. A bullnose is a rounded profile ground on the top slab edge and adds roughly $5 to $20 per linear foot over a standard eased edge. A mitered edge adds $25 to $60 per linear foot and also needs a separate drop piece of material. On a project with significant linear footage, the gap between bullnose and miter can easily reach $500 to $2,000.
Can a mitered edge countertop be repaired if the seam opens?
Yes. A fabricator cleans the old adhesive out of the open seam, injects fresh color-matched epoxy, re-clamps, and re-polishes. The repair is straightforward if caught early. If water has gotten in and stained the joint from behind, it's harder because the stain has to be poulticed out of the stone before re-bonding. Early action matters.
Do mitered edges work on quartz countertops?
Quartz is one of the best materials for miters because it's consistent in color and pattern throughout the slab, so seam color-match is easy. Engineered quartz brands like Cambria and Silestone are commonly fabricated with mitered edges. The material's hardness means you need a sharp diamond blade for the cut, but overall quartz is predictable and reliable for this profile.
How do fabricators book-match stone at a mitered corner?
Book-matching at a miter means the vein on the vertical drop piece mirrors and continues from the top slab, like a book opened at the spine. Fabricators cut both pieces from adjacent sections of the same slab, then orient the drop piece so its vein aligns at the corner. This takes careful slab layout before any cuts, and sometimes extra slab material to get the alignment right.
What angle is used for a mitered countertop edge?
Almost always 45 degrees. Both the top slab and the drop piece are cut to 45 degrees so they meet at a 90-degree outside corner. Some fabricators use a compound angle for very thick decorative or stacked miter looks, but 45 degrees is the industry standard for kitchen countertops. Any other angle would leave a visible overhang or gap at the joint.
Does a mitered edge add to countertop installation time?
Yes. A mitered waterfall countertop usually takes 1 to 2 hours longer to install than a standard countertop of the same size. The side panel has to be set, leveled, and bonded on-site, and the adhesive needs time to reach handling strength before loading. Some fabricators pre-bond in the shop and bring it as one unit, but large pieces are often bonded on-site to avoid transport stress on the joint.
Can I get a mitered edge on a bathroom vanity countertop?
Yes. Miters are done on vanities, though they're less common there than in kitchens because vanities rarely have the exposed sides that make a waterfall work. A mitered front edge on a vanity adds apparent thickness and a refined look, especially on thin porcelain or compact quartz. The fabrication process is identical to a kitchen countertop miter.
What's the minimum slab size needed to cut a mitered edge countertop?
You need enough material for the top slab and the drop piece, plus the book-match allowance if you want it. A typical 4-foot waterfall island might need the top slab (say 4 x 2.5 feet) plus a side panel (4 x 3 feet) plus a second side panel. That can eat a big chunk of a standard slab (roughly 55 to 60 square feet). Your fabricator calculates exact yield during layout and nesting before buying material.
Does a mitered edge countertop require a special type of adhesive?
Most fabricators use a two-part color-matched epoxy or polyester-based adhesive made for stone. These reach handling strength in 20 to 45 minutes and full cure in about 24 hours at room temperature. Color-matching matters because any uncured adhesive that squeezes out and hardens on the face leaves a visible line. Some shops use UV-cure adhesives for faster setup, but two-part epoxy is still the most common choice for structural miter bonds.
Will a mitered edge countertop crack over time?
A properly fabricated and installed miter on a supported counter shouldn't crack under normal use. Cracking risk goes up with unsupported overhangs longer than 10 to 12 inches (without steel or plywood support), impact loading, and thermal cycling on outdoor counters. Natural stone with pre-existing fissures is higher risk than engineered quartz. Fiberglass rodding across the joint cuts cracking risk a lot on long unsupported spans.
Sources
- Cambria Company, Technical Specifications: Engineered quartz like Cambria is consistent in color and pattern throughout the slab, making color-matched miter seams straightforward
- Natural Stone Institute, Natural Stone Technical Handbook: Natural stone slabs should be inspected for fissures and soft spots before committing to precision cuts like miter edges
- Tile Council of North America, Handbook for Ceramic, Glass, and Stone Tile Installation: Porcelain and sintered stone materials require diamond blades rated for porcelain and surface protection during cutting to prevent chipping
- Natural Stone Institute, Fabrication and Installation Standards: Miter joint tolerances in professional stone fabrication target less than 0.5 mm variation across joint length; CNC equipment is preferred for precision angle cuts
- Akemi Stone Adhesives, Technical Data Sheet for Stone Epoxy: Two-part stone epoxies reach handling strength in 20 to 45 minutes and full cure in approximately 24 hours at room temperature
- Natural Stone Institute, ANSI/NSI 373 Specifications for Slabs and Countertops: Fiberglass reinforcement rodding is standard practice for mitered joints on natural stone and for unsupported spans exceeding 24 inches
- Remodeling Magazine / Zonda, 2023 Cost vs. Value Report: Kitchen countertop and remodeling labor costs vary significantly by region; premium edge profiles and specialty fabrication add measurable per-linear-foot cost
- National Kitchen and Bath Association, NKBA Professional Resource Library: Standard countertop lead times typically run 2 to 4 weeks; complex mitered waterfall projects require additional scheduling for fabrication and installation
- Natural Stone Institute, Care and Maintenance of Natural Stone: Most granite and natural stone countertops should be resealed every 1 to 3 years depending on porosity and sealer type
- U.S. Geological Survey, Dimension Stone Statistics and Information: Granite and marble remain the most commonly fabricated dimension stone products for countertop use in the United States
Last updated 2026-07-10