TL;DR
- A vanity countertop install takes a DIYer 2 to 6 hours and costs $150 to $1,200 in materials, depending on the surface.
- You need the right adhesive, a level cabinet, and a clean sink cutout.
- Stone slabs need a professional fabricator.
- Laminate and cultured marble are honest DIY jobs.
- This guide walks every step, material, and decision.
What does a vanity countertop installation actually involve?
A vanity top install is simpler than a full kitchen job, but it's more than dropping a slab on a box. You're bonding a horizontal surface to a cabinet, cutting or buying a sink opening, tying that opening to a drain and supply lines, and making sure nothing leaks, cracks, or rocks after years of daily use.
The work splits into three phases. Prep means leveling the cabinet, measuring, and ordering or cutting the top. Setting means adhesive, caulk, and securing the top. Plumbing means the sink, the drain, and the supply lines. You can separate the countertop work from the plumbing work, and plenty of homeowners do. They're still connected, so plan both at once.
Scope depends on the material. A prefab laminate top from a home center is a one-person afternoon. A custom stone slab needs a fabricator to template and cut it, which means a week or more of lead time plus a professional set. Cultured marble, solid surface, and tile land somewhere in between.
See countertop installation for how these projects run across kitchen and bath.
Which vanity countertop materials are worth considering?
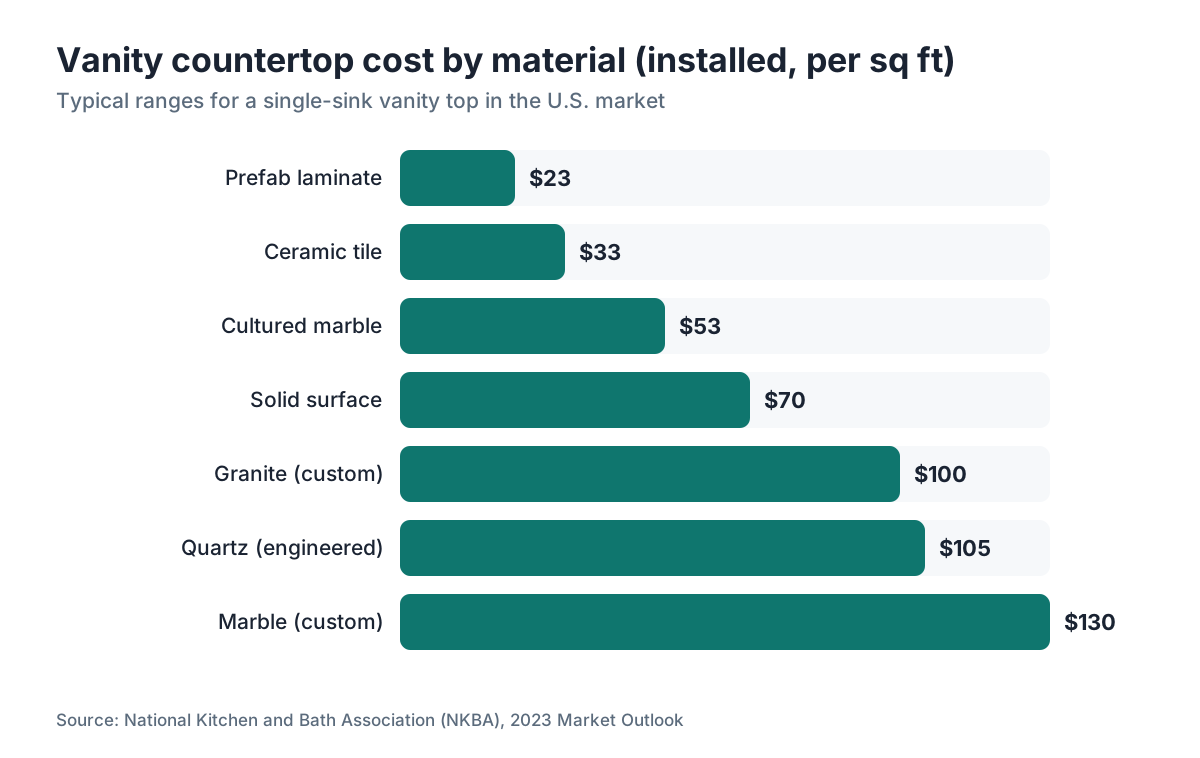
The material you pick sets your cost, your DIY odds, and how long the top lasts. Here's the honest comparison.
| Material | Typical installed cost (per sq ft) | DIY-friendly? | Durability |
|---|---|---|---|
| Prefab laminate | $10, $35 | Yes | 10 to 20 years |
| Cultured marble | $30, $75 | Moderate | 20+ years |
| Solid surface (Corian-type) | $45, $95 | Moderate | 20+ years |
| Ceramic/porcelain tile | $15, $50 (labor-heavy) | Moderate | Very long |
| Natural granite | $50, $150 | No (needs fab) | Decades |
| Marble | $60, $200 | No (needs fab) | Decades |
| Quartz (engineered) | $55, $155 | No (needs fab) | Decades |
Those are installed prices, and they swing hard by region, slab grade, and edge profile. The National Kitchen and Bath Association tracks project cost data that puts an average bathroom countertop replacement at $300 to $800 for mid-range installed materials [1].
Laminate is underrated in bathrooms. It handles moisture better than it does in kitchens, as long as you keep the seams caulked and the substrate dry. Laminate countertops and Formica countertops go deeper.
Cultured marble is the quiet winner for vanity tops. It's a cast polyester resin composite, it usually comes with an integrated bowl, and the seams are almost nothing because the whole top is one molded piece. It's not as heat-resistant as stone. Vanity tops rarely see hot pots, so that barely matters.
For stone, you're hiring a fabricator. A custom granite or marble top for a 24-inch vanity is a small job most shops turn around in 3 to 5 business days. Granite countertops and marble countertops cover the material specifics. Cambria countertops helps if you're weighing a quartz brand for the bath.
Solid surface like Corian countertops is a good DIY stretch. It cuts with a router, bonds with color-matched adhesive, and scratches sand right out. Done well, the seams disappear.
What tools and materials do you need before you start?
Get everything staged before you touch the old top. Running to the hardware store mid-install while a sink drain sits on the floor is miserable.
For a prefab laminate or cultured marble install, you'll need:
- Tape measure and pencil
- 4-foot level
- Adjustable wrench and basin wrench
- Utility knife and caulk gun
- Silicone caulk (100% silicone, not latex, for wet areas)
- Construction adhesive or countertop adhesive (Liquid Nails or equivalent)
- Shims (wood or plastic)
- Bucket and towels for the plumbing disconnect
- Safety glasses
Cutting a sink hole in an existing or custom-cut laminate top adds a jigsaw with a fine-tooth blade, a drill for the starter hole, and masking tape to keep the surface from scratching.
Don't cut stone yourself. A diamond blade on a circular saw works in theory, but the odds of cracking an expensive slab are real and the edge won't look right. That's fabricator work.
One tool people forget: slip-joint pliers or a drain wrench for the P-trap. You'll want it the second you reconnect the drain. Grab a headlamp too. Under-sink cabinets are dark caves.
How do you remove an old vanity countertop without breaking things?
Shut off the water at the valves under the sink first. If there are no shut-off valves, kill the main house supply and add valves while you're in there. Disconnect the supply lines from the faucet, loosen the P-trap slip joint, and drain the trap into your bucket.
Cut the caulk bead along the backsplash and the cabinet-to-top joint with a utility knife. Run the knife slow and make several passes instead of gouging. If the top is caulked to the wall, cut that line too.
Lift from the front edge. Most prefab tops sit on a few beads of adhesive or silicone and break free easily once the caulk is cut. If it won't move, look under the cabinet for screws or brackets. Some fabricated stone tops have L-brackets or clips screwed to the cabinet rails.
Grab a helper for anything over about 40 pounds. A 36-inch granite top can weigh 80 to 120 pounds. Stone cracks when it flexes, so carry it flat or at a low angle, not standing on edge through a doorway unless the run is short.
With the old top out, check the cabinet rails. They need to be level within 1/8 inch across the full span. Shim the cabinet if they aren't. A top on a twisted cabinet rocks, and a rocking stone top eventually cracks.
How do you install a prefab vanity countertop step by step?
This is the common DIY scenario: a prefab top from a home center with an integrated or pre-cut sink opening.
Step 1: Dry-fit the top. Set it on the cabinet without adhesive and check the fit against the wall. Mark any gap over 1/4 inch. Small gaps get caulked. Large ones need the top scribed and trimmed.
Step 2: If the top has a backsplash, hold it against the wall and mark the high point. Walls are rarely straight. You may need to sand or plane the back edge so the backsplash sits flush.
Step 3: Apply adhesive. Run a thin bead of construction adhesive or 100% silicone along the top edges of the cabinet rails. Don't glob it. You want enough to bond, not so much that it squeezes into the cabinet.
Step 4: Set the top. Lift it in, press down firmly, and check that the overhang is even on the front and sides. Most prefab tops have a 1-inch overhang.
Step 5: Let it set. Give the adhesive 30 minutes before you reconnect anything, and check the label. Some construction adhesives want 24 hours for a full cure.
Step 6: Caulk the backsplash-to-wall joint and any gap where the top meets the cabinet sides. Use 100% silicone in a color that matches the top. Smooth it with a wet finger.
Step 7: Reconnect the plumbing. Install the faucet if it's new (much easier before the top goes down), then reconnect the supply lines and P-trap. Turn on the water, run it, and check for drips at every joint.
Step 8: Run a bead of silicone around the sink rim if it's a drop-in. Some drop-in sinks ship with a foam gasket and need no extra caulk. Follow the sink maker's guidance.
How do you install an undermount sink with a stone vanity top?
An undermount sink under stone is a fabrication job, not a home-center pickup. The fabricator cuts the opening to your exact sink template, polishes the inside edge (it's visible), and either pre-installs the clips or preps the stone for adhesive bonding.
On install day, the fabricator usually sets the top and mounts the sink in one move. They run two-part epoxy around the sink perimeter, lift the sink up against the stone from below, and tighten the undermount clips to pull the rim tight. The epoxy needs 24 hours before it sees water.
A DIY solid-surface undermount runs the same way. The sink bonds to the underside with color-matched adhesive, and clips hold it while it cures. On solid surface, the joint sands invisible. On stone, the silicone line always shows from below.
Here's the mistake installers make: they don't support the stone over the sink opening while the adhesive cures. A heavy undermount assembly can sag the stone before the bond sets. Slide a piece of foam or a bucket underneath to carry the weight overnight.
For care after the install, see how to clean stone countertops or the material guides for quartzite and soapstone.
What adhesive and caulk should you use for a vanity countertop?
This is where installs quietly fail. The wrong product in the wrong spot either won't bond or turns into a mold farm.
For the cabinet-to-countertop bond, use construction adhesive (DAP Weldwood, Liquid Nails Heavy Duty, or equivalent) or 100% silicone. Construction adhesive gives a stronger permanent bond. Silicone is the pick when you might want to remove the top later without wrecking the cabinet, and it stays flexible enough to take minor movement.
For the drop-in sink rim: 100% silicone, every time. Not kitchen-and-bath caulk, not latex. A mold-resistant silicone is worth the extra dollar. ASTM C920 is the standard specification for elastomeric joint sealants in wet applications, and 100% silicone products meet it while latex sealants generally do not [2].
For the backsplash-to-wall joint: 100% silicone. That joint moves with humidity and temperature. A rigid caulk cracks.
For stone-to-stone seams on a fabricated top: the fabricator uses color-matched two-part polyester or epoxy seam adhesive. Never fill stone seams with silicone. It stays rubbery and grabs grime.
Caulk color matters more than people expect. White silicone on a gray quartz vanity looks fine for a year, then yellows. Match the caulk to the grout or the countertop tone. Clear silicone works almost anywhere and stays cleaner longer.
Do you need a permit to install a vanity countertop?
In most U.S. jurisdictions, a countertop-only replacement (same cabinet, same sink spot, no moving drain lines) needs no building permit. The work counts as repair and maintenance, not new construction or a change to the structure or mechanical systems [3].
Move the sink, add a new drain, or relocate supply lines, and now it's plumbing work that usually needs a permit and an inspection. The International Residential Code (IRC) Section R105.2 lists work generally exempt from permits, covering minor repair and replacement, but local amendments vary [4]. Check with your local building department if you're unsure. Some places, notably many California cities and New York City, set stricter permit triggers than the IRC baseline.
For a vanity swap in an existing bathroom with no plumbing changes, you almost certainly don't need a permit. If your home is in a historic district or an HOA, read the covenants. Some HOAs require approval for visible exterior changes, and a few stretch that to major interior work.
Doing your own plumbing reconnect? Check whether your state requires a licensed plumber for any plumbing work, even on your own home. Most states let homeowners plumb their own residence. A handful don't, or they require inspection.
What are the most common installation mistakes and how do you avoid them?
The failures cluster in a few predictable spots.
Not leveling the cabinet first. This one tops the list. An out-of-level cabinet makes the top rock, the caulk crack, and a stone top fracture. Spend 10 minutes with a 4-foot level and shim before you bond anything.
Skipping the dry-fit. Set adhesive before you've test-fitted and you'll find the gap or the overhang problem while the glue is already going tacky. Dry-fit, mark, trim, then apply adhesive.
Using too much adhesive. A thick glob doesn't bond better. It squeezes out, makes removal impossible, and can telegraph as a high spot under a flexible top. Thin, even beads.
Not caulking the backsplash joint. Water gets behind the backsplash and rots the drywall. One bead of silicone where the backsplash meets the wall takes two minutes and stops a mold problem. Use it.
Installing the faucet after the top is down. Faucets go on far easier from above before setting the top. Wait until after and you're on your back inside the cabinet with a basin wrench, which is exactly as bad as it sounds.
Not leak-testing right away and again at 24 hours. Compression fittings on braided stainless supply lines can be cross-threaded and feel tight while they seep slowly. Fill the basin, run the drain, and check every joint while the project is still fresh in your head.
How long does a vanity countertop installation take, and when should you hire a pro?
A first-timer swapping a prefab laminate or cultured marble top should plan 3 to 5 hours from first wrench turn to final caulk. That covers the disconnect, the set, the reconnect, and cleanup. Someone who's done it before knocks it out in 90 minutes.
Custom stone adds lead time but shortens install day. The fabricator templates in 15 minutes, fabricates off-site over 3 to 7 business days, and sets a single-sink vanity in under an hour. You're paying for their tools and skill, not their minutes on site.
Hire a pro when:
- The top is stone and heavier than two people can safely handle in a tight bathroom.
- Your sink setup is complex (double bowl, vessel with an odd cutout, integrated bowl).
- The cabinet is out of plumb in multiple directions and needs shimming, maybe against the wall.
- You've had a leak under this vanity before and you're not sure the substrate is sound.
- You want an undermount stone install. Undermount stone punishes mistakes. If the sink drops, it takes the stone with it.
Fabricators pricing custom vanity tops know the job is small but the margin is thin. Software like SlabWise can generate a quote for a single vanity slab, edge profile and sink cutout included, in a few minutes without hand-measuring.
A prefab drop-in install is a real DIY project. An undermount custom stone top with a vessel faucet on a marble slab is not. Be honest about which one you have.
How do you finish the edges and backsplash on a vanity countertop?
Edge profiles on prefab tops are done at the factory. That usually means a laminate-wrapped bullnose, an eased edge, or a molded edge. You don't touch it.
On stone, the fabricator cuts the profile to your spec. Common bathroom choices: eased (flat top, softened corner), beveled (an angled cut at the front edge), and ogee (an S-curve that reads formal). Eased is the default and costs nothing extra. Ogee and other decorative profiles add $10 to $25 per linear foot at most shops.
The backsplash on a vanity is often simpler than a kitchen. Your options:
- Integrated backsplash: cut from the same slab as the top, rising 4 inches up the wall. The fabricator makes it as one piece. No grout line, easy to wipe.
- Separate tile backsplash: you tile after the top is set. More design freedom. Grout lines need upkeep.
- No backsplash: in a half-bath with no splash zone, sometimes nothing is the right call. Caulk the top-to-wall joint and move on.
On a prefab top with a separate backsplash piece (common on laminate), the backsplash snaps or adhesive-bonds to the wall side of the top, and the joint gets caulked. Some prefab tops come with end caps for exposed sides. Those heat-bond with an iron and trim flush with a file.
With stone, the fabricator handles the backsplash cut and any polished exposed end where the top runs to an open side.
How do you maintain and clean a vanity countertop after installation?
Maintenance rides almost entirely on the material.
Laminate and solid surface need next to nothing: a damp cloth and a mild cleaner. Keep abrasive pads off laminate (they scratch the pattern layer). Solid surface can be sanded if it scratches.
Cultured marble has a gel coat that abrasives scratch and bleach dulls. Clean it with a non-abrasive bathroom cleaner. If the gel coat crazes or stains deep after years, a solid-surface restoration company can repolish it.
Natural stone in a bathroom wants the same care it gets in a kitchen. How to clean stone countertops covers the basics. Granite and quartz in a vanity are low-maintenance. Marble and quartzite need sealing and protection from acidic products like toothpaste, cologne, and a lot of skincare. See how to clean quartzite countertops and how to clean soapstone countertops for those.
The caulk at the backsplash and around the sink rim needs watching. Silicone in a wet room lasts 5 to 10 years before it separates or molds. Replacing it is a 30-minute job with a razor scraper, some acetone, and a fresh tube. Don't ride a failed caulk line. Water migrating behind the top is exactly how you rot a cabinet.
One honest admission: nobody has clean data on average vanity top lifespan by material, because it hinges on cleaning habits and how much water pools on the surface. The closest proxy is remodeling data from the Harvard Joint Center for Housing Studies, which puts bathroom renovation cycles at roughly 15 to 20 years for owner-occupied single-family homes [5].
Frequently asked questions
Can I install a vanity countertop without removing the sink?
Only if you're setting the top over the existing sink, which is unusual. Most vanity top replacements need you to disconnect the drain and supply lines to pull the old top and set the new one. Disconnecting the plumbing under a vanity sink takes about 20 minutes. Skipping it to dodge the plumbing creates more problems than it solves.
How much does it cost to install a vanity countertop?
Materials run about $10 per square foot for prefab laminate up to $200 per square foot for premium marble. A typical 24-inch single vanity top is 4 to 6 square feet. Pro labor for a simple swap runs $100 to $300, more for custom stone. Total installed cost lands between $150 for a budget laminate DIY and $1,200 or more for a fabricated stone top with an undermount sink.
What is the easiest vanity countertop to install yourself?
Prefab laminate tops are the easiest. They arrive pre-cut with a finished edge and an integrated or pre-drilled sink opening. Apply adhesive, set it, caulk the backsplash, reconnect the plumbing. Cultured marble with an integrated bowl is a close second because there are no separate sink parts to fuss with. Both are realistic one-person jobs for a first-timer.
Do I need to turn off the water to replace a vanity countertop?
Yes. Shut off the hot and cold supply valves under the sink before you disconnect anything. No valves? Shut off the main water supply and add valves while you're in there. Working with live supply lines in a bathroom cabinet is how a project turns into an emergency. The five-second shut-off is not negotiable.
Can you put a new vanity countertop over an old one?
You can in theory, but it's usually a bad idea. The extra height throws off faucet clearance and can catch on cabinet doors. You also can't inspect the substrate for damage. And the combined weight may beat what the cabinet was built for, especially with stone over old stone. Remove the old top. It's not much extra work.
How do you cut a sink hole in a vanity countertop?
For laminate, use a jigsaw with a fine-tooth blade. Trace the sink template (it ships with the sink) on the underside of the top, drill a starter hole at a corner inside the cut line, and cut along the line. Lay masking tape on the surface before marking to prevent scratches. For stone, don't cut it yourself. Hand the template to the fabricator and let them cut it with diamond tooling.
What type of caulk should I use around a vanity countertop?
100% silicone for every wet joint: the backsplash-to-wall line, the drop-in sink rim, and anywhere the top meets the cabinet on an exposed side. Not latex, not latex-silicone blends. In a bathroom those joints see constant moisture and slight movement. Silicone stays flexible and doesn't crack. A mold-resistant formula adds some life in a humid bath.
How do you level a vanity cabinet before installing a countertop?
Set a 4-foot level across the cabinet's top rails in both directions. If it reads out of level, shim the legs or base from below. Most vanity cabinets have adjustable legs behind a toe-kick panel. If yours doesn't, thin wood or plastic shims under the base work fine. Get the top rails within 1/8 inch across the full span before you apply any adhesive.
How long should I wait after installing a vanity countertop before using the sink?
Let construction adhesive or bonding silicone cure at least 24 hours before heavy use. The caulk around the sink rim and backsplash joint also needs 24 hours to fully cure before it gets wet. Most silicone is touch-dry in 1 hour and waterproof in 24, but check your product label. Reconnecting the plumbing and running a quick leak check is fine the same day.
Does a vanity countertop need to be sealed?
Laminate, cultured marble, solid surface, and glazed ceramic tile: no sealing. Natural granite, marble, quartzite, and most natural stones: yes, seal before use and reseal annually or when water stops beading. Quartz (engineered): no sealing, the resin binder is non-porous. When in doubt, run the water test. Drop water on the surface. If it soaks in within a few minutes, seal it.
Can I install a vessel sink on any vanity countertop?
A vessel sink sits on top of the counter instead of dropping in or mounting below. It needs a simple circular drain hole (no finished sink-opening edge required), and the faucet has to reach the bowl, usually 10 to 12 inches tall or higher. Almost any countertop material works. The real constraint is faucet height and clearance to any overhead cabinetry.
How do you install a vanity countertop on a wall-mounted or floating vanity?
A floating vanity (wall-mounted, no legs) still has a cabinet box that gives you a bonding surface. The process matches a standard install: adhesive on the top rails, set the top, caulk the joints. The difference is weight. The cabinet is only as strong as its wall anchors. Stone tops on floating vanities need those anchors checked, ideally into studs or on proper toggle bolts, before you add 80-plus pounds of stone.
What is the standard depth and overhang for a vanity countertop?
Most bathroom vanity cabinets are 21 inches deep, and standard tops are 22 inches deep, which gives a 1-inch front overhang. Some cabinets are 18 inches deep (usually in small bathrooms), so check yours before ordering. Side overhang is typically flush or 1/2 inch on open sides. These aren't code requirements, just industry convention. Custom stone can be cut to any depth you specify.
Sources
- National Kitchen and Bath Association (NKBA), 2023 Kitchen and Bath Market Outlook: Average bathroom countertop replacement cost range of $300, $800 for mid-range installed materials
- ASTM International, Standard Specification C920 for Elastomeric Joint Sealants: ASTM C920 covers sealants used in wet construction applications; 100% silicone meets this standard while latex sealants generally do not
- U.S. Department of Housing and Urban Development, HUD User: Countertop-only replacement is generally classified as repair and maintenance, not new construction requiring a permit
- International Code Council, International Residential Code (IRC) Section R105.2, Work Exempt from Permit: IRC R105.2 lists minor repair and replacement work that is generally exempt from building permits, though local amendments vary
- Harvard Joint Center for Housing Studies, Improving America's Housing 2023: Bathroom renovation cycles average roughly 15 to 20 years for owner-occupied single-family homes, based on remodeling activity data
- U.S. Environmental Protection Agency, WaterSense Program: EPA guidance on bathroom sink plumbing fixture replacement relevant to supply line and faucet installation standards
- U.S. Consumer Product Safety Commission (CPSC): CPSC documents bathroom fixture-related injury data relevant to safe installation practices
- Tile Council of North America (TCNA), Handbook for Ceramic, Glass, and Stone Tile Installation: Industry standard reference for tile countertop installation specifications including adhesive and grout requirements
- Natural Stone Institute (formerly Marble Institute of America), Dimensional Stone Design Manual: Professional standards for stone countertop fabrication and installation including undermount sink bonding methods
- U.S. Department of Energy, Energy Saver: Federal guidance relevant to shut-off valve requirements and plumbing best practices during fixture replacement
Last updated 2026-07-09