TL;DR
- Before and after countertop photos convert better than any other fabricator marketing content because they show the transformation a real customer paid for.
- Shoot in consistent lighting with a wide angle, always get the homeowner's permission in writing, write captions that name the material and room type, and post across Google Business Profile, Instagram, and Houzz to reach buyers at every stage of their search.
Why do before and after photos work so well for countertop marketing?
They prove you can do the job. A homeowner deciding between keeping their laminate and jumping to quartz does not want to read a paragraph about your craftsmanship. They want to see a dark, dated kitchen become something they recognize from a renovation magazine. A before and after delivers that in under two seconds.
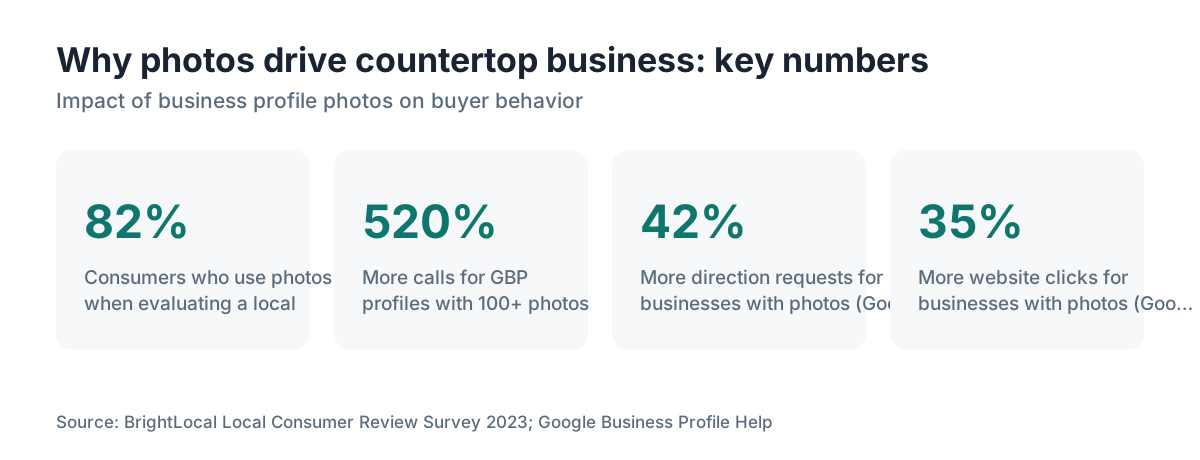
The research backs this up hard. The U.S. Small Business Administration, in its guidance on marketing for small firms, tells owners that showing real work and customer results is one of the cheapest ways to build trust with local buyers (see sba.gov, Market and sell your product or service). A 2023 BrightLocal consumer survey found that 82% of consumers use photos when they evaluate a local business, and that profiles with more than 100 photos on Google Business Profile draw far more calls than profiles with a handful. That is the difference between a phone that rings and one that sits quiet.
Countertop work photographs well because the change is dramatic, contained, and fast. A full remodel takes months. A countertop swap transforms a kitchen in a day or two. The before shows what almost every homeowner has right now. The after shows what they want. That gap does your selling for you.
Shops that snap a quick phone shot on the way out the door are leaving money on the table. Shops that treat every finished job as a shoot, plan the frame, fix the light, and caption it with useful detail report steady growth in referrals and inbound calls without spending another dollar on ads.
What equipment do you actually need to shoot good before and after photos?
Not a professional camera. A recent iPhone or Android flagship shoots more than enough resolution for web use. What you need is attention to a few variables that separate a usable photo from a great one.
Light is everything. Window light is your best friend and your worst enemy at the same time. Shoot during the day with every fixture on, but keep direct sun off the countertop surface, because a low-angle beam creates blown-out hot spots that erase stone veining. Overcast days give the most even light for indoor kitchens. Do not shoot the after on a bright sunny day when the before was cloudy. The comparison looks off even when the work is excellent.
Use the widest lens your phone offers without going ultra-wide, which bends straight lines into curves. On most phones that is the standard 1x camera. Stand in the same spot for both shots. Mark it with floor tape if you have to, or note what you were standing against. Consistency between before and after is what makes the transformation land.
A basic tripod (under $30 online) kills camera shake and forces you to match angles. Height matters too. Shooting from countertop height, around 36 inches, shows the edge profile clearly and matches how a homeowner sees the space when they walk in. Shoot from standing eye height and the counter flattens and shrinks.
For materials with strong veining like quartzite or marble countertops, grab a close-up detail shot too. The wide room shot shows the transformation. The detail shot closes buyers who care about the specific slab.
How should you stage the space before taking the after photo?
Staging is not about deceiving anyone. It is about removing noise so the countertop is actually visible.
Clear every appliance, mail pile, dish rack, and paper towel holder off the surface. Leave one or two intentional props: a small bowl of fruit, a cutting board, a plant. You want the surface to dominate the frame. A busy counter reads as a busy counter, not as beautiful stone.
Clean the surface until it has no fingerprints, water spots, or dust. For polished stone like granite countertops, a wipe with a microfiber cloth and one drop of mineral oil deepens the color and adds a subtle sheen that photographs well without looking wet or greasy.
Turn on all overhead and under-cabinet lights. Open blinds partway for ambient light, but close them fully if a window sits directly in frame and blows out. Pull the bar stools out slightly so they add depth without blocking the counter.
Stage the before too, in a way. Shoot it to honestly show what was there, not at its worst moment with dirty dishes everywhere. The transformation should come from the material and the workmanship, not from comparing a filthy kitchen to a spotless one. Buyers can tell the difference, and a faked comparison burns trust fast.
Do you need the homeowner's permission to use photos of their kitchen?
Yes, and you need it in writing before you post anything. This is more than legal housekeeping. A homeowner who sees their home's interior shared publicly without warning can get upset, and that one social media complaint can undo everything the photo was supposed to do.
A one-page photo release covers you. It states the homeowner's name and address (or a job reference number if you would rather keep addresses off signed documents), confirms they grant the fabricator the right to use photos taken at the property for marketing including social media and the company website, and carries a date and signature. One sentence promising you will not display their full address publicly makes people much more comfortable signing.
Get the signed release before the job ends, not two weeks later when you are ready to post. On most jobs, asking during the final walkthrough feels natural. Try: "We love to show this kind of work on our Instagram, would you mind signing a quick photo release?" Most homeowners say yes, and plenty ask you to tag them.
Some shops fold the release language into the standard installation contract so it is agreed to before day one. That works, but keep the language plain and out of the fine print. A homeowner who feels tricked will say so publicly. On the legal side, the Federal Trade Commission's advertising rules require that marketing claims and endorsements be truthful and reflect real experiences (see ftc.gov, Advertising and Marketing guidance), so a signed release plus an honest before shot keeps you clean.
How do you write captions that actually help people find you?
Most fabricators waste the caption. They type "New quartz countertops installed!" and stop. That line tells a buyer nothing they could not already see in the photo.
A caption that works names the material and brand or origin ("Calacatta Oro quartz by Cambria"), the edge profile ("waterfall edge with mitered seams"), the room type and rough square footage if you are comfortable sharing it, the city or region, and the problem the job solved ("replaced original laminate from the 1990s").
That caption does two jobs. It gives the homeowner searching for that exact material and finish enough detail to pick up the phone. And it hands search engines and social algorithms real text to index, so when someone searches "Calacatta quartz waterfall edge [your city]," your post has a shot at surfacing.
For Google Business Profile, the photo description field takes full text. Write two or three sentences, not a one-liner. For Instagram, the first 125 characters show before the "more" cutoff, so lead with the strongest line. Something like "Formica from 1987 to Calacatta quartz in one day. Here is the full transformation." gives people a reason to tap through.
If the job used a material a buyer might not know, link to more information in your bio or caption. Sending someone to learn about cambria countertops or laminate countertops from a before and after keeps them on your content instead of losing them to a competitor's article.
Where should you post before and after countertop photos to get the most leads?
Different platforms catch buyers at different stages, so spread across more than one.
Google Business Profile is the highest-return spot if you only have capacity for one channel. Photos there show up directly in local search results and Google Maps. Google's own Business Profile Help states that profiles with photos see more requests for directions and more website clicks than profiles without them. There is no algorithm to beat. Your photos sit attached to your listing, visible to anyone who searches your name or "countertop fabricator [city]." Post every finished job here.
Instagram rewards consistency and volume. Post two or three times a week if you can hold the pace. Use location tags and material hashtags like #quartzite or #graniteinstall alongside local ones like #[city]kitchenremodel. The before and after carousel (swipe to reveal the after) beats single images for engagement because it builds a deliberate reveal moment.
Houzz skews toward homeowners actively planning a renovation, often 12 to 18 months out. Your project portfolio there ranks in Google image search on its own, so every project you post becomes a second or third web presence for that query.
Pinterest pulls long-tail traffic from very specific searches like "white kitchen countertop ideas" or "leathered granite edge." Pin every project with a detailed description and a link back to your website or profile.
Facebook still works for local audiences over 40, a core homeowner group. A before and after post in a neighborhood Facebook group, where the rules allow it, can pull 10 to 20 leads from a single post in a way paid ads rarely match.
Your own website needs a portfolio or gallery page updated at least monthly. A static page showing the same 20 photos from 2019 tells buyers you may not be active anymore.
How often should a fabricator post before and after photos?
Every finished job should produce at least one before and after pair for your archive, even if you do not post all of them right away. Batch the shoot, caption later, post on a schedule.
For most small to mid-size shops running 10 to 30 jobs a month, one before and after per week to Google Business Profile and three a week to Instagram is sustainable and effective. Shops that post daily see diminishing engagement per post, but they build archive depth faster, which helps search indexing over time.
The trap is posting nothing for six weeks, then dumping 20 photos at once. Every platform rewards steady activity over spikes. One or two good posts a week beats a month of silence.
Season matters too. Post kitchen transformations in late winter and early spring when homeowners make renovation decisions. Post outdoor kitchens and bar tops in early spring. Post bathroom vanity projects year-round, since bathrooms are less seasonal than kitchens. Line your content calendar up with when buyers actually decide, and the photo does even more work.
How do you use before and after photos on your website for SEO?
A gallery page full of images with no text is nearly invisible to search engines. Photos need context to rank.
Build individual project pages instead of one big gallery. Each page gets its own URL, title tag, and a 100 to 200 word description: material, edge profile, room type, city, and any interesting install detail. That page can then rank for searches like "quartz countertop installation [city]" or "leathered granite kitchen [city]."
File names matter. Rename photos before uploading. "IMG_4821.jpg" tells Google nothing. "calacatta-quartz-waterfall-edge-kitchen-austin-tx-before.jpg" and the matching -after.jpg tell it exactly what the image shows. Add alt text that matches: "before photo of dated laminate kitchen countertop in Austin TX home" and "after photo of Calacatta quartz countertop with waterfall edge in Austin TX kitchen." Google's Search Central image guidance is blunt about this: descriptive filenames and alt text help Google understand and rank your images (developers.google.com/search).
Load speed affects rankings. Compress images before uploading. Squoosh (squoosh.app), an open-source tool from Google Chrome Labs, cuts a 4MB phone photo to under 200KB with no visible loss at web resolution. A portfolio page that loads in under 2 seconds holds visitors. One that takes 6 seconds loses them before a single photo appears.
If your shop uses fabrication software that tracks jobs by material and size, cross-reference the job database against your photo archive to find gaps: materials you fabricate all the time but have no great photos of. Shops running SlabWise for quoting can pull a job list by stone type and check it against the portfolio to spot those holes systematically.
What mistakes do most fabricators make with project photos?
The most common one: shooting only the after. Without a before, you have a product photo, not a transformation story. The before is what creates the emotional contrast that moves buyers.
Close second: bad light in the after shot. A dark, yellowish frame makes even $10,000 of stone look like something a buyer would question. Your materials are beautiful. The photo has to prove it.
Third: mismatched angles. Shoot the before from the doorway and the after from inside the kitchen, and the brain never registers them as the same room. The transformation reads as dishonest even when it is not.
Fourth: no follow-up system. Shops that mean to shoot photos but leave it to installers to remember get inconsistent results. Build the shot into the installation checklist. Make it part of closing a job, the same way you collect final payment.
Fifth: skipping the before because the old countertop looks rough. That is exactly the point. The worse the before, the bigger the after. Shoot it every time, even when the client is embarrassed by their old formica countertops or cracked tile. Buyers who start from the same place will see themselves in that before and want the after immediately.
Can before and after photos help with Google reviews and word-of-mouth?
Yes, and the mechanism is direct. A homeowner who sees their own kitchen transformation on your Instagram or Google Business Profile shares it. They tag friends. They mention it when a neighbor asks who did the countertops. The photo becomes the evidence they hand the next buyer.
Send the homeowner a high-resolution version of the final after photo as a courtesy a few days after the job closes. Add a short note thanking them and mentioning you would appreciate a Google review if they are happy. That single email lands better than most fabricators expect. The photo reminds them how good the change was, which puts them in the right frame of mind to write five stars.
BrightLocal's 2023 Local Consumer Review Survey found that 98% of consumers read online reviews for local businesses. Reviews and photos work as a pair. The Federal Trade Commission's endorsement guidance is worth remembering here too: any review you solicit has to be genuine and unpaid to stay within the rules (ftc.gov, Endorsements and testimonials guidance).
For countertop installation businesses, the review and the portfolio photo together answer the two questions every buyer has: "Can they do the work?" (photo) and "Are they easy to work with?" (review). Cover both and you have covered the whole decision.
How do you organize a growing photo library so it stays useful?
After two or three years of steady shooting, a fabricator can pile up 500 to 1,000 project photos. Without organization, that archive turns useless, because you cannot find what you need when a prospect asks to see, say, quartzite with a live edge.
Folder structure is the simplest fix. Organize by material first, then by edge profile or room type inside that. A folder called "Quartz / Waterfall Edge / Kitchen" is easy to navigate years later. Prefix every photo with a job number or date so you can find the full project when you need caption details.
Keep a separate "ready to post" folder with already cropped, compressed, captioned versions. Splitting the posting-ready files from the master archive means whoever runs social media does not have to dig through thousands of raw files.
Tag photos by city or neighborhood if you cover a wide area. A prospect in one suburb usually wants to see nearby work more than work anywhere in the metro. Pulling up "West Side projects" or "[city] kitchen remodels" fast during a sales call is a real closer.
Cloud backup is non-negotiable. A lost archive is gone for good. Google Photos, iCloud, or a dedicated service like Backblaze (about $99 a year for unlimited storage) keeps years of work safe.
Should you invest in professional photography for countertop jobs?
Honest answer for most fabricators: not for every job, but yes for your best work and your website's hero images.
A professional architectural or interior photographer runs roughly $200 to $600 for a two-hour shoot depending on your market. For a standard kitchen that took a day to install, that cost does not pencil out. But for a high-end job with dramatic stone like a book-matched quartzite island, a custom curved butcher block countertop, or a full kitchen with multiple materials, a pro shoot produces images that anchor your portfolio for years.
Treat professional photos as infrastructure, not a job expense. The images live on your homepage, in your Google Business Profile hero image, in sales presentations, and maybe in local print ads. Spread over three years of use, a $400 shoot on a standout job costs less than a single Google ad click in a competitive market.
For everything else, a well-lit phone photo with a clean caption beats a mediocre professional shot every time. The real differentiator is not camera quality. It is consistency: showing up with a process on every single job.
Frequently asked questions
How many before and after photos should a countertop fabricator have on their website?
There is no magic number, but a portfolio with fewer than 20 distinct projects looks thin to most buyers. Shops with 50 to 100 well-organized project photos see higher time-on-site and lower bounce rates because buyers browse. Aim to add at least two to four new projects a month so the portfolio shows recent, active work instead of a static historical archive.
What is the best time of day to photograph an installed countertop?
Midday on an overcast day is ideal for most kitchens, because diffused outdoor light comes through windows without harsh shadows or blown-out spots. If the only available time is a clear sunny day, close blinds on south and west-facing windows and lean on overhead lighting. Early morning with eastern light works well for east-facing kitchens. Avoid shooting after dark unless you have supplemental lighting.
Do before and after photos work for commercial countertop jobs, or just residential?
They work for both, but the audience differs. Commercial buyers (restaurant owners, office managers, property developers) respond to photos that show durability and scale: square footage completed, material specified, timeline. Put those data points in the caption for them. Residential buyers respond more to the emotional transformation. Adjust the caption style to the audience without changing your shooting process.
Can I use before and after photos in Google Ads or Facebook Ads?
Yes, and they usually beat stock photography or product shots in paid campaigns. Facebook and Instagram allow before and after formats as long as the images do not imply a medical result or a weight change, which fall under a separate policy. For countertops there is no restriction. Test a carousel that lets users swipe from before to after for higher engagement than a static single image.
What if the homeowner says no to a photo release?
Respect it and move on. Roughly 10 to 15% of homeowners decline for privacy concerns, HOA rules, or rental restrictions. Have a fallback: ask if you can photograph just a close-up detail of the countertop surface with no identifying room features. Most people who decline a full room shot will agree to a material detail photo, which still adds value to your portfolio.
How do before and after countertop photos compare to video content for marketing?
Video gets higher organic reach on Instagram and Facebook because the algorithms favor it, and time-lapse installation clips perform well when done right. But video takes more time to shoot and edit, and photos are far easier to use across every channel consistently. The practical call: do photos on every job, add video when you have capacity. A steady stream of good photos beats occasional video with long gaps.
Should I watermark my before and after photos?
A light watermark with your company name and website in a corner is reasonable for social photos that get shared without context. Avoid heavy watermarks that cover the surface, because they hide what you are trying to show. For photos posted straight to your Google Business Profile, watermarks matter less since attribution is built in. Never watermark photos you send to homeowners as a courtesy.
How do I get installers to consistently take before photos on every job?
Make it a checklist item tied to job closeout. Many shops add a photo confirmation step to the installation sign-off: the installer uploads a before photo when they arrive and an after photo before leaving. If your shop management software tracks job status, trigger a reminder at job start. Some shops pay a small per-job bonus for complete photo documentation, which changes behavior fast.
What image dimensions work best for posting countertop photos on Instagram versus Google Business Profile?
Instagram square posts display at 1080 x 1080 pixels; landscape at 1080 x 566; portrait at 1080 x 1350. Portrait gets the most screen space in the feed. Google Business Profile photos display best at a minimum of 720 x 720 pixels, and Google recommends staying under 5MB per file. For before and after carousels, use consistent dimensions across all slides so the swipe transition looks clean.
Is it worth creating a separate before and after highlight or album on social media?
Yes. On Instagram, create a Story Highlight called something like "Transformations" and add every before and after pair as a Story first, then save it. New visitors go straight to Highlights to figure out what you do. On Facebook, create a dedicated album called "Before and After Projects" that buyers can browse apart from general posts. Both take five minutes to set up and work passively for years.
How do I photograph darker stone materials like soapstone or black granite without losing detail?
Dark stone needs more light, not less. Turn up all overhead lighting, add portable LED panels if you have them, and avoid backlighting from windows behind the camera. Shoot in RAW if your phone supports it, which gives more room to recover shadow detail in editing. A light mist of water on a honed soapstone surface brings out texture and veining. Check our guide on cleaning soapstone for surface prep before shooting.
Can before and after photos help me rank higher in Google local search?
Photos on your Google Business Profile feed into local search prominence signals. Google's own guidance says profiles with more photos get more views and actions. Individual project pages on your website, with photos and text, can rank for material-plus-city queries on their own. Combining steady profile photo updates with a well-structured on-site portfolio is one of the most cost-effective local SEO tactics a fabricator has.
What editing tools should I use to process countertop photos before posting?
Keep edits minimal. The goal is accurate representation, not a stylized look that disappoints buyers in person. Snapseed (free) and Lightroom Mobile (free tier) both handle brightness, white balance, and straightening well on a phone. Correct white balance first to kill any yellow cast from indoor lighting. Nudge clarity up slightly to bring out stone texture. Never use filters that shift the material color. The photo should match the showroom.
Sources
- BrightLocal, Local Consumer Review Survey 2023: 98% of consumers read online reviews for local businesses; 82% use photos when evaluating a local business; businesses with more than 100 GBP photos receive far more calls.
- U.S. Small Business Administration, Market and sell your product or service: SBA guidance advises small businesses to build local trust by showing real work and customer results as a low-cost marketing method.
- Google Business Profile Help: Businesses that add photos to their profiles receive more requests for directions and more website clicks than those without photos.
- Federal Trade Commission, Advertising and Marketing guidance: FTC rules require that advertising claims and endorsements be truthful and reflect genuine customer experiences.
- Google Search Central, Image SEO Best Practices: Descriptive filenames and alt text help Google understand image content and improve image search ranking.
- U.S. Census Bureau, Quarterly E-Commerce and Retail Trade data: Federal retail data confirms home improvement and building material sales remain a large, active consumer spending category, supporting steady demand for renovation services.
- U.S. Copyright Office, Copyright basics: Photographs are protected by copyright, which affects who may license and reuse images of a completed job.
- Meta for Business, Advertising Policies: Facebook and Instagram ad policies restrict before and after images that imply medical or weight-change results but do not restrict home improvement before and after comparisons.
- Houzz, Pro portal: Houzz project portfolios are independently indexed by Google, creating additional search visibility for fabricators beyond their own websites.
- Squoosh, Open Source Image Compression Tool (Google Chrome Labs): Squoosh can compress a 4MB phone image to under 200KB with minimal visible quality loss at web resolution.
- Backblaze, Personal Backup Pricing: Backblaze offers unlimited cloud backup for approximately $99 per year for personal use.
Last updated 2026-07-11