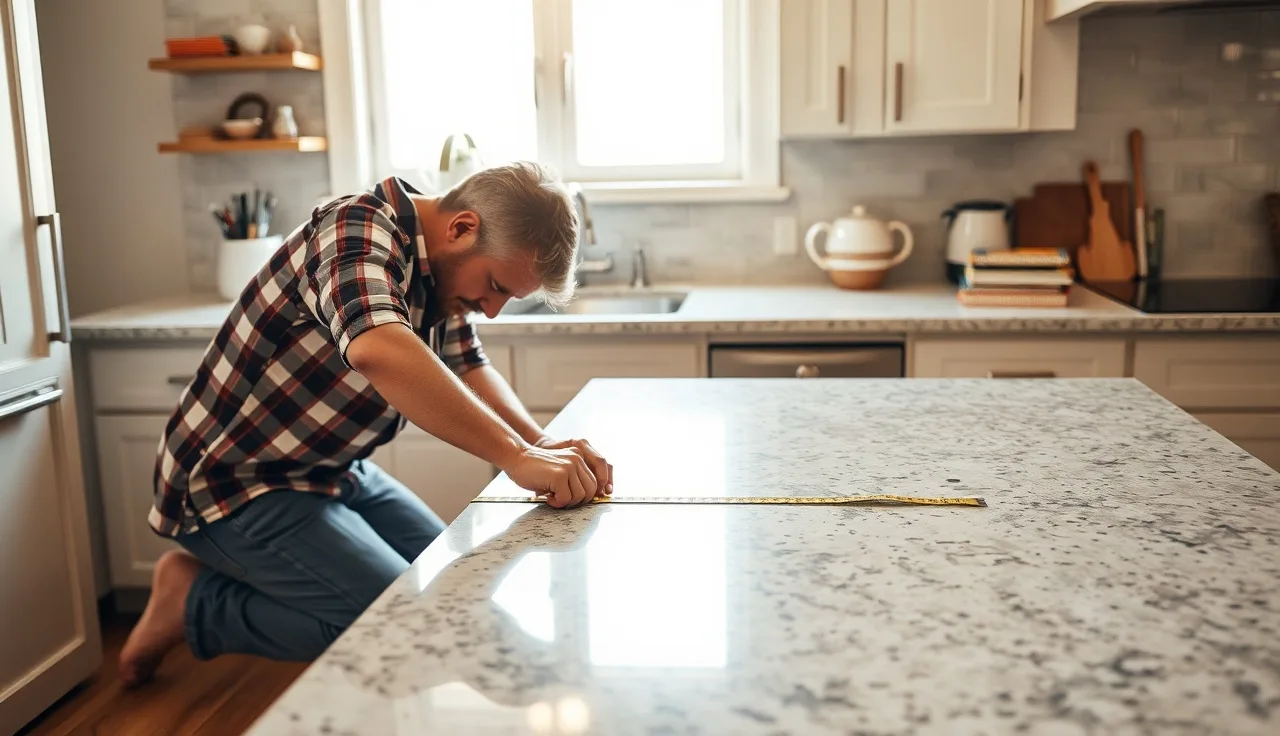
TL;DR
- Measure each countertop run in inches, multiply length by depth, then divide by 144 for square feet.
- Add 10-20% for waste, and measure to the wall, not the cabinet edge.
- A standard kitchen countertop is 25-26 inches deep including overhang.
- The average U.S.
- kitchen has about 30 square feet of counter.
- Check every number twice before you call a fabricator.
Why getting your measurements right matters before anything else
Bad measurements cost real money. A fabricator who cuts a slab to the wrong dimensions either scraps the piece or charges you for a second cut. Natural stone like granite or quartzite runs $60 to $150 per square foot installed, so a two-square-foot error on a single slab can waste $120 to $300 of material before labor even counts [1].
Accurate numbers also come before any quote that means something. Most shops price by the square foot, and they ask for your square footage upfront. Hand them a vague sketch and you get a vague number back. Measure carefully once, and every conversation after that gets easier.
This guide walks through kitchens, bathrooms, islands, and bars step by step. It covers the math, the common mistakes, and a few judgment calls where experienced fabricators disagree. Read the whole thing before you pick up a tape measure.
What tools do you need to measure countertops accurately?
A 25-foot steel tape handles almost every residential kitchen. Skip cloth tapes and short 12-foot tapes. A stiff steel blade stays straight across long runs without sagging. You also want a pencil, a notepad or your phone's notes app, and a square (a speed square or framing square) to check whether your walls meet at 90 degrees. Many don't.
A laser distance measure helps on long runs over 10 feet. It speeds things up and cuts down on reading errors. Consumer models from Bosch or Stanley run $30 to $60 and read accurately to within 1/16 inch at typical kitchen distances [2].
Skip graph paper unless you enjoy drawing. A plain list of labeled measurements works fine. What matters is that every segment has a clear name, so you can match each number to a physical spot later.
How do you measure kitchen countertops step by step?
Break the kitchen into rectangular segments first. Most kitchens are an L-shape, a U-shape, or a galley, and each straight run gets measured on its own.
Step 1: Measure each run in inches. Put the tape at the wall on one end and pull it to the wall (or to the edge of an appliance opening) on the other. Measure at counter height, about 36 inches off the floor, not down at the baseboard where walls toe out. Write down length and depth for each segment.
Step 2: Use standard depth unless your cabinets are odd. Stock base cabinets are 24 inches deep [6]. Add a 1.5-inch front overhang and let the top run to the wall at the back, and total depth lands at 25.5 inches. Many fabricators round to 25 or 26 inches [3]. Measure your actual cabinets to confirm.
Step 3: Get square inches, then convert. Multiply length by depth, both in inches. Divide by 144 for square feet. A run 96 inches long and 25 inches deep is 96 x 25 = 2,400 square inches, divided by 144 = 16.67 square feet.
Step 4: Add the segments. Sum every run for your gross square footage.
Step 5: Add a waste factor. Simple rectangular kitchens with clean edges get 10%. L-shapes, U-shapes, and heavy cutouts get 15 to 20%. Diagonal cuts, large radius corners, and directional stone patterns can push waste past 25% [1].
Here's a worked example for a simple L-shaped kitchen:
| Segment | Length (in) | Depth (in) | Sq In | Sq Ft |
|---|---|---|---|---|
| Run A (along wall) | 108 | 25 | 2,700 | 18.75 |
| Run B (return wall) | 72 | 25 | 1,800 | 12.50 |
| Corner overlap (subtract) | 25 | 25 | 625 | 4.34 |
| Gross total | 26.91 | |||
| + 15% waste | 30.95 |
That corner overlap trips people up constantly. When two runs meet at a corner, the corner square gets counted in both measurements if you aren't watching for it. Measure each run to the inside corner, not past it, or subtract the overlapping corner square once.
How do you account for the kitchen sink cutout in your measurements?
Most fabricators do not deduct sink cutouts from the quoted square footage, and there's a reason. The stone still gets cut from a slab that size. It just has a hole in it, and the cutout piece is scrap. So measure your full countertop area, including where the sink sits, and expect a quote on that full number [9].
A few shops deduct a standard opening, roughly 14 by 20 inches for an undermount single bowl, but that's not the norm. Ask your fabricator what their policy is before you try to do the math yourself.
What does matter for measuring: note the sink's location and size on your sketch. The fabricator needs to know where cutouts fall relative to slab edges and seams. A sink that lands directly on a seam line is a structural problem, so they plan the seam around it.
How do you measure bathroom countertops and vanity tops?
Bathroom vanities are simpler than kitchens, with two quirks worth knowing. First, vanity tops often have a backsplash built into a single piece, so the depth you quote needs to include that backsplash slab if you want an integrated look. A standard vanity top is 22 inches of cabinet plus a 1-inch front overhang, so 22 to 23 inches total. The backsplash is usually a separate 4-inch-tall piece measured on its own.
Second, double-sink vanities with two vessel or undermount sinks in one slab need precise sink-center measurements. Measure from the wall to the center of each sink opening, and from the left end of the cabinet to each sink center. Write those down separately from the overall slab dimensions. Your fabricator needs both.
A single-sink vanity is straightforward. Length of the cabinet (measured at counter height, wall to wall) times the depth. A 60-inch double vanity at 22 inches deep is 60 x 22 = 1,320 square inches, or 9.17 square feet before waste.
How do you measure a kitchen island for countertops?
Islands are usually the easiest measurement in the kitchen because they're rectangular and freestanding. Measure length and width. Two things change the depth number, though: overhang for seating and waterfall edges.
An island without seating gets a 1.5-inch overhang on all sides, so the top is 3 inches wider and 3 inches longer than the cabinet base. A seating overhang on one side usually runs 12 to 15 inches so a stool fits comfortably [3]. Measure the cabinet, then add the intended overhang on each side separately.
Waterfall edges, where the stone runs down the side of the island to the floor, add a lot of material. Measure the height from the countertop surface to the floor on each waterfall side (usually around 36 inches for a counter-height island) and treat each waterfall as its own rectangle. A 48-inch island with two waterfall sides adds roughly 2 x (48 x 36) = 3,456 square inches, or about 24 extra square feet of stone. That number surprises most homeowners.
If you're pricing kitchen countertops in general, the island is often where material costs jump without warning.
How do you handle corners and non-square walls when measuring?
Most residential walls are not perfectly square. Pull out that speed square and check the corner angle. If the walls meet at 89 or 91 degrees instead of 90, a fabricator who cuts the stone at exactly 90 degrees leaves a visible gap at one side of the corner.
For quoting, out-of-square walls barely change your square footage, but they matter a lot for templating. A professional templater catches this during the template appointment and adjusts the cut angle. If you're just measuring for a quote, write "corner appears slightly out of square" on your sketch so the fabricator knows to look at it during templating.
Walls that are dramatically off, more than 2 to 3 degrees, sometimes draw an extra charge for the added layout time. Ask about it.
What is the standard countertop overhang, and how does it affect measurements?
The standard front overhang on a base cabinet is 1.5 inches. That's what most fabricators assume unless you tell them otherwise. The top usually runs all the way to the wall at the back (butting against or behind a backsplash), so the back edge sits flush with the cabinet or slightly behind it.
Breakfast bars and peninsulas often get a 12-inch overhang on the seating side. Anything past 12 inches usually needs corbels or hidden steel supports to keep the stone from cracking under weight, especially natural stone [3]. That's not strictly a measuring issue, but it changes how much material you buy and what the fabricator plans for structurally.
On islands, measure and state the intended overhang on each side out loud. Don't let a fabricator assume 1.5 inches all around when you want 15 inches on the seating side.
How do you calculate countertop square footage for a quote?
Once you have every segment in inches, the math is three steps.
- Multiply each segment's length by its depth in inches.
- Add all segments together for total square inches.
- Divide by 144 to get square feet.
Then apply the waste factor. Simple rectangular layouts get 10%. L or U shapes get 15%. Complex shapes, heavy cutouts, or book-matched stone get 20 to 25%.
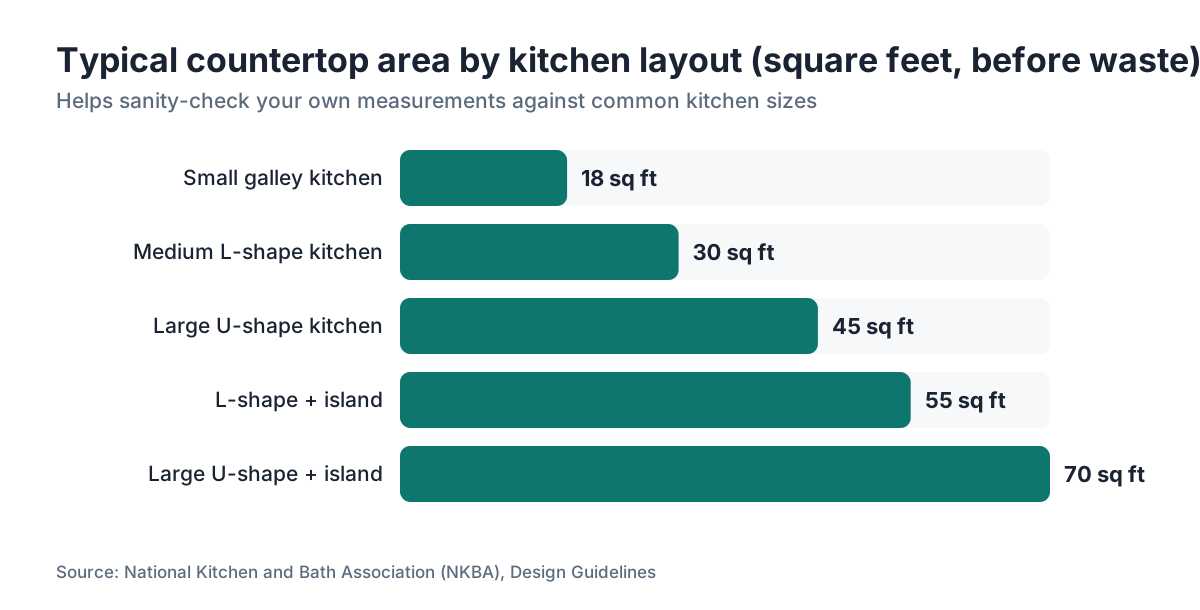
Here's a gut check: the average U.S. kitchen has about 30 square feet of countertop, per the National Kitchen and Bath Association [4]. If your number comes out to 60 square feet for a medium kitchen, measure again. If it's 12 square feet, measure again. Those ranges catch errors before you hand numbers to a fabricator.
For granite countertops, material alone typically runs $40 to $100 per square foot before fabrication and installation, so knowing your square footage within a foot or two matters [1]. For laminate countertops, the per-foot stakes are lower, but accuracy still shapes your budget.
What measurements should you give your fabricator or countertop company?
Give them all of this, in writing:
- A labeled sketch of the kitchen or bathroom from above (a bird's eye view). It doesn't have to be pretty, just accurate and labeled.
- The length and depth of each segment in inches.
- The location and size of each sink or cooktop cutout.
- The overhang dimension on each exposed edge.
- Any corners that seem out of square.
- Edge profile preference (affects labor, not material area).
- Where you want seams, or where you definitely don't (near a sink, for example).
Most shops send a professional templater after you pick your material, and that person takes their own measurements with a digital template tool or physical template before anything gets cut. Your measurements are for quoting, not for cutting. The fabricator's template is what drives the saw.
If you're using software like SlabWise to build your own quote before calling shops, it runs the same square-footage math above and flags seam placement issues and waste estimates from your inputs.
For countertop installation timing, the templating appointment usually happens 1 to 2 days after cabinets are installed and leveled.
How much extra material should you add for waste and mistakes?
The waste factor is not padding or profit. It reflects real physics. Stone is brittle. Cuts that don't go perfectly get redone. Sink cutouts remove material. Matching the grain or veining across a seam forces the slab into a specific orientation, which leaves large unusable off-cuts.
Industry practice, based on fabricator guidance from the Natural Stone Institute (formerly the Marble Institute of America), runs 10 to 20% waste depending on complexity [5]. A few situations push it higher:
- Book-matched slabs (mirrored stone panels): up to 30% extra, because both slabs have to align.
- Mitered waterfall edges: 25% or more, because the side pieces come from the same slab to match grain.
- Diagonal or angled runs: add 10% on top of the base waste factor.
- Marble countertops with bold veining need careful placement, which adds waste.
Butcher block countertops and laminate countertops run lower, around 5 to 10%, because they cut more predictably and off-cuts sometimes get reused.
Nobody has perfectly standardized data on average industry waste rates. The 10 to 20% range is the honest working answer from practitioners, not a figure from a controlled study.
What are the most common measuring mistakes homeowners make?
Measuring at floor level instead of counter height. Walls toe out at the base, so the gap between wall faces often reads 0.5 to 1 inch wider at the floor than at 36 inches. Measure at counter height.
Forgetting the corner overlap in L and U-shaped layouts. If Run A is 120 inches including the corner and Run B is 60 inches including the corner, you've counted the corner square twice.
Ignoring the backsplash. A 4-inch backsplash running 120 inches is 4 x 120 = 480 square inches, or 3.33 square feet. It adds up on long walls, and it has to come from the same material.
Not noting appliance locations. A range or slide-in cooktop breaks a run into pieces. The countertop on each side is its own piece with a finished edge facing the appliance. Skip the appliance width and the fabricator has no idea how many finished edges to price.
Assuming all cabinets are the same depth. A peninsula or island might run 27 inches deep while the wall cabinets are 25. Measure each run's depth on its own.
Rounding too hard. Keep measurements to the nearest 1/8 inch. Rounding a 97.5-inch run down to 96 seems minor, but that 1.5-inch error leaves a gap at the wall.
Do you need to measure for backsplashes separately from countertops?
Yes, and the math changes. A backsplash is a tall, narrow rectangle. Measure the height from the countertop surface to the bottom of your upper cabinets (typically 15 to 18 inches, though it varies a lot), then measure the length of each wall section that gets a backsplash [10].
Height x length divided by 144 gives you square feet. For a tile or stone backsplash that matches the countertop, many fabricators use off-cuts from the same slab, which cuts cost, but only if enough material is left over.
A 4-inch integral backsplash (a short upstand that's part of the countertop piece) is different from a full-height backsplash. That 4-inch piece is usually measured and quoted with the countertop. A full-height backsplash going up to the cabinet bottom is often quoted separately.
For any stone material like cambria countertops or corian countertops, ask your shop which backsplash approach they quote by default so you're comparing the same thing across bids.
Frequently asked questions
How do I measure countertops for replacement without removing the old ones?
Measure the existing countertop surface directly. Pull your tape along the front edge for length and from the wall to the front edge for depth. That gives you the finished countertop dimension, which is what a fabricator needs. You don't need to measure the cabinet boxes. Note any spot where the current top overhangs more than standard, since you may want to match or change that dimension.
What is the standard depth of a kitchen countertop?
Standard kitchen countertops are 25 to 26 inches deep, measured from the wall to the front edge. That covers 24-inch base cabinets plus a 1 to 1.5-inch front overhang. Kitchens with thicker walls or deeper cabinets vary. Measure your actual cabinet depth and add your preferred overhang rather than assuming the standard number.
How do I measure for a kitchen island countertop?
Measure the island cabinet's length and width, then add your intended overhang on each side. A standard no-seating overhang is 1.5 inches per side. A seating overhang is usually 12 to 15 inches on the seating side. Multiply total length by total width and divide by 144 for square feet. For waterfall edges, measure the drop height separately for each side.
How many square feet is the average kitchen countertop?
The National Kitchen and Bath Association estimates the average U.S. kitchen has about 30 square feet of countertop before waste factor. Small galley kitchens can drop to 15 to 20 square feet. Larger kitchens with islands routinely hit 50 to 70 square feet. Use it as a sanity check: if your numbers land far outside this range, measure again.
Should I measure in inches or feet for countertops?
Measure in inches. Countertops are rarely whole numbers of feet, and working in inches avoids decimal errors. Convert to square feet at the end by dividing total square inches by 144. Keeping everything in inches until the final step reduces mistakes.
How do I measure an L-shaped kitchen countertop?
Measure each straight run separately in inches. Run the tape from the inside corner to the end wall for each leg of the L. Multiply each run's length by its depth, add the two totals, then subtract the corner overlap (the depth squared, since that corner square gets counted in both runs). Add 15% for waste to account for the angled corner cut.
Do countertop fabricators measure for you, or do I need to do it myself?
Both. You measure for quoting so you get an accurate price. The fabricator sends a professional templater before cutting, and that template (not your tape measure) drives the actual saw. Your measurements only need to be close enough to generate a real quote. Off by an inch or two, the quote shifts slightly. Off by 10 inches, you get a wrong quote.
How do I measure countertop square footage for pricing?
Measure each segment's length and depth in inches. Multiply them for square inches. Add all segments. Divide the total by 144 for square feet. Then add 10 to 20% for waste depending on layout complexity. That final number is what fabricators use to price stone and engineered quartz. Provide it when you request quotes.
How do I calculate the overhang for a breakfast bar or peninsula?
Measure from the cabinet edge to the front edge of your intended countertop. Standard seating overhang is 12 inches for counter-height stools and 15 inches for bar-height stools. For stone, overhangs past 12 inches usually need corbels or hidden steel supports to stop cracking. Include the overhang dimension in your total depth when you calculate square footage.
How do I measure bathroom vanity countertops?
Measure the vanity cabinet length from wall to wall (or end to end if freestanding), and the depth from back wall to front edge including overhang. Standard vanity depth is 22 inches of cabinet plus a 1-inch front overhang, so 22 to 23 inches total. For double sinks, also record the distance from the left end to each sink center so the fabricator can plan cutout placement.
What waste factor should I add when calculating countertop square footage?
Use 10% for simple straight runs, 15% for L or U shapes, and 20 to 25% for layouts with heavy cutouts, mitered waterfall edges, or book-matched stone. These are industry working estimates, not figures from a formal study. Laminate and butcher block run lower, around 5 to 10%, because they cut more predictably than natural stone.
How do I measure for a countertop backsplash?
A standard 4-inch integral backsplash is usually included in the countertop quote. A full-height backsplash going to the bottom of upper cabinets is measured separately: height in inches (typically 15 to 18 inches) times the length of each wall section, then divide by 144 for square feet. Stone backsplashes are sometimes cut from countertop off-cuts, which can reduce material cost.
Does a sink cutout reduce the square footage I'm charged for?
Usually not. Most fabricators charge for the full slab area including where the sink goes, because the stone has to be cut from a full-size piece regardless of the hole. The cutout piece is scrap. A few shops deduct a standard opening, roughly 14 by 20 inches for an undermount single bowl, but confirm the policy before you adjust your calculations.
How precise do my countertop measurements need to be for a quote?
Measure to the nearest 1/8 inch. Rounding to the nearest inch introduces small errors that compound across multiple runs, and rounding to the nearest foot is too rough to get a meaningful quote. For quoting, within half an inch on each run is fine. The fabricator's templater takes the precise measurements before cutting.
Sources
- HomeAdvisor (Angi), Countertop Installation Cost Guide: Natural stone countertops can run $60-$150 per square foot installed; waste factors affect total material cost.
- Bosch Tools, laser measure product specifications: Consumer laser distance measures are accurate to within 1/16 inch at typical room distances.
- National Kitchen and Bath Association (NKBA), Kitchen Planning Guidelines: Standard counter depth is 25-26 inches; seating overhangs of 12-15 inches recommended for stool clearance; overhangs over 12 inches on stone require structural support.
- National Kitchen and Bath Association (NKBA), Design Guidelines and Access Standards: The average U.S. kitchen has approximately 30 square feet of countertop space.
- Natural Stone Institute (formerly Marble Institute of America), Fabrication and Installation Guidelines: Industry practice is to add 10-20% material waste factor depending on layout complexity; book-matched slabs can reach 30%.
- U.S. Department of Housing and Urban Development, Residential Rehabilitation Inspection Guide: Standard base cabinets in residential construction are 24 inches deep; standard counter height is 36 inches from the floor.
- National Association of Home Builders (NAHB), What Home Buyers Really Want (study): Kitchen islands are among the most requested kitchen features; countertop area and layout affect resale desirability.
- U.S. Census Bureau, American Housing Survey: Data on average kitchen sizes and renovation activity in U.S. residential housing stock.
- Natural Stone Institute, Dimensional Stone Design Manual: Sink cutouts are not typically deducted from quoted slab area because the material still must be sourced and handled from a full-dimension piece.
- Tile Council of North America (TCNA), Handbook for Ceramic, Glass, and Stone Tile Installation: Backsplash height from countertop to upper cabinet bottom is typically 15-18 inches in standard residential kitchens.
Last updated 2026-07-10