TL;DR
- Making concrete countertops takes 3 to 7 days from forming to final seal.
- You cast a fiber-reinforced cement mix into a melamine or foam mold, cure it covered for at least 24 to 48 hours, then grind and polish the surface before applying a penetrating sealer.
- DIY material costs run $15 to $40 per square foot.
- Professional fabrication runs $65 to $150 per square foot.
What are concrete countertops and are they worth making yourself?
Concrete countertops are cast-in-place or precast slabs made from portland cement, aggregates, water, and reinforcement, then ground and sealed to a finished surface. They're one of the few countertop materials a skilled DIYer can actually build from scratch without stone-shop equipment.
They reward patience and punish shortcuts. A bad pour produces cracks, pinholes, or warping that no amount of sealer will hide. If you're comfortable with basic carpentry, mixing concrete, and sanding, you have the skills. If you expect a weekend project with zero learning curve, you'll be disappointed.
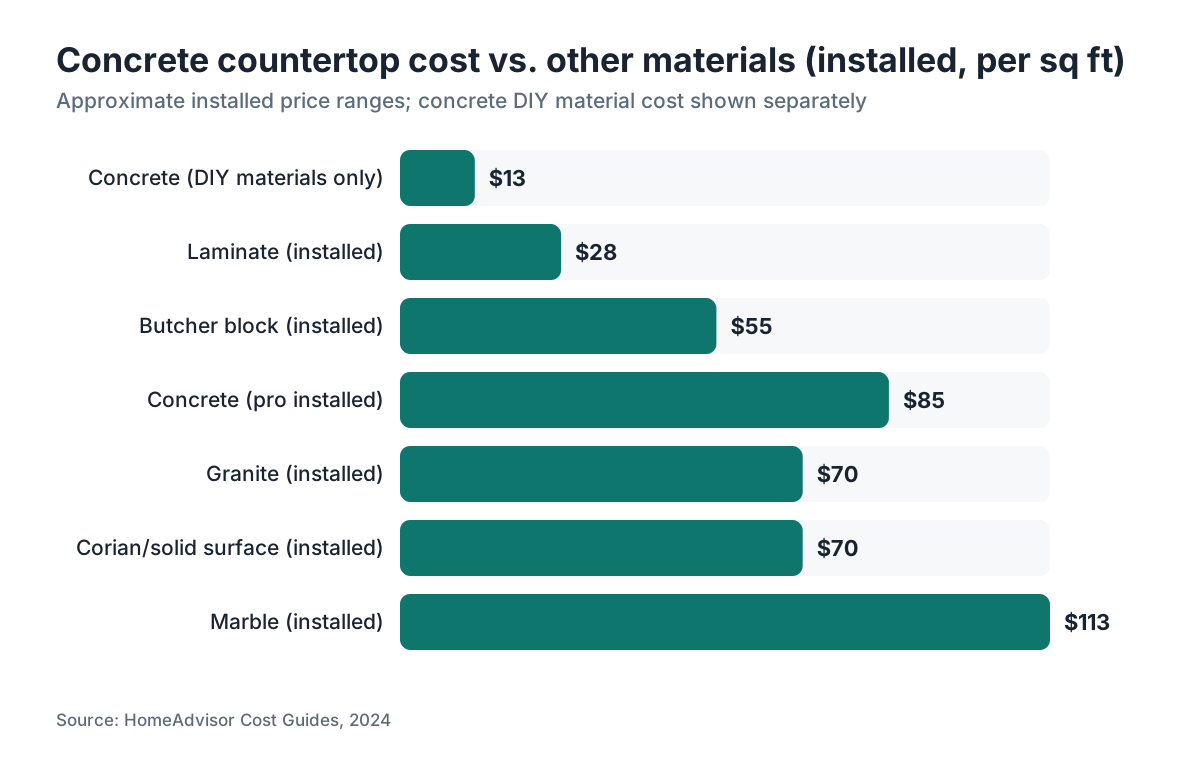
Professional concrete countertop fabricators charge $65 to $150 per square foot installed, according to HomeAdvisor's national cost survey [1]. DIY material costs land between $15 and $40 per square foot depending on mix choice, reinforcement, and sealer. For a typical 30-square-foot kitchen section, that's a possible savings of $1,500 to $3,300. Worth it for many people. Not worth it for everyone.
Against granite countertops or marble countertops, concrete lets you control the color, aggregate, and edge profile completely. Against laminate countertops or formica countertops, concrete demands far more labor but produces a surface that's genuinely custom. That's the trade you make with eyes open.
What tools and materials do you need before you start?
Stage everything before you mix anything. Concrete has a working time measured in minutes and an unforgiving memory for the moments you scrambled for a missing tool.
Mold materials
- 3/4-inch melamine-coated particleboard (for casting face-down precast slabs)
- Foam backer rod or silicone caulk for edges and inside corners
- 1.25-inch drywall screws
- Mold release agent (vegetable oil works; commercial release wax is cleaner)
Mix materials
- Portland cement, Type I or I/II [2]
- Washed concrete sand (fine aggregate, ASTM C33 graded) [3]
- Fly ash or metakaolin as a supplementary cementitious material (optional but improves workability and reduces shrinkage)
- Plasticizer or superplasticizer (water reducer) to improve flow without adding water
- Alkali-resistant (AR) fiberglass fibers, 1/2-inch chopped (adds crack resistance)
- Water (potable; the water-to-cement ratio should stay at or below 0.45)
Reinforcement
- 1/2-inch rebar or 16-gauge wire mesh for spans over 18 inches
- Plastic spacers to hold reinforcement 1/2 to 3/4 inch off the mold bottom
Tools
- Drill with a mixing paddle or a rented electric mixer
- Orbital sander or angle grinder with diamond cup wheel (40, 100, 200, 400, 800 grit pads)
- Wet-dry vacuum
- Straightedge screed and margin trowel
- Variable-speed polisher
- Safety glasses, N95 or better respirator, gloves
Sealer
- Penetrating silane-siloxane sealer for raw concrete
- A topical epoxy or acrylic topcoat if you want a wet look
The respirator is non-negotiable. Respirable crystalline silica from cement and sand causes silicosis, an irreversible lung disease. OSHA's silica standard for construction (29 CFR 1926.1153) sets a permissible exposure limit of 50 micrograms per cubic meter as an 8-hour time-weighted average [4]. Wet-grinding and wet-mixing cut airborne dust hard. Use them.
How do you design and build the mold?
Precast face-down is the method most DIYers should use. You build a mold in the shape of your finished countertop, put the finished face against the mold bottom, pour the mix in from the back, then flip the slab after curing. The mold surface becomes your finished surface, so melamine's smoothness matters.
Cut the melamine base panel to the finished countertop dimensions. Cut perimeter strips 2 inches tall (your slab thickness will be 1.5 inches; the extra 1/2 inch gives you room to overfill and screed). Screw the strips to the base from the outside with 1.25-inch screws spaced every 6 inches. Silicone all interior seams and inside corners with a smooth, even bead, then tool them with a wet finger to create a small radius. Sharp inside corners concentrate stress and crack slabs. Every inside corner in the mold needs that radius.
For sinks, cut the sink knockout from 3/4-inch foam insulation board and glue it to the mold bottom with construction adhesive. Standard undermount rough openings vary by sink model. Measure twice and account for any lip that will sit under the edge.
Apply mold release (vegetable oil or commercial wax) to all interior surfaces with a brush. Two coats. Let each dry before pouring.
The mold must be level. Set it on a table or sawhorses, check with a 4-foot level, and shim until it's flat in both directions. A mold that's off by more than 1/8 inch end to end will produce a warped slab.
What mix ratio and recipe should you use for concrete countertops?
Standard sidewalk concrete (3000 psi bags from a home center) works in a pinch but produces a coarser, more porous surface. A purpose-made countertop mix gives you a denser, more workable pour with fewer pinholes.
A reliable base recipe by weight:
- Portland cement: 1 part
- Fine concrete sand (ASTM C33): 1.5 parts
- Fly ash: 0.2 parts (replaces some cement; improves flowability and reduces heat of hydration) [10]
- Water: 0.38 to 0.42 water-to-cement ratio by weight
- AR fiberglass fibers: 0.5 lb per cubic foot of mix
- Plasticizer: per manufacturer's dosage (typically 5 to 15 oz per 100 lb of cementitious material)
For a 1.5-inch-thick, 30-square-foot countertop you'll need roughly 0.55 cubic feet of mixed concrete, which works out to about 60 to 65 lb of dry cementitious material. Mix in batches small enough to pour and consolidate within 20 minutes of adding water.
Color comes from iron oxide pigments blended into the batch (typically 1 to 6 percent of cement weight) or from acid stain applied after grinding. Integral color is more predictable. Acid stain produces organic variation you can't fully control. Neither is wrong. They're different looks.
Mix the dry ingredients thoroughly before adding water. Add about 80 percent of your water, mix for 3 minutes, then add plasticizer and the rest of the water slowly until the mix holds its shape when squeezed but flows off the trowel without crumbling. That's your target. A mix that's too wet shrinks and cracks more as it cures. The Portland Cement Association notes that water-to-cement ratios above 0.50 increase porosity and cut compressive strength, which is why a countertop pour stays at or below 0.45 [9].
How do you pour, consolidate, and cure a concrete countertop?
Pour the mix into the mold in layers about 1/2 inch thick. After each layer, run a margin trowel around the perimeter to push mix against the mold walls and kill voids. Then consolidate: press a palm sander or orbital sander (turned off) against the outside of the mold walls and vibrate it by hand, or run a cheap electric jigsaw against the mold sides with no blade in it. That vibration floats the air bubbles up.
Place your wire mesh or rebar after the first 3/4-inch layer. Hold it off the mold bottom with plastic spacers so it lands centered in the slab thickness. Pour the rest of the mix over it, screed flush with the mold edges, and float the back surface with a trowel until it's roughly level. Don't chase a perfect finish on the back. Nobody sees it.
Cover the mold immediately with plastic sheeting. Tape it down. Concrete needs to stay moist for the first 24 to 72 hours to hydrate properly. The American Concrete Institute recommends a minimum curing period of 7 days for concrete in normal conditions, though for countertops with a water-to-cement ratio below 0.45, most fabricators demold at 24 to 48 hours and keep wet curing the slab afterward [5].
Keep the pour above 50 degrees F during curing. Below that, hydration crawls. Above 90 degrees F, the mix dries too fast and cracks. A garage in moderate weather is usually fine.
At 24 to 48 hours, unscrew the mold sides carefully. Don't pry against the slab face. If the sides resist, run a utility knife along the seam to break the silicone bond. Flip the slab with at least two people. A 30-square-foot slab at 1.5 inches thick weighs roughly 300 to 350 lb. Use moving blankets and get help.
After demolding, wet-cure for another 5 days by wrapping the slab in wet burlap under plastic. Concrete reaches about 70 percent of its design strength at 7 days and roughly 95 percent at 28 days [5].
How do you grind, sand, and polish a concrete countertop?
This is where the surface comes alive, and it takes longer than most guides admit.
Start with a 50 or 100 grit diamond cup wheel on an angle grinder to knock down high spots and open the pores. Keep the grinder moving and keep water flowing over the surface (a sponge works; a helper with a spray bottle is better). Dry grinding concrete throws respirable silica dust. Wet grinding keeps it down.
Work through the grits: 50, 100, 200, 400, 800. At each grit, sand the entire surface before you move up. You want a uniform scratch pattern with no marks left from the previous grit. This takes time. A 30-square-foot section runs 4 to 8 hours of grinding across all grits, depending on how rough the pour came out.
Pinholes show up at this stage. They're normal. You have two options: grout them with a slurry of cement and pigment (apply it, let it cure 24 hours, re-grind from 200 grit), or leave them as texture. Small pinholes often vanish at finer grits. Large voids need grouting.
Want a matte finish? Stop at 400 grit and seal. For a honed look, go to 800. For a polished look, keep going to 1500 or 3000 with a variable-speed polisher and resin-bonded diamond pads. Polished concrete shows more depth, but it also shows every water spot and scratch in daily use. Most kitchens do better with a 400 to 800 hone.
Wipe the surface with a damp cloth after each grit change and inspect under raking light before moving on. Raking light (a worklight held low and to the side) reveals scratches and pinholes that hide under overhead light.
How do you seal a concrete countertop so it actually holds up?
Unsealed concrete stains from cooking oil, coffee, and citrus in under an hour. Sealing is not optional.
Let the slab dry for at least 24 hours after final polishing. For a truly dry slab, wait 28 days from the pour before sealing with an epoxy topcoat (epoxy traps moisture and can delaminate on green concrete). Penetrating sealers tolerate earlier application.
Two main approaches.
Penetrating silane-siloxane sealer. This soaks into the concrete's pores and repels water and oil without building a film on top. The look stays matte or honed. Reapplication is easy (once a year or as needed). The protection is real but not absolute. Acidic liquids like lemon juice still need wiping up fast. Apply with a foam roller or brush in two coats, wait 30 minutes between coats, then wipe the excess before it dries (dried excess leaves a white haze).
Topical epoxy or polyurethane sealer. This builds a hard film over the surface. More stain-resistant day to day but harder to repair if it scratches or peels. Epoxy systems usually mean mixing Part A and Part B and applying a thin, even coat with a foam roller. Most epoxy topcoats for concrete cure to foot traffic in 24 hours and full chemical resistance in 7 days.
For kitchens, a penetrating base coat under a food-safe topcoat (look for NSF/ANSI 51 compliance if food contact worries you) is the most practical system [6]. Wax topcoats (carnauba or beeswax-based) are not structural sealers. They're light protection added over a real sealer and need monthly renewal.
The Food and Drug Administration regulates coatings and adhesives that may contact food under 21 CFR Part 175 [7]. A fully cured, sealed concrete surface is generally considered food-safe, but check the specific sealer product's data sheet.
How do you install concrete countertops once they're finished?
Concrete countertops are heavy. A 1.5-inch slab runs about 18 to 20 lb per square foot. A 30-square-foot section weighs 540 to 600 lb. Your cabinet boxes need to be screwed to the wall studs and in sound structural shape before any slab goes on them.
For precast slabs, set them on a bead of silicone run along the cabinet tops. Do not use rigid adhesive. Concrete moves slightly with temperature, and a rigid bond can load the slab enough to crack it. Silicone stays flexible.
Where countertop sections meet (at corners or seams), scribe and grind the mating edges until they close with a gap under 1/16 inch. Fill the joint with a color-matched caulk or epoxy filler, then sand flush after cure.
Undermount sinks attach to the underside of the countertop with epoxy and mounting clips before installation. Make sure the clip hardware is rated for the sink weight. Cast-iron undermount sinks can weigh 80 lb or more, and a few cheap clips will not hold that.
For the full countertop installation workflow, from templating through final connection, that guide covers the general process across all materials.
Once the slab is set, caulk the backsplash joint with a color-matched silicone. Apply a final coat of sealer to any edges cut or ground during fit-up. Any exposed raw concrete will stain.
What does a concrete countertop actually cost to make?
The table below shows realistic material cost ranges for a 30-square-foot DIY concrete countertop project. Labor is your time.
| Item | Low | High | Notes |
|---|---|---|---|
| Melamine board for mold | $25 | $50 | One 4x8 sheet usually covers a standard section |
| Portland cement (80 lb bag) | $12 | $18 | 1 to 2 bags for 30 sq ft at 1.5 in thick |
| Concrete sand (50 lb bag) | $6 | $10 | 2 to 3 bags |
| Fly ash | $5 | $15 | Optional; improves mix |
| AR fiberglass fibers | $15 | $25 | One 1 lb bag is typically enough |
| Plasticizer | $10 | $20 | Small quantity from countertop supply house |
| Pigment | $10 | $30 | Optional; iron oxide from concrete supplier |
| Wire mesh or rebar | $10 | $20 | Per section |
| Sealer (penetrating, quart) | $20 | $45 | Enough for 30 to 50 sq ft |
| Epoxy topcoat (quart) | $30 | $70 | Optional second layer |
| Diamond grinding pads (set) | $40 | $80 | Reusable across projects |
| Total materials | $183 | $383 | $6 to $13 per sq ft |
Add tool rental (angle grinder with diamond cup, variable-speed polisher) at $40 to $80 per day if you don't own them. First-time projects almost always run long. Budget for two to three days of rental.
On the professional side, HomeAdvisor's 2024 data puts the average installed price for concrete countertops at $85 per square foot, with a range of $65 to $135 [1]. That's $1,950 to $4,050 for the same 30-square-foot section. The DIY savings are real, but you're trading money for 20 to 30 hours of labor and the learning curve of a first pour.
Fabricators pricing concrete work often find that job costing inside countertop quoting software keeps material and time per square foot honest. Concrete margins swing more than stone because labor hours move a lot between a simple rectangular section and complex curved or embedded work.
What are the most common problems and how do you fix them?
Cracking. Hairline cracks during curing usually come from a water-to-cement ratio that ran too high, curing that went too fast, or thin reinforcement over a long span. Fill them with a color-matched epoxy crack filler, then re-sand and reseal. Cracks that run through the full thickness need structural evaluation before you use the slab.
Pinholes. Almost every first pour has them. Grout them with a portland cement and pigment slurry at the 200-grit stage. Apply with a rubber grout float, let it cure 24 hours, then re-grind from 200 grit.
Color variation. Integral color drifts between batches if you don't measure pigment by weight. Acid stain always varies. Neither is wrong as a design choice, but if uniformity matters, use integral color, measure everything by weight, and pull all batches from the same bag of pigment.
Sealer blush or peeling. Usually caused by sealing over moisture. Wait the full 28 days for epoxy topcoats. Penetrating sealers forgive more. If blush shows up, strip the sealer with a chemical stripper rated for that sealer type, let the slab dry completely, and reapply.
Warping. A slab that isn't flat after demolding was poured in a mold that wasn't level, or it dried too fast on one side. Minor warping (under 1/8 inch over 36 inches) can be shimmed during installation. More than that is a structural problem. Wet-curing both sides evenly prevents most warping.
Staining through sealer. Oil and acid stains that punch through a topical sealer usually mean the sealer has worn off. Strip, re-polish to 400 grit, and reseal. On penetrating sealers, a food oil stain often darkens the surface for a while but wicks out over days. Citrus etching is permanent and needs re-grinding of the affected area.
How does concrete compare to other countertop materials?
Concrete sits in an interesting middle spot. It's softer than granite and chips at edges more easily. It handles heat better than laminate countertops or corian countertops but asks for more maintenance than either. It's in the same durability bracket as butcher block countertops in that both need periodic sealing and reward attention.
| Material | Approx. installed cost (per sq ft) | DIY-able? | Maintenance | Heat resistance |
|---|---|---|---|---|
| Concrete | $65 to $135 | Yes (skilled) | High (reseal annually) | Good (no direct hot pans) |
| Granite | $40 to $100 | No (stone fab required) | Low (seal every 1-3 years) | Excellent |
| Butcher block | $30 to $80 | Yes | Moderate (oil regularly) | Poor |
| Laminate | $15 to $40 | Yes | Low | Poor |
| Corian/solid surface | $45 to $95 | Partial | Low (scratches repair) | Moderate |
| Marble | $75 to $150 | No | High (etches easily) | Good |
Concrete's real edge is total customization. Size, color, embedded objects (glass, stone, shells), integral drain boards, and custom edge profiles are all possible in a single pour. No other material gives you that much design control at DIY material costs.
Its real weakness is that maintenance is not optional and not forgiving. A sealed granite slab you ignore for three years is still fine. A sealed concrete countertop you ignore for three years may have stains that only re-grinding removes. That's the honest trade. If you cook heavily with acidic ingredients and don't want to think about maintenance, cambria countertops or another engineered quartz surface is the more practical pick for your kitchen.
What safety and regulatory issues do you need to know?
Silica exposure is the most serious risk in concrete countertop work. OSHA standard 29 CFR 1926.1153 covers construction activities including any dry cutting, dry grinding, or dry drilling of concrete [4]. "The standard requires that employers limit worker exposure to respirable crystalline silica to 50 micrograms per cubic meter of air, averaged over an 8-hour day," as stated in OSHA's silica standard overview [4]. Wet methods and an N95 or P100 respirator are your primary controls. NIOSH lists wet grinding and wet cutting among its recommended engineering controls for reducing silica exposure during concrete work [11].
Portland cement is also a skin sensitizer. Repeated contact can cause allergic contact dermatitis. The American Contact Dermatitis Society identifies hexavalent chromium in cement as the allergen [8]. Wear nitrile gloves through mixing and casting.
For installed countertops, sealer chemistry matters if the surface will contact food. The FDA regulates food contact substances and coatings under 21 CFR Part 175 and related subchapters [7]. Most reputable concrete sealers state whether they meet food-safe requirements after cure. Check the product's technical data sheet specifically.
On structural loading, your cabinets carry 18 to 20 lb per square foot of slab weight. Most standard cabinet boxes are rated for about 50 lb of countertop load per linear foot under normal kitchen use. A 24-inch-deep, 1.5-inch concrete slab is within that range for spans under 36 inches. For overhangs past 10 to 12 inches without support, either add a steel substrate under the concrete or drop slab thickness to 1 inch and raise the fiber reinforcement.
Building permits for a countertop swap in an existing kitchen usually aren't required across most U.S. jurisdictions. But if you're cutting into plumbing (for a sink relocation) or changing electrical for a new outlet, those trades need permits. Check with your local building department.
Frequently asked questions
How long does it take to make concrete countertops from start to finish?
Plan on 7 to 14 days from first pour to daily use. Demolding happens at 24 to 48 hours, wet curing continues for another 5 days, grinding and polishing takes 1 to 2 days, and the sealer needs 24 to 72 hours to cure depending on the product. Epoxy topcoats need a full 28-day cure before they're fully chemically resistant, though most are safe for light use at 7 days.
Do concrete countertops crack easily?
Concrete countertops crack if the mix has a high water-to-cement ratio, if curing runs too fast, or if unsupported spans exceed about 36 inches without rebar. With a water-to-cement ratio below 0.45, AR fiberglass fiber reinforcement, and proper wet curing, hairline cracking is uncommon and structural cracking is rare. Chips at unsupported edges are more common in daily use than full cracks.
Can I make concrete countertops without special equipment?
You can mix and pour with basic tools, but grinding and polishing need diamond abrasive pads and either an angle grinder or a variable-speed polisher. These rent at most tool rental shops for $40 to $80 per day. Skipping the grinding and just sealing a troweled surface gives you a rougher finish with more pinholes, and it's harder to keep clean.
What thickness should concrete countertops be?
1.5 inches is standard for precast slabs. It's thick enough for structural strength across typical cabinet spans and light enough that two people can handle most sections. Cast-in-place countertops can go to 2 inches for extra mass. Going below 1 inch requires high-fiber or glass-fiber-reinforced cement (GFRC) techniques and is harder to pull off as a beginner.
How do I prevent pinholes in my concrete countertop?
Pinholes come from air bubbles trapped against the mold face. Vibrate the mold sides during pouring with a palm sander pressed against the exterior, pour in thin 1/2-inch layers rather than all at once, and use a plasticizer to improve flowability without adding extra water. Any pinholes that remain get fixed at the 200-grit stage by filling with a cement-pigment slurry.
What kind of sealer is best for a concrete countertop in a kitchen?
A penetrating silane-siloxane sealer applied first, then a food-safe topical sealer (epoxy or polyurethane rated for food contact after cure), gives the best kitchen protection. The penetrating coat blocks moisture from below. The topcoat handles stains from above. Wax alone is not enough for a kitchen surface. Check the sealer's technical data sheet for food-contact compliance.
Can I make a concrete countertop in place (cast in place) instead of precast?
Yes. Cast-in-place means you build the form on top of the cabinets and pour directly. The upside is no heavy lifting. The downside is that the top surface is troweled, not mold-face smooth, so grinding is more work. Dust containment in the kitchen during grinding is also a real problem. Most first-timers get cleaner results with precast face-down in a controlled workspace.
How do I add color to concrete countertops?
Two methods: integral pigment (iron oxide powder or liquid mixed into the batch, typically 1 to 6 percent of cement weight) or acid staining after grinding. Integral color is more predictable and uniform. Acid stain reacts with lime in the concrete and produces organic, variegated color that's impossible to fully control. Both can look great. Choose based on whether you want uniformity or character.
How heavy are concrete countertops and will my cabinets hold them?
A 1.5-inch concrete slab weighs about 18 to 20 lb per square foot. Standard cabinet boxes screwed to wall studs typically handle this load for countertop spans under 36 inches. For unsupported overhangs beyond 10 to 12 inches (at a breakfast bar, for example), add a steel support bracket underneath or consult a structural carpenter before installing.
How often do concrete countertops need to be resealed?
Penetrating sealers typically need reapplication every 1 to 3 years depending on cooking volume and cleaning habits. Topical epoxy or polyurethane coats last 3 to 5 years before they show wear. You'll know it's time when water stops beading on the surface and starts soaking in. Re-polishing and resealing a concrete countertop is straightforward and costs $10 to $30 in materials.
What water-to-cement ratio should I use for concrete countertops?
Keep the water-to-cement ratio at or below 0.45 by weight. Higher ratios raise workability but also raise porosity, shrinkage, and cracking risk. Use a plasticizer (superplasticizer) to get the flow you need without adding water. Measuring by weight rather than volume is the only accurate way to hit a target ratio.
Can you make an outdoor concrete countertop with the same method?
The casting and grinding process is the same, but sealer selection matters more. Outdoor concrete needs a UV-stable topcoat (many indoor epoxies yellow in sunlight) and a sealer rated for freeze-thaw cycling if you're in a cold climate. Penetrating silane-siloxane sealers handle freeze-thaw well. Plan for more frequent reapplication outdoors, roughly every 1 to 2 years.
Is GFRC (glass fiber reinforced concrete) better for countertops than standard concrete?
GFRC uses alkali-resistant glass fibers mixed into a portland cement slurry, which produces a thinner (3/4 to 1 inch), lighter slab with strength comparable to standard 1.5-inch reinforced concrete. The mix and spraying technique are more complex and usually need a pump or spray gun. GFRC is the professional fabricator's choice for large or curved pieces. Standard reinforced concrete is more accessible for first-time DIYers.
Sources
- HomeAdvisor, Concrete Countertops Cost Guide: Professional concrete countertops cost $65 to $135 per square foot installed, with a national average around $85 per square foot (2024 data).
- ASTM International, C150/C150M Standard Specification for Portland Cement: Portland cement Type I or I/II is the standard cementitious binder specified for general concrete work including countertop applications.
- ASTM International, C33/C33M Standard Specification for Concrete Aggregates: ASTM C33 specifies grading requirements for fine aggregate (concrete sand) used in concrete mixes.
- OSHA, Respirable Crystalline Silica Standard for Construction (29 CFR 1926.1153): OSHA's silica standard sets a permissible exposure limit of 50 micrograms per cubic meter as an 8-hour time-weighted average and requires wet methods or engineering controls for concrete grinding and cutting.
- American Concrete Institute, ACI 308R Guide to External Curing of Concrete: ACI recommends a minimum curing period of 7 days for concrete at normal temperatures; concrete reaches approximately 70 percent of design strength at 7 days and 95 percent at 28 days.
- NSF International, NSF/ANSI Standard 51: Food Equipment Materials: NSF/ANSI 51 establishes requirements for materials and finishes suitable for food contact equipment, including coatings applied to food preparation surfaces.
- U.S. Food and Drug Administration, 21 CFR Part 175: Indirect Food Additives, Adhesives and Components of Coatings: FDA 21 CFR Part 175 regulates substances in coatings and adhesives that may contact food, including sealers applied to food preparation surfaces.
- American Contact Dermatitis Society, Cement and Hexavalent Chromium: Hexavalent chromium in portland cement is identified as a primary allergen causing allergic contact dermatitis from repeated skin contact.
- Portland Cement Association, Design and Control of Concrete Mixtures (EB001): Water-to-cement ratios above 0.50 increase porosity and reduce compressive strength; ratios at or below 0.45 are recommended for dense, durable concrete.
- U.S. Environmental Protection Agency, Coal Ash (Fly Ash) Basics: Fly ash used as a supplementary cementitious material improves workability, reduces water demand, and can reduce shrinkage cracking in concrete mixes.
- National Institute for Occupational Safety and Health (NIOSH), Silica Dust Controls for Construction: Wet grinding and wet cutting are among NIOSH's recommended engineering controls for reducing respirable crystalline silica exposure during concrete work.
Last updated 2026-07-09