TL;DR
- Butcher block countertops cost $950 to $2,550 installed for a typical 30-square-foot kitchen, depending on species and finish.
- A DIY install takes 4 to 8 hours with a circular saw, jigsaw, drill, and router.
- You have to seal the wood before use.
- Mineral oil is cheapest but needs reapplication every 4 to 6 weeks.
- A polyurethane or hardwax-oil finish lasts longer and holds up better near a sink.
What do butcher block countertops actually cost?
Material alone runs about $25 to $65 per square foot for solid-wood edge-grain or face-grain slabs, and $100 or more per square foot for end-grain blocks in walnut or teak [1]. A kitchen with 30 square feet of counter costs $750 to $1,950 in wood before anyone touches it.
Labor adds $200 to $600 for a pro, depending on your market and how many cutouts (sink, cooktop) the job needs. So butcher block installed lands between $950 and $2,550 for a midsize kitchen. Most homeowners report right around $1,500 for a standard L-shaped layout with a single undermount sink cutout [2].
If you're a fabricator quoting the work, the numbers move with species, thickness (1.5 inches is standard; 4 inches is a furniture-grade statement piece), and whether you edge-profile and finish in the shop or on-site. A 1.5-inch hard maple edge-grain panel from a wholesale supplier usually lands around $28 to $40 per square foot at wholesale. Adding 30 to 40 percent on top for labor, sealer, and overage is a reasonable starting point.
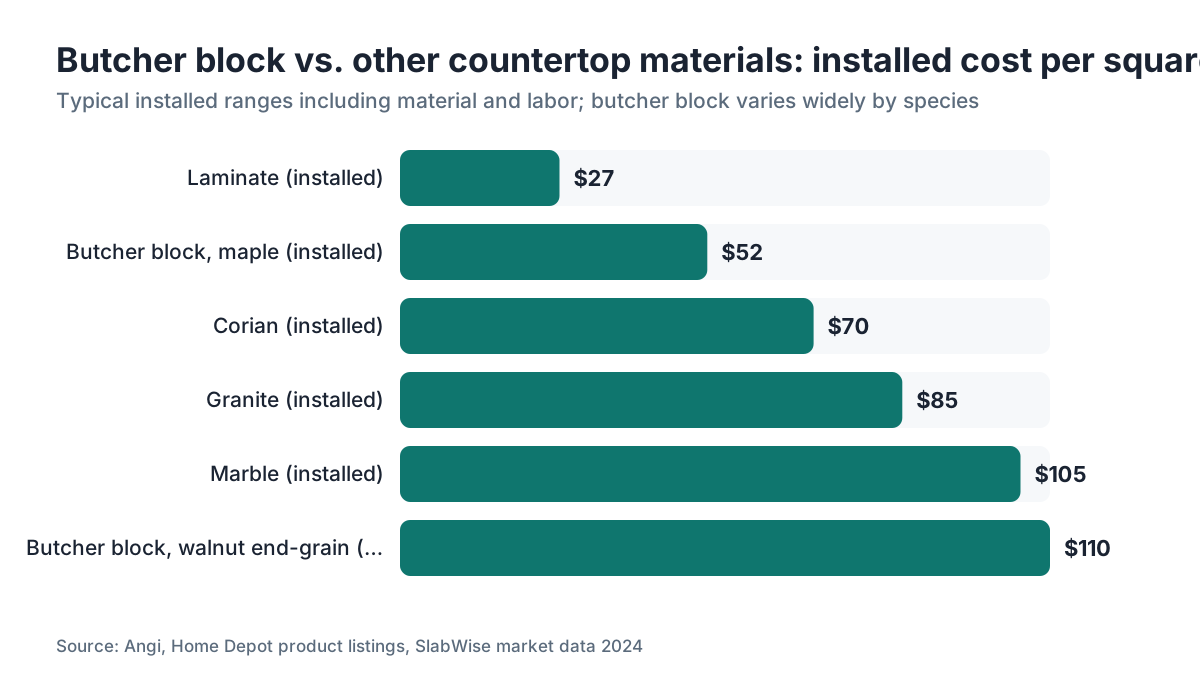
Here's where butcher block sits against the materials people cross-shop:
| Material | Installed cost (per sq ft, typical range) |
|---|---|
| Butcher block (maple, standard) | $30, $75 |
| Butcher block (walnut, end-grain) | $80, $140 |
| Laminate countertops | $15, $40 |
| Granite countertops | $50, $120 |
| Marble countertops | $60, $150 |
| Corian countertops | $45, $95 |
Those ranges come from retailer price surveys and national remodeling cost data. They track lumber prices, so treat them as a baseline, not a quote.
What tools and materials do you need before you start?
Get everything on this list in the room before you cut. Nothing kills a butcher block install faster than stopping mid-job to hunt for a missing bit.
Tools:
- Circular saw with a fine-tooth blade (60-tooth or higher to reduce tearout)
- Jigsaw for sink and cooktop cutouts
- Router with a straight-cutting bit and edge-profile bit (optional but worth it)
- Drill and bits, including a countersink bit
- Belt sander or random-orbit sander with 80, 120, and 180 grit paper
- Tape measure, speed square, and a 4-foot level
- Clamps, at least 4 bar clamps
- Safety glasses and hearing protection
Materials and hardware:
- Butcher block panels (measure carefully and add 2 inches to each dimension before ordering)
- Wood glue rated for kitchen use (Titebond III is food-safe after cure) [3]
- Figure-8 fasteners or z-clips, or wooden expansion clips (NOT screws straight through the cabinet rail, which will crack the slab as the wood moves)
- Sandpaper in the grits listed above
- Your chosen sealer (mineral oil, cutting-board oil blends, food-safe polyurethane, or hardwax oil)
- Silicone caulk for the backsplash seam
- Painter's tape
One word on fasteners. Wood moves with humidity. Rigid fasteners that pull the slab tight to the cabinet frame will eventually crack it. Figure-8 fasteners or expansion clips hold the slab down while letting it slide sideways. This is not optional. It matters more than any other single decision in the install.
How do you measure and cut butcher block countertops?
Measure the existing countertop or the cabinet run twice. Write down the depth (usually 25 inches for standard base cabinets, which gives a 1-inch overhang on the front) and the full length. If you have an L-shaped or U-shaped kitchen, treat each run as its own piece and plan the miter joint location before you order material.
Transfer the measurements to the panel with a straightedge and pencil. Mark the cut line on the face-down side if you're using a circular saw. A standard circular saw blade cuts on the upstroke and will tear out the top surface. With a track saw, you can cut face-up.
For straight cuts, clamp a straightedge guide to the panel. Do not freehand it. A line that's 1/8 inch off over 60 inches leaves a visible gap at the wall. Take the cut slow and steady, especially through 1.5-inch or 2-inch stock.
Sink and cooktop cutouts are where most DIY jobs go wrong. Get a template from the fixture manufacturer (most come in the box). Tape it down, trace it, then drill a 3/4-inch hole just inside the cut line at each corner as a jigsaw starter. Cut with a jigsaw using a downstroke blade to reduce tearout. Have a helper support the cutout piece from below as you finish the last few inches so it doesn't drop and split the wood.
Smooth the cut edges right away with 80-grit, then work up to 120 and 180. Seal cut edges the same day you cut them. End grain drinks moisture faster than anything on the panel and will swell or crack if you leave it raw overnight.
How do you install butcher block countertops step by step?
Here's the actual sequence. Do these in order.
-
Remove the old countertop. Shut off the water and disconnect the sink supply lines and drain first. Most laminate tops are held by silicone and a few screws from inside the cabinet. Run a utility knife along the backsplash seam to break the silicone, then lift.
-
Check that the cabinet tops are level. A long level earns its keep here. Shim low spots with cedar shims before the countertop goes down. Butcher block follows the plane of the cabinet, and a twisted slab looks bad and is hard to fix later.
-
Dry-fit the slab. Set it in place, check the overhang on all exposed sides (1 inch on the front face is standard [7]), and check the gap at the wall (you want no more than 1/8 inch for a tight caulk line). Mark any adjustments.
-
Attach figure-8 fasteners or z-clips to the inside of the cabinet rail. Space them every 16 to 24 inches. Pre-drill the matching slot into the underside of the slab (a 3/4-inch Forstner bit works well). The fastener should sit in the slot with room to slide.
-
If two pieces meet at a corner, run a bead of wood glue or construction adhesive on the miter joint. Clamp it tight and let it cure before moving on.
-
Set the slab in place and snug down the fasteners. Do not overtighten.
-
Reinstall the sink. Drop-in sinks are simple. Undermount sinks need to be epoxied and clamped to the underside of the slab before it goes in, or held with a sink installation kit after the slab is down. Silicone every seam between the sink rim and the wood.
-
Caulk the backsplash seam with a color-matched silicone. Do not use rigid grout or caulk here. The wood moves seasonally and a rigid joint will crack.
-
Apply your finish. This comes last, after every cut and fitting is done, and it's the step that decides whether the counter survives its first year. See the sealing section below.
For how this fits into a full countertop job, see our guide on countertop installation.
How do you seal a butcher block countertop?
Sealing is where people make the wrong call, and it shows within a year. Start with one question: what is the counter for? A dedicated cutting surface or prep zone where you want raw, renewable wood wants food-safe oil. A regular countertop that sees water, coffee, wine, and daily wiping needs a film-forming finish.
The four main options:
-
Food-safe mineral oil or cutting-board oil blends. USP-grade mineral oil (the same stuff sold as a laxative at the pharmacy) is cheap and food-safe [4]. Flood the surface, let it soak 20 minutes, wipe off the excess, and repeat. The first application usually takes 3 to 5 coats over two or three days. Then you reapply every 4 to 6 weeks. It never hardens into a film, so it gives you zero water resistance. Water raises the grain and grays the sink area over time. Good for a chopping island. Wrong for a sink run.
-
Hardwax oil (Rubio Monocoat, Osmo Polyx). These penetrate and harden slightly, adding more water resistance than plain mineral oil while staying repairable. Rubio Monocoat states that one coat is enough for most interior surfaces when applied correctly [5]. They're food-safe after a cure that takes 5 to 7 days. This is the finish most fabricators reach for now when butcher block needs to look good without heavy build.
-
Food-safe polyurethane (water-based or oil-based). This builds a hard plastic film on top of the wood. It's the most water-resistant option and asks for almost no maintenance. The trade-off: it looks like a film, it chips and scratches as a sheet rather than wearing gracefully, and when it fails you strip and sand, you don't spot-repair. Apply 3 coats (sand lightly with 220 grit between them), let it cure fully (water-based 24 hours, oil-based 72 hours), and keep water off it during cure.
-
Tung oil or Danish oil. Penetrating finishes with some curing. Pure tung oil (not "tung oil finish," which is often a varnish blend with barely any tung oil) is food-safe after full cure. It takes more coats and more time than hardwax oils, and the food-safe claim covers only pure tung oil, never the blended products. Read labels closely.
How to seal butcher block, step by step, using hardwax oil as the example:
- Sand to 150 grit with a random-orbit sander, then finish by hand along the grain.
- Vacuum and tack-cloth every speck of dust. Dust trapped under a finish coat is permanent.
- Apply a thin, even coat with a lint-free cloth or white scotch-brite pad, working with the grain.
- Let it penetrate 3 to 5 minutes, then buff off the excess with a clean cloth. No puddles. Puddles dry tacky.
- Let it cure 24 hours at room temperature before a second coat, if you need one.
- Wait out the full cure (5 to 7 days for hardwax oils) before the counter goes into daily service.
The near-sink strip is the highest-risk zone on the whole top. Wherever water pools, reseal more often no matter what finish you chose. Reseal that strip every 6 months even when the rest of the counter looks fine.
Can you install butcher block countertops yourself, or should you hire out?
Most homeowners with basic woodworking experience can do this in a day. The skills are measuring carefully, making straight cuts with a guided circular saw, and staying patient through the finishing.
Where people trip: sink cutouts (easy to wander off the curve, or drop the cutout and crack it), getting the miter tight at an inside corner, and forgetting the expansion gap at the walls.
A galley kitchen with no sink cutout and square 90-degree cuts is a genuine beginner project. A farmhouse sink with a custom cutout, a 45-degree miter at a corner, or a wavy wall that needs the back edge scribed is different. Hire a pro, or at least bring in someone who's done it.
Professional installation runs $200 to $600 in most markets [2]. That's a small slice of the total, and cheap insurance against a $500 slab cracking on a bad cut. In a complicated kitchen, the labor pays for itself.
To see how other surfaces handle install complexity, read our kitchen countertops guide.
What mistakes do most people make installing butcher block?
These show up in every forum thread and every call to a fabricator asking how to fix a bad DIY job.
Rigid fasteners. Screwing straight down through the cabinet rail into the slab is the single most common mistake. The screw holds the wood still, the wood moves anyway, and the slab cracks around the screw hole. Always use expansion hardware.
Sealing only some of the sides. Every cut edge, the bottom face, the back edge against the wall. Bare wood pulls moisture from any unprotected surface. Seal the top and forget the bottom, and you'll get cupping within months in a humid climate.
Rushing the finish. Putting the counter into service before the sealer cures is everywhere. You run water the next morning and the finish turns white or goes tacky. Read the cure time on your product and respect it.
Over-tightening the sink clips. A little over-torque pulls the wood down around the cutout, and over time it can crack out from a sink corner. Snug, not cranked.
Ignoring seasonal movement. In humid summer months a 60-inch-wide panel can expand 1/8 to 1/4 inch, depending on species and moisture content [6]. Cut the panel flush to the wall with no gap, caulk it rigid, and something has to give.
How do you handle sink cutouts in butcher block?
The sink cutout is the highest-stakes moment of the install. Blow it and you've wrecked the most expensive part of the job.
For a drop-in sink, the opening just has to clear the basin with enough rim overhang to catch the sink clips. Trace the template exactly, drill your corner starter holes, and cut slowly.
An undermount sink is trickier in wood than in stone, because you can't bond to the underside with standard stone adhesive. The usual method is a silicone bead around the rim plus undermount brackets that clamp from inside the cabinet. Some installers add a two-part marine epoxy for holding power. The part that matters most: seal the entire cutout edge before the sink goes in. That end-grain edge lives in constant sink splash and humidity. Three coats of sealer on it, minimum.
Let the sealer cure fully before you set the sink and hook up the supply lines. Do not rush this one.
How do you join two pieces of butcher block at a corner?
An inside corner or L-shaped run needs a joint. You've got two options: a straight butt joint (one piece butts against the end of the other) or a 45-degree miter (both pieces cut at 45 degrees and meeting at the corner).
A butt joint is easier to cut and easier to get right. The downside is it shows the end grain of one panel.
A miter looks cleaner but demands accurate cuts and square walls. If your walls aren't square, the miter opens a visible gap at one end.
Either way: brush Titebond III or a waterproof wood glue on both mating faces, clamp the joint, and let it cure 24 hours before you move the assembly [3]. For long joints, biscuits or dominos keep the faces aligned while you clamp.
After the glue cures, sand the joint flush with a belt sander starting at 80 grit, then work up. A belt sander is faster and more controllable than a random-orbit for leveling a joint. Any gap or step left in the joint telegraphs through every sealer coat you put down.
To see how butcher block stacks up against other kitchen surfaces, read our butcher block countertops overview.
How do you maintain butcher block countertops after installation?
Daily care is easy. Wipe with a damp cloth and mild dish soap. Dry it promptly, especially near the sink. Never let standing water sit.
On oil-finished surfaces, reapply mineral oil or cutting-board oil every 4 to 6 weeks, or whenever the wood looks dry. The surface tells you. It goes lighter and matte in patches as the oil runs out.
Polyurethane-finished surfaces behave more like a hard floor. Wipe clean, skip abrasive scrubbers, and refinish the top every few years when the film wears through.
Hardwax-oil finishes take a touch-up by hand: rub a little fresh product into the worn spot. You repair it in place, no stripping the whole top, which is the real advantage over polyurethane.
Deep scratches and gouges are fixable on any oil finish. Sand the area with 80-grit, work up to 180, and reseal. On a film finish like polyurethane, spot repairs show. Full sanding and recoating is the only way to make it uniform again.
To compare how other natural surfaces age, see how to clean stone countertops.
Fabricators who want to speed up quoting for butcher block and other materials can see how SlabWise handles material pricing, cutout complexity, and job costing at slabwise.com.
How long does installing butcher block countertops take?
For a straight galley kitchen with no sink cutout, a DIYer working alone can cut, fit, and fasten in 2 to 3 hours. Add the sink cutout and you're at 4 to 5. Add a corner joint and an L-shaped layout, and 6 to 8 hours is honest for a first-timer.
Fabricators running this as routine work finish a standard kitchen with one sink cutout in 2 to 4 hours.
The finish adds time that's mostly waiting. An oil finish takes 2 to 3 days of repeated coats before the counter takes light use. A polyurethane finish wants 24 to 72 hours between coats and full cure before water touches it. Plan the job for a stretch when you can live without the kitchen sink for at least 48 hours.
If you're weighing alternatives that install faster because there's no on-site finishing, laminate countertops or Formica countertops are worth a look for a budget renovation.
Frequently asked questions
How do you seal butcher block countertops?
Sand the surface to 150 grit, remove all dust, and apply your finish. Food-safe mineral oil soaks in and needs reapplication every 4 to 6 weeks. Hardwax oils like Rubio Monocoat penetrate and harden slightly, giving more water resistance with one or two coats and a 5 to 7 day cure. Polyurethane builds a hard film, needs 3 coats, and is the most water-resistant option but the hardest to repair.
How do you seal a butcher block countertop near the sink?
The strip within 6 inches of the sink is the wettest zone on any butcher block top. Use a film-forming finish (polyurethane or hardwax oil) there, not plain mineral oil. Apply 3 coats to that strip, seal the underside of the cutout edge before the sink goes in, and reseal the sink area every 6 months no matter how the rest of the counter looks.
Can I use butcher block countertops as an actual cutting surface?
Yes, if you finish them with food-safe oil rather than polyurethane. A film finish like polyurethane chips and scratches under a knife, and flakes of film are not something you want in food. Mineral oil or pure tung oil finishes are food-safe after cure and let you sand and re-oil the surface when it shows wear.
What is the average cost of butcher block countertops installed?
Most homeowners pay $950 to $2,550 for butcher block installed in a midsize kitchen (25 to 35 square feet). Material alone runs $25 to $65 per square foot for standard maple or birch edge-grain, with walnut end-grain reaching $100 or more per square foot. Professional installation adds $200 to $600 in most markets, depending on cutouts and miter joints.
How do you install an undermount sink in butcher block?
Seal the cutout edge thoroughly before the sink goes in. Apply at least 3 coats to the end-grain edge, let it cure, then set the sink with undermount brackets from inside the cabinet plus a bead of silicone around the rim. Marine epoxy can supplement the silicone for extra hold. Don't put the sink into service until the silicone has cured, usually 24 hours.
How long do butcher block countertops last?
A properly sealed and maintained butcher block countertop can last 20 years or more. The wood is refinishable: deep scratches and worn finish sand back and reseal again and again. The failure modes are water damage at a poorly sealed sink cutout, cracking from rigid fasteners that block wood movement, and neglect that lets the wood dry out and split.
Is butcher block cheaper than granite?
Usually yes, especially at the low end. Standard maple butcher block installed runs $30 to $75 per square foot total. Granite typically runs $50 to $120 installed. But premium species like walnut end-grain reach $80 to $140 per square foot, overlapping mid-range granite. The gap narrows once you factor in that butcher block needs more ongoing maintenance.
What thickness of butcher block should I buy for countertops?
The industry standard is 1.5 inches, which gives enough strength for 24-inch-deep base cabinets without overhangs longer than 12 inches. For a kitchen island with bar seating and a 12 to 15 inch overhang, 2-inch or 2.5-inch stock adds stiffness [7]. The 4-inch furniture-grade slabs you see in showrooms are mostly decorative.
Can butcher block countertops be installed over existing countertops?
Technically yes, but it makes trouble. The existing top has to be flat and stable. The added height (usually 1.5 inches) throws off your sink depth, dishwasher clearance, and under-counter appliance fit. If the old surface has any flex or hollow spots, the butcher block cracks over those voids. Most pros pull the old top.
Do I need to seal the underside of butcher block countertops?
Yes. A bare underside absorbs moisture from below (humidity, under-sink leaks, condensation) and cups the slab. Put at least one coat of mineral oil or your chosen finish on the bottom face and back edge before installation. Most manufacturers say finish all six faces of the panel.
How do you fix a butcher block countertop that has cupped or warped?
Minor cupping (less than 1/4 inch across the width) sometimes corrects if you dampen the concave side and weight it flat over 24 to 48 hours, then seal the dry side more aggressively. Severe warping usually means pulling the slab, letting it fully equilibrate in a dry space, and reinstalling with proper expansion hardware. Warping from rigid fasteners may need a replacement.
What wood species is best for butcher block countertops?
Hard maple is the standard for good reason: it rates 1,450 lbf on the Janka scale, has a tight grain that resists moisture, takes a finish well, and stays affordable [8]. Walnut looks great but is softer (1,010 lbf) and shows knife marks faster. Cherry and oak sit in between. Teak resists water thanks to natural oils but costs a lot and is sometimes sourced poorly.
Can you put a hot pan directly on butcher block countertops?
No. Direct heat scorches the wood and damages any finish, regardless of finish type. Use a trivet or hot pad. Repeated heat also dries the wood and speeds up finish failure near a cooktop. If you have a cooktop cutout in butcher block, keep heat-resistant silicone mats nearby and treat it as a firm rule.
Sources
- Home Depot, Butcher Block Countertop Product Listings: Butcher block countertop panels retail from approximately $25 to over $100 per square foot depending on species and construction type
- Angi, Butcher Block Countertop Installation Cost Guide: Professional installation of butcher block countertops typically adds $200 to $600 to the material cost; total installed cost averages around $1,500 for a midsize kitchen
- Titebond, Titebond III Ultimate Wood Glue Technical Data Sheet: Titebond III is food-safe after cure per FDA regulation 21 CFR 175.105 for indirect food contact
- U.S. Food and Drug Administration, Code of Federal Regulations Title 21 (mineral oil, 21 CFR 178.3620): USP-grade mineral oil is recognized for incidental food contact under FDA 21 CFR 178.3620
- Rubio Monocoat, Product Application Guide for Countertop Surfaces: Rubio Monocoat states that a single coat is sufficient for most interior wood surfaces including countertops when properly applied
- USDA Forest Products Laboratory, Wood Handbook: Wood as an Engineering Material (General Technical Report FPL-GTR-282): Hardwood panels expand or contract measurably across the grain with seasonal humidity changes, on the order of 1/8 to 1/4 inch over a wide panel depending on species
- National Kitchen and Bath Association (NKBA), Kitchen Planning Guidelines: Standard kitchen countertop overhang is 1 inch on the front face of base cabinets; bar seating overhangs of 12 to 15 inches are recommended for knee clearance
- The Wood Database, Janka Hardness Ratings for Domestic Hardwoods: Hard maple rates 1,450 lbf on the Janka hardness scale; American walnut rates 1,010 lbf
- U.S. Census Bureau, American Housing Survey: Kitchen countertop replacement is among the most common remodeling projects reported by homeowners in the American Housing Survey
- Remodeling Magazine, 2024 Cost vs. Value Report: Minor kitchen remodels including countertop replacement have an average national cost around $27,000, with countertop materials representing a significant share
Last updated 2026-07-09