TL;DR
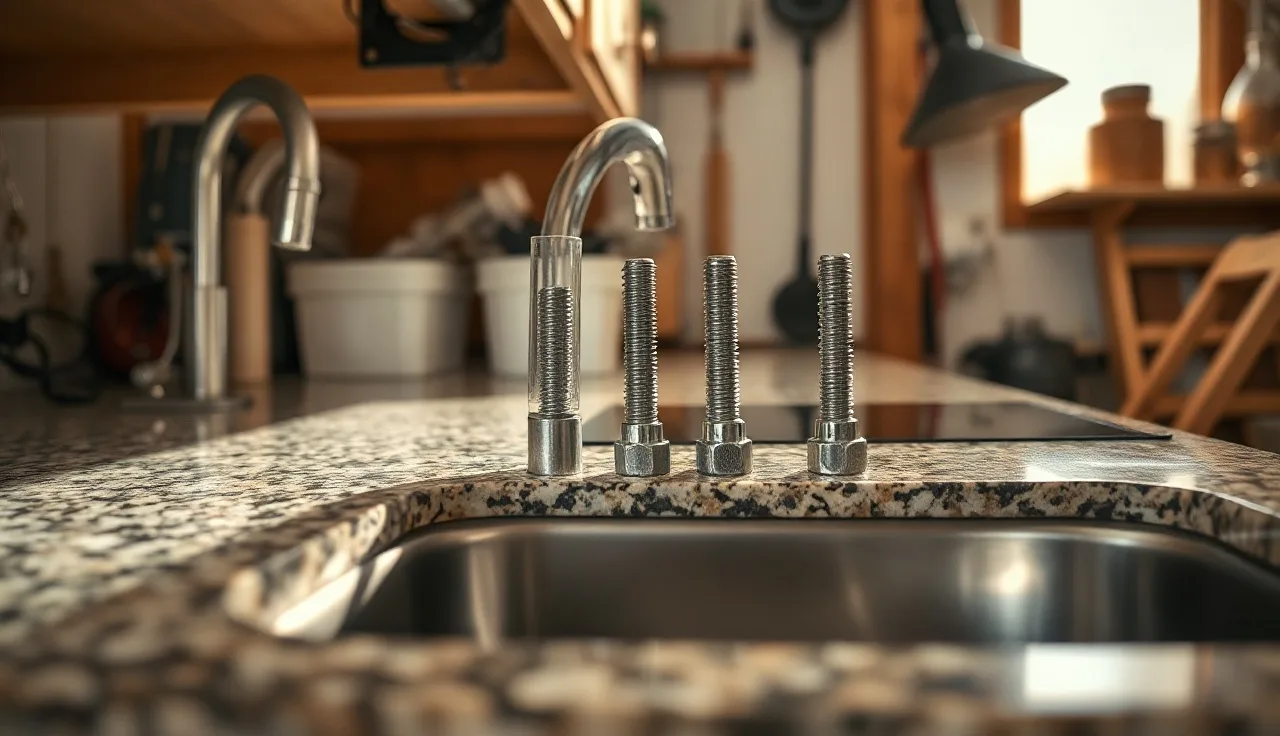
- A sink clip system is a set of metal clips and threaded rods that clamp an undermount sink against the underside of a countertop from below.
- Most kitchen installs use 12 to 16 clips, spaced every 6 to 8 inches around the sink rim.
- Clips work with silicone, not instead of it.
- Neither one alone gives you a safe, lasting hold.
What exactly is a sink clip system?
A sink clip system is the mechanical hardware that holds an undermount sink tight against the underside of your countertop. You never see it once the kitchen is done, which is the whole idea. The clips sit below the counter surface and clamp the sink rim up against the stone, quartz, or solid-surface material from underneath.
The parts are simple. There's a clip body, usually stamped steel or cast zinc, that hooks over the sink's mounting flange. A threaded rod or bolt runs up from the clip into an anchor drilled or epoxied into the underside of the countertop. A nut at the top of the rod tightens the assembly and pulls the sink up flush. Add a silicone bead around the perimeter, and that's your undermount installation.
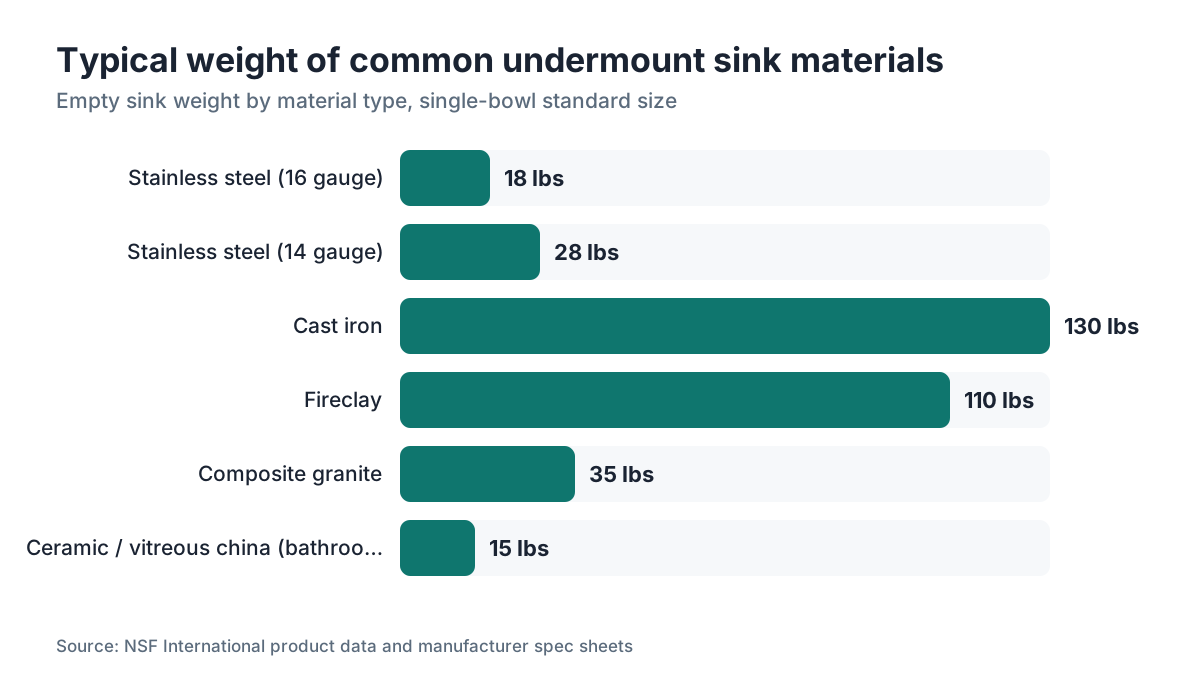
The system matters because undermount sinks carry real weight. A standard stainless steel undermount kitchen sink weighs roughly 15 to 30 pounds empty [1]. Fill it with water, stack it with dishes, drop in a cast iron skillet, and that number climbs fast. Clips spread the load around the entire perimeter instead of asking adhesive to do all the work.
The phrase "sink clip system" gets thrown around loosely. Some fabricators mean the manufacturer-packaged kit that ships with a sink. Others mean whatever combination of clips, anchors, and silicone they pull off the supply shelf. Both meanings are fine. Just know which one you're dealing with before you order parts.
How does a sink clip system actually work?
The working principle is compression. Each clip grips the underside of the sink's rim flange, and tightening the threaded rod pulls the sink upward, squeezing the silicone bead between the sink rim and the countertop. Get the tension right and you get a watertight seal with no flex.
Here's the sequence on a typical stone job. The fabricator cuts the sink cutout, then either epoxies threaded anchor studs into holes drilled into the bottom of the slab, or drops the rod into a plastic or metal anchor bonded into the stone. The sink goes up from below with a silicone bead already run along the rim. Clips hook onto the flange one by one. Each nut gets hand-tightened, then snugged with a basin wrench or nut driver, working around the sink in an alternating pattern like you'd torque a cylinder head.
That alternating pattern is not optional. Crank one side down before the other side is even hand-tight and you can crack the countertop near the cutout corners, which are already stress points in brittle stone. Experienced fabricators do this without thinking. DIYers usually don't know it's a thing.
Most clip systems call for spacing of 6 to 8 inches around the sink perimeter [2]. A standard 33-inch kitchen sink with a roughly 96-inch perimeter needs 12 to 16 clips to hit that spacing. A small bar sink gets by with 8 to 10.
The silicone seals. The clips hold. Pull the clips off a properly cured silicone installation and the bond often holds fine in the short term. Pull the silicone and the clips alone will not stop water from getting past the rim. Both parts share the job.
What are the main types of sink clip systems?
Four clip types show up in a countertop shop or on an install job.
Standard J-hook clips with threaded rod. The most common by far. A bent steel clip hooks over the sink flange, and a threaded rod runs up into an epoxied anchor in the stone. Works on nearly every thickness from 3/4 inch to 1.5 inch. These are the workhorses in most fabrication shops.
Integrated clips with a toggle or wing nut. Some kits skip the separate anchor and use a clip you tension with a single wing nut from below. Faster to install, but the hold is only as strong as the epoxy or adhesive bond. You see these more on laminate and solid surface, where you can drill from below without worrying about fracturing stone.
Rail or bar-mount systems. A continuous aluminum or steel channel bonds to the underside of the countertop, and clips slide into the channel at any position. You can adjust clip placement after the channel is bonded, which helps when sink flanges don't land in convenient spots. High-volume shops like these because setup is quick.
Specialty systems for thick stone or apron-front conversions. Working with 2cm stone on a plywood substrate, or retrofitting a farmhouse sink? Standard clips often can't reach. Extended-reach clips, Z-clips, and L-brackets handle those cases. Nothing exotic. Any stone supply distributor stocks them.
The table compares the four on the things that actually matter at install time.
| Clip Type | Best Substrate | Anchor Method | Typical Cost per Kit | DIY-Friendly |
|---|---|---|---|---|
| J-hook with threaded rod | Stone (granite, quartz, marble) | Epoxy anchor in stone | $15-35 | Moderate |
| Wing-nut integrated | Laminate, solid surface, tile | Drill-through or epoxy | $10-20 | Yes |
| Rail / bar-mount | Any, especially high-volume shops | Channel bonded to substrate | $25-60 | No |
| Extended-reach / Z-clip | Thick stone, plywood-backed, apron-front | Epoxy or mechanical | $20-45 | Moderate |
Do you always need clips, or can you just use epoxy or silicone?
This comes up constantly. The honest answer depends on the substrate, but for stone, you nearly always want clips.
Neutral-cure silicone reaches tensile adhesion of roughly 35 to 60 psi on clean stone [3]. Sounds strong, until you measure the actual contact area on a sink rim, which is narrow, then add the dynamic loads from a full basin, garbage disposal vibration, and thermal cycling. Silicone's peel resistance is much lower than its tensile strength. A sink pulling down and away from the stone is applying mostly peel load, not clean tension.
Epoxy bonded directly to the underside of the slab, no clips, is the other route some fabricators take. Two-part stone epoxy can top 2,000 psi tensile strength when it's mixed right and applied to a prepared surface [4]. On clean, dry, well-abraded stone with good coverage, epoxy alone can hold a sink for decades. A few high-end shops use this method exclusively on natural stone. The catch is that it's permanent. Removing an epoxied undermount sink without wrecking the countertop is brutal work.
Clips plus silicone gives you redundancy. If the silicone softens from a harsh cleaner (it happens, especially with non-neutral-cure products on certain stones) the clips still hold. If a clip corrodes and fails, the silicone still holds. That backup is why most residential installations use both.
For laminate like Formica or Corian solid surface, epoxy is usually the wrong call. The substrate isn't porous the way stone is, and it can flex. Clips matter more there, not less.
One case where clips alone, no silicone, are fine: commercial jobs where frequent sink swaps are expected. A hotel renovation crew wants to pull and replace sinks without demoing the counter. Some commercial clips are built for exactly that, using a compressible gasket instead of silicone.
What countertop materials work with standard sink clip systems?
Sink clip systems were built for stone, and stone is where they work best. Granite, quartz, quartzite, and marble all have enough compressive strength at the cutout rim to take the clamping load without cracking, as long as the clips are torqued carefully and spaced right [2].
For granite countertops and marble countertops, the epoxy anchor method dominates because both materials stay reliably rigid. The anchor hole is usually 3/8 inch across, drilled 3/4 to 1 inch deep into the bottom of the slab, then filled with two-part epoxy before the stud goes in. Cure time before you load the joint is 24 hours minimum at 70°F on most epoxy data sheets [9].
Quartz surfaces like Cambria countertops follow the same protocol as natural stone. The engineered resin matrix is dense enough to hold anchors, and Cambria's own installation guide calls for mechanical clip support on every undermount sink [10].
Laminate countertops use clips too, but with a different anchor approach, because drilling into the laminate from below risks delamination. Here you use a clip that hooks the sink flange from below and tensions against the underside of the substrate (usually particleboard), not through it.
Butcher block countertops are their own animal. Wood moves seasonally, so rigid epoxy anchors can crack the joint over time. Clips with a little mechanical give work better. Silicone choice matters more here too: use a neutral-cure, mold-resistant product to keep moisture out of the wood.
Thin porcelain slabs (under 12mm) are the one material where standard clips get genuinely tricky. The slab is brittle and thin, and drilling an anchor carries real fracture risk. Rail systems or full-perimeter epoxy bonding to a substrate are the safer bets there.
How many clips does an undermount sink installation need?
The right number of clips comes from perimeter length, not from sink size category. Industry standard spacing is one clip every 6 to 8 inches around the sink rim [2]. Measure the full perimeter of your sink's mounting flange and divide by 7 inches (a fair midpoint) for a working count.
A typical single-bowl kitchen sink running 33 inches front to back by 22 inches has a perimeter of roughly (33+33+22+22) = 110 inches. At 7-inch spacing, that's about 16 clips. Kits usually come in 10-clip increments, so buy a 20-clip kit and keep the spares.
Under-clipping is one of the more common DIY mistakes. Eight clips on a large sink feels like plenty. But if those 8 clips are 13 inches apart, the rim flexes between anchor points under load. That flex works the silicone joint and eventually opens a leak.
Over-clipping is almost never a problem. It just takes longer. If you have a 10-clip kit and the math says 8, use all 10 and space them evenly.
One rule on corners: always put a clip within 2 inches of each inside corner of the cutout. Corners are where the countertop is most likely to crack from downward load on the sink, and a clip close to each corner sends that load back into the slab efficiently.
What silicone sealant should you use with sink clips?
Not all silicone is the same, and the difference bites you in a wet, chemical-heavy spot like a sink cutout.
Neutral-cure silicone is the standard choice for stone. Acid-cure (acetoxy) silicone releases acetic acid as it cures, and that acid can etch polished marble, limestone, and some granites [5]. If it smells like vinegar during cure, you're using an acid-cure product. For stone, verify the label says "neutral cure" or "non-acidic" before you run a bead.
For mildew resistance, look for an antimicrobial additive, which matters in a kitchen where organic gunk collects in the joint. ASTM C920 is the specification for building sealants. Per ASTM, C920 covers "elastomeric joint sealants" and sets minimum requirements for adhesion, elongation, and weathering [6]. A product certified to it has cleared that bar.
How much to apply: a bead 3/16 inch to 1/4 inch across, run continuously around the sink flange before install. Once the clips are tight, some squeeze-out is normal and welcome, because it confirms full coverage. Tool the exterior bead smooth with a wet finger before it skins.
Cure time before you run water: 24 hours for most formulations. Some fast-cure products claim 4 to 8 hours. Label aside, I wouldn't hit a fresh joint with a full sink of water for at least 12 hours. The clips carry the load during cure anyway. The silicone is just building its bond.
Can a homeowner install an undermount sink with a clip system, or is this a fabricator job?
It depends on the countertop material, and that answer isn't a dodge.
For laminate, solid surface, or tile, a capable DIYer can install an undermount sink with a clip system. The cuts and drilling don't need stone tools, a mistake costs less, and most manufacturers pack a full hardware kit with instructions.
For natural stone or engineered quartz, the countertop is almost always already in place when the sink goes in. The fabricator has usually pre-drilled or pre-placed the anchor points at templating or installation. If yours didn't, you're now drilling into hardened granite or quartz from below in a cramped cabinet, which needs a diamond-tipped core bit, a drill guide to hold the angle, and patience. Doable, but genuinely miserable work.
The more common DIY scenario is a sink swap. The old sink failed or you want an upgrade, the anchors are already in the stone, and you're sourcing the right clips and re-sealing. That's a reasonable weekend project. The step that makes or breaks it is cleaning every trace of old silicone off both the stone and the sink flange before you apply new sealant. Old silicone doesn't bond to itself. Skip that cleaning and the replacement sink leaks.
Fabricators who quote and manage jobs with tools like SlabWise's countertop quoting software track sink cutout specs and hardware per job, which helps make sure the right clip hardware ships with the right slab. That kind of coordination prevents field problems instead of chasing them later.
One practical warning: some undermount sink makers, especially for cast iron and fireclay, require specific manufacturer-approved clip systems and will void the warranty if you use others. Read the documentation before you buy third-party hardware.
What can go wrong with a sink clip installation?
A handful of failure modes come up again and again.
Anchor pullout. The epoxy anchor in the stone lets go, usually because the hole wasn't clean and dry before bonding, or the epoxy wasn't fully mixed. Surface contamination from cutting fluid, dust slurry, or water is the top cause. The fix is a thorough acetone wipe of the drilled hole and dry time before the epoxy goes in.
Cracked countertop at the cutout corners. Almost always from uneven clip tightening or clips set too far from the corner. Stone is strong in compression, weak in tension, and the inside radius of a sink cutout concentrates stress. Good fabricators cut a larger inside radius (1/2 inch minimum is common) specifically to lower this risk.
Corrosion. Cheap zinc clips in a permanently wet spot corrode within a few years. The body weakens, and the threaded rod seizes or snaps. Stainless steel clips cost a little more and last indefinitely. On any install you want to keep, the upgrade pays for itself.
Silicone failure from the wrong product. Acid-cure silicone on marble or limestone etches the stone at the bond line. The bead may look fine while the stone underneath is damaged and adhesion is shot. Use neutral-cure on natural stone. Every time.
Under-torqued clips. The silicone bead needs compression to fully wet out and bond. Clips left only hand-tight let the sink hang slightly loose, and the silicone never grabs both surfaces properly. Tighten with a nut driver or basin wrench until snug, then a quarter turn more. Don't overtighten, which cracks thin stone, but don't stop at hand-tight either.
How do you replace an undermount sink without damaging the countertop?
Sink replacement drives a lot of the calls fabricators get, and the answer is usually the same: the silicone is the hard part, not the clips.
Step one is the clips. Loosen and remove each nut from below. The clips should drop free or come off by hand. If the rods are corroded, hit the threads with penetrating oil, wait 15 minutes, and try again. If the rod itself is epoxied into the stone (deeper than just the anchor), you may have to cut it flush with the stone using a rotary tool.
Step two is the silicone. Run a thin flexible putty knife along the seam between the sink flange and the stone to break the bond. Work slowly. Yanking the sink down while the bond is still intact can crack the stone. A hook-style sealant removal tool makes this easier. Some fabricators use a thin oscillating blade.
Once the old sink drops free, clean both surfaces obsessively. Old silicone has to come off the stone and off the new sink's flange before new silicone goes on. A plastic scraper takes the bulk, a razor blade takes the residue, and acetone wipes the surface clean. Any silicone left behind leaves voids in the new bead, and voids become leaks.
For countertop installation in general, keeping documentation from the original fabricator about anchor placement and clip count makes replacement far easier. Worth requesting when your countertop is installed, and worth filing where you'll find it.
How much does sink clip hardware typically cost?
Hardware cost is tiny next to the labor it protects. A standard 10-clip kit with rods and epoxy anchors runs $15 to $35 at stone supply distributors. Premium stainless kits with 20 clips run $35 to $65. Rail systems start around $25 and reach $80 for longer spans.
Silicone is a separate line. A professional-grade neutral-cure kitchen silicone in a 10-ounce cartridge costs $8 to $18. Most single-sink installs use one cartridge.
Epoxy for anchors often comes in two-part syringe kits. Stone-specific two-part epoxy (polyester or acrylic based) runs about $12 to $25 per syringe kit, which covers 10 to 15 anchor holes.
Total hardware for a single undermount kitchen sink lands between $40 and $120, depending on clip type and quantity. That's a rounding error against a $500 to $4,000 countertop [7], which is exactly why cutting corners on hardware makes no financial sense.
Shops usually buy clip hardware in bulk from stone supply distributors. Per-unit cost drops hard at volume: a 100-clip box often comes out under $1 per clip. High-volume fabricators tend to fold hardware into their per-square-foot price instead of itemizing it on the quote.
Frequently asked questions
What is the difference between a sink clip and a sink bracket?
The terms get used interchangeably. Technically a clip hooks over the sink flange and tensions with a single threaded rod, while a bracket is a more rigid L-shaped or Z-shaped piece that bolts to the cabinet or substrate on its own. In practice, most residential systems called 'brackets' work the same way as clips. Check the anchor method, not the name, when you evaluate hardware.
Can you reuse sink clips when replacing an undermount sink?
You can reuse clips if they show no corrosion and the threads run clean. The anchors set in the stone are almost always reusable. What you cannot reuse is the silicone: it has to be fully removed and replaced. If the clips are cheap zinc hardware more than 5 years old, replace them. They cost little enough that reusing marginal parts on a fresh install isn't worth the risk.
How long does it take for sink clips to fully hold after installation?
The mechanical hold from clips is immediate. The silicone bond reaches handling strength in 1 to 4 hours and full cure in 24 hours at 70°F and 50% relative humidity. Cold or dry air slows the cure. Don't submerge or heavily stress the joint for at least 12 to 24 hours. Clips carry the full load during that window, which is exactly why you want both.
Do undermount sink clips work for cast iron or fireclay sinks?
Yes, with caveats. Cast iron undermount sinks can weigh 100 to 200 pounds empty. Standard clip systems rated for 30 to 50 pounds aren't enough. Heavy sinks need heavy-duty clips, more anchor points, or perimeter support brackets resting on the cabinet base. Many cast iron and fireclay makers specify their own approved hardware. Read the manufacturer's installation guide before you pick clips.
What is the best epoxy for sink clip anchors in granite or quartz?
Two-part polyester or acrylic stone epoxy rated for countertop use is the standard. Products from brands like Akemi, StonePro, or Tenax are sold specifically for stone fabrication. Look for tensile strength above 1,500 psi, compatibility with your stone, and enough working time to set anchors before it gels. Mix ratios matter: follow the manufacturer's spec exactly to reach full strength.
Can sink clips be used on quartz countertops without drilling?
Some clip systems bond an anchor pad to the underside of the quartz with a structural adhesive, no drilling. These work reasonably on engineered stone where drilling risks chipping, but adhesive-only anchors are generally rated for lighter sinks. For a standard stainless sink, a drilled and epoxied anchor is still more reliable. Drilling quartz needs a diamond core bit, water cooling, and low RPM to avoid cracking.
How do you know if your undermount sink clips have failed?
The earliest sign is a visible gap opening between the sink rim and the countertop, often first at one corner. Water pooling under the counter near the cutout is another. Cabinets below the sink swelling or showing water stains mean the seal has been failing for a while. A sink that moves when you press on it is a clip failure until proven otherwise. Don't ignore any of these. Water damage compounds fast.
Are sink clip systems required by building code?
No U.S. building code names sink clip systems specifically. The International Residential Code requires plumbing fixtures to be properly installed and supported [8], but leaves the method to manufacturer instructions and installer judgment. That said, installer liability and manufacturer warranties often require clips in practice. If a sink falls and damages property or injures someone with no fasteners used, the absence of clips creates real liability exposure [11].
What's the difference between a top-mount and undermount sink clip installation?
Top-mount (drop-in) sinks rest on the counter surface with the rim above the counter, and clips pull up from below to hold the rim against the edge. Undermount sinks hang below, flush with or just under the counter surface. The mechanisms look similar, but the force runs opposite: drop-in clips pull down and toward center, undermount clips pull up. The two hardware types aren't interchangeable.
Do you need special clips for an undermount sink in a bathroom vanity?
No separate category exists, but bathroom clips are often smaller because vanity stone is usually thinner (2cm rather than 3cm) and the sink perimeter is shorter. Compact kits with shorter threaded rods are common. Anchor method, silicone choice, and spacing rules match kitchen installs. Weight matters less since bathroom undermount sinks are almost always ceramic or cast polymer, running 10 to 25 pounds.
How deep should anchor holes be drilled for sink clips?
Most fabricators drill anchor holes 3/4 inch to 1 inch deep in 3cm (1.25-inch) stone [9]. The rule of thumb is to go no deeper than two-thirds of the slab thickness so you don't break through the polished top. For 2cm stone, 1/2 inch depth is safer. Use a depth stop collar on the bit. Too shallow cuts your epoxy bond area; too deep risks slab damage that destroys an expensive countertop.
Can you install an undermount sink in laminate countertops using clips?
Yes. Laminate uses a different clip system than stone: clips that hook the sink flange from below and tension against the particleboard or MDF substrate rather than epoxy anchors drilled into the laminate. Because laminate substrates swell with moisture, pay extra attention to silicone coverage to keep water out of the cutout edge. Seal any factory-cut edges with edge banding or waterproof sealant before install.
What tools do you need to install undermount sink clips?
For stone: a diamond core drill bit (3/8 inch), an angle drill or right-angle adapter for cabinet access, acetone and clean rags for prep, two-part epoxy, a basin wrench or 1/4-inch nut driver, and neutral-cure silicone with a caulk gun. For laminate, skip the core drill but use a jigsaw or oscillating tool for the cutout. A flashlight and a helper make the under-counter work much less miserable on any material.
Sources
- NSF International, NSF/ANSI 18 standard for manual food and beverage dispensing equipment; sink weight ranges from product data: Standard undermount stainless steel kitchen sinks weigh roughly 15 to 30 pounds empty
- Tile Council of North America (TCNA), Handbook for Ceramic, Glass, and Stone Tile Installation: Industry standard clip spacing for undermount sinks is one clip every 6 to 8 inches around the sink perimeter
- Dow (formerly Dow Corning), Silicone Sealant Technical Data, neutral-cure silicone adhesion to stone surfaces: Neutral-cure silicone achieves tensile adhesion strengths of roughly 35 to 60 psi on clean stone surfaces
- Akemi, Technical Data Sheet for Akepox stone epoxy products, tensile strength specification: Two-part stone epoxy can achieve tensile strengths above 2,000 psi when properly mixed and applied to prepared surfaces
- Natural Stone Institute (formerly Marble Institute of America), Care and Cleaning for Natural Stone surfaces: Acid-cure silicone releases acetic acid during curing, which can etch polished marble, limestone, and some granites
- ASTM International, Standard Specification C920 for Elastomeric Joint Sealants: ASTM C920 covers elastomeric joint sealants and sets minimum requirements for adhesion, elongation, and weathering
- Angi (formerly HomeAdvisor), Cost to Install Countertops national data: Countertop installation cost ranges from roughly $500 to $4,000 depending on material and size
- International Code Council, International Residential Code (IRC), Chapter 27, Plumbing Fixtures: The IRC requires plumbing fixtures be properly installed and supported but does not mandate a specific clip method by name
- Natural Stone Institute, Installation Guidelines for Natural Stone Countertops: Fabricators typically drill anchor holes 3/4 inch to 1 inch deep in 3cm stone for sink clip anchors
- Cambria, Professional Installation Guide for Quartz Countertops, Undermount Sink Section: Cambria's installation documentation calls for mechanical clip support on all undermount sinks in quartz countertops
- U.S. Consumer Product Safety Commission (CPSC), Home Safety Data and Incident Reports: Unsupported heavy kitchen fixtures failing and causing injury or property damage create product and installer liability exposure
Last updated 2026-07-10