
TL;DR
- Natural stone slabs almost always have fissures, which are linear separations that formed as the rock cooled or got compressed over millions of years.
- Most are cosmetic.
- Reject the ones that run perpendicular to a planned seam, cross the full width, catch your fingernail, or move under light hand pressure.
- Check with a strong light at a low angle, dry the surface first, and flex-test anything suspicious.
What is a fissure in a stone slab, and is it the same as a crack?
A fissure and a crack are not the same thing, even though stone yards sometimes use the words interchangeably. A fissure is a naturally occurring linear separation or void that formed while the stone was being created, whether that was granite cooling from magma, marble recrystallizing under heat and pressure, or quartzite being compressed over geologic time. The Marble Institute of America describes natural fissures as "naturally occurring mineral cleavage or separation" that are considered inherent characteristics of natural stone, not defects.[1]
A crack, by contrast, is damage that happened after the stone solidified. It could come from quarrying, transport, poor storage at a slab yard, thermal shock during fabrication, or an impact during installation. Cracks are structural problems. Fissures usually are not, but some fissures in bad locations are effectively cracks waiting to happen.
The practical difference matters when you're standing in a slab yard trying to decide what to buy. The stone industry's own standards, including those published by ASTM International, treat natural fissures as acceptable characteristics of dimension stone rather than grounds for rejection.[2] That said, ASTM C503 and C615 (for marble and granite respectively) do set absorption and flexural strength minimums that indirectly catch slabs so compromised by internal voids that they'd fail mechanical testing.[2]
Here's the takeaway. Fissures are expected. What you're inspecting for is whether a specific fissure sits in a location and orientation that puts your finished countertop at risk.
Which stone types have the most fissures?
Marble and quartzite have more fissures than granite, and that's not an opinion. It's a function of how they formed.
Marble is metamorphic. It started as limestone and got cooked and compressed, which aligns calcite crystals in ways that create natural cleavage planes. Some marble varieties, particularly those with strong directional veining like Calacatta or Statuario, have fissures that follow those veins almost exactly. Quartzite went through similar metamorphic stress, and while it's harder than marble, its crystalline structure can have pronounced foliation planes.[7] Granite, being igneous and more even in crystal structure, tends to have fewer and shallower fissures, though it's not immune.[4] Soapstone and travertine have their own version of the problem: travertine has literal voids (the holes you see are dissolved limestone pockets), and soapstone can have soft talc-rich seams that behave like open fissures.
Engineered stone like Cambria or other quartz composites is different. Because those slabs are manufactured from crushed stone bound with polymer resin under vacuum and pressure, they don't have natural fissures. If you see a linear separation in an engineered slab, that's a manufacturing defect or shipping damage, and you should reject it outright. Learn more about Cambria's manufacturing standards.
For marble countertops and granite countertops, the inspection steps below are non-negotiable before purchase. For engineered surfaces, you're mainly checking for chips and shipping damage rather than geological fissures.
What tools do you need to inspect a slab at the yard?
You don't need specialized equipment. What you need is:
- A strong flashlight or phone flashlight. The bright LED flashlight in most smartphones works, but a dedicated 500-lumen-plus handheld is better because you can hold it at a very low angle without juggling your phone.
- A clean white cloth or paper towels. You'll use these to dry sections of the slab surface before reading fissures.
- A metal fingernail or a thin metal pick (a dental pick works well, or even a car key). You'll drag this lightly across suspected fissures to feel whether they're open voids or just surface-level color variation.
- Your hands. You'll apply light, flat-handed pressure to suspicious areas to feel for flex.
- A measuring tape. If you have your countertop layout dimensions, you can mark on the slab where cuts will land and see whether fissures fall at high-risk positions like sink cutouts or near seam lines.
- A photo of your countertop template or a sketch with dimensions.
Some experienced fabricators carry a small bottle of water to wet the surface, which makes fissures briefly more visible (they show as darker lines). That works, but it can also create false positives on surface scratches. I prefer to inspect dry first, then wet-check anything suspicious.
One tool that genuinely helps in marginal cases is a UV blacklight. Some mineral inclusions and resin fills that yards use to pre-fill known voids fluoresce under UV, revealing repairs the yard didn't disclose. You can buy a UV flashlight for under $20 online.
How do you actually do the inspection, step by step?
Step 1: Get the slab vertical or tilted. Most yards store slabs in A-frame racks. If you can see the slab vertically lit by overhead light, great. If it's horizontal on the ground, ask staff to tilt it or plan to get down and use your flashlight at a nearly parallel angle to the surface.
Step 2: Dry the surface. Water, condensation, or yard dust can obscure fissures or create false readings. Wipe down the area you're inspecting.
Step 3: Use raking light. Hold your flashlight nearly parallel to the stone surface, 2 to 4 inches away, and sweep it across the face slowly. Raking light (also called oblique or side lighting) catches surface depressions and separations that overhead lighting completely misses. Any linear shadow is worth examining more closely.
Step 4: Mark what you see. Use a piece of blue painter's tape (most yards have this) to mark fissures you want to revisit. Don't skip this. When you're looking at a 9-foot slab, your eyes lose track of exactly where a fissure was.
Step 5: Test marked fissures with your fingernail or a metal pick. Drag it lightly across the line. A true open fissure will catch your nail; a surface scratch or vein color change will not. If your nail catches, note the depth and direction.
Step 6: Apply hand pressure at open fissures. Place both hands flat on either side of the fissure and push gently. Any perceptible movement or flex means the fissure is through-and-through with no stone bridging it. That's a structural concern.
Step 7: Overlay your template. Position your measuring tape (or a printed template if you brought one) to show where your cut lines and sink cutout will land. Fissures that run parallel to a long edge are less risky. Fissures that run perpendicular to a planned cut, or that intersect where a seam will be, or that cross a sink corner, are the ones to worry about.
Fabricators who track their layouts digitally, for example in software like SlabWise that lets you overlay a template on a slab image before cutting, can catch fissure conflicts before the slab ever hits the saw. If your fabricator uses that kind of digital nesting tool, ask them to flag any fissures in the layout view before they finalize the cut plan.
Step 8: Check the back of the slab. Turn the slab (or ask yard staff to help) and inspect the back face the same way. Fissures visible on both faces are through-fissures. A mark only on the face might be surface-only and lower risk.
How do you know if a fissure is structurally dangerous or just cosmetic?
This is the question that actually matters, and the honest answer is that the line isn't always crisp. But there are reliable indicators on both sides.
Fissures that are almost certainly cosmetic:
- Closed fissures: your nail slides across without catching, the line is purely visual.
- Short fissures (under 4 to 6 inches) that don't intersect any planned cut lines or seam areas.
- Fissures that run parallel to the long axis of the slab and will sit well away from sink cutouts.
- Fissures filled with a contrasting mineral (called a healed fissure). In granite, for instance, you'll sometimes see a quartz-filled vein that is actually harder than the surrounding matrix. That's not a weakness; it's part of the rock's history.
Fissures that are structurally concerning:
- Open fissures: your nail catches, you can feel a void depth.
- Any fissure that shows visible movement under hand pressure.
- Fissures that run perpendicular to a planned seam line, which means the cut will sever whatever small bridges of stone are holding it.
- Fissures that cross the area directly behind a sink cutout (this is the highest-stress zone in most kitchen installations, because the unsupported stone between the sink front edge and the counter edge is carrying its own weight in cantilever).
- Multiple intersecting fissures creating a Z-pattern or X-pattern, which can isolate a chunk of stone with very little surrounding support.
- Fissures on the short dimension of the slab that run more than halfway across the width.
When a fissure is borderline, a skilled fabricator can sometimes mitigate it by rotating the layout to keep the fissure parallel to a support point, adding a substrate backer, or applying a penetrating consolidant resin before cutting. Those are legitimate strategies, but they require the fabricator to know the fissure is there. Which is exactly why you inspect before purchase, not after the slab arrives at the shop.
What should you ask the slab yard before buying?
Most slab yard staff are knowledgeable and honest, but their job is to sell slabs. Asking direct, specific questions gets you useful information.
Ask: "Has this slab been repaired or filled anywhere?" Yards routinely fill open fissures with clear or color-matched epoxy resin before slabs go to display.[6] That's a normal and acceptable practice, but you want to know where those fills are. A filled fissure may be stable, but it tells you the stone had open voids significant enough that someone decided to address them. Under UV light, many resins fluoresce differently than surrounding stone, which is one reason a UV flashlight is worth bringing.
Ask: "Do you have the quarry lot number or supplier's slab report for this stone?" Some premium suppliers include a quality tier rating and notes on known characteristics. Not all yards have this, but asking signals that you're a careful buyer.
Ask: "What is your policy if we discover a structural fissure during fabrication?" Some yards will replace a slab if a fabricator discovers a through-fissure after cutting that wasn't visible during inspection. Get that policy in writing if possible.
Ask: "Which slabs in this same lot came from the same block?" If you're buying for a large project and need multiple slabs, selecting from the same block means similar veining and, critically, similar fissure patterns, which makes it easier for your fabricator to nest the layout consistently.
For kitchen countertops especially, where you may have an island plus perimeter runs, matching block origin matters a lot for both aesthetics and structural consistency across the project.
Does your fabricator share responsibility for catching fissures?
Yes, and a good fabricator will tell you that clearly. A professional stone fabricator should inspect every slab before cutting, and most do. That said, the legal and practical reality is more complicated.
The Marble Institute of America's industry standards hold that natural fissures are an inherent characteristic of natural stone and are not considered defects under the standard trade terms most fabricators use.[1] This matters because it means if a slab with a fissure that was visible at the yard later fails, the fabricator may argue the material was accepted as-is when you approved the slab. Some fabricators have their customers sign a slab approval form that explicitly notes any visible fissures and acknowledges they are natural characteristics. If your fabricator offers this, read it carefully before signing.
That said, a fabricator who cuts straight through a known open through-fissure without rotating the layout or reinforcing the slab has made a professional error. If the countertop breaks during installation or shortly after, and it can be shown the fissure was through-and-through before cutting, you have a reasonable dispute. But "reasonable dispute" and "easy resolution" are different things.
The cleanest protection: inspect the slab yourself before purchase, photograph every fissure with a ruler in the frame for scale, share those photos with your fabricator before the cut, and ask them to confirm in writing how they plan to handle each one. This adds maybe 20 minutes to the process and eliminates most post-installation arguments.
For information on what the countertop installation process involves after slab selection, understanding how fabricators manage structural risk during templating and cutting helps you ask better questions.
Can fissures be repaired, and who pays for it?
Fissures in natural stone can be stabilized and filled, but "repaired" is a strong word. You're not restoring the stone to a monolithic state; you're filling a void with a compatible material to prevent moisture intrusion, stop propagation, and restore a smooth surface.
The standard material is a low-viscosity epoxy or polyester resin, sometimes color-matched to the stone with powdered pigments. A skilled fabricator can inject this into open fissures, let it cure, and then grind and polish the surface so the fill is nearly invisible. The MIA's technical manual notes that color-matching stone repairs is partly art, not pure science, and slight color variation is normal.[1]
Who pays depends on when the fissure was discovered and what was disclosed.
If the fissure was visible at the yard and you bought the slab anyway: repair cost is typically on you. You accepted the stone knowing it had open fissures.
If the fissure was hidden (not visible during a reasonable inspection) and only emerged during fabrication: this is a gray area. Some yards absorb repair costs as a goodwill gesture. Others don't. Having that conversation before purchase, not after, is the right approach.
If a fabricator created or extended a fissure through improper cutting, handling, or not using adequate support during transport: that's fabricator liability.
Typical fissure fill and polish on one location runs $50 to $200 depending on depth and complexity, based on common shop rate structures, though prices vary widely by region and shop. Multiple intersecting fissures in a high-visibility area can cost significantly more, and there's no guarantee the fill will be invisible in polished stone.
Are there any standards or tests for acceptable fissure levels?
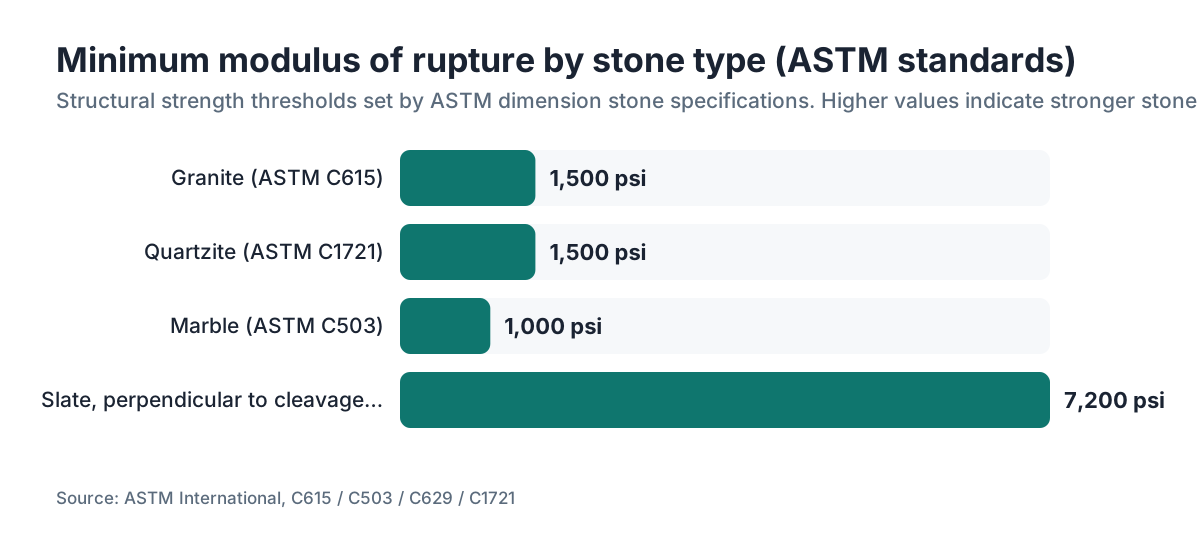
There are industry standards, though they don't specify a maximum number of fissures per slab. ASTM International publishes specifications for dimension stone that set minimum physical property thresholds rather than visual defect limits.
ASTM C615 (Standard Specification for Granite Dimension Stone) requires a minimum modulus of rupture of 1,500 psi and minimum compressive strength of 19,000 psi.[2] ASTM C503 (Standard Specification for Marble Dimension Stone) requires minimum modulus of rupture of 1,000 psi.[2] A slab so full of fissures that it fails these mechanical thresholds would technically be a non-compliant material, but slabs aren't routinely tested this way before retail sale. The test methods behind these acceptance criteria trace back to standard physical property procedures for dimension stone.[5]
The Marble Institute of America's "Dimension Stone Design Manual" is the closest thing the industry has to a practitioner's field guide for evaluating stone quality, and it explicitly categorizes natural fissures as inherent characteristics rather than defects.[1]
For practical purposes, no standard gives you a bright line like "reject if fissure length exceeds X inches." The field judgment call is yours and your fabricator's. What the standards do tell you is that mechanically sound granite and marble have substantial strength reserves, which is why most fissures that pass the fingernail and hand-pressure tests don't matter structurally in normal countertop use.
What are the biggest mistakes buyers make when inspecting slabs?
Skipping the dry inspection is the most common mistake. Wet stone looks different. A yard that sprays down slabs before showing them can make fissures temporarily less visible (the wet surface creates uniform reflectance) or more visible (wet darkens color and makes lines pop). Either way, you want to see the stone dry before drawing conclusions.
Trusting overhead light exclusively is the second mistake. Showroom and yard lighting is almost always overhead fluorescent or LED. Under those conditions, fissures that run parallel to the light direction are effectively invisible because they cast no shadow. Raking light with a handheld flashlight held nearly parallel to the surface is the tool that actually shows you what's there.
Not bringing your template dimensions is a mistake that's easy to avoid. A fissure that would run along the back wall under the upper cabinets, where a backsplash covers it and the countertop is fully supported against the wall, is a non-issue. The same fissure, shifted 18 inches toward the sink, might cross directly behind the cutout. Without your layout in hand, you can't tell the difference.
Assuming all fissures are fine because the yard says so is understandable but naive. Slab yard staff vary in their stone knowledge. Some are expert; others are primarily salespeople. Verify any assurances yourself using the steps above.
Skipping photos before purchase leaves you with no record if something goes wrong later. Take photos with your phone, include a ruler or tape measure in the frame for scale, and note which face of the slab (front or back) you photographed.
How does stone care after installation affect fissures?
Sealing natural stone regularly reduces the risk that an existing fissure becomes a bigger problem over time. A fissure is a channel. Without sealer, it's a channel that absorbs water, cooking oils, and acidic liquids directly into the stone. Over months and years, that moisture cycling (wet, dry, wet, dry) can cause micro-expansion and contraction that slowly propagates a hairline fissure into something more significant, particularly in freeze-thaw conditions or near a window where temperature swings are large.
The Natural Stone Institute recommends sealing natural stone countertops with a penetrating impregnator sealer, with reapplication frequency depending on stone porosity. Marble and limestone are more porous and need more frequent sealing than granite.[6] Quartzite sits in between, and its actual porosity varies enough between quarries that you should test your specific slab rather than going by general advice. Learn how to clean quartzite countertops and maintain the seal correctly.
For general stone countertop care, using pH-neutral cleaners matters near fissures specifically because acidic cleaners can etch the stone immediately adjacent to a fissure edge, making it more vulnerable.
If you have an open fissure that wasn't filled before installation, consider having a fabricator or stone restoration specialist inject it with low-viscosity resin and polish the surface. This is a maintenance task, not a defeat, and it's far cheaper than replacing a slab that propagated into a full crack because moisture got in over five years.
When should you walk away from a slab entirely?
Some slabs aren't worth the risk regardless of price. Here are the situations where I'd walk away.
Through-fissure with movement. If you feel flex when you apply hand pressure to either side of a fissure, the stone has no continuous bridge across that line. No amount of resin fills that to structural adequacy in a spanning application like a countertop.
Multiple intersecting fissures near a planned sink or cooktop cutout. Cutouts are stress concentration points. A single fissure approaching one from the corner is risky; two intersecting fissures there is a likely failure point.
Fissures running perpendicular across more than 60 to 70 percent of the slab's short dimension. At that point, the fissure is effectively dividing the slab into two pieces held together by a thin bridge. Fabrication stress alone can finish that job.
Undisclosed resin repairs revealed by UV light. A fill or two on a slab of expensive marble is normal and not automatically disqualifying. But if you find four or five filled fissures the yard didn't mention, you're looking at a slab the supplier knew was compromised. Find a different one.
Yards typically hold multiple slabs from the same block, and the one with the worst fissures is usually the one most prominently displayed or most aggressively priced. It's not always the case, but it's worth looking at the slabs on either side of the one you're shown first.
Frequently asked questions
Is a fissure in granite a defect I can return the slab for?
Under standard trade terms for natural stone, visible fissures are considered inherent characteristics rather than defects, per the Marble Institute of America. Most slab yards won't accept returns based on natural fissures alone. Your best protection is pre-purchase: inspect before you commit, photograph what you see, and get any yard assurances in writing. Post-purchase returns for natural fissures are rare and usually unsuccessful.
Can I inspect a slab at the yard myself, or do I need my fabricator there?
You can do a useful inspection yourself with a flashlight, a fingernail, and the seven steps described above. But bringing your fabricator or having them visit the yard before the slab is purchased is genuinely better. They've seen hundreds of slabs and can assess fissure position relative to your specific template far faster than a first-time buyer. If you can't arrange that, photograph every fissure with a ruler in frame and send images to your fabricator before finalizing.
Do marble countertops have more fissures than granite?
Yes, generally. Marble is metamorphic stone with natural cleavage planes that follow its crystalline structure, making fissures both more common and more directional than in granite. Heavily veined marbles like Calacatta or Statuario often have fissures that track along the veins. Granite, being igneous and more even in crystal structure, tends toward fewer and shallower fissures. That doesn't make marble a bad choice, but it does make pre-purchase inspection more important.
What does a healed fissure mean in stone?
A healed fissure is a natural void that, over geological time, filled with a secondary mineral, often quartz in granite or calcite in marble. These are generally stronger than they look. The fill mineral bonded under enormous pressure, and in many cases the healed zone is as strong as or harder than the surrounding stone. You can usually identify a healed fissure because your fingernail slides across without catching and the fill material looks crystalline rather than epoxy-smooth.
Should I reject a slab if the yard has already filled its fissures with epoxy?
Not automatically. Pre-filling open fissures with color-matched epoxy before display is normal industry practice. A filled fissure is stable and typically fine for countertop use. What you want to know is how many fills are present and where. Use a UV flashlight to reveal resin fills the yard didn't disclose. If there are more than a few, or if fills cluster near where your sink cutout will land, those are reasons for concern, not necessarily rejection on their own, but worth discussing with your fabricator.
How do I tell a fissure from a vein in natural stone?
Veins are a type of mineral intrusion where a different mineral (often quartz, calcite, or feldspar) filled a void as the rock formed. They're bonded to the surrounding stone and fully solid. Fissures are separations or voids. The key test: drag your fingernail across the line. A vein is solid and your nail won't catch. An open fissure has a void edge your nail dips into. A healed fissure falls in between, usually solid but sometimes with a slight surface irregularity.
What part of a countertop is most vulnerable to a fissure failing?
Sink cutouts, especially the front corners. The strip of stone between the sink front edge and the counter's front edge is unsupported, spanning open air, and carries its own weight in cantilever. A fissure crossing that zone, particularly at a corner where stress concentrates, is the most likely location for a failure. Cooktop cutouts are the second most vulnerable, followed by any seam area where the slab was cut and the two pieces meet over a cabinet gap.
Does sealing a countertop help prevent fissures from getting worse?
Yes, indirectly. Sealing with a penetrating impregnator sealer reduces moisture absorption into open fissures. Moisture cycling causes micro-expansion and contraction that can slowly extend hairline fissures over years. Regular sealing doesn't repair a fissure, but it does slow the conditions that cause hairline separations to propagate. How often you reseal depends on stone porosity: marble and limestone need resealing every one to two years; dense granite may go three to five years.
Can a fabricator work around a fissure in my slab layout?
Often, yes. Rotating the layout so a fissure runs parallel rather than perpendicular to a planned cut, keeping fissures away from sink cutout corners, or positioning them under a seam that will be supported by a cabinet wall are all valid mitigation strategies. Good fabricators do this routinely. The condition is that they need to know about the fissure before cutting, which is why you photograph and document every one during your pre-purchase inspection and share that with your fabricator.
Is there a way to test a fissure's structural risk without cutting the slab?
The hand-pressure flex test described in this article is the most practical field test: place both hands on either side of the fissure and push. Any perceptible movement or flex indicates a through-void with no structural bridge. For a more rigorous assessment, a fabricator can wet-check the back face against the front to determine if a fissure is surface-only or through-and-through. Formal modulus of rupture testing per ASTM standards exists, but no slab yard will test an individual retail slab this way.
Do quartzite countertops have fissures like marble?
Quartzite can have significant fissures, and this surprises buyers who expect it to be nearly as fissure-free as granite because of its reputation for hardness. Quartzite is metamorphic, and its crystalline foliation planes can create pronounced fissures, particularly in certain varieties quarried from highly deformed zones. Apply the same inspection steps as you would for marble. The hardness of quartzite (typically 7 on the Mohs scale) gives it better resistance to fissure propagation than marble, but doesn't eliminate the risk.
What photos should I take when inspecting a slab?
Photograph the full slab face under raking light to document all visible fissures. Then photograph each fissure up close with a ruler or tape measure in the frame for scale. Note on your phone which face you photographed (front or back) and mark the slab number or lot number from the yard's tag. If you see epoxy fills or unusual discoloration, photograph those too. These images protect you in any post-fabrication dispute and help your fabricator plan the layout.
Are fissures more common in imported stone than domestic stone?
There's no reliable public data comparing fissure rates by country of origin. Fissure frequency is a function of the specific quarry geology, not whether the stone is Italian or Brazilian or domestic. What does vary by region of origin is how stone is handled and stored during long shipping: more handling cycles mean more opportunity for transport damage that can extend or open existing fissures. Inspect all stone the same way regardless of origin.
Sources
- Marble Institute of America, Dimension Stone Design Manual: Natural fissures in stone are described as naturally occurring mineral cleavage or separation and are considered inherent characteristics, not defects, under standard trade terms.
- ASTM International, Standards for Dimension Stone (C615, C503, C629, C1721): ASTM C615 requires minimum modulus of rupture of 1,500 psi and minimum compressive strength of 19,000 psi for granite dimension stone; ASTM C503 requires minimum modulus of rupture of 1,000 psi for marble.
- Natural Stone Institute, Care and Cleaning Resources: Penetrating impregnator sealers are recommended for natural stone countertops, with reapplication frequency depending on stone porosity.
- U.S. Geological Survey, National Minerals Information Center: Granite is classified as igneous and marble as metamorphic dimension stone, with formation processes that account for their differing structural characteristics including fissure frequency.
- National Institute of Standards and Technology, Voluntary Product Standard PS 15-69 (reference for stone testing methods): Standard test methods for dimension stone physical properties form the basis for ASTM acceptance criteria.
- Natural Stone Institute, Quarrying and Production of Dimension Stone: Industry guidelines address fissure filling with epoxy resin as standard practice in dimension stone preparation for retail sale.
- University of Minnesota Extension, Building Materials and Natural Stone Properties: Metamorphic stones including marble and quartzite develop cleavage planes and foliation during formation, making fissures more directional and common than in igneous stone.
- ASTM International, C1721 Standard Specification for Quartzite Dimension Stone: ASTM C1721 sets a minimum modulus of rupture of 1,500 psi for quartzite dimension stone.
Last updated 2026-07-10