
TL;DR
- Seams show up any time a countertop run beats slab size, roughly 55 to 65 inches wide for most granite and quartz.
- Fabricators put them where stress is lowest and eyes rarely land: away from sinks, off inside corners, out of the prep zone.
- Homeowners who understand the why before templating rarely get surprised on install day.
Why do countertops need seams at all?
Stone slabs are not infinite. A standard granite or quartz slab runs about 55 to 65 inches wide and 110 to 130 inches long, depending on the quarry and manufacturer [1]. Your kitchen run might be 144 inches. The math is blunt: one slab cannot cover it. A seam is where two pieces meet, and it sits there because slab dimensions say so, not because anyone cut a corner.
Engineered quartz like Cambria or Cambria countertops comes in consistent slab sizes, usually 56 by 120 inches or 65 by 132 inches depending on the product line [7]. Natural stone varies more. A jumbo granite slab from a high-volume quarry might reach 70 by 130 inches, which genuinely cuts seam count on big islands. Even then, a U-shaped kitchen with three runs almost always needs multiple pieces.
Laminate and laminate countertops have their own physical limits, though the sheets are lighter and the seams get handled differently. Solid surface like Corian countertops can be glued so tight the seam nearly vanishes. Stone cannot do that. Two pieces sit on a substrate, bonded with color-matched epoxy, and the joint is visible if you look for it. That is the honest baseline every homeowner needs to hear before templating.
Where do fabricators typically place seams, and why those spots?
Seams go where structural stress is lowest and human eyes are least likely to land during normal use. That single rule drives most placement decisions in the shop.
The habits are consistent across the trade. Seams stay away from the area right beside a sink cutout, because water pooling at a joint speeds up epoxy breakdown and can pull the seam open over time. They avoid inside corners, because that is where stone cracks under stress, and a seam there stacks a second failure point on top of the first [2]. And they keep clear of the main prep zone, the 24-to-36-inch stretch you stand at most.
On a long island, the seam usually lands at a natural break: about a third of the way along the run, or wherever a book-matched pattern lines up cleanly. On an L-shape, it often sits near the inside corner transition or slightly off it.
A few positions are almost always wrong, and a good fabricator says so out loud. Mid-span across a busy prep area is bad. Directly over a dishwasher, where steam and vibration never quit, is bad. At the front edge of a breakfast bar where people lean is bad, because edge loads torque the joint.
The table below sums up the placement logic:
| Location | Generally OK? | Reason |
|---|---|---|
| Away from sink by 6+ inches | Yes | Reduces moisture exposure at joint |
| Inside corner of L-shape | Avoid | Stress concentration point |
| Along a cabinet partition line | Yes | Structural support underneath |
| Mid-span over dishwasher | Avoid | Vibration and steam degrade epoxy |
| Near cooktop, 6+ inches away | Yes if supported | Heat is not the main concern; support is |
| Breakfast bar overhang edge | Avoid | Bending stress on unsupported stone |
| Island at roughly 1/3 point | Common | Balances slab yield and seam visibility |
How visible will the seam actually be?
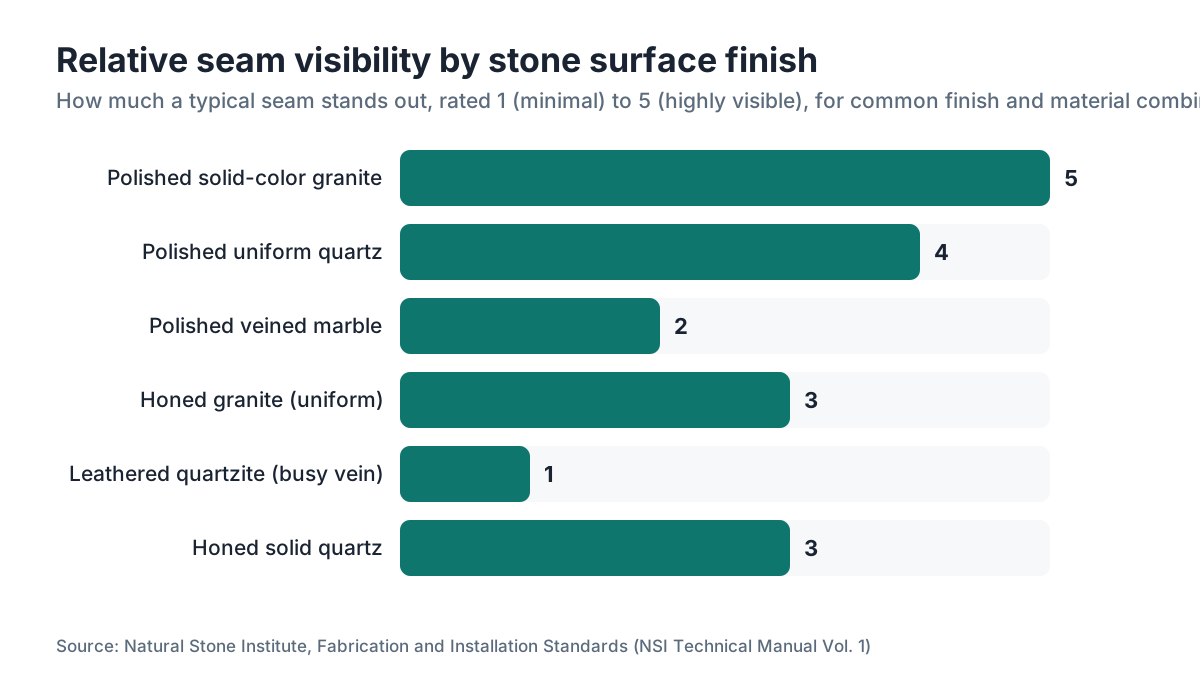
It depends on the material, and that is the honest answer homeowners rarely expect. Busy stone hides seams. Solid stone flaunts them.
Solid colors and tight-grain materials like absolute black granite or a uniform quartz show seams more, not less. Counterintuitive, but true. On a heavily figured quartzite or a dramatic marble countertops slab, the joint can nearly disappear into the veining. On a solid black surface the line and any slight color shift in the epoxy jump out under direct light.
Fill color carries a lot of weight. Fabricators mix epoxy to match the dominant tone of the stone, and on a multi-tone material they split the difference toward the mid-tone. A skilled hand on a patterned stone gets remarkably close. On a very dark or very light uniform surface the joint is always visible at some light angle, and saying that up front beats letting someone find it on install day.
Finish shifts the read too. A polished surface shows seams clearly because light bounces off it evenly and any break catches the eye. A honed or leathered finish scatters light, so the seam softens.
Line of sight is the variable homeowners forget. A seam at the back near the splash zone is basically invisible from where you stand. A seam at the front edge of a 36-inch island sits at eye level for a seated guest. Same quality joint. Completely different experience.
Can homeowners request a specific seam location?
Yes, and fabricators want that conversation before the template, not after. Before templating is the only window when the layout still moves for free.
Once the templater has drawn the pieces on the slab and the cuts are made, moving a seam means remaking a piece. That costs money and time.
The real constraint is yield. Slab material is priced by the square foot, and stone carries natural defects (fissures, pits, color breaks) that limit where a cut can land. Ask for the seam to move 18 inches left and the fabricator has to check whether the new layout still fits the slab. Sometimes it does. Sometimes it burns a chunk of material and the price climbs.
Some requests are almost always doable: nudging a seam a few inches either way, moving it to a cabinet partition instead of mid-span, or shifting it slightly behind the cooktop instead of in front. Harder asks: killing a seam entirely on a run that genuinely needs two pieces, or forcing a seam onto an inside corner (structurally a bad idea even when someone prefers the look).
The fabricator's job is to lay out the tradeoff plainly. Here is where the seam wants to go structurally. Here is where you want it. Here is what moving it costs and whether it is safe. That talk goes better at a table over a layout drawing than in the kitchen on install day.
What is a book-matched seam and should you ask for one?
Book-matching means two adjacent slabs get cut from the same block and mirrored so the veining lines up like the pages of an open book. Done right, the seam reads as a design choice instead of a compromise.
It is genuinely beautiful on the right material. On a dramatic quartzite, leathered granite countertops, or a veined quartz, book-matching can make a waterfall island edge look deliberate. On a uniform or subtly patterned stone it adds nothing worth the cost of sourcing matched slabs.
Expect more cost and more complexity. The fabricator needs two slabs from the same lot, ideally sequential blocks from the quarry. Yield drops because the mirrored layout is less forgiving of defects. And the templating has to be precise, since the alignment only works when the cut lands in exactly the right place.
For most kitchens the spend is not worth it unless the material is dramatic and the island is a real centerpiece. For a bathroom double-vanity with a bold stone, it can pay off. Have that talk before templating, and ask to see photos of the slabs side by side.
How should a fabricator explain seam placement to a homeowner before templating?
The best version of this conversation runs in three moves: show, explain, confirm.
Show means putting a layout drawing or digital template preview in front of the homeowner, or walking them through it on screen. Plenty of shops run software that generates a visual layout before the crew ever leaves the building. Some shops using tools like SlabWise pull a slab nesting preview so the homeowner sees exactly how the pieces sit on the stone. That picture kills most of the ambiguity.
Explain means saying three things out loud: where the seam goes, why it goes there (structure, slab size, yield), and what it will look like in this specific material. Do not skip the visibility part. Homeowners who were never warned that a polished dark surface shows the joint will call after install.
Confirm means getting a sign-off, ideally in writing. A one-line note in the work order that reads "homeowner approves seam location per attached layout diagram" has saved shops from countless post-install fights. It is not adversarial. It is just clear.
Tone matters. Homeowners are not being difficult when they worry about seams. They spent real money on a material they love and they want it to look right. Treat the seam talk as part of the service, not a negotiation to win, and people hear the information differently.
Does seam placement differ by material type?
Yes, meaningfully. The material dictates how much support the joint needs and how loud the seam reads.
Natural stone (granite, marble, quartzite, soapstone) is rigid and brittle. Seams need full support underneath and should never sit over an unsupported span. The substrate, usually 3/4-inch plywood under the stone, should reach within a couple inches of the seam on both sides. That is a structural requirement, not a preference.
Engineered quartz is also rigid and brittle, and the placement rules track natural stone almost exactly. Some fabricators argue quartz forgives small substrate variances a little better because the binder matrix is more uniform, but the practical rules do not change.
Honed or matte finishes, in any material, read softer at the joint because they scatter light. If you still have flexibility in finish, a honed surface on a uniform stone quiets the seam.
Butcher block countertops play by different rules entirely. Wood expands and contracts with humidity, so butcher block seams use mechanical fasteners and deliberate gaps that allow movement [8]. Nothing like stone.
Soapstone earns its own note. It is softer and denser than granite with a fairly uniform color, so its seams tend to show clearly in direct light. Fabricators who work with it regularly know to raise this early. If you want the maintenance side after install, how to clean soapstone countertops covers care.
Thin-profile edges (3/8-inch mitered or waterfall edges) add another visible line at the miter joint. That joint gets epoxied and filled with color-matched material, but on thin stone it reads sharper than a seam on a standard 3/4-inch or 1.25-inch profile.
What questions should homeowners ask before templating day?
A handful of targeted questions changes the outcome more than any amount of worrying does.
First: Can you show me a layout diagram before you come out? Any shop doing this professionally can produce one. If they cannot, that tells you something.
Second: Where exactly will the seam fall, and can you mark it on my counter with tape before templating so I see it in context? Some fabricators do this as routine. It takes five minutes and erases surprises.
Third: What will the seam look like in this material specifically? Ask to see a seam sample in the same or similar stone. Most shops keep off-cuts with finished joints for exactly this.
Fourth: Is there a structural reason the seam has to go there, or is there flexibility? That opens the tradeoff conversation without sounding like a fight.
Fifth: What happens if I am unhappy with the seam after install? Knowing this before any money moves is worth a lot. Most fabricators will address a seam that opens, separates, or landed differently than agreed. A seam that is visible but was disclosed and approved is usually not a warranty item.
For the full countertop installation process from the homeowner side, the seam talk is one piece of a bigger walkthrough worth having with your fabricator. Counter workflow zones matter here too, since the prep and cooking areas shape where a seam should never fall [6].
Can seams be repaired or moved after installation?
A seam that opens can usually be re-epoxied. The fabricator removes the old filler, cleans both faces, re-bonds, re-fills with color-matched epoxy, and polishes the surface [10]. If the stone has not chipped or cracked at the joint, this repair often reads as nearly invisible. If the joint opened because the substrate moved or support failed, the repair fails again unless someone fixes the underlying problem first.
Moving a seam after install is a different animal. That means pulling a piece, re-cutting, and reinstalling. In practice it almost never happens, because the cost approaches or beats remaking the piece from scratch. The cut faces are only a kerf-width apart, so there is no material to recover. If the seam was genuinely wrong because of a fabricator error, that is a remake and the shop eats it. If it was approved and the homeowner changed their mind, it is a full additional charge.
That gap is why the pre-templating talk beats any post-install talk. Changing a layout on a drawing costs nothing. Changing it in stone costs hundreds to thousands of dollars depending on piece size.
The best outcome is a homeowner who feels they made an informed choice before templating, not one who feels something got done to them. Fabricators who handle this well see far fewer post-install conflicts, and that alone is reason enough to build the conversation into every job.
How does pattern matching affect where seams can go?
On heavily veined materials, pattern continuity across a seam often matters more to the final look than the physical spot the joint lands in.
A vein running diagonally across the counter should, ideally, continue across the seam without a jarring offset. Pulling that off means orienting both pieces on the slab carefully, which can pin down where the seam lands. The pattern-continuation point may not sit exactly where structural logic wants the seam. That tension is real, and fabricators work it on every complex job.
For materials with very large pattern repeats, like some dramatic Calacatta marbles or bold quartzites, getting the vein to carry across a seam may force two slabs from the same block. That adds cost and lead time. Ask about it directly if the veining is a big reason you picked the material.
For uniform or small-grain materials, pattern matching is a non-issue and the fabricator has more room to optimize for structural position.
Working with marble countertops or a heavily figured granite countertops? Ask whether the seam location is driven by pattern matching, structure, or yield. Usually all three pull at once. Knowing which one dominates tells you what is actually negotiable.
What does a seam location approval look like in writing?
It does not need to be complicated. A signed layout diagram is the gold standard: the fabricator attaches the cut layout to the work order, both parties initial it, and the seam positions are marked clearly.
If a full diagram is not available, a written line in the work order stating the seam position ("seam at approximately 52 inches from left wall, between sink and cooktop") gives both sides a reference point.
Some shops fold a standard clause into the contract covering seam visibility, something to the effect that seams are inherent to stone fabrication and will show to some degree depending on material and lighting, and that the homeowner acknowledges it. Fair, accurate disclosure.
The Marble Institute of America, now the Natural Stone Institute, publishes fabrication quality standards that include seam standards [3]. The guidance calls for a seam that is filled flush and color-matched, and it sets no expectation of invisibility. As the standards put it, a seam should be "filled flush" with a color match to the surrounding stone. Knowing that baseline helps both sides calibrate.
Shops that bake seam approval into their standard workflow do more than cover themselves legally. They build trust. A homeowner who co-authored the layout decision is far more likely to send friends your way than one who felt the decision got made for them.
Frequently asked questions
How far from the sink should a seam be placed in a stone countertop?
Most fabricators aim for at least 6 inches from the edge of the sink cutout. Water pooling at a joint over time degrades the epoxy bond, and the area right around a sink cutout is already a stress concentration point. Keeping the seam well clear reduces both structural and moisture risk. Some shops prefer 8 to 12 inches when the layout allows it.
Will my countertop seam be invisible after installation?
Probably not invisible, but it can be very hard to notice depending on material and location. Busy veined stones hide seams better than solid or uniform colors. A polished black granite seam shows under most lighting. A heavily figured quartzite seam can nearly vanish into the pattern. Your fabricator should show you a sample seam in the same or similar material before installation so you know what to expect.
Can I ask my fabricator to avoid putting a seam on my kitchen island?
You can ask, and the answer depends on island size against slab dimensions. Most stone slabs run 55 to 65 inches wide. An island under that in one direction can come from a single piece. Larger islands need a seam. Some fabricators source jumbo slabs for oversize islands, but that adds cost and availability varies. Ask early, before material is ordered.
What epoxy color will the fabricator use to fill my seam?
Fabricators typically use a two-part color-matched epoxy, mixed on-site to approximate the dominant tone of the stone. On multi-tone materials they usually split the difference. Most bring a range of pigments to the install. If you have a strong preference about fill color, say so before the crew arrives. Changing it after the epoxy cures means grinding out the joint and redoing it.
Is a seam at an inside corner of an L-shaped countertop ever OK?
Technically yes, but most fabricators avoid it. Inside corners are stress concentration points in stone. A seam there stacks two weak spots in one place: the corner geometry and the bonded joint. The common move is to run one piece past the inside corner with a small notch, keeping the corner itself in a single piece of stone. That is stronger, and it moves the seam to a less loaded spot.
How much does it cost to repair a seam that opens on a stone countertop?
A typical seam repair, where the fabricator re-cleans, re-bonds, and re-polishes the joint, runs roughly $150 to $400 depending on access and local labor rates. If the seam opened from a substrate or support problem rather than the bond itself, fixing the substrate adds cost. Most fabricators warranty their seam work for a period, so check your contract before paying for a repair.
Do quartz countertop seams look different from granite seams?
Mechanically they get handled the same way: two-part color-matched epoxy, flush-filled and polished. Visually, engineered quartz seams can read slightly more noticeable on solid-color products, because the pattern is perfectly uniform and any color shift in the epoxy stands out. On pattern quartz the seam reads more like natural stone. Neither material hits the near-invisible seam that solid surface like Corian can produce.
What is the industry standard for an acceptable seam gap in stone countertops?
The Natural Stone Institute's fabrication and installation standards call for seam gaps no wider than 1/16 inch before filling, with a flush, smooth surface after the epoxy is applied and polished [3]. Some high-end fabricators work tighter, aiming under 1/32 inch on CNC-cut edges. A seam with a visible ridge or a gap wider than 1/16 inch is generally considered below standard.
Should I be present at templating so I can weigh in on seam placement?
Yes, if at all possible. The template visit is the last moment the layout is easy to adjust. Being there lets you walk the seam positions with the templater, ask questions, and approve or suggest changes before any stone is cut. Many disputes about seam location happen because homeowners were not present at templating and did not realize they had input until after install.
Does seam placement change for a countertop with a waterfall edge?
Significantly. A waterfall edge adds vertical stone panels on the island sides, and each panel has its own seam where it meets the horizontal top. The miter seam at the waterfall corner needs care: the vein on the top piece should ideally continue into the side panel, which takes book-matched slabs or at least slabs from the same lot. The fabricator should walk you through how each miter seam will look before cutting.
Can I ask my fabricator to put the seam at the back near the wall instead of the middle?
Often yes, and it is a reasonable request. A seam near the back wall is much less visible from where you stand. The constraint is whether the back piece ends up too narrow to handle safely or stay structurally sound. Pieces under about 6 inches wide get fragile and hard to template accurately. If the layout works, pushing a seam toward the backsplash line is a good option worth asking about.
Are seams in bathroom vanity countertops handled differently than kitchen seams?
The structural logic is the same, but visibility issues run sharper in bathrooms because the counter is smaller and people look at it up close. A seam on a 72-inch double vanity usually falls near the center, right where the eye goes. Some homeowners choose two separate vanity tops instead of one continuous piece specifically to skip a center seam. That adds edge finishing cost but kills the joint entirely.
What should I do if I notice a seam problem right after installation?
Point it out to the fabricator the same day, ideally before they pack up and leave. Document it with photos showing the gap, ridge, or color mismatch. Compare it against the work order or any signed layout diagram. Most reputable fabricators will address a seam that deviates from agreed standards. If you approved the location and the workmanship meets industry standards, your recourse may be limited, which is why pre-install sign-off matters.
Sources
- Natural Stone Institute, Technical Manual Vol. 1: Standard granite and quartz slabs typically range from approximately 55 to 65 inches wide and 110 to 130 inches long depending on origin and manufacturer.
- Natural Stone Institute, Fabrication and Installation Standards: Inside corners are stress concentration points; seams at inside corners add a second failure point in an already high-stress location.
- Natural Stone Institute, Dimension Stone Design Manual VIII: Industry seam standards specify gaps no wider than 1/16 inch before filling, with flush surface after epoxy is applied; seams are inherent to stone fabrication and will be visible to some degree.
- Marble Institute of America (now Natural Stone Institute), Countertop Installation Guidelines: Seams should be avoided within 6 inches of sink cutouts to reduce moisture exposure at the epoxy bond.
- U.S. Geological Survey, National Minerals Information Center, Dimension Stone Statistics: Dimension stone slab supply and sizing statistics; granite accounts for a significant share of domestic dimension stone production.
- National Kitchen and Bath Association, NKBA Planning Guidelines: Counter workflow zones and work triangle planning affect where seams should and should not fall in relation to prep and cooking areas.
- Cambria, Product Specifications (slab dimensions): Cambria engineered quartz slabs are produced in standard sizes including approximately 56 by 120 inches and 65 by 132 inches depending on product line.
- University of Florida IFAS Extension, Wood Countertop and Butcher Block Care: Wood countertops expand and contract with humidity changes, requiring different joint and seam approaches than rigid stone.
- U.S. Consumer Product Safety Commission, Home Renovation Safety: General structural and substrate support requirements for heavy countertop materials in residential kitchens.
- Natural Stone Institute, Seam Standards and Epoxy Application Technical Bulletin: Two-part color-matched epoxy is the industry standard for stone seam fill; seam surface should be flush and polished to match adjacent stone.
Last updated 2026-07-09