TL;DR
- Slabsmith is slab-layout software for stone shops.
- You photograph a slab, import that photo at true 1:1 scale, then drag countertop pieces (called parts) across it to maximize yield and match veining before any cut happens.
- The workflow: photograph, calibrate, import template shapes, arrange parts, check yield, get customer sign-off, export cut files.
- Accuracy runs about plus or minus 1/16 inch on a good setup.
What is Slabsmith and what does it actually do?
Slabsmith is slab-management and layout software from Northwood Design, built for stone fabrication shops. It does two jobs. It stores a photographic inventory of your slabs at true 1:1 scale, and it lets you drag countertop part shapes across those slab images to plan cuts before anyone touches the stone.
The software runs on Windows. It connects to a calibrated camera rig, or you import slab photos shot with a standard DSLR. Every slab that goes into the system gets a unique ID and tags for material name, thickness, lot number, and yard location. That data is searchable. A new Calacatta job walks in the door and you pull up every 3cm Calacatta slab you own in about ten seconds.
The difference between this and printing a paper template is scale accuracy. Slabsmith corrects for lens distortion and perspective, so the part shapes you move on screen match real dimensions within about 1/16 inch across a full slab. [1] That is tight enough to make cut decisions, not rough guesses.
Shops also lean on it for customer approvals. You generate a photo-real rendering that shows the customer exactly which slice of the stone lands on their island. That matters enormously on figured marble or quartzite, where two sections of the same slab can look like two different stones. The approval step alone kills a whole category of rework.
What do you need before you start a layout in Slabsmith?
Three things before you open the software: a calibrated slab photo, a set of part shapes from your template, and the job details already entered.
The slab photo is the foundation. Northwood recommends photographing slabs on a consistent surface (a shop floor works, a wall-mounted cradle is better) with a calibration bar in frame. The calibration bar is a physical rod of known length, usually 48 or 60 inches, that the software reads to correct scale. Skip it and you're guessing. An overhead camera bar system builds calibration into every shot automatically. Shoot handheld and you must include the bar every single time or your dimensions drift. [1][8]
The part shapes come from templating. If you run a laser templater like a Proliner or an LT-2D3D, you export the DXF and import it straight into Slabsmith. If you use paper or cardboard, someone traces them into a CAD file first (AutoCAD, or a lighter program), then exports a DXF. Slabsmith reads DXF natively. [9] It does not read SketchUp or Revit files without an intermediate export.
Enter job details first: customer name, job number, material, edge profile. Do the layout before you link a job and matching them up later gets fiddly, and in older versions it sometimes fails outright.
One more thing to flag. Slab photos shot under fluorescent shop light look different from natural-light photos, and both look different from what the customer saw at the yard. Consistent lighting narrows the gap. But always tell customers the rendered layout approximates color, it doesn't guarantee it.
How do you import a slab photo and calibrate it in Slabsmith?
Open the Inventory module and click New Slab. The software asks for a photo file (JPEG or TIFF, 8 megapixels minimum for a full slab, 12 or more is better) and the slab's basic data: material, thickness, lot number, bundle number, stock location.
Once the photo loads, calibration runs. Shoot with the Slabsmith camera bar and the software reads calibration automatically from metadata baked into the image. Shoot manually with a calibration rod and you click the two endpoints of the rod on screen, then type the known distance. The software applies lens correction and perspective correction. The image straightens slightly. That's normal.
After calibration the slab shows at screen scale with a dimension readout in the corner. Zoom in and measure a reference edge with the ruler tool. Match against the physical slab (drag a tape across it in the yard) and you're calibrated. Off by more than 1/4 inch on a 10-foot span? Redo it. The usual culprits: the calibration rod wasn't flat on the slab surface, the camera sat more than about 15 degrees off perpendicular, or the file got resampled or compressed after shooting. [1][8]
Save the slab to inventory. It shows up in your yard view with a thumbnail and all its metadata. Every part you lay on it later tracks against this record, so yard staff walk out and find the exact slab instead of hunting through a bundle.
How do you import countertop template shapes as parts?
In the Layout module, open the job you already created. Click Add Part or Import DXF (the label moves around by version). Point it at your DXF from the laser templater or CAD software.
Slabsmith reads the DXF layers. Each closed polyline becomes a separate part candidate. [9] If your templater exports sink cutouts on their own layer, the software imports those and subtracts them from part area for yield math. Pick the layers you want. Most shops bring in just the outer profile of each countertop section and handle cutouts separately.
Each imported part lands in the part list on the left panel with its label (whatever the templater named it: island, perimeter-section-1), its square footage, and its bounding box dimensions. Check these against your field notes. A backsplash strip that should stand 4 inches tall should not read 40 inches. If dimensions look ten times too big, the DXF export was set to millimeters when Slabsmith expected inches. Go back to the exporting software, switch units to inches, re-export. This is the single most common import error, and it burns shops every week.
No digital template? Draw parts by hand inside Slabsmith with the built-in shape tools. Rectangle, L-shape, and custom polygon are all there. Hand drawing is slower and easier to botch than a DXF import, but it's fine for simple rectangular sections.
With parts loaded, they sit as outlines in the panel. You haven't placed anything on a slab yet. That's next.
How do you place and position parts on the slab for best yield and veining?
Open the slab from inventory in the Layout module. Drag a part from the left panel onto the slab image. It lands as a semi-transparent overlay, so you see the stone pattern through it.
Yield-first placement means minimizing waste. Pack parts as tight as you can while leaving the kerf your blade eats (usually 1/8 to 3/16 inch for a 10mm blade). Slabsmith does not auto-nest parts the way dedicated nesting software does. It shows running totals of used area against remaining slab area as you drag. Some shops run a separate nesting tool and transfer the coordinates over, but most mid-size shops do it by hand. The visual feedback is enough for an experienced operator.
Veining match is where the slab photo earns its money. On a book-matched marble job (see our guide to marble countertops), you flip and rotate parts, then nudge them until the vein flows across sections. Slabsmith has a mirror-flip function built for book-match work. Zoom in and check that a dramatic vein doesn't run straight through a sink cutout location. Sink cutouts are expensive waste. Positioning the part so the vein reads across the field instead of disappearing into a hole is a real skill, and the software makes it visible before a single cut. [2]
Rotation is fully free. Spin a part to any angle, which matters for directional stone or for squeezing a long narrow piece across a slab that's barely wider than it is long. Most fabricators keep parts orthogonal when they can, since diagonal cuts throw away more material than straight ones. But the option is there when you need it.
Positioned a part? Right-click and lock it. Locked parts change outline color and won't drag by accident. Lock every part as you place it. Multi-slab job? Repeat on each slab in turn.
High-end granite countertops crews often run a first-pass layout in Slabsmith, then walk to the yard and hold a printout against the real slab to confirm the veining match reads right in person. The rendering is good. The eye is better.
How do you calculate material yield and waste in the layout?
Slabsmith tracks yield automatically as you place parts. The layout status bar shows total slab area, used area (the sum of all locked parts), and remaining area. It also shows yield percentage, which is used area divided by total slab area.
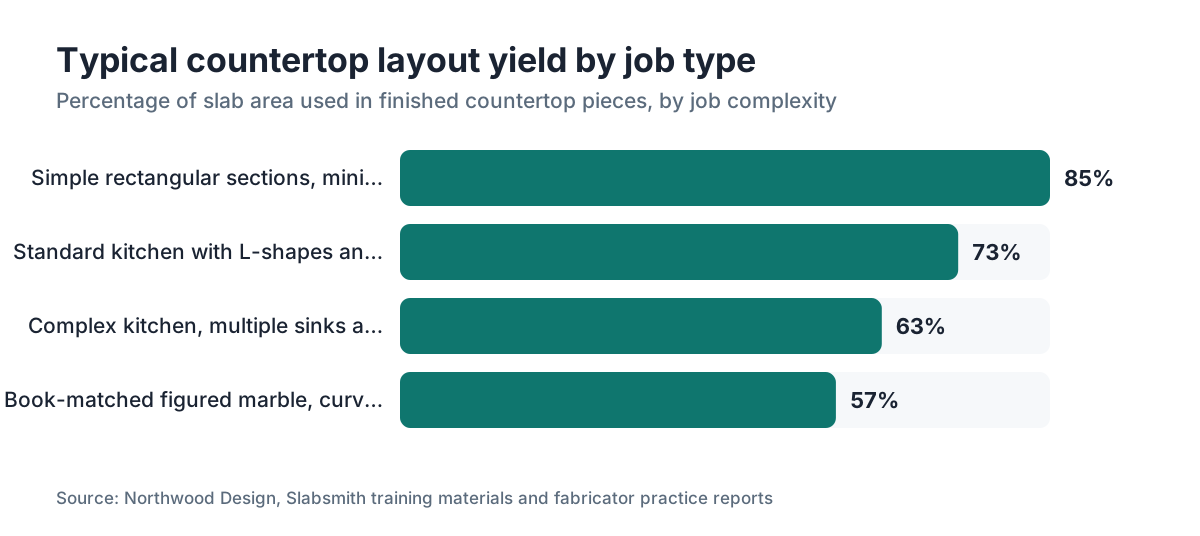
Residential countertop jobs on average slabs with standard shapes typically run 65 to 80 percent yield, according to figures in Northwood's own training materials. [1] Jobs loaded with L-shapes, curved edges, or cooktop cutouts lose more and can drop to 55 to 65 percent. Big rectangular islands with almost no cutouts can push past 85 percent.
The software also gives you a per-job material cost if you entered slab cost in inventory. Handy for a margin check. A layout showing 40 percent waste on a slab you paid $400 for means $160 of material is gone before fabrication labor even starts. Charge the customer for that waste or eat it, that's a shop call, but seeing the number beats guessing at it. [4]
Offfcuts big enough to reuse get flagged as remnants. Slabsmith builds a remnant record from the unused-area polygon and drops it into inventory. Shops running an active remnant program search that inventory when a small job comes in. A 12-inch strip left from a perimeter section might be exactly right for a bathroom vanity, and the search makes it findable instead of making someone walk the yard. [3]
Want to compare layout efficiency across jobs over time? The layout history on each slab record holds the data. Average yield by material and by operator is trackable if someone exports the records to a spreadsheet now and then. Slabsmith has no built-in analytics dashboard for this. The tracking is manual.
How do you use Slabsmith for customer veining approval?
The customer approval meeting is one of the strongest practical uses of Slabsmith. Once parts sit on the slab image, you generate a rendered image showing each countertop section with its actual stone photo underneath. Print it or export it as a PDF.
In the meeting, you show the customer the exact portion of stone headed for their kitchen. On figured materials like Calacatta marble, Blue Bahia granite, or leathered quartzite, this is a genuine value add. The customer sees whether the dramatic vein they fell for at the yard lands on the island or hides on an inconspicuous run behind the range.
Slabsmith also has a viewer mode (called the Customer Viewer or a showroom display, depending on version) that puts the layout on a touchscreen so customers zoom into specific areas themselves. Larger shops run this at a showroom design station.
For sign-off, print the layout sheet with the customer's name, job number, date, and a signature line. Have them sign. Keep it in the job folder. That signed sheet is your protection if the customer later claims the vein ended up in the wrong place. It also cuts disputes on countertop installation day, when they see the finished piece for the first time. [7]
Be straight with customers about what the rendering can't do. Screen color never matches the physical slab exactly, and the sheen of a polished surface makes the photo read differently from the installed piece. The approval covers position and veining flow. It is not a color guarantee.
How do you export cut files from Slabsmith for CNC or waterjet?
When the layout is approved and every part is locked, the export step sends cut geometry to your downstream equipment. Slabsmith writes DXF files with each part's position in the slab coordinate system. Your CNC software (Park Industries Destiny, CNC Therma, Alphacam, and similar) reads the DXF and knows where to cut relative to a slab origin you set on the machine.
The workflow: go to the Layout tab, confirm all parts are locked, click Export, choose DXF, set the coordinate origin (usually the lower-left corner of the slab or a specific registration mark), and save. The DXF carries layer-separated geometry for outer profiles, sink cutouts, edge treatments, and any drill points you flagged. [9]
No CNC? The export still helps. Plot a to-scale layout sheet to a large-format printer at 1:10 or 1:20 and your saw operator gets a paper guide. It's less precise than a CNC program, but it blocks the most common manual error: cutting a piece from the wrong section of the slab.
Shops running Slabsmith alongside nesting or quoting software fold the layout data into the wider workflow. Shops that use quoting software like the one from SlabWise can cross-check the material quantity from the Slabsmith layout against the quote to confirm the job is still on budget before committing to cuts. That check catches errors that cost real money once they reach the saw.
After export, update the slab inventory record to reflect which parts came off it. The remaining area becomes a remnant, or the slab shows as depleted. Keeping this current is tedious. It's also the only way your yard inventory stays accurate.
What are the most common mistakes fabricators make in Slabsmith layouts?
Calibration errors cost the most. An operator who skips rechecking calibration after switching cameras or changing the photo setup produces layouts off by a meaningful fraction of an inch across a big slab. That fraction can mean a part doesn't fit the physical opening. Measure at least two known dimensions on every new slab import. [8]
Not locking parts before saving runs a close second. Unlocked parts drift if the file reopens on another machine or if someone fat-fingers a click in the layout view. Lock every part the moment it's positioned and approved.
Forgetting seam placement is subtler. Slabsmith shows part outlines but does not enforce seam rules. You can butt two parts together on screen right over a dishwasher opening (a weak spot) or across a high-traffic prep zone. Seam judgment lives with the operator, not the software. [2]
DXF scale errors (millimeters versus inches) show up constantly in shops taking templates from different sources. Build a verification step into intake: every DXF import gets its largest dimension measured in Slabsmith before any layout work starts. [9]
Low-resolution slab photos are another repeat offender. A 4-megapixel phone shot of a 10-foot slab doesn't carry enough pixel density to judge veining at the part level. Minimum 8 megapixels for a 9- to 10-foot slab. Twelve or more is the practical standard for figured stone. [6]
Last one. Shops finish a layout, then change template dimensions after a field measurement correction, and forget to update the Slabsmith parts. Always re-import the corrected DXF and redo the layout when dimensions change. Running a cut list off a stale layout against revised field measurements is exactly how the expensive mistakes happen.
How does Slabsmith layout compare to paper templates and manual methods?
Paper templates worked for decades and still work fine on simple, small jobs. A plain bathroom vanity in solid-color quartz, measured with a tape and cut from a remnant, does not need Slabsmith. Photographing the slab and importing a DXF costs more time than it saves on a 15-minute job.
The math flips fast as jobs get complex. A full kitchen in figured marble, a book-matched island, a customer who wants to approve veining before cutting: that's where paper loses badly. The customer can't picture the layout from a cardboard cutout held against a slab in the yard. The fabricator can't easily calculate yield or find the best part position without the slab photo as a reference.
Here's a rough comparison of methods:
| Method | Veining preview | Scale accuracy | Yield tracking | Customer approval | CNC export |
|---|---|---|---|---|---|
| Paper templates | None | +/- 1/4 inch typical | Manual calculation | Not practical | Not possible |
| CAD only (no photo) | None | +/- 1/16 inch | Manual | Not practical | Possible |
| Slabsmith | Full photo | +/- 1/16 inch | Automatic | Standard feature | DXF export |
| Slabsmith + nesting software | Full photo | +/- 1/16 inch | Automatic | Standard feature | DXF export |
The accuracy figures reflect typical shop practice. Individual results depend on camera setup and operator consistency. [7]
For shops doing kitchen countertops in natural stone, the payback on a Slabsmith setup is clearest on figured materials and multi-slab jobs, where waste reduction and shorter approval cycles are real cost drivers. For shops mostly cutting quartz or solid-surface where pattern matching doesn't apply, the workflow gain is narrower, though yield tracking and inventory management still pull their weight.
How do you manage a multi-slab job in Slabsmith?
Multi-slab jobs are where the inventory system earns its keep. These are kitchens too large for one slab, or jobs where you match stone across several slabs from the same lot.
Start by confirming every slab you plan to use is already in inventory with a calibrated photo. Open the job and build the part list as usual. Instead of dropping all parts onto one slab canvas, open multiple slabs as separate layout tabs and distribute parts across them, dragging each piece to the slab where it fits best on size and veining.
For veining continuity across slabs (common on linear-grain marble runs), use the overlay or side-by-side view to watch how the grain exits one slab and enters the next. You want the perimeter grain from slab 1 to keep flowing on the perimeter section from slab 2 at the seam. This is judgment work. Having both slab photos open at once makes it tractable.
Slabsmith tracks which parts came from which slab in the job record. Generate the cut list or the customer approval PDF and it breaks out per-slab detail. That tells installation crews which slab each piece came off, which matters when slabs sit in different spots in the yard or arrive on separate trucks.
For lot-matched material, where you bought multiple slabs from the same quarry block for color consistency, tag them all with the same lot number in inventory. Filter inventory by lot to confirm you're laying out only from that batch. [3] Mixing lots on one countertop run looks fine in the shop and turns obvious the moment the countertops sit in the same room.
What hardware and setup does a shop need to run Slabsmith effectively?
Slabsmith runs on Windows 10 or 11 (64-bit). The minimum hardware Northwood specifies for current versions: an Intel or AMD multi-core processor (4 or more cores recommended for photo processing), 16GB RAM minimum with 32GB preferred for large slab files, a dedicated GPU for layout rendering, and at least a 1920x1080 monitor. A 27-inch or larger display genuinely helps, because you spend a lot of time staring at full-slab images. [1]
Two photography setups make sense. First is a fixed overhead camera bar mounted in the yard or shop, which Northwood sells as an accessory and which automates calibration. A full camera bar system runs roughly $3,000 to $8,000 depending on span and camera quality, per estimates in Northwood's published materials. [1] Second is a handheld DSLR with a calibration rod, near-zero hardware cost but demanding on operator technique to hold accuracy.
A networked setup (Slabsmith on a server or NAS with workstation clients) is common in larger shops, so the layout operator and the yard manager share one live inventory. Single-machine setups work fine under about 10 slabs a week.
Slabsmith is licensed software sold with annual maintenance contracts. Northwood doesn't publish pricing publicly, so current numbers require contacting them directly. Factor in the learning curve when you evaluate it. Getting a new operator to reliable, customer-ready layouts takes two to four weeks of regular use, per common shop reports, though the basics are learnable in a day. Treat it like any capital equipment decision and run the payback math before you buy. [4]
SlabWise, which handles quoting and material nesting for fabricators, plugs into workflows that include Slabsmith layout data for a closed loop from quote to cut file. A stack like that cuts the manual re-entry of dimensions and material quantities between steps.
Frequently asked questions
Can I use Slabsmith without a dedicated camera bar system?
Yes. Photograph slabs with any DSLR or mirrorless camera (8 megapixels minimum) as long as you include a calibration rod of known length in every shot. The rod is how the software corrects perspective and scale. The camera bar automates this and cuts operator error, but the manual photo workflow works fine for shops that shoot consistently and check calibration on every import.
What file format does Slabsmith use to import countertop template shapes?
Slabsmith imports DXF files natively. If your laser templater (Proliner, LT-2D3D) exports DXF, bring that straight into the layout. Use a non-DXF system and you export to DXF from your CAD program first. The most common import error is scale mismatch: the DXF exported in millimeters while Slabsmith expected inches. Verify the largest dimension after import before you start any layout.
How accurate is Slabsmith layout compared to physical templates?
With proper calibration and a quality slab photo, Slabsmith holds plus or minus 1/16 inch across a typical 10-foot slab. Paper templates can match that in experienced hands but stretch over time and are hard to reproduce. The software's accuracy stays consistent across operators and doesn't degrade when the file reopens or gets shared, which physical templates can't claim.
Does Slabsmith automatically nest parts for maximum yield?
No. Slabsmith is a manual layout tool. You drag parts onto the slab yourself and the software shows running yield totals. Automated nesting (the algorithm that packs shapes to minimize waste) needs separate nesting software. Some fabricators run a dedicated nesting tool and transfer the coordinates to Slabsmith, but most shops handle layout manually and rely on experienced operators to optimize placement.
Can customers see and approve the Slabsmith layout remotely?
Slabsmith exports a rendered PDF showing the slab photo with part outlines overlaid, which you email for remote approval. Some versions include a viewer or showroom display mode for in-person review. Emailed PDF is the most common approach for customers who can't visit the shop. Get a written signature or clear email confirmation before you cut.
How do I handle book-matched slabs in Slabsmith?
Slabsmith has a mirror-flip function. For book-matched pairs, import both slab photos and use the flip tool to create the mirrored version of one slab. Then lay the matching parts side by side using the grain as your visual guide. The software lets you zoom into specific vein lines to verify the match at the seam before you commit to cuts. This is one of its strongest use cases for high-end natural stone.
What happens to remnant pieces after a layout is cut in Slabsmith?
You flag unused slab area as a remnant after the layout is done and cuts are made. The software creates a new inventory record for the remnant with its own photo (usually the original slab photo cropped to the remaining area) and dimensions. That remnant is then searchable by size and material for a future job. Shops with active remnant programs use this to skip buying full slabs for small vanity or backsplash work.
How do I export a Slabsmith layout to a CNC saw or waterjet?
Export the locked layout as a DXF from the Layout module. Set the coordinate origin to match your machine's reference point (usually the lower-left corner of the slab). Your CNC software reads the DXF and positions cuts accordingly. Slabsmith separates geometry by layer: outer profiles, sink cutouts, edge treatments, and drill points each live on their own layer, so the CNC operator can tell what every line represents.
How many slabs can Slabsmith hold in its inventory?
Slabsmith's inventory is limited by your storage, not a hard cap in the software. A typical slab photo at 12 megapixels runs 5 to 15 megabytes before processing. A shop with 500 slabs in active inventory might use 10 to 20 gigabytes for photos alone. Most shops archive completed-job slabs each year and keep active inventory at a manageable size. Northwood recommends a dedicated server or NAS for large inventories.
Does Slabsmith work with quartz and engineered stone, or only natural stone?
Slabsmith works with any slab you can photograph: granite, marble, quartzite, soapstone, and engineered quartz. The veining-match feature matters less for solid-color quartz, but inventory management, yield tracking, and cut-file export are all equally useful. Some fabricators also use it for large-format porcelain slabs, where material cost and cut planning matter even without figured stone patterns.
How long does it take to do a complete layout in Slabsmith for a standard kitchen?
An experienced operator, with a calibrated slab already in inventory and a DXF template ready to import, completes a standard kitchen layout in 20 to 45 minutes. First-time layouts on new slabs (photo import plus calibration) add 15 to 30 minutes. Complex jobs with book-matching, multiple slabs, or many cutouts run two to three hours. The time pays back in avoided rework and fewer approval disputes.
What is the cost of Slabsmith software?
Northwood Design does not publish Slabsmith pricing publicly. Based on industry forum discussions and fabricator reports, the license plus first-year maintenance has historically run in the low to mid thousands of dollars, with annual renewal fees after that. Hardware (camera bar, server, display) is extra. Contact Northwood directly for current pricing, since it varies by configuration and seat count.
Can Slabsmith be used for backsplash tile layout as well as countertop slabs?
Slabsmith is built around slab-format stone, not tile grids. You can technically lay out large-format backsplash pieces cut from a full slab (some shops do this with thick porcelain or marble), but it isn't built for tile-by-tile layout with grout joints. For standard tile backsplash planning, dedicated tile software or even a simple spreadsheet fits better.
Sources
- Northwood Design, Slabsmith official product page and documentation: Slabsmith uses a calibration bar and camera distortion correction to achieve scale accuracy, and runs on Windows with specified hardware minimums; typical yield figures and camera bar cost range referenced from training and product materials.
- Natural Stone Institute (formerly Marble Institute of America), Natural Stone Reference Manual: Seam placement guidance for stone countertops, including structural considerations over appliance openings and high-traffic areas.
- Natural Stone Institute, Fabricator Business Resources: Industry guidance on stone slab inventory management and remnant tracking practices for fabrication shops.
- U.S. Small Business Administration, Technology and Equipment Financing for Small Manufacturers: General framework for evaluating capital equipment ROI in small manufacturing shops, applicable to software and camera hardware investment decisions.
- OSHA, Stone Fabrication Industry Health and Safety Guidance: Workplace layout and shop operations context for stone fabrication environments referenced in discussion of physical slab handling versus digital layout methods.
- University of Illinois Extension, Understanding Digital Image Resolution and Scale: Minimum image resolution requirements for accurate dimensional measurement from photographic sources, supporting the 8-megapixel minimum recommendation for slab photography.
- International Surface Fabricators Association (ISFA), Countertop Fabrication Standards: Industry standards for template accuracy tolerances and countertop installation fit, referenced in the plus or minus 1/16 inch accuracy discussion.
- National Institute of Standards and Technology (NIST), Dimensional Measurement in Manufacturing: Calibration and measurement traceability principles underpinning the importance of known-length calibration bars in photographic dimensional systems.
- Autodesk, DXF File Format Reference: DXF format specifications relevant to unit settings (inches vs millimeters) and closed polyline definitions used for part import in Slabsmith.
Last updated 2026-07-10