TL;DR
- A plywood subtop gives stone countertops a continuous, level surface to bond to and keeps the slab from cracking over cabinet gaps.
- Use 3/4-inch cabinet-grade plywood, fasten it to the cabinet rails with screws every 8 to 12 inches, and check for flat within 1/8 inch across the run.
- The job takes two to four hours for a typical kitchen.
Why do stone countertops need a plywood subtop at all?
Stone is heavy and brittle. Granite, quartz, and marble crack if they span an unsupported gap, and most face-frame cabinets have gaps of 2 to 4 inches between the front rail and the back rail. A plywood subtop bridges those gaps and gives the fabricator's silicone or epoxy adhesive a full, consistent surface to bond to.
Without a subtop, the stone rests only on the narrow cabinet rails, usually 1.5 inches wide. Any flex in the cabinet box, a heavy pot dropped near the center of a long run, or uneven settling can put enough stress on the underside of the stone to start a crack that runs straight through the slab. A subtop spreads that load across the entire cabinet carcass.
Not every countertop material needs one. Laminate countertops and butcher block countertops often go directly on rails because they flex before they crack. Stone doesn't flex. The subtop is cheap insurance against a $1,500 to $5,000 slab repair or replacement.
Some fabricators skip the subtop for shorter spans (under 24 inches) on thick stone, typically 3 cm (about 1.2 inches). That's a judgment call, and you should confirm it with your fabricator in writing before install day. Most shops in the US still call for a subtop as standard practice on any stone run longer than 24 inches [1].
What thickness and grade of plywood should you use?
Use 3/4-inch (18 to 19 mm) cabinet-grade plywood. That thickness resists deflection under stone, and cabinet-grade material (usually birch or maple veneer core) has fewer voids in the core layers than construction sheathing. Voids matter because a screw that threads into a void has almost no holding power.
Some fabricators spec 1/2-inch for thin-slab work (2 cm stone) on short spans, but 3/4-inch is the safe default. Going thicker than 3/4-inch usually creates a problem on the finished side: it raises the countertop height and can throw off dishwasher and appliance clearances [2].
Skip OSB (oriented strand board) as a subtop. OSB swells when it contacts moisture, and a kitchen guarantees some moisture exposure over time. Plywood holds its shape better. If you want to spend a little more, Baltic birch plywood has more laminations and fewer core voids than domestic cabinet-grade material, which gives you steadier screw holding. That's a worthwhile $15 to $20 per sheet on a kitchen [12].
MDF (medium-density fiberboard) shows up occasionally in prefab cabinet packages as a subtop material. It holds screws reasonably well when dry, but it's heavy and it swells aggressively when wet. Don't use it if you have a choice.
What tools and materials do you need before you start?
You don't need much. Here's the working list:
- 3/4-inch cabinet-grade plywood (calculate the square footage of your countertop runs and add 10% for waste)
- Circular saw or track saw for breaking down sheets
- Jigsaw for sink cutouts
- Cordless drill or impact driver
- 1-5/8-inch coarse-thread drywall screws or dedicated cabinet screws (coarse thread grips wood better than fine thread)
- 4-foot level and a long straightedge (8-foot is ideal)
- Wood shims
- Construction adhesive (optional but helpful at the perimeter)
- Tape measure and pencil
- Safety glasses
Bring a helper for anything longer than 48 inches. A 4x8 sheet of 3/4-inch plywood weighs about 60 to 70 pounds, and wrangling it over base cabinets in a tight kitchen is genuinely awkward alone [3].
How do you cut the plywood subtop panels to size?
Measure each cabinet run separately. Don't assume they're all the same depth. Standard US base cabinet depth is 24 inches, but builder-grade cabinets often vary by a quarter-inch or more between runs, and walls are rarely straight.
For a standard 25.5-inch-deep countertop (24-inch cabinet depth plus a 1.5-inch front overhang), rip your plywood to 25.5 inches. Cut the length to match the cabinet run exactly, wall to wall or wall to end panel.
Sink cutouts happen before the subtop goes down. Locate the center of the sink cabinet, measure the rough opening from the sink's template (every undermount sink ships with a paper template), and cut with a jigsaw. Leave at least 1.5 inches of plywood on all sides of the cutout so the stone around the sink has something to bond to. An oversized sink cutout is one of the most common subtop mistakes. It leaves the stone unsupported right where the weight of the sink pulls down [4].
If your run turns a corner (an L-shape or U-shape kitchen), miter the corner joints or butt-join them. A butt joint with screws from both directions is plenty strong here. Don't overthink the joinery.
How do you fasten the plywood subtop to the cabinets?
The plywood attaches to the cabinet's top rails, the horizontal frame members at the very top of each box. On face-frame cabinets, those rails are typically 3/4 inch to 1 inch thick. On frameless (Euro-style) cabinets, the top panel of the box itself is the attachment surface.
Drive 1-5/8-inch screws up through the cabinet top rails and into the plywood from below. This is the cleanest method and the one most fabricators expect to see: no screw heads on top of the subtop, nothing to interfere with the adhesive bond. Space screws every 8 to 12 inches along the front rail, back rail, and any intermediate rails.
If screwing from below is awkward (tight space, cabinets already against the wall), screw down through the top of the plywood and countersink the heads flush. The fabricator's adhesive fills over the countersunk holes. This works fine structurally.
At wall returns and end panels, a bead of construction adhesive along the edge adds holding power without forcing you to drive screws at an angle. Let it tack for 5 minutes before setting the plywood.
Here's what trips people up. Don't glue the plywood down with construction adhesive as your primary fastening method. Adhesive alone doesn't hold long-term under the weight of stone. Screws first, adhesive as a supplement [5].
How level does the subtop need to be, and how do you check it?
Your fabricator needs a surface flat within 1/8 inch across any 8-foot span. That's the tolerance most stone shops work to, and it lines up with the Marble Institute of America (now MIA+BSI) guidance [6]. If the subtop sags more than that, the fabricator has to shim the stone during install, which eats time and sometimes isn't possible with full slabs.
The MIA+BSI Dimension Stone Design Manual sets substrate flatness for dimension stone at within 1/8 inch in 10 feet for most applications. That's a real number you can hand to a general contractor or tile setter who pushes back.
To check, set your 4-foot level across the subtop in multiple directions: front to back, left to right, and diagonally. Mark low spots with a pencil. Low spots are easier to fix than high spots: slide a shim between the cabinet rail and the plywood underside, then re-drive the screw.
High spots are trickier. A belt sander can knock down a high ridge in the plywood, but more often a high spot means one cabinet sits higher than its neighbors. Loosen that cabinet's mounting screws (the ones into the wall studs), drop it slightly, re-level, and re-fasten. Do this before the subtop goes in, not after.
Check both directions at once. A subtop can read perfectly level left to right and still slope 1/4 inch front to back, which matters for kitchen countertops that hold standing water near the sink.
What overhang rules apply to the plywood subtop?
The plywood subtop sits flush with (or just behind) the face of the cabinet doors. It does not extend to the finished countertop overhang. The stone overhangs the plywood, and the plywood overhangs the cabinet box.
Standard finished countertop overhang at the front is 1 to 1.5 inches past the cabinet door face. The plywood subtop runs to the front edge of the cabinet frame, so the stone has something to sit on right to the edge. The stone then projects past the plywood by roughly 1 to 1.5 inches.
At islands and peninsulas, the rules change. Stone can cantilever unsupported up to 12 inches before it needs support underneath, per general stone industry guidance. Beyond 12 inches, you need corbels, hidden steel brackets, or a thicker stone ledge [7]. Don't expect the plywood subtop to carry a long cantilever on its own. It isn't stiff enough in that orientation.
For breakfast bars and seating overhangs, steel corbels bolted to the cabinet sides and the subtop are the right answer. The fabricator will want to see them in place before the template visit so they can account for bracket height in the stone thickness.
Do you need a subtop for all stone types, or does it vary?
The need scales with the stone's brittleness and thickness.
Granite countertops and marble countertops are the most demanding. Both are brittle rocks that crack rather than flex, and both sell commonly in 2 cm and 3 cm thicknesses. A subtop is standard for both.
Engineered quartz (brands like Cambria countertops) is slightly more flexible than natural stone but still brittle at the edges and around sink cutouts. Most engineered stone manufacturers specify a continuous substrate in their installation guidelines. Cambria's published installation guide calls for a flat, continuous substrate for all countertop installations [8].
Soapstone and quartzite behave like granite here: both are dense natural stones that crack under flex stress. The subtop requirement is the same.
The main stone-adjacent countertop that skips the plywood subtop is a solid surface like Corian countertops, which is flexible enough to conform slightly to imperfect cabinet surfaces and often goes in without a full subtop. Formica countertops and other laminates are similar.
Not sure what your stone needs? The answer is almost always: use the subtop. A sheet of plywood costs nothing against the risk of a cracked slab.
What are the most common mistakes people make installing a plywood subtop?
The single most common mistake is skipping the level check. People lay the plywood, fasten it, and assume it's fine because the cabinets looked level going in. Cabinets shift. Floors settle. Check with a level after the subtop is fastened, not before.
Second: making the sink cutout too large. Stay at least 1.5 inches inside the edge of the cabinet opening on all sides. A generous cutout feels like it makes life easier, but it leaves the stone unsupported at the sink perimeter, which is exactly where a chip or crack starts when someone drops something into the basin.
Third: using drywall as a subtop. This happens when a remodel runs tight on material and someone grabs a piece of 3/4-inch drywall instead of plywood. Drywall has almost no structural value here, and it isn't moisture-resistant. Don't do it.
Fourth: fastening the subtop with finish nails or staples because someone ran out of screws. Nails and staples pull through plywood under the weight of stone. Use screws.
Fifth, and this one bites fabricators specifically: not confirming cabinet height before templating. If the homeowner adds a subtop after the template visit, the finished countertop height changes by 3/4 inch, and the stone may not fit under the window sill, upper cabinets, or dishwasher. Template after the subtop is in, not before [9].
Fabricators running their own quoting and layout, like shops using SlabWise for job costing and slab nesting, often build a subtop checklist into the pre-template workflow to catch these before the truck rolls.
How does a plywood subtop affect the finished countertop height?
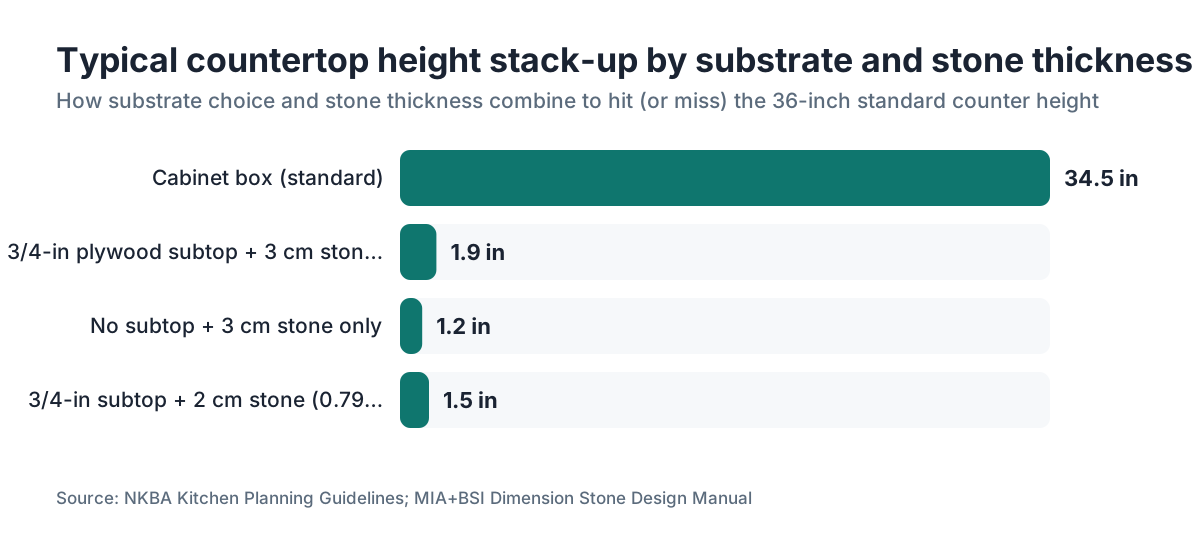
Standard US kitchen counter height is 36 inches from finished floor to top of surface. That 36 inches breaks down roughly as base cabinet box (34.5 inches) plus countertop material (1.5 inches for 3 cm stone) equals 36 inches [10].
Add a 3/4-inch plywood subtop and the math changes: 34.5 + 0.75 + 1.5 = 36.75 inches. That extra 3/4 inch matters for dishwasher clearance (standard dishwashers are built for counter heights up to about 36.25 inches), undermount appliance panels, and sight lines.
Most fabricators plan for this. They subtract the subtop thickness from the stone thickness target, or they run thinner 2 cm stone on a 3/4-inch subtop to land back at 36 inches. But you need this conversation before the template, not after the stone is cut.
Accessibility design guidelines (ADA standards, 36 CFR 1191) set a maximum surface height of 34 inches for accessible work surfaces. Building to ADA specs means the cabinet height, subtop thickness, and stone thickness all get coordinated from the start [11].
How long does installing a plywood subtop take, and can a homeowner do it?
A single-cook kitchen (roughly 30 to 40 linear feet of counter) takes two to four hours for someone comfortable with a circular saw and a drill. Most of that time is measuring, cutting, and fussing with level.
Homeowners can absolutely do this. The skills you need: measure twice, cut once; drive a screw without splitting wood; and read a level. None of that is beyond a handy homeowner with basic tools.
The part that trips people up is accurate sink cutouts. A jigsaw with a fresh blade and a patient hand does the job. Drill a starter hole inside the waste area first, then follow your layout lines. Take your time. You can't shrink a cutout that's too big.
If you're not comfortable with the saw work, any handyman can do this in an afternoon for $150 to $300 in labor, which is cheap relative to the countertop job.
The stone install itself is the fabricator's job. See our guide to countertop installation for what happens after the subtop is in place.
Does the plywood subtop affect how you clean or maintain the stone countertop?
Not directly. Once the stone is set and bonded, the plywood is completely hidden. You maintain the stone surface the same way regardless of what's underneath.
Still, the quality of your subtop install affects long-term maintenance indirectly. A well-fastened, flat subtop means the stone sits without stress, which means fewer hairline cracks over time. Hairline cracks in polished stone are impossible to clean fully because they trap grease and minerals, so preventing them matters.
For stone-specific care, see our guides on how to clean stone countertops, how to clean quartzite countertops, and how to clean soapstone countertops. The subtop has nothing to do with sealing, polishing, or stain removal.
Frequently asked questions
Can I skip the plywood subtop if my cabinets have a solid top panel?
Some frameless cabinets ship with a solid 3/4-inch wood or plywood top panel built in. If that panel is continuous (no gaps between boxes), flat within 1/8 inch, and firmly fastened, your fabricator may accept it as the substrate. Confirm this in writing with the shop before demo day. Gaps between cabinet boxes, even small ones, still need to be bridged.
What kind of screws should I use to fasten the plywood subtop?
Use 1-5/8-inch coarse-thread screws, either standard drywall screws or dedicated cabinet screws. Coarse thread grips wood fibers better than fine thread in a plywood-to-wood connection. Space them every 8 to 12 inches along all rails. Avoid nails and staples: they don't have enough withdrawal resistance to hold plywood under the weight of stone over time.
How do I handle a cooktop cutout in the plywood subtop?
Treat a cooktop cutout like a sink cutout: use the manufacturer's template, stay at least 1.5 inches from the edge of the cabinet opening on all sides, and cut with a jigsaw. Leave extra material around the cutout perimeter so the stone has support. Confirm the cutout dimensions with your fabricator before cutting; they may want a slightly different size than the cooktop template specifies.
Does the plywood subtop need to be waterproofed or sealed?
No special waterproofing is required for a standard kitchen subtop. The stone above and the cabinet box below provide reasonable moisture protection. If you're working in a bathroom with a vessel sink, or an outdoor kitchen with direct water exposure, a coat of exterior-grade primer on the plywood top face is a reasonable precaution. Standard interior plywood is fine for typical kitchen use without treatment.
My cabinets are frameless (Euro-style). Does the subtop installation change?
Slightly. Frameless cabinets have no front face frame rail, so you screw the plywood to the top panel of each box instead of a rail. That top panel on most frameless boxes is 5/8 or 3/4 inch thick. Use 1-5/8-inch screws and pre-drill to avoid splitting the panel edge. You may also want a bead of construction adhesive along the front edge where the plywood overhangs the box.
What gap, if any, should I leave between plywood panels where two runs meet at a corner?
Aim for no gap at interior corners: butt the panels together tightly. A gap at a corner is a low spot the stone has to bridge, which is exactly what you want to avoid. At outside corners (like an island end), the overhang of the stone past the plywood edge should be no more than about 1.5 inches without added support underneath.
Can I use two layers of 1/2-inch plywood instead of one layer of 3/4-inch?
Yes, and some fabricators prefer it because you can offset the seams between layers for extra rigidity. Fasten the bottom layer to the cabinet rails, then fasten the top layer to the bottom layer with screws, offsetting joints by at least 12 inches. The combined thickness is essentially the same as 3/4-inch. This approach also lets you level the first layer with shims before adding the second.
How close to the wall does the plywood need to go?
The plywood should run tight to the wall on wall-adjacent sides. Leave no gap. The fabricator scribes the stone to the wall, and any gap between the plywood and the wall is a place where the stone can rock or crack over time. If the wall is out of plane (bowed or racked), scribe the plywood edge to match, the same way you'd scribe a cabinet.
Will my fabricator install the plywood subtop, or is that my job?
Most stone fabricators in the US install and set stone only. They expect the substrate ready when they arrive. The plywood subtop is typically the homeowner's or general contractor's responsibility. Some shops offer substrate prep as an add-on for $150 to $400, but it's not the norm. Ask your fabricator explicitly what they expect to find on install day.
Does plywood thickness change if I'm installing extra-thick stone (4 cm or quartzite slabs)?
Not really. The plywood thickness stays at 3/4 inch; the extra stone provides its own rigidity. What changes with very heavy stone (some quartzite slabs run 20 to 25 pounds per square foot at 3 cm) is screw count: add screws every 6 to 8 inches rather than 12, and confirm your cabinet boxes are firmly anchored to wall studs, because total countertop weight on a full kitchen can exceed 500 pounds.
Do building codes require a plywood subtop under stone countertops?
No US building code mandates a plywood subtop specifically. The requirement comes from stone industry installation standards (MIA+BSI) and manufacturer installation guidelines. But if a countertop installation causes property damage or personal injury, code compliance plus adherence to manufacturer specs is the baseline that insurance and liability decisions hinge on. Following standard practice protects you on both fronts.
How do I account for out-of-level floors when setting the plywood subtop?
An out-of-level floor makes the cabinets out of level, which the installer should have corrected during cabinet installation using shims under the base. If they didn't, the real fix is to shim the cabinets before the subtop goes in. Don't build up the plywood subtop to compensate for cabinets more than 1/4 inch out of level across a run. Fix the cabinets first.
Sources
- Marble Institute of America (MIA+BSI), Dimension Stone Design Manual: Industry standard practice calls for a continuous substrate for stone countertop installation to prevent cracking over unsupported spans.
- National Kitchen and Bath Association (NKBA), Kitchen Planning Guidelines: Standard base cabinet height is 34.5 inches; countertop surfaces are designed to reach 36 inches with a 1.5-inch material thickness, limiting subtop and material stack-up.
- APA - The Engineered Wood Association, Panel Design Specification: A 4x8 sheet of 3/4-inch plywood weighs approximately 60 to 70 pounds depending on species and veneer grade.
- National Association of the Remodeling Industry (NARI), Countertop Installation Best Practices: Sink cutouts in substrates should retain at least 1.5 inches of material on all sides to ensure adequate stone support at the sink perimeter.
- APA - The Engineered Wood Association, Fastener Recommendations for Plywood: Screws provide significantly greater withdrawal resistance than adhesive alone for plywood-to-wood connections; adhesive should supplement, not replace, mechanical fasteners.
- MIA+BSI (Natural Stone Institute), Dimension Stone Design Manual, Substrate Flatness Tolerances: The Dimension Stone Design Manual specifies substrate flatness within 1/8 inch in 10 feet for dimension stone countertop installations.
- Natural Stone Institute, Stone Countertop Installation Guidelines, Overhang Limits: Stone countertop cantilever overhangs greater than 12 inches require additional support such as corbels or steel brackets.
- Cambria, Installation and Care Guide: Cambria's published installation guide specifies a flat, continuous substrate for all countertop installations.
- Tile Council of North America (TCNA), Handbook for Ceramic, Glass, and Stone Tile Installation: Substrate changes after templating alter finished surface height and can affect appliance clearances; template should occur after substrate is complete.
- NKBA, Kitchen Planning Guidelines and Access Standards: Standard US kitchen counter height is 36 inches from finished floor to top of counter surface, composed of 34.5-inch cabinet plus 1.5-inch countertop material.
- U.S. Access Board, ADA Standards for Accessible Design (36 CFR Part 1191): ADA standards specify a maximum accessible work surface height of 34 inches from finished floor for accessible counter applications.
- Forest Products Laboratory, USDA, Wood Handbook: Wood as an Engineering Material: OSB (oriented strand board) has significantly greater thickness swelling under moisture exposure than comparable plywood panels, making it a poor choice for moisture-adjacent substrate applications.
Last updated 2026-07-11