TL;DR
- Silicone caulk is a sealant, not a structural adhesive.
- For a bond that lasts, run polyurethane or epoxy construction adhesive on the cabinet rails and save silicone for exposed joints and backsplashes.
- Add corbels or blocking anywhere the overhang passes 12 inches.
- Clean, flat, dry rails plus that mechanical support keep stone anchored for decades.
Why does silicone fail as a countertop adhesive?
Silicone is a sealant, and that single fact decides everything. It stays flexible forever. That flexibility is exactly why it seals a backsplash joint for years, and exactly why it makes a lousy anchor for a 200-pound granite slab. Flexible materials creep under sustained load, and countertop load is almost always off-center, because someone is leaning on the edge.
The failure runs the same way nearly every time. The bond holds for a year or two. Then repeated micro-movement from thermal cycling, cabinet rack, and point loads (a stand mixer, someone sitting on the counter) opens a gap at the adhesive line. Moisture follows the gap in. The bond surface is compromised, and now you have movement you can feel. The callback jobs are almost always the ones where somebody swapped construction adhesive for silicone to save ten minutes.
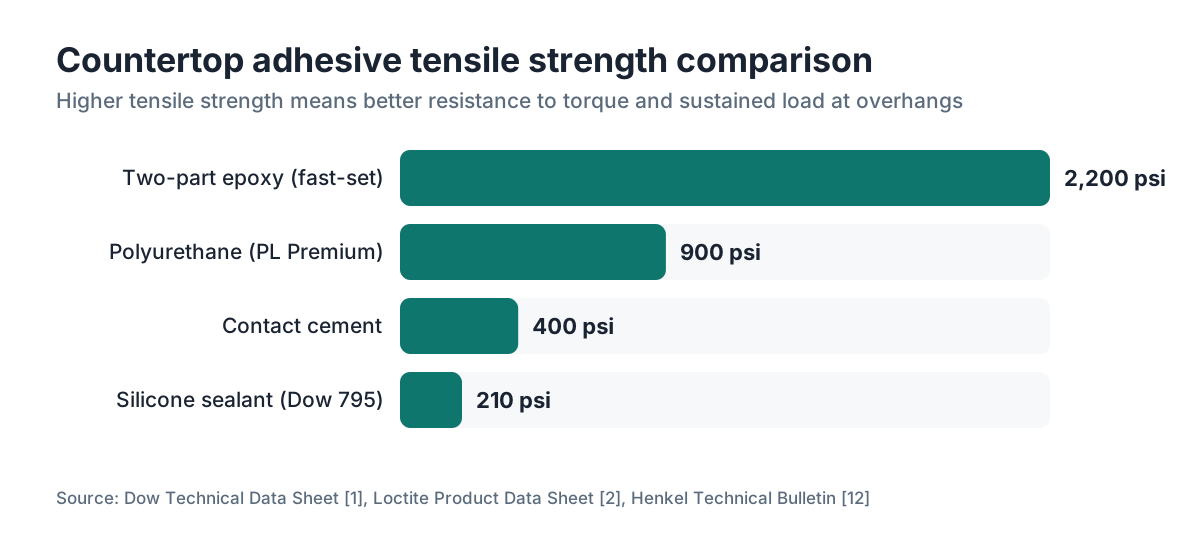
Silicone also has weak tensile strength next to rigid adhesives. Dow's published technical data for its 795 Silicone Building Sealant puts tensile strength around 210 psi. [1] A polyurethane construction adhesive like Loctite PL Premium runs 900 psi or higher once cured. Put any overhang on that slab and torque loads push local stress far past what silicone holds.
Silicone still earns its keep. It belongs at the backsplash-to-counter joint, around sink cutouts, and at any exterior joint where movement tolerance matters. It does not belong as the only thing between stone and cabinet rail.
What adhesive should you actually use to anchor a countertop to cabinets?
Use a two-part epoxy or a polyurethane construction adhesive for the stone-to-cabinet bond. That's the industry standard for stone-to-wood and stone-to-plywood contact, and which one you pick comes down to the material and how much rigidity the layout demands.
Polyurethane adhesives (PL Premium, Titebond Polyurethane, and the like) cure to a rigid but slightly forgiving bond, shrug off moisture, and cost almost nothing. A tube runs $6 to $10 and covers a full kitchen run. They need clamping or weight while curing, usually 24 hours for full strength, and they foam a little as they cure, so keep gaps tight or the foam will push the slab. [2]
Two-part epoxy is the pick for heavy stone, big overhangs, or anywhere you want maximum rigidity. Mixed epoxy has almost no give. That handles torque loads better but punishes an uneven substrate. If your cabinet rails aren't within 1/8 inch of coplanar, epoxy bridges the gaps and builds stress concentrations right where you don't want them. Shim first.
Laminate and solid-surface tops like Corian are a different animal. Contact cement on both faces is the traditional way to bond a post-form edge or a substrate sheet. Post-form laminate tops usually ship with built-in mounting strips and screw-up brackets, so adhesive plays backup to the mechanical connection. Our guide on laminate countertops covers those in full.
One trap catches even seasoned installers. Never use standard PL construction adhesive on quartz or natural stone without checking the manufacturer's compatibility notes. Some adhesives off-gas during cure in ways that stain certain stones. Cambria, for one, publishes its own installation guidance for this reason. [3]
| Adhesive Type | Tensile Strength | Cure Time | Best For |
|---|---|---|---|
| Silicone sealant | ~210 psi | 24 hr | Sealing joints, NOT primary anchor |
| Polyurethane (PL Premium) | 900+ psi | 24 hr | Primary anchor, most stone types |
| Two-part epoxy | 1,500 to 3,000 psi | 15 to 60 min | Heavy stone, large overhangs |
| Contact cement | ~400 psi | Immediate bond | Laminate to substrate only |
What surface prep is required before bonding a countertop?
Clean, dry, and flat. That's the whole job, and it's where most DIY installs and plenty of pro callbacks go wrong. The adhesive doesn't care what the stone cost. It only cares what it's touching.
The cabinet rail (the top edge of the face frame, or the top of the box, depending on construction) has to be clean of sawdust, oil, finish overspray, and old silicone. Old silicone is the worst of the bunch. You cannot bond reliably over cured silicone, period. Scrape it off with a razor blade, wipe with isopropyl alcohol at 90% or higher, and let it flash dry all the way. [4]
The underside of the stone or substrate needs the same care. Stone comes off the fabrication line dusty. Wipe it with a damp cloth, let it dry fully, then hit it with IPA before the adhesive goes on. Moisture trapped under adhesive is a leading cause of failure.
Flatness matters more than people expect. Cabinet rails are rarely dead coplanar, especially in an older kitchen. Run a 4-foot level or straightedge across the cabinet tops before the slab goes down. High spots get shimmed down or planed. Low spots get shimmed up. Use plastic or composite shims on stone, not wood, because wood compresses over time and reintroduces movement. Get all rails within 1/8 inch of a common plane. Go past that and you risk cracking a brittle stone or breaking the bond at the first high spot.
Check the backsplash wall for plumb too. A wall that bows out even 3/8 inch keeps the slab from sitting flat and loads the rear edge of the adhesive line every day it's there.
How do corbels, blocking, and mechanical supports prevent countertop movement?
Adhesive alone won't hold an overhang. That's physics, not a product shortcoming, and no glue changes it.
The stone industry's standard rule: unsupported overhangs on natural stone (granite, marble, quartzite) should not exceed 10 to 12 inches without mechanical support underneath. [5] Quartz makers generally allow up to a third of total slab depth unsupported, which on a typical 25.5-inch counter works out to about 8.5 inches, though it varies by brand. Check your manufacturer's install guide before you trust a number.
Past those limits, you have options.
Corbels are the common visible support. They fasten to the cabinet side panel or a dedicated cleat, reach out under the overhang, and give the stone a bearing surface. Steel beats wood for spans over 15 inches. Size a corbel to reach at least two-thirds of the overhang depth.
Blocking hides the support. A piece of 3/4-inch plywood or solid wood gets glued and screwed to the inside of the face frame, then rises to meet the underside of the counter. The adhesive bonds to that block instead of a thin rail edge. This shines on islands where you want no visible corbels but still need to carry a 12- to 15-inch seating overhang.
Steel angle brackets anchored to the cabinet interior carry load too, which helps on floating islands with no wall to grab. For very large overhangs (18 inches and up, common on waterfall islands), a fabricator sometimes specifies threaded rod anchors set into the stone that tie back to the cabinet structure. Leave that one to a professional shop.
Butcher block countertops change the math. Wood moves with the seasons, so the attachment has to let it expand and contract. Slotted screw holes in the mounting clips, not glue across the full perimeter, are the right call. The USDA Forest Products Laboratory documents this cross-grain seasonal movement in its Wood Handbook. [11]
What's the right way to use silicone on a countertop installation?
Use silicone at the backsplash joint and the sink perimeter, and nowhere structural. In those two spots it has no equal. Everywhere else, it's the wrong tool.
At the backsplash, the wall moves differently than the counter. A rigid adhesive or grout at that joint cracks within a few heating and cooling cycles. A bead of 100% silicone caulk, tooled smooth, stays flexible and rides with both surfaces. Color-match it to the grout or stone and it disappears.
At the sink cutout, silicone seals between the undermount rim and the stone underside. It carries no weight; the sink clips or epoxy do that. The silicone just keeps water from creeping under the stone and down into the cabinet. Use a 100% silicone rated for kitchen and bath, not a siliconized latex. [6]
Stone-to-stone seams are a whole different product. Seam adhesives are two-part polyester or epoxy systems, color-matched, and they cure rigid. They are not silicone. Confusing the two in the field is a common mistake, and it produces seams that look perfect on day one and open inside a year.
Technique matters. Lay silicone in a continuous bead, never in dabs, because every gap in the bead is a door for moisture. At the backsplash joint, aim for about a 3/8-inch bead before tooling. Tool it within 5 to 10 minutes, before it skins over.
How do you anchor a countertop to cabinets without damaging the stone?
For most kitchens, you don't touch the stone at all. The connection is adhesive to cabinet rail with the slab resting on top. The stone's own weight plus that bond holds it. A 3-cm granite slab runs 18 to 20 pounds per square foot, so a 10-square-foot section weighs 180 to 200 pounds before a drop of adhesive goes down. [7] It isn't moving under normal use.
The worry about cracking is real, though. Drill into stone with the wrong bit or technique and you'll crack a slab. Over-clamp it or seat it on uneven bearing and you can seed stress fractures that surface weeks later.
Drilling into stone comes up in specialty work: through-bolt attachments for island legs, anchoring stone to metal frames, securing backsplash panels to walls. For those, use a diamond core bit in a rotary drill (never hammer mode) with continuous water cooling. Match the bit to the anchor hardware, usually 1/4 inch to 1/2 inch. Drill slowly with moderate pressure. Force a diamond bit and you heat the stone and invite microcracking.
Granite countertops add one caution: stress from drilling travels along crystal boundaries in the grain. Leave at least 1.5 inches between any drilled hole and an edge or corner.
Screw-up anchors from inside the cabinet are the standard mechanical connection for wood-substrate tops (post-form laminate, butcher block, solid surface). The screw runs through a pre-drilled mounting strip up into the substrate, and it never reaches the surface. Natural stone has no substrate to grab, so this method doesn't apply.
Does countertop thickness affect how you anchor it?
Yes, and the difference is bigger than most people guess. Thickness changes how much the stone flexes, how much it weighs, and how forgiving it is about an imperfect substrate.
The trade has moved hard toward 3-cm stone (roughly 1.25 inches) as the kitchen standard. At that thickness the slab has enough rigidity and mass to sit stable on cabinet rails with little help. 2-cm stone (about 3/4 inch) is lighter and more flexible, so it telegraphs every substrate bump and needs tighter prep and more support to keep from flexing at the adhesive line.
Marble countertops still show up in 2 cm for bathroom vanities where weight matters. There, bond a plywood substrate to the underside of the stone before install. The plywood gives the adhesive more surface area, adds rigidity, and lets the mounting screws bite wood instead of leaning entirely on adhesive.
Laminate post-form tops land around 1.5 inches of total height including the substrate, and they carry their own screw-up brackets as part of the product, so thickness rarely causes trouble. Our overview of formica countertops walks through how that system goes together.
Waterfall edges are their own problem. The vertical panel gets mitered and bonded to the horizontal top with two-part epoxy, then supported by a ledger glued to the cabinet side. Weight distribution is tricky here: the vertical panel pulls outward on the top, so the ledger and epoxy bond have to be engineered, not improvised.
What are common installation mistakes that cause anchoring failures?
Five mistakes cover nearly every callback. Learn them and you dodge most rework.
Mistake one: silicone as the primary adhesive, usually to save cost or time. Covered above, but worth saying flat out. Don't.
Mistake two: skipping substrate prep. Dusty cabinets, oily rails from old caulk, or any leftover silicone will fail the bond no matter which adhesive you chose. Thirty minutes of cleaning kills a two-year callback.
Mistake three: setting the slab before the shims are right. Once adhesive is down and the stone is set, your adjustment window is short. Installers who skip the dry-fit end up trying to slide a 200-pound slab across fast-curing adhesive. The slab lands on a ridge, the adhesive bridges a gap, and a crack shows up later.
Mistake four: ignoring overhangs. A 13-inch overhang on a breakfast bar with no corbel isn't a style choice. It's a structural failure in waiting, and a safety issue if the slab pulls off under load. [8]
Mistake five: too much adhesive. A polyurethane bead that's too fat foams during cure and physically lifts the slab off the rail. Run a 3/8-inch bead, not a 3/4-inch bead. The bond area is the rail width, not the bead height.
Shops running multiple crews catch these on installation checklists. Management software like SlabWise lets a fabricator attach install spec sheets to a job, so the crew loading the truck always has the right adhesive and support requirements for that exact slab and layout. Small thing, big drop in rework.
How long does a properly anchored countertop last, and when should you reseal or rebond?
A countertop set with proper construction adhesive on a clean, flat substrate should outlast the cabinets under it. There's no scheduled re-adhesion for the stone-to-cabinet bond. Done right, you never touch it again.
The silicone is the part that needs attention. Kitchen silicone at the backsplash and around the sink, even good 100% silicone, starts showing mold, shrinkage, or separation after 5 to 10 years in a wet environment. [9] Redoing it takes about 30 minutes: cut the old bead out with a utility knife and oscillating tool, clean the residue with silicone remover or IPA, and lay a fresh bead. Do not caulk over old caulk. New silicone won't bond to the old surface, and you'll be back at it in a month.
Sealing the stone surface is a separate topic from anchoring. Granite countertops typically want resealing every 1 to 5 years depending on use and porosity. Quartzite often needs it more often. The details live in our guides on how to clean quartzite countertops and how to clean stone countertops.
If a countertop shifts or goes loose, the primary bond failed. Don't re-caulk the backsplash and call it done. The slab has to come up, both surfaces get cleaned of old adhesive, and the install gets done right from scratch. Injecting adhesive into an existing gap without full removal almost never lasts.
How do countertop anchoring requirements differ for islands versus perimeter cabinets?
Islands are harder, full stop. A perimeter counter has a wall along its back edge that gives passive support and limits which way the slab can move. An island floats in the room with no wall contact, so the only things holding it are the adhesive and the mechanical supports.
Seating overhangs and structure fight each other on islands. A comfortable bar-stool overhang is 12 to 15 inches. The safe unsupported span for most stone is 10 to 12 inches. Do the math and nearly every island with seating needs corbels or blocking. No exceptions worth taking.
An island with a finished waterfall panel also needs its cabinet base anchored to the floor. A 250-pound slab with a 14-inch seating overhang generates enough torque that someone dropping their weight onto a stool could tip the whole unit if the cabinets aren't secured. Most local codes require kitchen islands to be fastened to the floor or adjacent structure, though enforcement varies a lot. The International Residential Code covers general structural and cabinet requirements in Chapter 3, but specific countertop anchoring is left mostly to product install specs and the local building official's read. [10]
Freestanding ranges between perimeter cabinets split the counter into separate pieces left and right. Each piece gets anchored to its own cabinet run; they don't span the range. The gap at the range gets filled with silicone once the range is in place.
Across material types, the logic in our countertop installation guide stays the same even when the adhesive changes. Flat substrate, clean surfaces, mechanical support at overhangs, correct adhesive for the material. That holds whether you're setting quartzite, quartz, or solid surface.
Can you re-anchor a countertop that's already installed and shifting?
Sometimes, with real caveats. It depends on how far it's moved and how much access you have.
If the shift is small (the stone moves slightly but the adhesive hasn't fully let go), you may be able to inject low-viscosity construction adhesive into the gap with a syringe applicator, then clamp or weight the area for 24 hours. This works best on a straight perimeter run where access and clamping pressure are good. It almost never works at a mitered corner, a seam, or an island edge where you can't reach.
If the stone has actually lifted, or the gap is more than 1/8 inch, full removal is the honest call. Soften the adhesive line with a heat gun or warm water, lift the slab with suction cups, clean both surfaces completely, shim and level again, and re-adhere from scratch. It sounds like overkill. A botched patch generates more callbacks than the original failure did.
Undermount sinks are their own repair. If the sink is pulling away from the stone, fix the stone-to-sink joint: clean it, re-epoxy the clips or run fresh two-part stone epoxy around the perimeter, and brace the sink from below while it cures. No need to pull the countertop.
One thing shops should always document. If a customer reports movement that seems excessive for the install's age, check the cabinets first. If the boxes are racking from bad leveling or weak fastening to the studs, no adhesive on earth keeps the stone steady. The cabinet install has to be right before the countertop install means anything. SlabWise's job documentation tools let a shop attach pre-install checklists and sign-off photos to each job record, which is exactly what you want when you have to prove what the substrate looked like at install.
Frequently asked questions
Can I just use silicone to glue my countertop down?
You can, but it will likely fail within a few years. Silicone is a sealant with tensile strength around 210 psi. It stays flexible and creeps under sustained load, which lets heavy stone countertops shift over time. Use a polyurethane construction adhesive (like PL Premium) or two-part epoxy as the primary bond, and reserve silicone for the backsplash joint and sink perimeter only.
How much overhang can a stone countertop have without support?
The stone industry standard is 10 to 12 inches of unsupported overhang for natural stone like granite or marble at 3-cm thickness. Most quartz manufacturers allow up to 1/3 of the slab depth, roughly 8 to 9 inches for a standard 25.5-inch counter. Any overhang beyond those limits needs corbels, blocking, or steel angle brackets underneath to carry the load safely.
What's the best adhesive for anchoring granite to cabinet rails?
A polyurethane construction adhesive such as Loctite PL Premium or Titebond Polyurethane works well for most granite installations. For heavy slabs or large overhangs, a two-part epoxy offers higher tensile strength (1,500 to 3,000 psi versus 900 psi for polyurethane). Always check your stone's compatibility, clean both surfaces with isopropyl alcohol, and allow full 24-hour cure time before loading the counter.
Do I need to screw a stone countertop down to the cabinets?
No. Natural stone countertops are not screwed down. The weight of the stone combined with construction adhesive on the cabinet rails holds them in place. Screw-up mounting clips are used for wood-substrate tops like laminate post-form, butcher block, and solid surface, where screws go through cabinet mounting strips into the substrate without penetrating the surface material.
How do I remove old silicone before re-anchoring a countertop?
Cut the bulk of the old silicone off with a sharp utility knife or oscillating multi-tool. Remove the residue with a dedicated silicone remover product, a razor scraper, or 90% isopropyl alcohol. Do not apply new adhesive or silicone over old silicone residue; adhesion to cured silicone is poor and will fail quickly. Allow the surface to dry completely before applying any new product.
What causes a countertop seam to open up after installation?
Seam adhesive failures are almost always caused by one of three things: substrate movement (cabinet racking or settling), incorrect adhesive (silicone instead of a rigid two-part seam adhesive), or poor prep (dust or moisture on the stone faces before bonding). A seam that opens within the first year usually points to substrate issues. A seam that opens after several years often means the original adhesive was too flexible or the substrate has shifted.
How do I anchor a butcher block countertop so it can expand with humidity?
Wood countertops move seasonally, expanding across the grain in humid months and contracting in dry months. Do not fully glue them down. Instead, use the screw-up clips built into most cabinet top rails, with slotted holes that allow the wood to move. The front edge near the sink can be silicone-sealed, but the rear and side attachment points need to be free to shift slightly. Never use rigid two-part epoxy as the primary anchor on wood tops.
Can I re-anchor a countertop without removing it?
Only if the gap is small (under 1/8 inch) and you have clear access. Inject low-viscosity construction adhesive with a syringe, then apply weight or clamps for 24 hours. This works on straight perimeter runs but rarely succeeds at miters, seams, or islands. If the stone has significantly shifted or lifted, full removal, substrate prep, and reinstallation is the correct path and typically the only one that won't generate another callback.
Does the type of countertop material change how you anchor it?
Yes. Natural stone uses construction adhesive to cabinet rails with no substrate, no screws. Quartz follows similar logic but check brand-specific installation guides. Laminate, butcher block, and solid surface use screw-up clips into a wood substrate. For butcher block, slotted holes allow wood movement. Two-part epoxy is appropriate for heavy stone and large overhangs across materials. Silicone belongs only at sealed joints, never as the primary anchor for any material.
How do I anchor a countertop to a kitchen island safely?
Islands need more care than perimeter counters because there's no wall support. Use construction adhesive on all cabinet rails, add corbels or blocking at any overhang over 10 to 12 inches, and verify the cabinet base is anchored to the floor. An unsecured island base with a large seating overhang can tip under load. Most local codes require kitchen islands to be fastened to the floor, though specific requirements vary by jurisdiction.
How long does countertop adhesive take to cure before I can use the counter?
Polyurethane construction adhesives (PL Premium and similar) reach handling strength in 4 to 6 hours and full cure in about 24 hours at 70°F. Two-part epoxies vary widely: fast-set versions reach working strength in 15 to 30 minutes but may take 24 hours to reach full rated strength. Keep weight off the counter for at least 24 hours after installation. Cold temperatures significantly slow cure times for both product types.
When should I call a professional instead of DIYing a countertop anchor repair?
Call a fabricator if the stone has cracked, if the overhang is over 12 inches and unsupported, if a waterfall panel has separated, or if the cabinet structure itself is failing. Also call a pro if the countertop weighs over 100 pounds and you don't have suction cups and help, since dropping a stone slab during repositioning causes injuries and almost always destroys the slab. Silicone resealing and small perimeter re-adhesion are reasonable DIY tasks.
Does silicone color matter for countertop joints?
Functionally, no. Any 100% silicone rated for kitchen and bath use will perform the same regardless of color. Aesthetically, matching the silicone to the grout color or to the stone edge makes the joint less visible. White, biscuit, almond, and gray are the most common colors for kitchen use. Clear silicone works well on lighter stones but can yellow slightly over time near heat sources like a range.
Sources
- Dow Chemical, 795 Silicone Building Sealant Technical Data Sheet: Dow 795 silicone sealant has a tensile strength of approximately 210 psi, illustrating silicone's limited load-bearing capacity compared to rigid construction adhesives
- Loctite PL Premium Polyurethane Construction Adhesive Product Data Sheet: PL Premium polyurethane adhesive cures to over 900 psi tensile strength with a full cure time of approximately 24 hours and expands slightly during cure
- Cambria, Installation Guide for Cambria Quartz Surfaces: Cambria publishes specific installation guidance including adhesive compatibility requirements for installers working with Cambria quartz
- OSHA, Isopropyl Alcohol Safety and Handling (Chemical Hazard Communication): Isopropyl alcohol at 90% or higher concentration is effective for surface degreasing prior to adhesive application, per standard industrial cleaning practice referenced in OSHA chemical safety guidance
- Marble Institute of America (now Natural Stone Institute), Dimensional Stone Design Manual: The Natural Stone Institute's design manual specifies that unsupported overhangs in natural stone countertops should not exceed 10 to 12 inches without mechanical support
- Tile Council of North America, Handbook for Ceramic, Glass, and Stone Tile Installation: 100% silicone (not siliconized latex) is specified for kitchen and bath wet-area joints where movement tolerance and waterproofing are required
- Natural Stone Institute, Stone Reference Manual: 3-cm granite weighs approximately 18 to 20 pounds per square foot, contributing significantly to countertop stability through mass alone
- U.S. Consumer Product Safety Commission, Home Improvement Safety: Unsupported heavy countertop overhangs represent a structural hazard; the CPSC documents injuries from falling or tipping countertop sections in home improvement contexts
- EPA, Indoor Air Quality and Building Materials: Silicone caulk in wet kitchen and bath environments is subject to mold growth and degradation; EPA IAQ guidance notes typical caulk service life of 5 to 10 years in high-moisture areas
- International Code Council, International Residential Code (IRC), Chapter 3: The IRC addresses general structural and cabinet installation requirements applicable to kitchen island anchoring, though specific countertop anchoring is largely left to manufacturer installation specifications and local AHJ interpretation
- Forest Products Laboratory, USDA, Wood Handbook: Wood as an Engineering Material: Wood countertop substrates expand and contract with seasonal humidity changes across the grain, requiring fastening methods that allow movement rather than rigid adhesive anchoring
- Henkel AG, Loctite Epoxy Technical Bulletin: Two-part epoxy adhesives achieve tensile strength of 1,500 to 3,000 psi depending on formulation, making them appropriate for high-load applications such as large countertop overhangs
Last updated 2026-07-10