TL;DR
- Continuous vein matching lines up a stone's veins so they flow unbroken across a seam.
- It takes slabs from the same quarry bundle, a sequence layout (bookmatch or running match), vein lines marked before any cut, and a precise reference edge at the saw.
- Done right, the seam reads as part of the pattern instead of a line across your counter.
What is continuous vein matching and why does it matter?
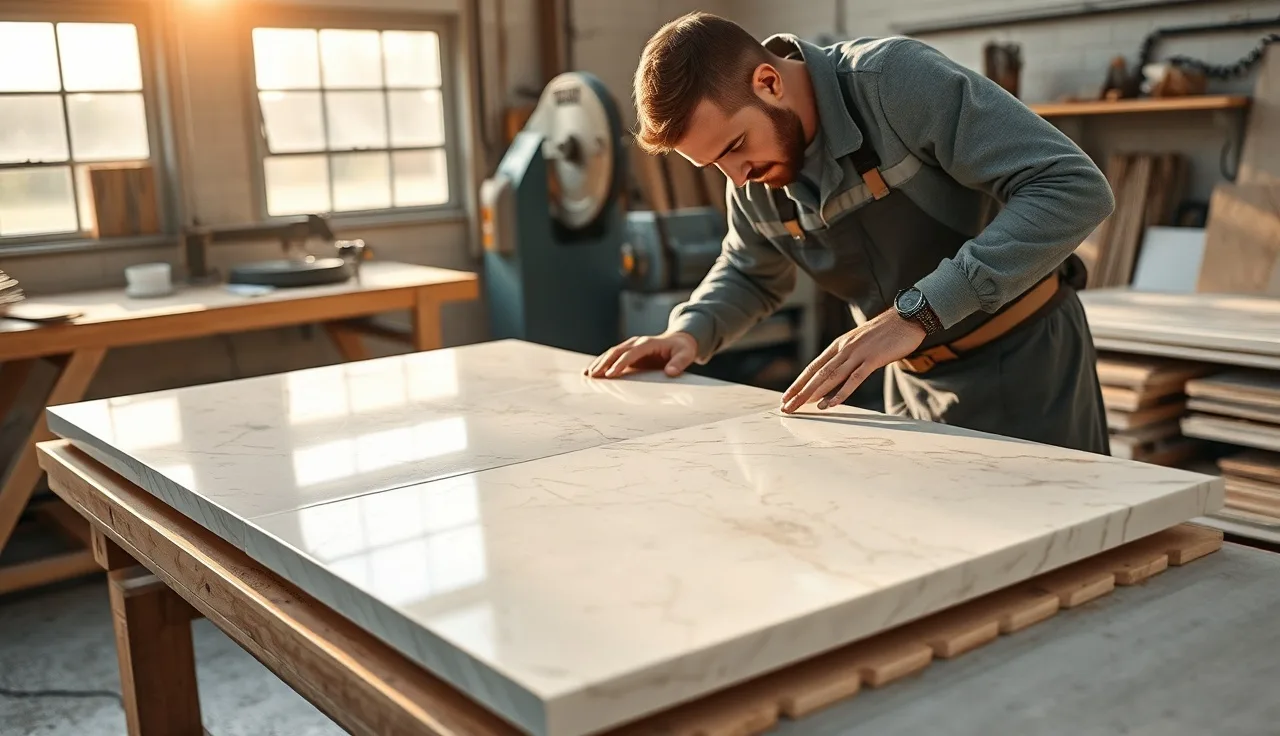
Continuous vein matching means cutting and placing stone pieces so the veins, cracks, and color run through a seam as if the counter were one uncut slab. It shows up most on dramatic marble and quartzite, but it applies to any stone with directional movement.
The payoff is visual. A well-matched seam in Calacatta marble or a veined quartzite can be hard to spot from across a kitchen. A bad match on the same stone pulls your eye straight to the line, and the whole counter looks like a patchwork.
For fabricators, matching is a way to stand apart. Shops that deliver matched seams every time charge more and get more referrals. For homeowners, knowing the basics gets you a smarter conversation with your fabricator and saves you from finding the seam only after it's glued down.
Not every stone rewards the work. A uniform white quartz has nothing to match. A heavily mottled granite with no clear direction is just as forgiving. The stones where matching earns its keep are the ones with long diagonal veins: Calacatta Gold, Statuario, Taj Mahal quartzite, Blue Bahia, and any bookmatched exotic. [1]
See marble countertops and granite countertops for how different stone types behave at the seam.
What slab selection decisions affect vein matching before you even cut?
Everything downstream depends on what you buy at the yard. This is where most vein-matching projects win or lose.
Slabs in a quarry bundle are cut one after another from the same block. The bundle sequence is numbered, usually on the slab edge with a paint marker or a stamped tag. Slabs 1 and 2 from a bundle are mirror images. Slabs 2 and 3 run in sequence. That relationship is the whole reason bookmatching and running matches work.
Grab two slabs from different bundles, or the same bundle but skip a number, and the veins won't line up no matter how carefully you cut. Buy from the same bundle. Confirm the numbers at the yard, not after delivery.
For an L-shaped kitchen with a seam in the corner, you usually need enough square footage from two or three consecutive slabs. Measure your layout before you go to the yard, sketch the pieces on paper, and work out which slab numbers you need. A standard slab runs roughly 55 to 65 square feet for marble or quartzite, though larger formats around 120 inches by 65 inches are more common now from some suppliers [2]. Your pieces have to nest inside those dimensions in the right order.
Buy a little extra. The common rule of thumb is 15 to 20 percent overage for a straight layout and up to 25 to 30 percent when matching is required, because the match forces cuts into specific spots instead of wherever waste is lowest. [3]
At the yard, lay the candidate slabs side by side on the A-frame rack if you can. Step back 10 feet and read the vein direction. If the veins run at a steep diagonal, your seam has to fall where the veins actually cross the edge, not wherever the slab geometry would rather put it.
What are the different types of vein matching: bookmatch vs. running match vs. flow match?
These three terms describe different geometric relationships between neighboring pieces. Knowing which one you want tells you how to orient and cut the slabs.
Bookmatch: You open consecutive slabs like the pages of a book. Slab 1 sits face-up. Slab 2 flips face-down, mirrored. The veins meet at the seam as a mirror image, which gives you that symmetrical butterfly pattern. This is the boldest look and the standard for waterfall islands where the top and the vertical panel are bookmatched. It needs consecutive slabs from the same bundle.
Running match (also called sequence or flow match): Both slabs stay face-up, set so the vein keeps going in the same direction from one piece to the next. The seam shifts the pattern slightly, but the flow holds. This is the practical pick for long counter runs where you want continuity without the mirrored symmetry.
Flow match: A looser running match. The fabricator lines up the main vein lines as close as possible but doesn't force a perfect continuation. Good for stones with irregular, branching veins where a strict running match can't happen. Honest fabricators tell you upfront which approach a given stone allows.
The table below shows when each method makes sense:
| Match Type | Best Stone Types | Layout Requirement | Seam Appearance |
|---|---|---|---|
| Bookmatch | Marble, quartzite with long veins | Consecutive slabs, second flipped | Symmetrical mirror |
| Running match | Marble, quartzite, some granite | Consecutive slabs, both face-up | Continuous flow, slight shift |
| Flow match | Irregular exotic stone | Same bundle preferred | Near-continuous, not exact |
| No match (random) | Uniform quartz, busy granite | Any slabs | Seam visible in pattern |
Engineered quartz gets its matching set at the factory, only for products designed for it. Cambria, for example, makes some designs in sequential slabs meant to install as a running match. See cambria countertops for how that plays out. [11]
How do you lay out the template for a vein-matched seam?
Templating is where the plan turns into a physical cut line, and it's the most skill-dependent step in the whole job. Get the seam location right and everything after it is easier.
Start with the finished layout drawn to scale. Mark where the seam falls. Seam placement for matching is never arbitrary. Put the seam where the vein crosses the edge at a clean angle, ideally where it enters and exits both pieces so it looks intentional. A seam sitting in the middle of a vein's widest arc looks bad. A seam where the vein enters from the back edge and exits toward the front is far easier to match and to hide.
Now lay that template over the physical slab. Most shops use a digital templating device (a Proliner, Prodim, or similar) or a physical template cut from hardboard or corrugated plastic sheeting. [4] Set the template piece on the slab, trace around it, and mark the vein lines that cross the cut edge with a grease pencil or soapstone marker.
For the neighboring piece, position the second template so the matching vein marks line up. For a bookmatch, the second piece's edge marks mirror the first. For a running match, they continue in the same direction. Mark those lines too.
If the templates can't sit in a position that gives you the match, the seam has to move. This is a real constraint, not a preference. Sometimes the seam shifts 2 to 4 inches from where the cabinetmaker assumed it would go, because the vein geometry demands it. Talk to your fabricator before the cabinet install is locked in.
For L-shaped kitchens, the corner seam usually lands 3 to 4 inches off the interior corner to avoid stress cracking, and that spot may or may not hit a clean vein crossing. The fix is often a 45-degree miter at the corner, which hides the seam better than a straight butt joint and gives you room to place the vein. [5]
How do fabricators cut and join stone to get vein lines to match at the seam?
The cut happens on a CNC bridge saw or a manual wet saw with a diamond blade. The match quality rides almost entirely on the precision of the cut line and the accuracy of the edge profiling. Wet cutting is standard here for a second reason: dry cutting stone throws crystalline silica dust, and OSHA requires water feed or ventilation on all stone cutting, seam prep included. [10]
Both pieces get cut off the same reference edge, usually the back wall edge. Let one piece wander 1/16 inch off the line and the vein offset at the seam shows. Most CNC saws hold 1/32 inch or better, tight enough for a good match. Manual saws lean on the operator's hand.
After cutting, dry-fit the two pieces on a flat surface before any edge profiling. Set them seam faces touching and look at the vein alignment from standing height. Small misalignments show up now, before anything is polished or installed. Off by more than 1 to 2 mm? Recut.
Edge profiling takes material off the seam face. A bullnose or eased edge on the perimeter is fine, but the seam face stays flat. Polishing that face to the same grit as the surface (typically 1500 to 3000 grit for marble) is what makes the line disappear. A seam face left at 400 grit next to a 3000-grit surface bounces light differently, and the seam glows.
Color-matched epoxy fills the seam during installation. Most fabricators mix dry pigment into a two-part epoxy to match the dominant background color. Don't chase the vein color. Match the background. A slightly wrong vein color in the filler is invisible. A wrong background color reads as a stripe across the counter.
SlabWise's fabrication software lets shops lay out slab cuts digitally before templating, so the match position gets tested on a scanned slab image instead of discovered at the saw. For a fabricator, that pre-visualization cuts remakes. See demo at slabwise.com.
For countertop installation specifics, see countertop installation.
How wide should a vein-matched seam be, and can a seam ever be invisible?
A vein-matched seam is still a seam. The goal is inconspicuous, not invisible, and setting that expectation up front saves everyone a hard conversation later.
The Natural Stone Institute, which absorbed the Marble Institute of America in 2015, sets an acceptable seam width at 1/16 inch (about 1.5 mm) or less for residential countertops. Some fabricators push for 1/32 inch. Below that, the pieces are basically touching, which nobody recommends, because stone moves a little with temperature and moisture. A zero-gap seam can crack over time. [6]
A well-matched seam in a light marble, filled with color-matched epoxy and polished flush, can be genuinely hard to see from standing height in normal light. Raking light (a flashlight held at a sharp angle) will show it. So will a nose-to-the-counter inspection. That's fine. The real question is whether it reads as an interruption during normal kitchen use, and a good matched seam doesn't.
Dark stones with high contrast between vein and background are harder to hide. A thin white vein in a dark green marble crosses the seam, and a 1 mm offset jumps out. Light stones with soft, diffuse veining (white Thassos marble, honed Bianco Sivec) forgive the most.
Glossy polished finishes show seams more than honed ones. Honing scatters the reflection, which softens any slight height difference at the line. If seam appearance matters to you and you're torn between polished and honed on a strongly veined stone, honed is the safer bet.
What mistakes make vein matching fail, and how do you avoid them?
Most failures trace back to one of five problems.
Buying slabs from different bundles. The number one cause of mismatch. Veins can't align if they came from different parts of the block. Confirm bundle numbers at purchase, every time.
Poor seam location. Put a seam where the vein runs parallel to the cut, and both pieces have matching lines running away from the edge, so any offset is obvious. Better to find a spot where the vein crosses the seam at 30 to 60 degrees.
Slab movement between template and cut. If the slab shifts on the table between layout and cut, the reference marks move and the match dies. Proper clamping or vacuum hold-down on CNC gear stops this.
Uneven surface height at the seam. One piece sitting 1/32 inch above its neighbor gives you lippage. Run a straightedge across the seam after installation and before the epoxy fully cures. Shim or press down as needed.
Epoxy color mismatch. Too dark, too light, or the wrong undertone in the filler pulls attention to the seam even when the vein alignment is perfect. Mix the epoxy in daylight, not under shop fluorescents, and test it on a scrap before you fill the real seam.
A sneakier failure is template flex. Hardboard bends. If the template bows even slightly when the fabricator lays it down to transfer vein marks, the cut line shifts. Rigid template stock, or a digital templating device that captures reference edges without any physical flex, kills that problem. [4]
Does vein matching cost more, and how much extra should you budget?
Yes, it costs more. The extra money comes from three places: material waste, labor time, and sometimes a premium on the slab purchase.
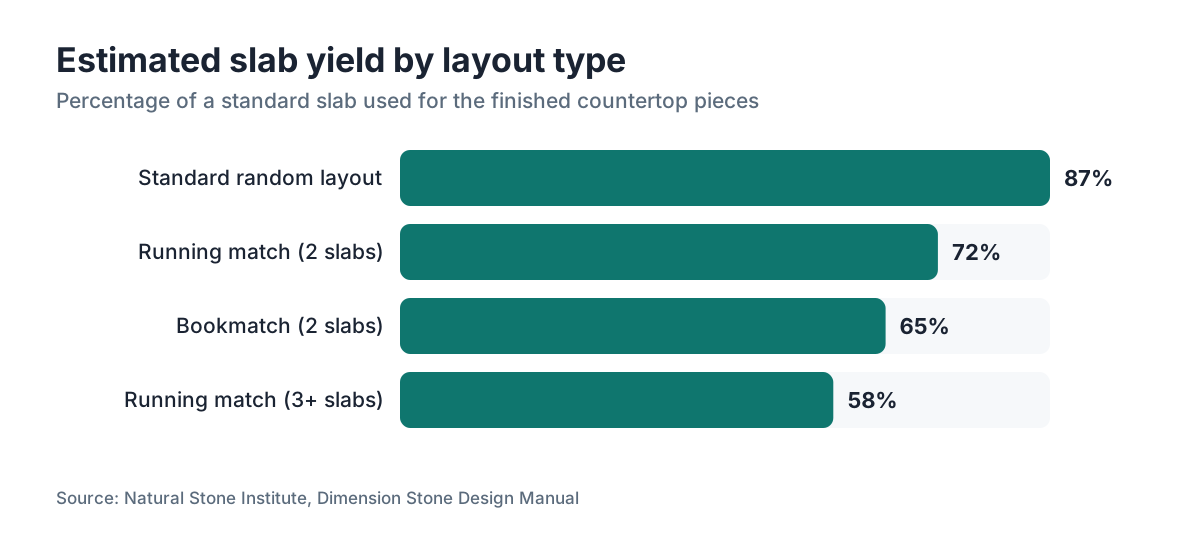
Material waste is the biggest driver. A layout tuned purely for yield might use 85 to 90 percent of a slab. A layout constrained by vein matching might use 60 to 70 percent, because the pieces have to nest in fixed positions relative to each other. That extra material cost is real, and it gets passed on.
Labor adds roughly 1 to 3 hours for a typical kitchen: layout planning, dry-fitting, and precision cutting. At shop rates of $75 to $150 per hour (rates vary a lot by region; this is a rough U.S. midpoint as of 2024), that's $75 to $450 in added labor. [7]
Some fabricators charge a flat "vein matching" or "bookmatch" fee that rolls the extra material and labor together. That fee usually runs $200 to $600 for a standard kitchen, higher for complex layouts or very expensive stone.
The slab premium is the hard one to predict. At many yards you can't buy a single slab out of a bundle for matching. You may have to buy two consecutive slabs even when you only need one slab's worth of stone. That second slab may or may not do you any good on a later job.
Homeowners: when quotes come in, ask straight out whether the price assumes vein matching and whether it includes enough slab square footage from one bundle. A cheap quote that assumes random placement from any available slab is not the same product as a quote that includes a matched layout.
Fabricators: pricing a matched job accurately means knowing the slab cost per square foot, the matching waste factor, and the added labor. Software that models nesting with match constraints, instead of pure yield, hands you a number you can defend to the customer.
Can vein matching work on an island or waterfall edge?
The island is actually the easiest place to nail a great match, because it's a single flat slab with no return pieces. If there's a seam at all, you can place it deliberately across the most dramatic part of the vein run.
Waterfall edges are the hard version. A waterfall is where the counter's stone runs down the side panel of the island to the floor. For the vein to wrap the corner, you need a bookmatch: the top slab and the vertical panel are consecutive slabs from the same bundle, with the vertical piece flipped and mirrored so the vein meets at the 45-degree mitered corner.
Cutting a clean 45-degree miter on stone is unforgiving. A 0.5-degree error opens a visible gap at the top of the miter and pinches tight at the bottom, which breaks the vein alignment. CNC machines hold this tolerance. Handheld grinders don't.
The adhesive at a waterfall miter has to carry the vertical panel, which can weigh 80 to 150 pounds depending on stone thickness and panel height. Two-part structural epoxy, often backed by a hidden mechanical L-bracket inside the cabinet structure, is the standard approach. [5]
For stones with strong directional veining like bookmatched Calacatta Oro or Azul Macaubas quartzite, a clean waterfall island is about the most dramatic thing you can do with countertop stone. Alignment is everything. One millimeter off and the whole effect collapses.
Does vein matching work for quartz, porcelain, or other engineered surfaces?
Engineered quartz and porcelain are manufactured, so their vein patterns get printed or embedded at the factory. Whether you can match them depends entirely on how the maker designed and packaged the product.
Some quartz brands make slabs with a declared vein direction and sell sequential slabs built for running-match installation. Cambria is one, and its installation guidelines describe how to orient sequential slabs for continuity. [8] Others make random patterns on purpose, so matching isn't part of the deal.
Large-format porcelain (sintered stone) like Dekton and Lapitec works the same way. Some patterns are designed to match, some aren't. The manufacturer's install guide says which.
For engineered surfaces, the fabricator can't change what the factory made. If the product wasn't built for matching, the seam shows either the pattern repeat or a random break. Ask the manufacturer or distributor whether a specific product ships in matched sequential slabs before you commit to a running-match plan.
Fully uniform surfaces (white quartz, solid-color quartz, Corian) have no vein to match at all. The seam still reads as a thin line, but it's not a pattern-alignment problem. See corian countertops for how seaming works on solid-surface materials.
How do you verify the vein match before and after installation?
Verification happens at three moments: at the yard when you pick slabs, at the shop after cutting, and at the job site before the epoxy sets. Skip any one of them and you're gambling.
At the yard, ask to have the candidate consecutive slabs pulled off the A-frame and leaned together vertically with the proposed seam edge touching. Stand back and look. If the shop won't do this, that tells you something.
At the shop, the dry-fit on a flat surface is the real quality check. Both cut pieces go on the table, seam faces together, and you shoot the joint from above under even light. That photo travels with the slab to the job site and confirms nobody swapped the orientation.
At installation, before any epoxy, the pieces get set dry and checked again. Job-site light usually differs from shop light (daylight versus fluorescent), and the alignment can read differently. This is your last chance to adjust.
After the epoxy sets (about 24 hours for full cure on most two-part stone epoxies [9]), the seam face gets polished flush with a hand polisher and a matching diamond pad sequence. Check for lippage with a metal straightedge. Lippage over 1/32 inch on a countertop seam is generally outside tolerance under most fabrication standards. [6]
For stone care after installation, see how to clean stone countertops so you know which cleaners won't hurt the epoxy or the polished surface near the seam.
What does a homeowner need to ask a fabricator to make sure vein matching is done right?
Good shops bring this up on their own. Asking directly protects you anyway.
Ask: "Can I come to the yard with you when you pick the slabs?" A fabricator confident in their process says yes. You want to be there when bundle numbers get confirmed.
Ask: "Where will the seam fall, and why there?" A good answer talks about the vein crossing angle and the structural reason (corner position, sink cutout clearance, and so on). A vague answer is a yellow flag.
Ask: "Can I see a dry-fit photo before installation?" Standard in quality shops. If they don't dry-fit, install day is the first time anyone knows whether the match worked.
Ask: "What's your tolerance on seam lippage?" The answer should be 1/32 inch or less. Anything past 1/16 inch catches crumbs, wears unevenly, and may fall outside warranty.
Ask: "What epoxy color are you using at the seam?" Ask to see a sample on scrap stone from your actual slab before they commit.
For the bigger picture, kitchen countertops covers where vein matching fits in the full planning process, and countertop installation walks through the install-day sequence.
SlabWise's homeowner quoting tool helps you get itemized quotes that spell out whether vein matching is included and what slab assumptions the price is built on. That way you're comparing quotes on equal terms.
Frequently asked questions
Can you vein match across more than two slabs?
Yes, but it gets harder fast. Matching three or four consecutive slabs in a U-shaped kitchen means every piece comes from sequential bundle slabs, all oriented the same way, with seam positions that work for all the vein crossings at once. Most fabricators will tell you yield loss climbs sharply past two slabs. It's doable. Expect a higher waste premium, and confirm the bundle has enough consecutive slabs before you commit.
Does vein direction matter for which way to orient the stone?
Yes, and it's an aesthetic call with practical weight. Veins running front-to-back (perpendicular to the wall) pull your eye into the counter. Veins running side-to-side stretch the length. Most fabricators default to running the vein with the long dimension, but the slab's natural vein direction may not cooperate. Check the vein angle on the actual slab, not the product photo.
What happens if two slabs from the same bundle don't match?
It happens, though it's rare with reputable suppliers. Natural stone branches and varies even within a bundle. If consecutive slabs show a large offset, check that the numbers are truly sequential and that neither slab got recut or damaged at the yard before delivery. If the numbering is correct and they still don't match, you may have received mislabeled slabs. Document with photos and call the supplier.
How do you vein match around a sink cutout?
The cutout usually sits in one slab, so it doesn't interrupt the seam directly. The catch is that the cutout removes material where the vein runs, so you confirm the seam isn't so close to the sink that support becomes a problem. Most fabricators keep seams at least 3 inches from any cutout. The vein still has to match at the seam, which is planned before the cutout is made.
Does a honed finish affect seam visibility differently than polished?
Yes. Polished surfaces are highly reflective, so any height difference at a seam throws a shadow or glare line under raking light. Honed surfaces scatter light more evenly, which makes small lippage less obvious. If your stone has strong contrasting veins, honed is generally more forgiving at the seam. The trade-off: honed surfaces take stains more easily and need sealing more often.
Can a bad seam be fixed after installation?
Vein misalignment can't be fixed without removing and recutting one or both pieces. Lippage can sometimes be reduced by grinding and repolishing the high side, but that risks a visible dip when done by hand. Color-mismatched epoxy can be picked out with a dental tool and refilled, though it's tedious. The honest answer: fixing a bad seam costs nearly as much as doing it right the first time. Dry-fitting prevents most of this.
Is vein matching possible with quartzite?
Yes, and quartzite is one of the best stones for it. Taj Mahal, Sea Pearl, and Azul Macaubas carry long, dramatic veins that reward matching. The process mirrors marble: same bundle, sequential slabs, matching vein marks at the cut edge. Quartzite is harder than marble, so cutting precision matters even more. See how to clean quartzite countertops for post-install care.
How do you document vein orientation so installers don't put pieces in backward?
Mark the top face and front edge of each piece with a wax pencil before it leaves the shop, and photograph the dry-fit with a reference marker showing piece 1 and piece 2. Put the photo in the installation packet. Some shops use numbered painter's tape on the underside of each piece. The worst seam failures happen when a piece gets flipped or rotated in transport and nobody checks before the epoxy goes in.
Does stone thickness affect seam quality or vein matching?
Thickness (2 cm versus 3 cm) doesn't directly change the vein match, but thicker stone is more rigid and less likely to flex in transport, which helps keep the cut edges true. Thicker pieces are also heavier, so dry-fitting is more of a wrestling match. The epoxy and polishing steps are the same at any thickness. For waterfall edges, 3 cm is strongly preferred for structural reasons.
What's a bookmatch, and is it the same as vein matching?
Bookmatching is one type of vein matching. In a bookmatch, two consecutive slabs open like a book: slab one face-up, slab two flipped face-down, mirror-image side by side. The veins meet at the seam in a symmetrical pattern. Vein matching is the broader term that also covers running match and flow match. Bookmatching is the boldest version and the most common on waterfall islands.
How do I know if my fabricator is truly doing vein matching or just saying so?
Ask to see the slab bundle numbers on the invoice, confirm the slabs in person at the yard, and request a dry-fit photo before installation. A fabricator who can't or won't show you these things hasn't done the work. A reputable shop won't blink at any of it. This is standard quality control, not an unusual ask.
Does vein matching add to countertop lead time?
Usually 1 to 3 extra days. Slab selection takes longer if you need consecutive bundle slabs that happen to be in stock, and the shop layout and dry-fit add time. For projects with three or more seams, the planning phase alone can add a week. Build this into your kitchen timeline. If a fabricator offers vein matching with no added lead time, ask how they're pulling that off.
What epoxy is used to fill stone seams, and is it food-safe?
Two-part polyester or epoxy adhesive, tinted with dry pigment, is standard. Brands like Tenax, Akemi, and Integra are common in U.S. shops. Once cured and polished, the epoxy is non-porous and treated as food-safe by most fabricators, though no countertop seam is FDA-certified as a food contact surface. Normal kitchen use with regular cleaning poses no risk. [9]
Sources
- Natural Stone Institute, "Natural Stone Resource Library": Marble and quartzite with long directional veins are the primary stone types where vein matching is architecturally significant
- USGS, National Minerals Information Center, "Dimension Stone Statistics and Information": Standard marble and quartzite slab dimensions and the increasing prevalence of large-format slabs from international quarries
- Natural Stone Institute, "Dimension Stone Design Manual": Industry guidance on overage percentages for matched-vein layouts vs. standard layouts, typically 15-30 percent depending on match requirements
- Natural Stone Institute, "Dimension Stone Design Manual": Templating methods including digital templating devices and physical templates, and the effect of template flex on cut accuracy
- Natural Stone Institute, "Countertop Fabrication Standards": Seam placement guidance including minimum distance from corners and structural adhesive requirements for waterfall edge installations
- Natural Stone Institute, "ANSI/NSI B48.1 General Safety and Performance Requirements for Natural Stone": Acceptable seam width of 1/16 inch (approximately 1.5 mm) or less and maximum lippage tolerances for residential countertop seams
- U.S. Bureau of Labor Statistics, Occupational Employment and Wage Statistics: Labor rate benchmarks for stone fabrication trades in the U.S. market as context for per-hour cost of additional vein matching labor
- Cambria, "Cambria Installation and Care Guide": Cambria produces sequential slabs for some designs and provides running match installation guidelines for vein continuity
- Tenax USA, "Stone Adhesive and Epoxy Technical Data": Two-part epoxy formulations and pigment systems used for seam filling in stone fabrication, including cure times of approximately 24 hours
- OSHA, "Crystalline Silica": Cutting and grinding stone generates crystalline silica dust; wet cutting and ventilation requirements apply to all stone cutting operations including seam preparation
- Natural Stone Institute, "Natural Stone Resource Library": Technical definitions of bookmatching vs. running match vs. flow match and their respective slab orientation requirements
Last updated 2026-07-11