
TL;DR
- Most kitchen islands over 60 inches long need at least one seam because standard stone slabs run 55 to 65 inches wide and 100 to 130 inches long.
- Where that seam lands depends on slab size, stone type, pattern matching, structural support, and budget.
- A good fabricator hides the joint near a sink cutout or under an overhang, and you should see a seam plan on paper before any cutting starts.
Why do large kitchen islands need seams at all?
Stone slabs are finite. A typical granite or quartz slab runs about 55 to 65 inches wide and 100 to 130 inches long, depending on the supplier [1]. If your island footprint is 40 by 84 inches, that may fit on one slab. But a 48 by 120-inch island almost certainly needs two pieces, and two pieces means a seam.
Engineered quartz from brands like Cambria or Silestone tops out around 56 by 120 inches in standard sizes. Jumbo slabs exist, but they cost more [2]. Natural stone varies more than quartz because each quarry block is different [8]. A 10-foot island in quartzite or marble will nearly always need a seam.
Solid-surface materials like Corian play by different rules. They can be factory-joined with near-invisible seams using color-matched adhesive, which is one reason designers reach for them on large, continuous islands. Stone and engineered quartz are rigid and heavy, so their seams are real physical joints filled with epoxy and color-matched pigment.
Here's the practical rule. Plan for a seam whenever your island runs past about 55 inches in any direction, and count on one for sure when it clears 60 inches in both directions.
Where is the best place to put a seam on an island countertop?
The best seam placement does three things: it hides the joint, it sits over solid cabinet support, and it stays out of high-stress zones where stone likes to crack.
Near a sink cutout is the classic answer. Every sink cutout already breaks the slab, so a seam running from the front edge to the back of the sink opening interrupts the visual line and lands both pieces on supported cabinet structure. The joint gets short. The eye stops at the sink anyway. This is where most experienced fabricators default.
No sink? Then the seam should sit over a cabinet rail or wall support, never over open air. Cantilevered overhangs are already a stress point. A seam floating in the middle of a 12-inch overhang with no steel underneath is a crack waiting to happen [6].
Book-matched slabs flip the whole logic. On a dramatic veined marble or quartzite island, the seam is the visual centerpiece. Two mirror-image pieces meet at the center so the veining opens like a butterfly. This takes two consecutive slabs from the same block and a fabricator who can actually pull it off. When it works it looks extraordinary.
Keep seams away from cutout corners and point loads. Corners concentrate stress in stone. If a layout puts a seam within a couple of inches of a cooktop corner, ask the fabricator to shift it.
How many seams will a typical large island need?
One seam is the norm for islands up to about 96 inches (8 feet) long. Two seams show up on islands 10 to 12 feet long, or on L-shaped and waterfall-edge islands where corner joints are unavoidable.
Waterfall edges add a wrinkle. Each waterfall side is a separate piece that has to miter at a precise 45-degree angle to the horizontal top. That miter joint counts as a seam, and matching the grain or pattern through the miter is one of the harder jobs in stone fabrication. An island with two waterfall ends carries at least three seam lines from the waterfalls alone, plus whatever the flat top needs.
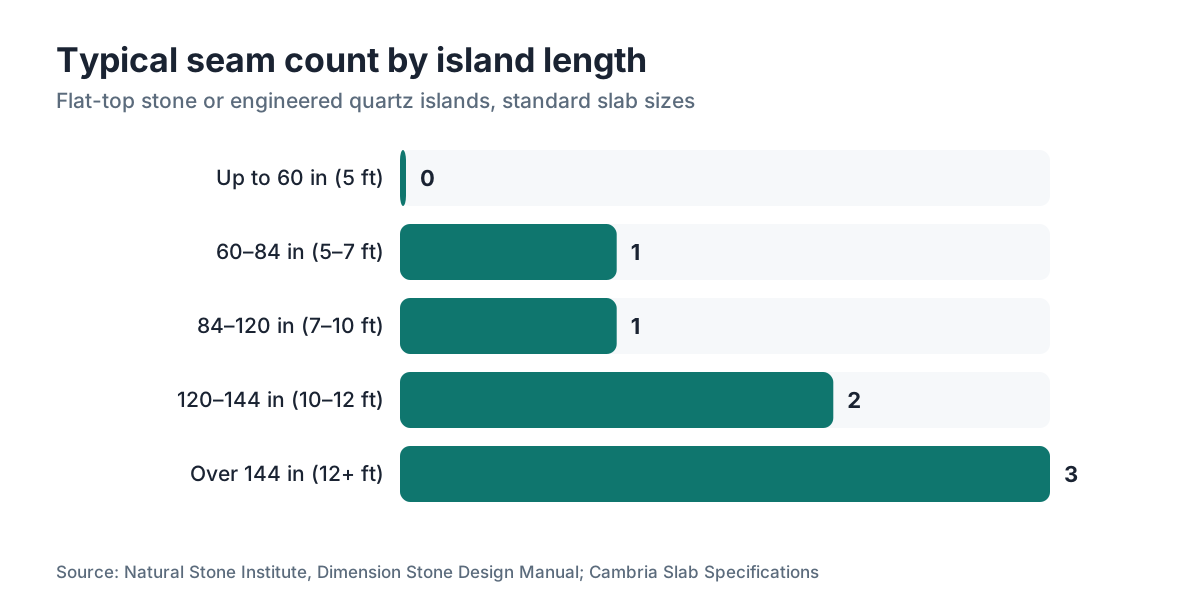
The table below is a rough guide based on island length and material.
| Island length | Typical seams (flat top only) | Notes |
|---|---|---|
| Up to 60 in | 0 | May fit one slab |
| 60 to 84 in | 0 to 1 | Depends on slab width vs. island depth |
| 84 to 120 in | 1 | Usually unavoidable |
| 120 to 144 in | 1 to 2 | 10 to 12 ft islands |
| Over 144 in | 2+ | Plus waterfall joints if applicable |
These numbers assume standard-size slabs. Oversized slabs can drop the count by one in some cases, at added material cost.
Does seam placement change depending on stone type?
Yes, and the differences matter.
Granite is dense and strong. Its seams get filled with a two-part epoxy color-matched to the stone, and a good joint reads as nearly invisible from standing height. Because granite's pattern is random, matching across a seam is less demanding than with marble, though fabricators still align the background movement. Granite countertops with busy, small-scale patterns hide seams better than uniform solid-color granites.
Marble and quartzite often carry dramatic linear veining that runs the length of the slab. A seam that cuts across a prominent vein at an angle looks jarring. On these stones, fabricators work to land the seam where the vein runs parallel to the joint, or to book-match so the vein mirrors itself. The catch is fewer layout options.
Engineered quartz has a consistent, manufactured pattern. Seams are visible up close but less distracting than on natural stone because the pattern continues predictably. Brands like Cambria publish slab dimensions on their websites, so you can check whether your island needs a seam before you set foot in a showroom [2].
Marble countertops with large-format veining are the hardest common material to plan seams for. Expect the conversation with your fabricator to run longer and possibly cost more because of the layout work.
Laminate and solid-surface are different animals. Laminate countertops have visible seams sealed with color-matched caulk. They are not epoxied and polished like stone. Corian and other solid-surface materials get heat-welded and sanded to an essentially invisible joint.
What structural support does a seam need underneath?
A seam in stone has to land over something solid. The rule most fabricators follow: every seam needs cabinet support within about 3 inches of the joint on each side, which works out to roughly 6 inches of supported structure centered under the seam [6].
On islands with an overhang on the seating side, the cabinet frame usually ends 12 to 16 inches from the edge [5]. If your seam sits out in that overhang zone, you need steel rods or an added cross-rail. Many fabricators epoxy 3/8-inch threaded steel rods into routed channels on the underside of the stone at a seam, running perpendicular to the joint, to pin the two pieces together and spread the load. That's standard practice for seams in overhangs and on waterfall miters.
Heavy stone raises the stakes. A 3-cm quartzite slab (roughly 1.25 inches thick) needs the cabinet level to within 1/8 inch across the seam area. Any more deviation and the joint telegraphs as a step or a gap. Level the base cabinets before template day, not on install day. That's how you avoid the problem instead of fighting it.
Floating islands with no leg cabinet underneath get more complicated fast [9]. If that's your design, tell the fabricator early. They may require a steel frame welded to the base before they'll stand behind the seam.
How does pattern matching affect seam cost?
Pattern matching adds time and material waste. When a fabricator has to orient two pieces so their veins line up across a seam, they usually can't cut the most efficient shapes from the slab. They position the two pieces relative to each other first, eat whatever waste that produces, then nest the rest of the cuts around that constraint.
Book-matching is the priciest approach. It means buying two slabs from the same lot, ideally the same block, and the fabricator often charges a layout premium on top of material.
Here's a rough sense of the numbers. A standard single seam on a granite island might add $50 to $150 in labor (epoxy, time, polishing). A mitered waterfall seam on marble with grain matching can add $200 to $600 per miter, depending on complexity and region. These are ballpark figures from common shop pricing structures. Actual quotes swing hard by market.
Fabrication software like SlabWise lets shops model slab nesting and show customers where seams fall before any material gets committed. That surfaces layout conflicts early and cuts down on expensive re-cuts.
If pattern matching matters to you, say so before the shop pulls your slab. Once a slab is processed, the layout is locked.
What should the seam plan look like on paper before fabrication starts?
You should get a drawing, even a dimensioned sketch, showing your island pieces laid out with seam locations marked. Good shops produce this as a byproduct of templating. The template (a physical or digital outline of your cabinets) gets laid over a scaled slab diagram so you can see exactly where each cut happens.
The drawing should show:
- The exact location of each seam line relative to cutouts, edges, and cabinet structure
- Which direction the slab grain or pattern runs
- The planned support points under each seam
- The size of each piece so you can confirm they fit the slabs you bought
If a shop gives you a verbal description and no drawing, ask for one. It protects both of you. The drawing doubles as your checklist. If the seam as shown lands over open air, you catch it before anything gets cut.
Digital templating tools, whether hand-digitized from a physical template or captured with a laser or camera rig, make this easier because the fabricator already has the geometry in software. Ask if they can print or email the layout before your material gets scheduled for production.
Can you hide a seam with the right edge profile or overhang?
Somewhat, yes. A seam on the top surface reads as less visible from the seating side when it runs front-to-back (perpendicular to the seating edge) instead of side-to-side (parallel to the long edge). The overhang hides the front portion of a perpendicular seam at a casual glance.
Edge profiles don't hide seams on the top surface, but they change how visible a seam is on a waterfall or mitered edge. A simple eased or flat edge shows the epoxy line more clearly than a rough-honed or leathered finish, where the texture breaks up the eye.
Leathered and honed finishes on natural stone genuinely beat high polish at hiding seams. The matte texture scatters light so the joint doesn't catch your eye the way it does on a mirror-polished surface. If you're doing a large marble island and seams worry you, leathered finish is a practical reason to pick it, more than a looks reason.
Thick-slab countertops at 6 cm (roughly 2.5 inches) often use laminated edges, where a full-thickness strip gets glued to the underside of the perimeter. Seams in laminated edges are a separate joint from the top-surface seam and need their own alignment. On a long waterfall with laminated edges, a misalignment of those joints is obvious and hard to fix after install.
What questions should you ask your fabricator about seam placement?
Before you sign a contract or approve a layout, get clear answers to these:
- Where exactly will each seam be? Can you show me on a drawing?
- What is under the seam on the cabinet side? Is that solid support?
- Will you use steel rods or any mechanical reinforcement at the seam?
- How will you match the pattern or grain across the seam?
- What epoxy color will you use, and can I see a sample on scrap stone?
- Will the seam be polished flush with the surrounding surface?
- For a sink seam: does the seam run through the sink opening, or beside it?
- If I want a book-match, can you source a second slab from the same block?
Good fabricators answer these without hesitation. Hedged or vague answers to the structural questions (what's under the seam, what reinforcement) are a warning sign.
Some shops offer to show you a finished seam on a countertop they installed for another customer, or on a shop sample board. Take them up on it. A seam done well on granite can be nearly invisible from two feet away. A seam done badly has a visible gap, a color mismatch, or a lip you feel when you run your hand across the surface.
How do seams affect long-term durability and maintenance?
A properly executed epoxy seam in stone is not a weak point in normal use. The two-part adhesives fabricators use cure hard enough to be routed and polished flush, and their shear strength sits well above the weight and impact a countertop sees [7]. The seam won't open up if the cabinets are level and stable.
What actually stresses a seam over time:
- Differential settlement, where one side of the cabinet sinks slightly and puts a bending load on the joint
- Thermal cycling near a cooktop, though that's a minor factor with modern epoxy formulations
- A poor initial cure, often from the shop not allowing enough working time in cold conditions
See a gap develop in a seam? It almost always means the support shifted. Re-epoxying without fixing the cabinet level is a band-aid. Fix the cabinet first.
Cleaning is simple. Seams on stone need no special treatment beyond what the stone itself needs. Scrubbing the seam with harsh abrasives can dull the polished epoxy over time, which makes the seam more visible. Use the same stone-safe cleaner you'd use on the rest of the surface [3].
For more on keeping stone in good shape, see our guide on how to clean stone countertops.
Does countertop material choice change how you should plan seams?
Absolutely. The material is often the first variable that constrains or frees your seam options.
Butcher block usually comes in lengths up to 12 feet and can be end-grain joined fairly invisibly, but the joint gets glued and clamped with wood glue, not epoxy. It's a maintenance surface too, so the seam area needs oiling like the rest of the top. See our full guide on butcher block countertops for care specifics.
Porcelain tile, if anyone's still weighing it, has grout lines rather than seams. Layout planning for large-format porcelain slabs works much like stone.
Engineered quartz (Silestone, Caesarstone, Cambria) gives you more predictability because slab dimensions are published and consistent [10]. You can figure out whether you need a seam before the template appointment.
Laminate is more forgiving on size. Formica and similar products come in sheets up to about 5 by 12 feet, so seams are avoidable on many island sizes. But when a laminate seam does appear, it's more visible than in stone and can't be polished. See the Formica countertops and laminate countertops articles for sizing specifics.
Corian and other Corian countertops run a different process entirely. Factory-certified fabricators can thermoform and adhesive-weld pieces so the seam essentially disappears. That's a real advantage for unusual island shapes.
How does a fabricator quote a seam, and what drives the price?
Seam pricing usually shows up as a line item in a fabrication quote, separate from square footage. A standard straight seam on a granite kitchen island might run $50 to $200 depending on market, stone type, and complexity. Miter seams for waterfall edges, which need precise angle cuts and pattern alignment, often cost $150 to $500 per miter in most US markets, based on common shop rate structures.
The variables that push cost up:
- Harder stone (quartzite and some granites blunt saw blades faster)
- A pattern matching requirement
- A seam location in an overhang requiring rod reinforcement
- Polishing difficulty (leathered finishes need hand-polishing at the seam)
- Number of seams
A shop using good quoting software itemizes seam charges so you can see exactly what you're paying for, instead of burying those costs in a single price per square foot. When you compare quotes, check whether seam labor is included or listed separately. Shops quote differently, and you might be comparing apples to oranges.
For overall budget planning, the countertop installation guide covers what else drives final installed cost beyond material and seams.
Frequently asked questions
Can a large kitchen island countertop be made from one piece of stone?
It depends on island dimensions versus slab size. Standard stone slabs run roughly 55 to 65 inches wide and 100 to 130 inches long. If your island is smaller than both those dimensions, one piece may be possible. Islands larger than about 60 by 100 inches in natural stone almost always need at least one seam. Jumbo slabs exist but cost more and offer limited stone selection.
How visible are seams on a granite island countertop?
On a well-fabricated granite island, a seam is usually hard to notice from normal standing or seated distance. Granite's random pattern helps hide the joint. The seam line gets filled with color-matched epoxy and polished flush. Up close you can usually spot it if you look. Visibility depends heavily on the fabricator's skill, the stone's color, and how well the epoxy color was matched.
What is a waterfall edge seam, and why is it harder than a regular seam?
A waterfall edge wraps the countertop material down the side of the island to the floor in a continuous panel. The horizontal top and vertical side meet at a 45-degree miter joint. That miter has to be cut precisely, and on veined stone the grain must appear to flow through the corner. Any misalignment in angle or pattern is instantly obvious. It costs more because it takes longer and wastes more material.
Should a countertop seam be placed at the sink?
Yes, if the layout allows it. Running a seam into a sink opening is a common, smart technique. The sink cutout already breaks the slab, so the seam ends there instead of crossing the full depth of the island. Both stone pieces get solid cabinet support on either side of the sink, and the visual interruption of the sink itself pulls the eye away from the seam.
What is book-matching on an island countertop?
Book-matching uses two consecutive slabs cut from the same block so their veining mirrors each other, like pages of an open book. The slabs are oriented so the vein pattern opens symmetrically from the seam at the center of the island. It works best on dramatic veined marble or quartzite. It requires sourcing two matching slabs, adds layout complexity, and costs more than a standard seam, but the result can be striking.
How do I check seam quality on an installed island?
Run your fingertips slowly across the seam. It should feel flat with no detectable lip or ridge. Look at it from a low angle with a raking light source. The epoxy color should blend into the surrounding stone without a sharp line. There should be no visible gap. If the seam has a step, a gap, or a sharply contrasting epoxy color, those are legitimate warranty issues to raise before you sign off on the job.
What epoxy is used for stone countertop seams?
Fabricators typically use a two-part polyester or epoxy adhesive designed for stone, often from brands like Tenax, Akemi, or Integra. The fabricator mixes the base with a color-matched pigment to get close to the stone's background color. It cures hard enough to be routed and polished flush with the surface. The color match is the tricky part. It's never perfect, but it should be close enough to be inconspicuous.
Do seams on an island countertop affect resale value?
Not significantly, as long as they are well-executed. Buyers and appraisers do not typically deduct for seams on large islands because seams are expected on any island over about five feet. A seam that's visible from across the room, has a gap, or has chipped edges could raise questions. A tight, polished seam that's hard to spot from standing height is a non-issue in any resale conversation.
Can seams open up over time on an island countertop?
Yes, but usually only if the cabinet base shifts. If one section of the island cabinet settles, or if the island gets moved, the two stone pieces can develop differential stress and the epoxy joint can crack or open. Properly supported, level cabinets that don't shift keep seams tight for decades. If you see a seam opening, level the cabinets before re-epoxying or the gap will come back.
Is it better to have one wide seam or two narrower seams on a very long island?
One seam usually beats two if you can pull it off with available slab sizes. Each seam adds a visible joint and a potential failure point. On very long islands, 10 to 12 feet, two seams may be unavoidable with standard slabs. In that case, place the seams symmetrically, one-third in from each end rather than clustered. That looks better and distributes support more evenly than two seams close together.
Does the direction a seam runs matter on an island countertop?
Yes. A seam that runs front-to-back, perpendicular to where people sit, is less noticeable because it shortens across your field of view. A seam running side-to-side, parallel to the long edge, crosses your full line of sight from the seating side and looks more prominent. Perpendicular seams also tend to land over more cabinet support. When you have a choice, perpendicular is usually the better call.
What are steel rods in a countertop seam and do I need them?
Steel rods, typically 3/8-inch threaded rod, get epoxied into routed channels on the underside of the stone on either side of a seam, running perpendicular to the joint. They pin the two pieces together and resist the twisting or differential movement that can open a seam. They're standard on seams in overhangs and on waterfall miters. For seams over solid cabinet support with no overhang, a good epoxy bond alone may suffice, but rods add insurance.
Can you avoid seams by choosing a different countertop material?
Solid-surface materials like Corian can be joined with near-invisible factory welds, making seams much less of a concern on large islands. Laminate sheets come in lengths up to about 12 feet, which can eliminate seams on many island sizes. For stone and engineered quartz, avoiding a seam means limiting island size or paying a premium for oversized slabs, which are harder to source and cost more to transport and handle.
Sources
- Natural Stone Institute (formerly Marble Institute of America), Dimension Stone Design Manual: Standard granite and marble slab dimensions typically range from 55 to 65 inches wide and 100 to 130 inches long.
- Cambria, Slab Specifications page: Cambria engineered quartz slabs are available in standard sizes up to approximately 56 by 132 inches, with jumbo formats in select designs.
- Natural Stone Institute, Care and Maintenance of Natural Stone: Stone-safe pH-neutral cleaners are recommended for all polished stone surfaces including at seam lines.
- Occupational Safety and Health Administration (OSHA), Silica in the Workplace: Stone countertop fabrication generates respirable silica dust; OSHA has set the permissible exposure limit at 50 micrograms per cubic meter as an 8-hour TWA.
- National Kitchen and Bath Association (NKBA), Kitchen Planning Guidelines: NKBA planning guidelines address island overhang dimensions and structural requirements for countertop support.
- Natural Stone Institute, Technical Bulletin on Seam Placement in Stone Countertops: Seams in stone countertops should be supported within 3 inches on each side by solid cabinet structure.
- Tenax USA, Stone Adhesives and Epoxy Technical Data: Two-part polyester and epoxy adhesives used for stone seams cure to a hardness suitable for routing and polishing flush with the surrounding stone surface.
- U.S. Geological Survey (USGS), National Minerals Information Center, Dimension Stone Statistics and Information: Dimension stone slabs are quarried in variable block sizes; slab dimensions are determined by the block and saw capacity at each quarry.
- International Code Council (ICC), International Residential Code, Section R702: Residential building codes address structural support requirements for countertop installations including load distribution.
- Silestone by Cosentino, Technical Specifications: Silestone engineered quartz slabs are available in sizes up to approximately 56 by 120 inches in standard formats.
Last updated 2026-07-11