
TL;DR
- Zero-reveal means the sink opening is cut flush to the sink's edge, so no countertop lip shows above the sink rim.
- Positive-reveal means the fabricator cuts the opening slightly smaller, leaving a visible border of stone around the sink.
- The gap is usually 1/8 to 3/8 inch, and it changes how the sink looks, how water behaves on the counter, and what the install demands.
What does 'reveal' actually mean in countertop fabrication?
Reveal is the amount of countertop surface that shows between the edge of the cutout and the visible rim of the sink. Think of it as the gap, or lack of one, between where your stone stops and where your sink begins.
In undermount sink installations the sink sits below the stone, and the cutout edge is what you see when you look at the sink from above. The fabricator controls exactly how much stone overhangs, or doesn't overhang, the sink bowl's edge. That dimension is the reveal.
The term shows up in every fabricator's shop and most manufacturer spec sheets. NKBA (National Kitchen and Bath Association) guidelines treat reveal as a key dimension in sink cutout specifications, and most stone shops make it one of the first decisions a homeowner and designer settle before templating begins. [1]
Reveal is measured horizontally from the inside top edge of the sink rim to the edge of the stone cutout directly above it. Zero reveal means those two edges are perfectly flush. Positive reveal means the stone extends inward past the sink rim by some amount, usually 1/8 to 3/8 inch, leaving a visible shelf of stone. Negative reveal, less common and generally a sign of poor installation, means the stone is cut back farther than the sink rim, so the rim is exposed or the stone doesn't support the sink properly.
What is a zero-reveal sink mount?
A zero-reveal mount means the stone cutout edge sits exactly at the inside edge of the sink's top rim. Look down at the counter and the stone ends right where the sink bowl begins. There's no visible border of countertop between you and the sink.
This look is cleaner and more contemporary. You get an uninterrupted visual transition from the stone into the sink, which is why it's popular in modern kitchens with integrated or apron-front sinks, and with designers who want the sink to read as part of the stone rather than an object sitting inside it.
Zero reveal wins on cleanup in one specific way: there's no small ledge for crumbs or water to collect on top of the sink rim. Everything slides straight into the bowl.
The tradeoff is precision. Because the stone edge sits right at the sink rim, any slight variation in the cut or in the sink's own dimensions can leave a gap, show part of the sink's mounting clip hardware from above, or create a thin stone edge that chips more easily on brittle materials like marble or quartzite. [2] Fabricators who work in zero reveal need accurate templates and, ideally, the actual sink in the shop before cutting. Even 1/16 inch of variance matters here.
For granite countertops and engineered quartz, zero reveal is fairly routine. For softer or more brittle natural stones, some fabricators recommend leaving at least a small positive reveal as insurance against edge chipping.
What is a positive-reveal sink mount?
A positive-reveal mount leaves a visible lip of countertop stone that extends inward over the top edge of the sink rim. The cutout is smaller than the sink opening, so when you look down you see a narrow border of stone before the sink bowl begins.
The most common positive-reveal specs are 1/8 inch, 3/16 inch, and 1/4 inch, though some designers push to 3/8 inch for a more pronounced look. The spec is usually written on the shop drawing as a single number: "1/8 positive" or "positive reveal: 3/16."
Positive reveal is the traditional undermount standard for a reason. The stone lip covers the top edge of the sink mounting clips and any slight irregularity in the sink's rim, so installation errors are less visible. That lip also gives the stone cutout edge more material, which reduces the risk of chipping at the corner radius.
On the cleaning side, the ledge created by positive reveal can trap water if the stone-to-sink transition isn't properly caulked. A thin bead of silicone across the entire perimeter is mandatory, and it needs to be replaced periodically because silicone breaks down, especially with cleaning chemicals. [3] When that caulk fails, water wicks under the stone shelf and can damage cabinet boxes or, in laminate-topped scenarios, cause swelling.
For anyone looking at marble countertops or cambria countertops, positive reveal is often the safer specification because it protects a more delicate or expensive edge from the mechanical stress of the cutout corner.
How do zero-reveal and positive-reveal mounts compare side by side?
Here's a direct comparison across the dimensions that actually matter to homeowners and fabricators:
| Attribute | Zero Reveal | Positive Reveal (1/8", 3/8") |
|---|---|---|
| Stone lip over sink | None | 1/8", 3/8" visible |
| Aesthetic | Modern, flush, integrated | Traditional, defined border |
| Crumb/water ledge | None | Small ledge, needs caulk |
| Edge chip risk | Higher (thin edge at cutout corner) | Lower (more material at corner) |
| Fabrication tolerance required | Very tight (±1/16") | Moderate (±1/8") |
| Sink hardware visibility | Possible if off-spec | Usually concealed |
| Caulk maintenance | Minimal | Required, periodic |
| Common on which materials | Quartz, granite, solid surface | All stone types |
| Typical extra cost vs. standard | Usually none; skill-dependent | Usually none |
Cost differences between the two styles are generally small. Both take the same CNC or hand-cutting time. What changes is the tolerance and the skill level the job demands. A zero-reveal cutout on a brittle stone with inconsistent sink dimensions is where shops can burn extra time, which may or may not show up in your quote.
If your fabricator is quoting these as meaningfully different line items, ask what's driving that. Sometimes the answer is legitimate (natural stone vs. engineered, CNC vs. hand), and sometimes it's not.
Which reveal style is right for your kitchen sink and stone type?
For most kitchens, the choice comes down to three things: the look you want, the stone you chose, and how much maintenance you're willing to do.
If you want a clean, contemporary look and you've chosen a hard, stable material like engineered quartz or a dense granite, zero reveal is a strong pick. The sink integrates into the stone visually, and there's no caulk ledge to worry about. Just make sure your fabricator has the actual sink in hand before templating.
If you've chosen a softer or more brittle natural stone, think marble, quartzite, or a heavily veined granite with natural fissures, a small positive reveal of 1/8 to 3/16 inch gives the cutout edge more material and cuts chip risk. The difference in appearance is subtle, especially at 1/8 inch. Most guests won't notice.
For farmhouse or apron-front sinks, reveal choice matters less because the front of the sink is exposed by design, and the back and sides carry the reveal specification. Zero reveal on the visible sides of an apron front reads especially well.
Soapstone is a special case. It's soft and workable but also has a very distinctive look where the stone character is the point. A small positive reveal tends to read better on soapstone because it plays up the stone rather than hiding it behind the sink. If you want to know more about caring for that material after installation, the how to clean soapstone countertops guide covers that in detail.
For shop owners tracking cutout specs across multiple jobs, keeping reveal preferences documented by project is one of the small details that prevents remakes. Fabrication quoting and job management software, including tools like SlabWise, lets you capture that specification at the quote stage so it travels with the job through templating and production.
Does the sink brand or model affect which reveal you can use?
Yes, more than most homeowners expect.
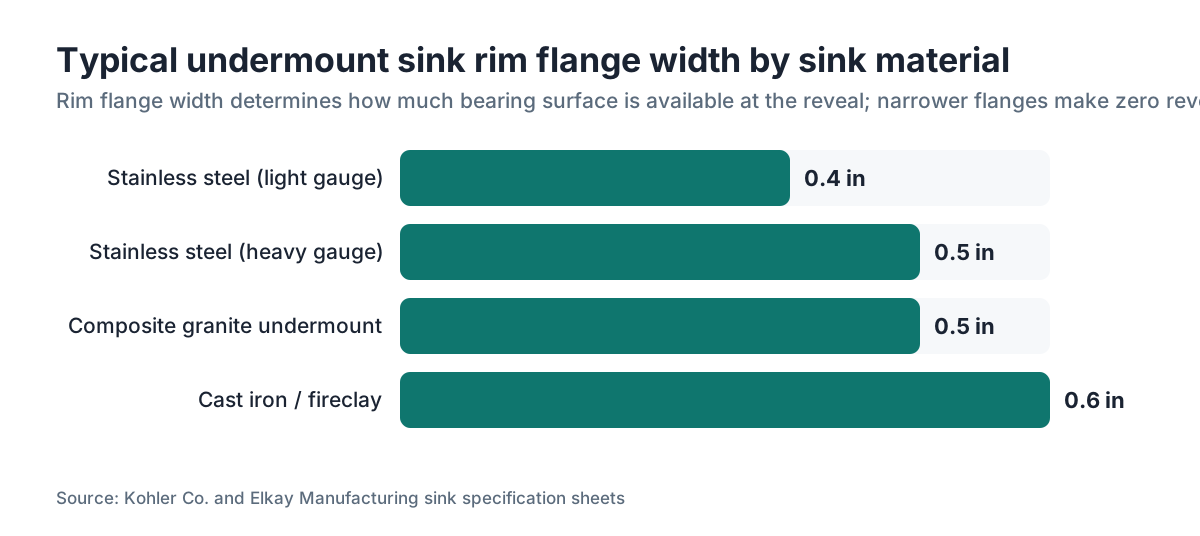
Sink manufacturers publish templating guides that specify a minimum cutout size. That minimum exists to keep the sink's rim, which sits below the stone, fully supported by the counter, and to stop the sink from dropping through the opening. [4] If you specify zero reveal on a sink with a narrow rim flange, you may find there's barely enough bearing surface to support the sink's weight, especially if the rim flange is only 3/8 to 1/2 inch wide.
Stainless steel undermount sinks, the most common type sold in the U.S., usually have a rim flange between 3/8 and 5/8 inch wide. [5] At zero reveal, the stone edge sits at the inner edge of that flange, so the flange bears the vertical load. That's typically fine for lighter stainless sinks. For heavier cast iron or fireclay sinks, a positive reveal of at least 1/8 to 3/16 inch is often recommended because it spreads the load over more stone surface.
Blanco, Kohler, Elkay, and other major manufacturers publish cutout templates as downloadable PDFs. Always request the template for your specific model and hand it to your fabricator before templating day. Some shops will not template until they have that document. That's a reasonable policy.
The sink's corner radius matters too. If the sink has tight 1-inch corner radii and your fabricator tries to run them at zero reveal, there's very little room for error before the stone corner gets too thin to survive installation. Most shops default to a minimum 3-inch radius at the cutout corners for brittle materials, regardless of reveal spec.
How does reveal affect caulking and long-term maintenance?
This is where positive reveal creates an ongoing maintenance job that zero reveal mostly avoids.
With positive reveal, the stone lip sits on top of the sink's rim, and that joint needs a seal of 100% silicone caulk. The joint is horizontal and takes standing water, cleaning products, and thermal expansion as the sink goes from cold to hot during use. Kitchen silicone typically needs inspection every one to two years and replacement every three to five years, depending on use and cleaning habits. [3]
When the caulk fails and water gets under the stone ledge, it can drip into the cabinet below. On plywood or particleboard cabinet boxes, that moisture causes swelling and eventually structural failure. On frameless European-style cabinets with thinner panels, the damage can happen fast. The repair often costs more than a caulk replacement would have.
Zero reveal has a caulk line too, but it's vertical rather than horizontal. A vertical caulk joint sheds water rather than collecting it, so the joint sits under less continuous water exposure. It still needs to be sealed and checked, but the failure mode is slower and less damaging.
If you're comparing materials for a countertop installation and weighing a more forgiving surface, some solid-surface materials like Corian let the sink be integrated and the joint chemically welded, killing the caulk line entirely regardless of reveal spec. The corian countertops guide goes into that in more depth.
What is a negative reveal, and when does it happen?
Negative reveal means the stone cutout is larger than the sink's rim, so the rim is exposed or partly visible from above. Sometimes it's deliberate, for a specific design effect. Usually it's a mistake.
A negative reveal exposes the top edge of the sink's rim and the mounting hardware. On a stainless steel sink, the stamped or brushed rim surface becomes visible, which looks unfinished. On a cast iron or fireclay sink, the enamel edge gets exposed.
More practically, negative reveal means the stone cannot properly support the sink. The load transfer from the stone to the sink rim shrinks or disappears, which puts all the weight on the mounting clips alone. For a heavy cast iron or fireclay sink, that's a structural problem.
Negative reveal almost always comes from a measuring or template error in the shop. On CNC-cut jobs, it can also come from a programming offset applied in the wrong direction. If you receive a finished slab with a negative reveal cutout, that's a remake situation. The stone cannot be patched. The only repair is a new piece, which is why fabricators pin cutout templates to the actual stone before any cut is approved.
How do fabricators specify and communicate reveal to homeowners and installers?
On a shop drawing or templating document, reveal is typically called out as a note near the sink cutout: "zero reveal," "1/8 positive," or sometimes just a dimension like "R=1/8" or "Rev: 3/16."
The spec should appear on both the template drawing and the cut ticket that travels with the slab through the shop. Put it on only one document and it can vanish when a different person handles the CNC programming versus the templating.
For homeowners, the best time to talk reveal is at the design or quote stage, before any deposit is placed. Ask your fabricator what they typically default to and why. If they say "we always do 1/8 positive," that's a reasonable shop standard. If you want zero reveal, ask whether they need the sink in hand before templating. Any experienced shop will say yes.
Some fabricators offer to show homeowners both options on a sample or cutout scrap before cutting the final slab. That's worth asking for if you're uncertain. The difference looks different in person than in photos, and seeing it with your actual stone color and sink finish helps.
For shop owners, making reveal a required field on every job ticket cuts remakes. Shops that leave it to verbal communication or assume a default without confirming produce more sink cutout errors than shops that put the spec in writing. The NKBA Professional Resource Library includes template documentation guidelines that address this kind of spec communication. [1]
Does reveal choice change the price of countertop fabrication?
In most cases, no. The cutting time for a zero-reveal versus a positive-reveal cutout is nearly identical. The slab material is the same. The templating visit is the same.
Where cost can differ is complexity and risk. A zero-reveal cutout on a material like marble or quartzite demands tighter tolerances and, if done wrong, a remake. Some fabricators charge a small premium for zero reveal on high-risk materials, particularly by hand rather than CNC. That premium, where it exists, is usually $50 to $150 and reflects genuine labor cost, not markup on a simple preference. [6]
On standard quartz or granite, zero reveal and positive reveal are priced identically at most shops. If a shop quotes you more without a clear reason tied to material or process, ask for an explanation.
The bigger cost risk is a remake. If a cutout is wrong because the reveal spec wasn't communicated clearly, you may be buying a new piece of stone, which on a natural stone countertop can run hundreds to several thousand dollars depending on the slab. That's a much better argument for clear documentation than for paying extra per se.
For more on the factors that drive countertop pricing, the kitchen countertops guide covers material and fabrication cost breakdowns in detail.
Can you change the reveal after the countertop is installed?
No. Once the slab is cut, the reveal is fixed. You cannot add stone back to a cutout.
Got a zero-reveal installation and decided you want positive reveal? The only option is a new piece of stone. Positive-reveal installation and you want zero reveal? Same answer. This is not like a tile job where you can adjust grout lines. The stone is cut and the edge is finished.
That's why getting the reveal spec right before cutting matters so much. Take time at the design stage to understand what you're asking for. Look at real installations in person if you can, not photos on a design website. Photos are often shot at angles that make reveal differences hard to judge.
If you're unhappy with an existing installation because of reveal, the most practical interim option is to focus on the caulk line. A fresh, neatly applied bead of silicone can make a sloppy reveal look cleaner from a few feet away. It won't change the dimension, but it does affect how the joint reads.
Frequently asked questions
What is the standard reveal for an undermount sink?
There's no single universal standard, but the most common default in U.S. fabrication shops is 1/8 inch positive reveal. This covers the sink rim, protects the cutout edge, and gives a clean look that works with most design styles. Some shops default to 3/16 inch. Zero reveal is increasingly requested in modern kitchens but is not the default at most fabricators.
Is zero reveal harder to fabricate than positive reveal?
Yes, in practice. Zero reveal requires tighter tolerances because the stone edge must land precisely at the sink's inner rim. A 1/16-inch error is visible. With positive reveal, the fabricator has more margin. On CNC equipment with good templates, zero reveal is routine. In hand-cut shops, or with sink models that have variable rim dimensions, the difficulty jumps noticeably.
Which reveal looks better, zero or positive?
That depends on the kitchen style. Zero reveal looks cleaner and more contemporary, with an uninterrupted flow from stone to sink. Positive reveal gives a more defined, traditional look with a visible stone border. At 1/8 inch, the difference is subtle. At 3/8 inch, it's a distinct design choice. Neither is objectively better; it's a style decision.
Do I need to tell my fabricator which reveal I want before templating?
Yes, before templating, not after. The reveal dimension sets the cutout size, which is marked on the template. If you don't specify, most shops apply their default (usually 1/8 inch positive). If you want zero reveal, also confirm the fabricator needs your actual sink in the shop before templating, because sink dimensions vary by manufacturer and model.
Can zero reveal cause problems with heavier sinks like cast iron or fireclay?
It can. Heavy sinks need enough bearing surface on the stone to spread their weight. At zero reveal, the stone edge lands at the inner rim of the sink, cutting the contact area. For cast iron or fireclay sinks, which can weigh 50 to 100 pounds or more, a positive reveal of at least 1/8 to 3/16 inch is generally recommended so the stone provides a wider support shelf.
What happens if my fabricator cuts a negative reveal by mistake?
A negative reveal means the cutout is too large and the sink rim is exposed or unsupported. This is a fabrication error. The stone cannot be repaired; only a full replacement piece fixes it. If this happens, work with your fabricator to figure out whether the error came from a template issue, a missing sink template, or a CNC programming mistake, and confirm who covers the remake cost.
Does reveal affect how I clean my countertop around the sink?
Yes. Zero reveal has no ledge above the sink rim, so water and crumbs sweep straight into the bowl without getting trapped. Positive reveal creates a small stone shelf that can collect water and debris, and it requires a maintained caulk seal at that joint. From a cleaning standpoint, zero reveal is simpler. From a caulk maintenance standpoint, it's also lower-maintenance over time.
What reveal should I use for quartzite countertops?
Quartzite varies in hardness, but many varieties are brittle enough that a thin cutout edge can chip during installation or from impacts over time. A small positive reveal of 1/8 to 3/16 inch leaves more material at the cutout edge and reduces chip risk. Check with your fabricator about the specific quartzite slab's characteristics; some are denser and more tolerant of zero reveal than others.
Do sink manufacturers recommend a specific reveal?
Most manufacturers publish cutout templates with a minimum cutout size, which protects the sink's rim support, but they rarely dictate a specific reveal beyond that minimum. Blanco, Kohler, and Elkay all provide downloadable templates. The fabricator's job is to stay within the manufacturer's minimum cutout while hitting the reveal the homeowner or designer specified.
Is reveal the same thing as the sink's overhang or drop?
No. Reveal is the horizontal dimension: how much stone shows above the sink rim from a top-down view. Overhang or drop describes how far below the stone surface the sink bowl extends, which is a vertical dimension. Both matter for installation, but they're separate specifications. Reveal is about the cutout width; drop is about sink depth relative to the counter thickness.
Can I use zero reveal with a laminate countertop?
Laminate countertops almost always use drop-in or top-mount sinks, not undermount sinks, because laminate's core material (usually particleboard or MDF) absorbs water and swells at exposed edges. Undermount sinks, and the reveal conversation, generally apply to stone, quartz, and solid-surface countertops. For laminate options and their sink compatibility, the laminate countertops guide has more detail.
How do I describe what I want to my fabricator if I'm not sure of the terminology?
Show a photo. Pull up an image of a sink cutout with the look you want and show it to your fabricator at the design meeting. Then ask them to translate that into a reveal dimension. Most fabricators deal with homeowners who don't know the terminology and can easily work backward from a photo to a spec. Confirm the spec in writing on your design agreement before the template date.
Does the type of sink cutout shape (rectangular vs. rounded) affect the reveal choice?
Not directly. Reveal is a separate dimension from the cutout shape. But tighter corner radii do interact with reveal, because a small radius combined with zero reveal leaves very little stone material at the corner, raising chip risk. Many fabricators require a minimum corner radius of 2 to 3 inches when specifying zero reveal on brittle materials, regardless of the overall cutout shape.
Sources
- National Kitchen and Bath Association (NKBA), Professional Resource Library: NKBA guidelines address reveal as a key dimension in sink cutout specifications and document template communication standards for fabricators.
- Natural Stone Institute (formerly Marble Institute of America), Natural Stone Countertop Installation Standards: Natural stone installation guidance notes that thin cutout edges on brittle materials like marble increase the risk of chipping, particularly at corner radii.
- U.S. Department of Housing and Urban Development, Residential Rehab Inspector's Guide: Kitchen silicone caulk at sink and countertop joints typically requires inspection every one to two years and replacement every three to five years depending on use and cleaning exposure.
- Elkay Manufacturing, Sink Installation and Cutout Specifications: Sink manufacturers publish minimum cutout dimensions to ensure the sink rim is fully supported by the countertop and the sink cannot drop through the opening.
- Kohler Co., Undermount Sink Specification Sheets: Standard stainless steel undermount sink rim flanges typically measure between 3/8 and 5/8 inch in width, which determines the available bearing surface at the stone edge.
- Concrete Network, Countertop Fabrication Cost Guide: Fabrication complexity premiums for specialty cutout tolerances on natural stone, where applicable, typically range from $50 to $150 depending on material and process.
- Natural Stone Institute, Countertop Fabrication Tolerances Technical Bulletin: Industry fabrication tolerance guidance for undermount sink cutouts on natural stone references acceptable variance ranges and edge thickness minimums for various stone types.
- Blanco America, Sink Cutout Templates and Installation Guidelines: Blanco publishes downloadable PDF cutout templates for all undermount sink models specifying minimum cutout dimensions by model.
- U.S. Consumer Product Safety Commission, Kitchen Safety Guidelines: Water infiltration under countertop surfaces at failed caulk joints is a documented cause of cabinet structural damage in kitchen installations.
- NKBA, Kitchen Planning Guidelines with Access Standards: NKBA kitchen planning guidelines include sink installation specifications that reference cutout documentation requirements and designer-fabricator communication protocols.
Last updated 2026-07-10