TL;DR
- Inside corners are almost never a true 90 degrees.
- Capture the actual wall angle with a digital angle finder or scribe compass, transfer it to your template material exactly, and leave 1/8" to 3/16" clearance for movement.
- The costly mistake is assuming the corner is square.
- Always dry-fit before you cut stone.
Why are inside corners the hardest part of a countertop template?
The wall is the problem. In most residential kitchens, inside corners are not 90 degrees. They look square. They were framed square. But drywall compound, tile, backerboard, and paint build up unevenly, and by the time you press a template into a corner, the actual angle might be 89.2° or 91.5°. That half-degree sounds trivial until you're cutting a $200-per-square-foot quartzite slab and the back edge won't sit flush.
Stone and engineered quartz do not flex. Laminate can be scribed a little. Wood can be planed. Stone cannot. If your template corner is off, your slab corner will be off, and you're looking at a visible gap or, worse, a cracked slab you tried to force into a wall that isn't where you thought it was.
The second problem is stress. On an L-shape or U-shape, the inside corner is where two runs meet. Any mismatch in cabinet height, any twist in the base, any error in your measurement gets magnified right there. Fabricators who have done this for years slow down at inside corners for a reason. Most of a template can be corrected at the saw with a small trim. Inside corners often cannot.
What tools do you actually need to template inside corners?
You can template a countertop with a tape measure and a carpenter's square, but the right tools get you a better result faster. Here is a realistic breakdown.
Digital angle finder (bevel gauge): A digital version costs $15 to $40 at any hardware store and reads the wall angle to a tenth of a degree. This is the single biggest upgrade over guessing that corners are square. Analog bevel gauges work too, but you have to transfer the angle to your template by eye.
Scribing compass (wing dividers): Copies an irregular wall line straight onto your template. Set the compass to the widest gap between template and wall, run one leg along the wall, and the other scribes the exact profile onto your material. This is the tool for uneven wall surfaces.
Template material: Luan plywood (1/8" thick) is the traditional rigid choice. It holds shape and cuts cleanly. Some fabricators prefer cardboard strip systems (like a Proliner setup or shop-made cardboard) because strips handle better in tight kitchens. Either works. What matters is that the material doesn't flex or shift while you trace.
Hot glue gun: For cardboard-strip templating, hot glue joins the strips at the corner. It sets in under 30 seconds and holds rigidly enough to survive the ride to the shop.
Jigsaw or circular saw: For cutting luan to rough shape on-site.
Fine-tip permanent marker: Template lines need to be visible, consistent, and on the correct side of the material. Thin markers cut ambiguity. Mark every reference line: wall edge, reveal line, overhang line, and the corner itself.
Laser level (optional but useful): Confirms both legs of an L-shape are truly level before you lock in your template. A 3-foot level works for single runs, but a laser catches height mismatch between the two cabinet runs at the corner.
How do you measure a wall angle that isn't 90 degrees?
Press your digital angle finder (or a sliding bevel gauge) into the inside corner at counter height with both blades flat against the walls, and read the number. Write it down. Then measure it again about 6 inches forward from the wall. Walls aren't always flat, so the two readings should be close but might differ by a degree or two.
If you're using a sliding bevel gauge, lock the blade at the wall angle and transfer it to your template. Set the handle on the edge of the template piece and draw a line along the blade. That gives you the exact angle to cut your template corner.
Once a corner deviates more than 2 degrees from 90°, the difference shows up in the finished countertop unless the templater compensates. A 91° corner means one miter leg needs a 45.5° cut instead of 45°. Small number, real gap. Residential framing tolerances under the 2021 IRC routinely produce corners that read off-square after drywall and finish go on [9].
Write the measured angle right on the template at the corner. The shop needs that number the moment the template lands on the bench. Don't make the fabricator re-derive it from the template shape.
Step-by-step: how to template an L-shaped inside corner with luan
This is the method most professional fabricators use for natural stone and engineered quartz. It takes more setup than cardboard strips but gives you a rigid, accurate template.
Step 1: Confirm cabinet height and level. Before you touch template material, check that both cabinet runs are level and at the same height. Lay a 4-foot level across the corner. If they're off by more than 1/8", shim the cabinets first. A countertop cannot fix unlevel cabinets. Note any high spots.
Step 2: Establish your reference lines. Set a straightedge or long level along the front edge of the cabinets and mark that front-edge line on top with tape. This is your overhang reference. Standard overhang is 1-1/2" on a base cabinet with no seating, 12" for bar seating [1].
Step 3: Cut luan to rough shape. Cut two pieces, one for each leg of the L, about 2 inches smaller than the finished counter all around. You're not fitting the final shape yet. You're building a base to work from.
Step 4: Position the luan and scribe the walls. Push each piece into the corner, leaving a small gap at the walls (about 1/2"). Clamp or tape the pieces so they can't shift. Now set your scribing compass to the widest gap between the luan edge and the wall, run one leg along the wall, and let the other leg mark the actual wall profile onto the luan. That scribe line is your cut line.
Step 5: Cut along the scribe lines. Cut the luan on the scribed lines with a jigsaw and test-fit it back into the corner. The back and side edges should now follow the real wall profile with roughly 1/16" to 1/8" clearance for movement.
Step 6: Lock the inside corner. Where the two pieces meet, join them accurately with a small block of luan glued and screwed across the joint from below. Check with your digital angle finder that the joined angle matches your measured wall angle. This is the step that makes or breaks the template. If the luan corner doesn't match the wall, the stone corner won't either.
Step 7: Mark all reference information. Label with permanent marker: the wall edge ("wall side"), overhang dimension, finished edge style, sink cutout centerlines, faucet hole locations, cooktop cutout, material (quartz, granite, etc.), thickness (3 cm is standard for stone [2]), edge profile, and the measured corner angle. Mark which direction is "up" so the shop doesn't flip it.
Step 8: Photograph everything. Before you leave, shoot the template in place, the corner detail, and any unusual wall conditions. Two minutes on-site saves an hour of phone calls later.
How does cardboard strip templating handle inside corners differently?
Cardboard strip templating (sometimes called the "story stick" or "builder's strip" method) uses narrow strips of cardboard, usually 1.5" to 2" wide, hot-glued into the outline of the counter. It's faster than luan for simple shapes and far easier to carry up stairs or through tight doorways.
At an inside corner, you run one strip along each wall and overlap them at the intersection. Hot-glue the joint on both sides and let it set. The corner angle in the finished framework captures the real wall angle automatically, because the strips were pressed against the actual walls when you glued them.
Rigidity is the catch. A cardboard template of a large L-shape flexes during transport if it isn't braced. Fabricators who use this method add a diagonal brace strip across the corner to stop it from racking. Some shops won't accept cardboard for complex shapes at all, so check before you template.
For homeowners bringing a DIY template to a shop, cardboard strips are usually fine if you call ahead. The fabricator just needs an accurate, rigid outline. The tolerance most shops work to is plus or minus 1/16" [10].
Digital tools change the math. A Prodim Proliner (a laser-based measuring device) captures the corner angle and wall profile as point data that feeds straight into the shop's CAD/CAM software [3]. That's the fastest and most accurate method, but a Proliner runs $15,000 to $25,000 new. It's a fabricator tool, not a DIY one.
What clearance should you leave at the wall on an inside corner?
Leave 1/8" to 3/16" between stone and the wall at inside corners when a backsplash will cover the gap. That clearance absorbs wall irregularities and gives the stone room to sit without binding. The backsplash and caulk joint hide it.
For a flush-to-wall install with no backsplash (less common, sometimes done on islands or open-shelf counters), the fabricator has to scribe the stone edge to match the wall profile exactly. That means the template has to capture the real wall line, not an average of it. Your scribing compass is the tool for that job.
Never butt stone tight into a corner with no clearance and no caulk joint. Stone expands and contracts slightly with temperature, and the house itself moves. Seasonal wood movement, foundation settling, and HVAC cycling all create micro-movement at walls. Jam a stone counter tight into a corner with no relief and it will eventually crack, usually right at the inside corner or a seam near it. The Marble Institute of America's guidelines call for a minimum 1/8" flexible caulk joint at all wall-to-countertop intersections [4].
At an inside corner, that caulk joint does two jobs at once. It fills the gap between the two runs, and it seals the wall intersection. Use color-matched silicone, not grout. Grout is rigid and cracks. Silicone stays flexible and keeps the joint watertight at the most vulnerable spot on the counter.
How do you handle a notched or clipped inside corner (like around a wall post or bump-out)?
Notched corners are common. A wall jogs inward, a structural post intrudes into the run, or a soffit drops into the counter area. Each one creates a more complicated inside corner on the template.
The principle doesn't change: measure every angle, every dimension, every depth. The execution just needs more reference points. When you template a notch, record:
- The depth of the notch (how far it extends into the counter field)
- The width of the notch (how much counter length it removes)
- The angle of each corner inside the notch (a rectangular notch has four 90° corners, but a wall post is often not square)
- The height of any bump-out if it affects clearance
Use a combination square for the notch depth and your angle finder for each corner. Dimension the notch from a fixed reference point, usually the front edge of the cabinet run, so the shop can locate it precisely on the slab.
For luan, cut the notch straight into the template. For cardboard, use short strips to outline the notch perimeter and reinforce the corners with extra glue. Either way, photograph the condition before you leave.
One common mistake: measuring the notch at one height and assuming it holds at counter height. Wall bumps taper. A post might be 3.5" wide at the floor and 3.75" at counter height because of stacked drywall finish. Measure at exactly counter height, and note any taper.
What's the difference between a square inside corner and a clipped or radius corner?
A square inside corner on the countertop itself (not the wall) is a 90° interior corner in the stone. These show up constantly on L-shapes and U-shapes.
The trouble with a tight square inside corner is stress concentration. Stone has very low tensile strength. It resists being pulled apart far less than it resists being crushed [5]. A sharp inside corner is a stress riser: any load, vibration, or thermal movement focuses at that single point. That's why fabricators almost always add a small relief cut or radius at the inside corner, even when the template shows a hard 90°.
A clipped corner (also called a "chamfered" or "notched" corner) knocks off the sharp point with a small diagonal, usually 1/4" to 1/2". It's faster to cut than a radius but spreads stress less evenly.
A radius corner (1/4", 3/8", or 1/2") is the standard in most shops. Show the radius you want on the template. Leave a sharp 90° with no note and a good fabricator will either call to confirm or default to the shop standard, usually 1/4". Ask upfront what that default is.
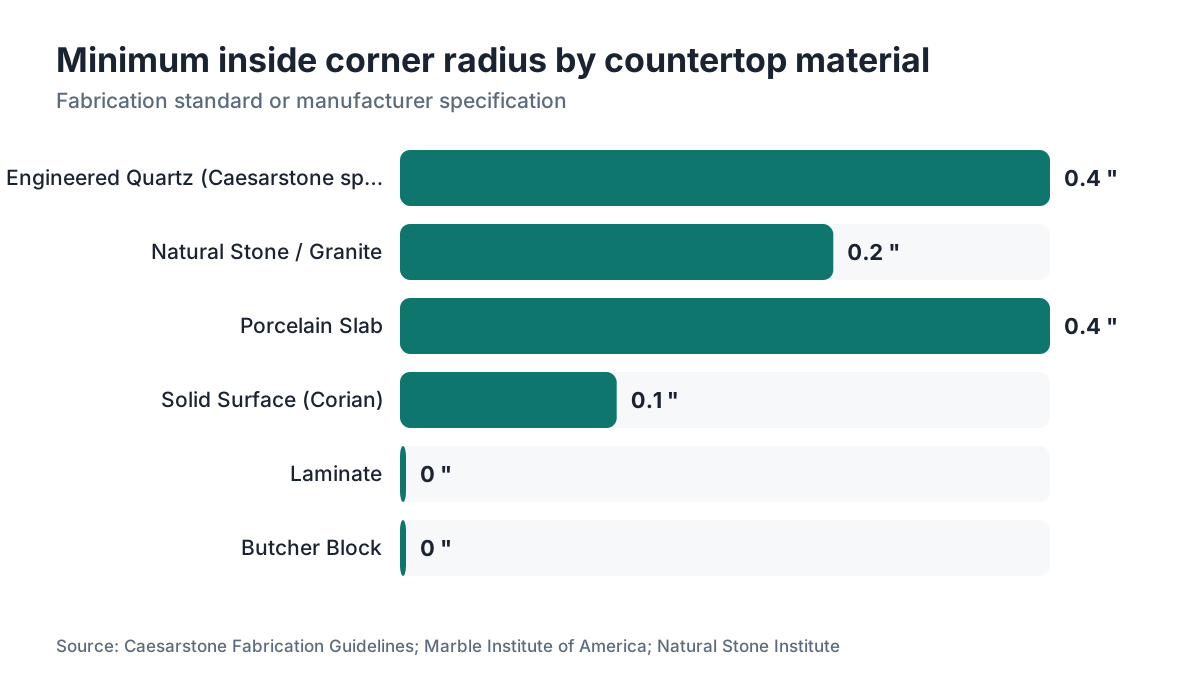
For engineered quartz, Caesarstone's fabrication guide calls for a minimum 3/8" radius at all inside corners to prevent cracking [6]. That's a real spec, not a suggestion. If you're quoting or templating a quartz job, mark the inside corner radius on the template and on the order.
How do you transfer a template inside corner accurately to a slab at the shop?
Once the template reaches the shop, the inside corner has to move onto the stone before anyone cuts. How that happens depends on the shop.
CNC shops digitize the template, either by tracing it with a digitizing arm or scanning it, then cut the stone directly to the digital profile. The inside corner is just another vector in the toolpath, and the operator sets the corner radius as a machine parameter. Accurate template in, accurate part out.
Manual and bridge saw shops lay the template on the slab and trace it with a soapstone pencil or fine marker. At the corner, they set a combination square or bevel gauge to the measured angle to confirm the traced corner matches the template. This is exactly where a clearly marked corner angle earns its keep.
Transfer accuracy lives or dies on template rigidity. A floppy template shifts during tracing and lands the corner in a slightly different spot than you measured. That's the main argument for luan over cardboard on complex L-shapes.
Shops running software like SlabWise can enter the template dimensions as a digital drawing that outputs a cut file straight to the CNC, skipping the physical transfer and the transcription error that can creep in at the corner.
After cutting, dry-fit the stone in the shop before delivery whenever you can. Set both pieces of an L-shape together on a flat surface and check that the inside corner closes clean. A gap caught here is cheap. The same gap caught in the customer's kitchen is not.
What are the most common inside corner templating mistakes and how do you fix them?
Assuming the corner is 90°. The most common and most expensive mistake. Measure every corner with an angle finder, every time. Even brand-new construction runs a degree or more off.
Not scribing the wall profile. Walls bow, bump, and taper. A template that only approximates the wall edge yields stone that gaps at the wall or won't fit at all. Take the time to scribe.
Template flex during transport. An L-shaped luan template that isn't rigidly joined at the corner racks when you load it into the van, and the corner angle drifts. Add a diagonal brace from the inside corner to a rigid point on each leg.
Marking on the wrong side. Templates are made to the finished top face. Trace reference lines on the back face by accident and the shop may mirror your layout, dropping the sink cutout on the wrong side. Mark the face side in large letters.
Ignoring cabinet height mismatch. Both legs of an L-shape need the same height for the corner to land right. A 1/4" difference between runs means the stone corner rocks or needs a shimmed build-up. Check level before you template.
Forgetting the seam location. Larger L-shapes usually carry a seam somewhere in the run. The inside corner itself should not be the seam (seams at inside corners crack), but the seam's position relative to the corner belongs on the template so the shop can plan the slab layout.
Catch a mistake after the stone is cut and your options narrow fast. A corner angle error usually means a recut. A small fit issue (a 1/8" gap at the wall) often disappears under caulk and a backsplash. This is the whole case for templating carefully the first time: it costs a fraction of a recut or a fresh slab.
Should homeowners template their own countertops or hire a fabricator?
Honest answer: for natural stone or quartz, let the fabricator do the template. Stone is expensive (granite runs $40 to $100 per square foot installed on average, quartzite higher [7]), and template errors come out of your pocket as wasted material and labor. Most fabricators fold templating into the project cost or charge $75 to $150 for a standalone visit. That's cheap insurance.
For laminate, solid surface (Corian), or butcher block countertops, DIY templating makes more sense. Those materials forgive more and cost less to recut. A careful homeowner with good measuring skills and the right tools can produce a usable template.
If you template it yourself for any material, bring the template to the fabricator before you order any stone and have them review it. An experienced fabricator spots problems in two minutes that would cost you hours to find.
For shop owners, the real question is digital templating (Prodim Proliner or similar) versus staying with physical templates. A Proliner costs roughly $15,000 to $25,000 [3], but it kills most inside corner errors, cuts template time by 40 to 60 percent per Prodim's published benchmarks, and drops cut files straight into the CNC. For shops running more than 10 to 15 jobs a week, the math usually works. For smaller operations, a disciplined physical template process with the tools above does the job fine.
Still deciding on material? Granite countertops, marble countertops, and laminate countertops all tolerate template accuracy differently, which changes how much care the inside corner needs.
How does inside corner templating change for different countertop materials?
The process is the same across materials. The tolerances and specs are not.
| Material | Inside Corner Radius (min) | Wall Clearance | Template Tolerance | DIY Template OK? |
|---|---|---|---|---|
| Granite / Natural Stone | 1/4" | 1/8" to 3/16" | ±1/16" | Not recommended |
| Engineered Quartz | 3/8" (Caesarstone spec [6]) | 1/8" to 3/16" | ±1/16" | Not recommended |
| Laminate | None required | 0" (scribed) | ±1/8" | Yes |
| Solid Surface (Corian) | 1/8" min | 0" to 1/8" | ±1/8" | With care |
| Butcher Block | None required | 1/16" to 1/8" | ±1/8" | Yes |
| Porcelain Slab | 3/8" min | 1/8" | ±1/16" | Not recommended |
Laminate and solid surface scribe directly to the wall, so you can fill that inside corner tight with no visible gap. Stone cannot. Porcelain slab acts like natural stone: brittle, no flex, zero tolerance for a forced fit.
Kitchen countertops covers the full material range if you're still choosing. For care once the stone is installed, see how to clean stone countertops.
Frequently asked questions
How do I find the angle of an inside corner for a countertop template?
Press a digital angle finder ($15 to $40 at hardware stores) into the inside corner at counter height and read the angle off the display. If you only have a sliding bevel gauge, lock the blade against the corner and transfer the angle to your template material. Measure at two heights to catch any wall taper, and write the reading directly on the template.
What happens if I don't put a radius on an inside corner of a stone countertop?
A sharp inside corner concentrates stress in the stone. Because stone has low tensile strength, vibration, load, or temperature change can start a crack radiating from that point. Caesarstone specifies a minimum 3/8" radius for engineered quartz inside corners. Most fabricators add at least a 1/4" radius automatically. Ask your shop what their default is and confirm it before cutting.
Can I use cardboard instead of luan for an inside corner template?
Yes. Cardboard strips hot-glued together work fine at inside corners as long as the template stays rigid during transport. Add a diagonal brace strip across the corner to prevent racking. Some fabricators prefer or require luan for complex shapes, so call your shop before templating to confirm what they accept. For large L-shapes, luan is more reliable.
How much clearance should I leave between the countertop and the wall at an inside corner?
Leave 1/8" to 3/16" between stone and the wall at inside corners. The Marble Institute of America specifies a minimum 1/8" caulk joint at all wall-to-countertop intersections. Fill the gap with color-matched silicone, never grout. This clearance handles wall irregularities and the micro-movement every house goes through seasonally. A backsplash usually covers the joint.
My kitchen corner is clearly not 90 degrees. How do I template it without the stone cracking?
Measure the actual angle with a digital angle finder and record it on the template. The fabricator cuts each piece to match the measured angle instead of assuming 90°. Also make sure the inside corner of the stone itself carries a small radius (at least 1/4") to reduce stress concentration. Never force stone into a tight corner with no clearance; a flexible caulk joint is your safety buffer.
What information should I write on a countertop template before bringing it to the shop?
Write which side is the wall edge, which side is the front (with overhang dimension), the measured corner angle, material and thickness (e.g., 3 cm quartz), edge profile on each edge, sink cutout centerline, faucet hole locations, and "TOP" to mark face-up orientation. Add the job name or address and the date. Photograph the template in place before transport.
How do fabricators use CNC machines to cut inside corners on stone countertops?
The CNC reads a digital file (from a digitized template or direct Prodim data) and routes the stone with a diamond toolhead. Inside corners get a specified radius programmed into the toolpath. The machine cannot cut a truly sharp interior corner because the bit has a diameter, so a small radius is always present. Most shops run a 1/4" to 3/8" inside corner radius as standard on stone.
Can a homeowner re-template a countertop if the first cut didn't fit?
Yes, but a new template won't fix a piece that's already cut wrong. If the mismatch is small (under 1/8" gap at the wall), caulk and a backsplash may solve it cosmetically. If the angle error is significant, the fabricator may need a new piece. Prevent this by having the fabricator review your template before any stone is cut, and dry-fit in the shop before delivery to catch errors early.
What's the best way to template a countertop around a wall post or structural column?
Measure the notch at exactly counter height: depth from the front edge of the cabinet, width along the cabinet run, and the angle of each notch corner with a digital angle finder. Locate all dimensions from a fixed reference point (usually the front cabinet edge). Capture the actual wall profile around the post with a scribing compass. Photograph the condition and note it on the template.
How accurate does a countertop template need to be at inside corners?
For natural stone and engineered quartz, fabricators work to a tolerance of ±1/16" on template dimensions. Inside corner angle accuracy matters most: an error over 1 to 1.5 degrees produces a visible gap. Laminate and solid surface tolerate ±1/8" more comfortably because they can be scribed and trimmed. Always dry-fit your template in the space before leaving the job site to catch fit issues.
Do I need to account for a backsplash when templating inside corners?
Yes. If a tile backsplash goes in after the countertop, leave enough wall clearance at the corner for tile thickness plus thinset. A typical tile backsplash adds 3/8" to 1/2" to the wall surface [8]. If you template before the backsplash is installed, note this on the template and confirm the clearance with your fabricator so the stone doesn't end up tight against finished tile.
How is templating a U-shaped countertop with two inside corners different from an L-shape?
A U-shape has two inside corners instead of one, and both must be measured independently because they're rarely the same angle. The template also has to capture the overall length of the back wall run accurately, since any cumulative error across the U shows up at both corners at once. Rigidity matters more: brace a U-shape luan template at both inside corners before transport.
What is a Prodim Proliner and how does it change inside corner templating?
The Prodim Proliner is a laser-based digital measuring device used by stone fabricators. It captures precise point coordinates of the counter area, including inside corners, wall angles, and cutout positions, then feeds the data straight into CNC software, eliminating the physical template. It runs $15,000 to $25,000 new. For high-volume shops it cuts inside corner errors sharply and reduces template time by 40 to 60 percent per Prodim's published data.
Should the seam on an L-shaped countertop be at the inside corner?
No. A seam at or near an inside corner is a cracking risk. The inside corner is already a stress concentration point in the stone, and a seam there stacks two weak zones in the same spot. Standard practice locates the seam at least 6 inches from the inside corner, usually along one of the straight runs. Mark the intended seam location on your template so the fabricator can plan the slab layout.
Sources
- National Kitchen and Bath Association (NKBA), Kitchen Planning Guidelines: Standard countertop overhang is 1 to 1.5 inches on base cabinets; bar seating requires 12 inches minimum knee clearance overhang
- Marble Institute of America (MIA), Dimension Stone Design Manual: 3 cm (approximately 1-1/4 inch) is the standard thickness for stone countertop slabs used in residential applications
- Marble Institute of America (MIA), Countertop Installation Guidelines: MIA installation guidelines specify a minimum 1/8-inch flexible caulk joint at all wall-to-countertop intersections, including inside corners
- U.S. Geological Survey, Properties of Common Rocks and Minerals: Natural stone has significantly lower tensile strength than compressive strength, making it prone to cracking from stress concentrations at notches and sharp interior corners
- Caesarstone, Fabrication and Installation Guidelines: Caesarstone fabrication guidelines recommend a minimum 3/8-inch radius at all inside corners of engineered quartz countertops to prevent stress cracking
- HomeAdvisor (Angi), Granite Countertop Cost Guide 2024: Installed granite countertop costs average $40 to $100 per square foot depending on grade and region; quartzite typically runs higher
- Tile Council of North America (TCNA), Handbook for Ceramic, Glass, and Stone Tile Installation: Standard tile backsplash installation adds 3/8 to 1/2 inch to a wall surface when accounting for tile thickness plus thinset mortar bed
- International Code Council, 2021 International Residential Code, Chapter 6: Wall Construction: Residential wall framing tolerances under the IRC allow variations that commonly result in finished corners deviating from true 90 degrees after drywall and finish application
- Natural Stone Institute, Fabrication Standards for Countertops: Professional countertop fabrication tolerances for cut dimensions are generally ±1/16 inch; inside corner geometry must match the template within this tolerance to ensure proper fit
Last updated 2026-07-11