TL;DR
- Sealing granite in the shop before delivery gives the stone 24-plus hours to cure before anyone touches it, cuts callback risk, and lets you control conditions.
- Use a penetrating impregnator, apply at 65-85°F on a clean dry slab, let it absorb for 3-5 minutes, wipe fully, and let it off-gas overnight before wrapping for delivery.
Why seal granite in the shop instead of after installation?
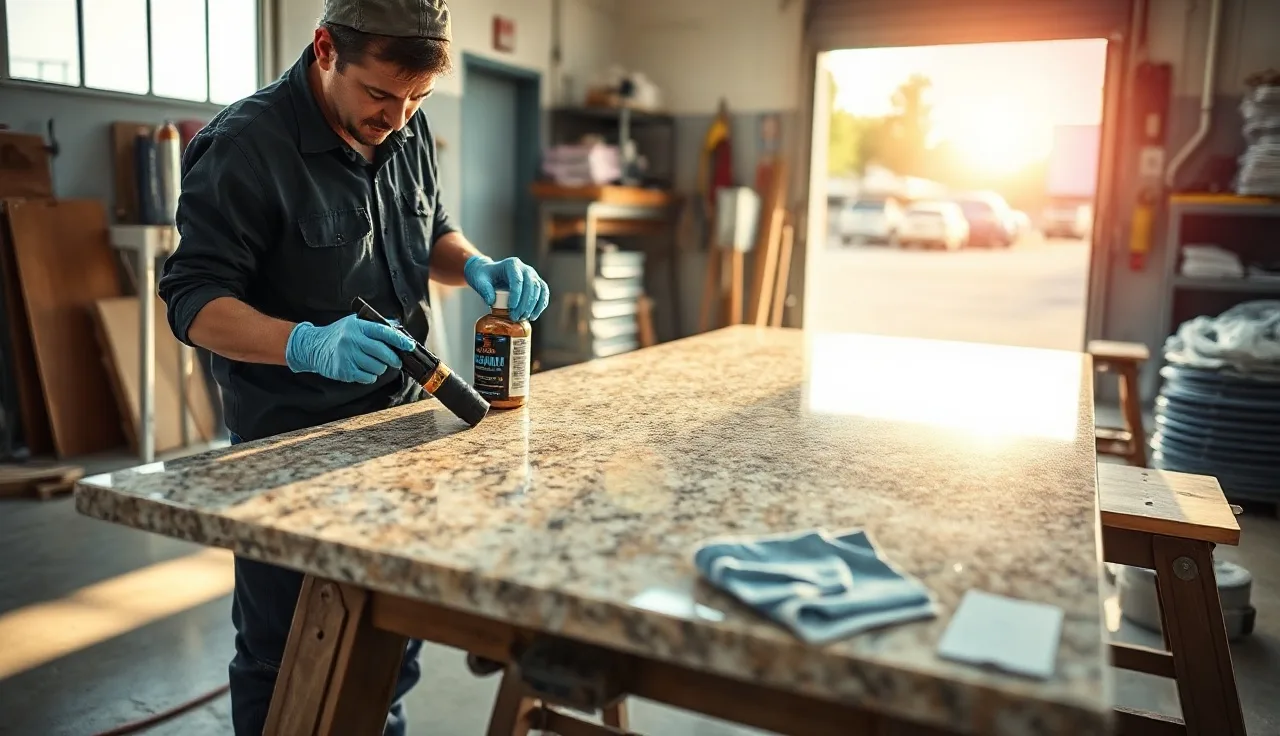
Shop sealing wins for most fabricators, and the reason is control. You set the temperature, the cleanliness of the surface, and the cure time. Once a slab is installed, the homeowner might wipe it down the same day, or the contractor might get silicone caulk on it before the sealer has cured. None of that happens in your shop.
There is also a quality-of-application argument. Flat horizontal slabs on a workbench or A-frame are easier to coat evenly than installed counters with a backsplash in the way. You can see the wet sheen uniformly across the whole slab, and you can wipe the excess without awkward angles.
The one real downside: the slab gets wrapped and transported after sealing. If you wrap it too soon, you can trap off-gassing solvents against the stone and get hazy spots. The fix is simple: let the sealer cure overnight before wrapping, or use a water-based impregnator with a shorter off-gas window. More on both of those below.
For homeowners, shop sealing also means one less thing on the punch list after install. The countertop is ready to use faster, and there is no chemical smell in the kitchen during the sealer's cure window.
What kind of sealer should you use on granite?
Use a penetrating impregnator, not a topical or coating-style sealer. The two are very different products.
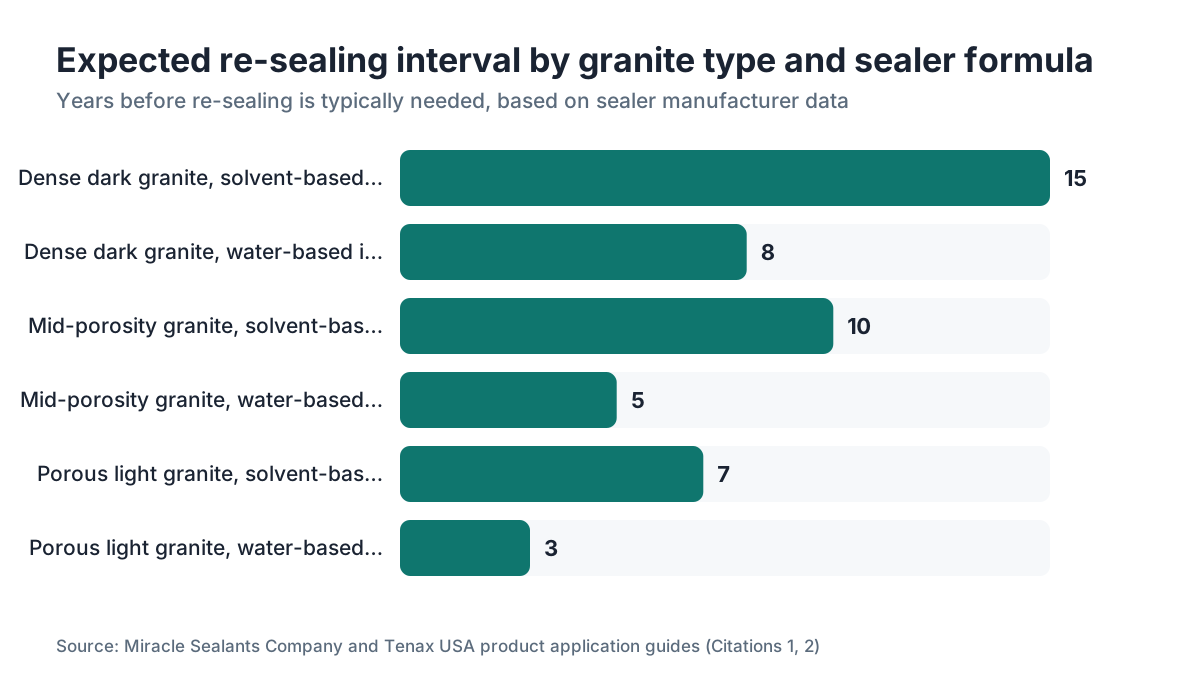
A penetrating impregnator soaks into the pore structure below the polished surface and makes the stone hydrophobic and oleophobic without changing its look. Brands like Tenax Hydrex, Miracle Sealants 511 Impregnator, and StoneTech BulletProof are industry standards. Solvent-based versions generally penetrate deeper and last longer (often 10-15 years on dense granites) [1]. Water-based versions are lower-VOC, cure faster, and are safer to use indoors without heavy ventilation, but may need reapplication in 3-5 years on more porous stones [2].
A topical sealer sits on top of the polished surface and creates a film. It will peel, scratch, and turn milky. Never use it on polished granite countertops.
For shop use, the choice between solvent-based and water-based comes down to your ventilation setup and your VOC compliance requirements. California Air Resources Board (CARB) rules, for example, cap VOC content in stone sealers sold in California at levels that push most products toward water-based formulations [3]. Check your state's air quality rules before stocking solvent-based products.
One more product type worth knowing: fluoropolymer-based impregnators. These give the best oil resistance and earn their premium on lighter-colored granites where cooking oil stains show badly. They cost roughly 30-50% more per treated square foot than standard silicone-based impregnators, but on a cream or white granite that a client paid $90+ per square foot for, that premium is trivial.
What surface preparation does granite need before sealing in the shop?
The sealer can only penetrate a clean, dry, open-pore surface. Any residue sitting on the stone blocks absorption and causes the impregnator to sit on top, where it will either haze or peel.
Start with a thorough wipe-down using a stone-safe cleaner (pH neutral, no soap residue) right after final polish. Get rid of slurry dust, polish compound, and any oil fingerprints. Let the slab dry completely. In a humid shop, "completely dry" might take 30-60 minutes with airflow. In a dry climate, 15-20 minutes is usually enough. The surface needs to be at or near room temperature, not warm from recent polishing.
If your shop does resin-filled slabs, check whether the resin treatment affects sealer penetration. Many resins seal portions of the stone surface on their own. Some fabricators skip or reduce the sealer on heavily resin-filled material for exactly this reason. Test a small area with water first: if the water beads immediately on the resin-filled zones, those areas are already protected.
For any granite that had adhesive, grease, or oil contact during fabrication, use a degreaser rated for stone before the cleaning step. Acetone works for small spots. Let acetone fully evaporate before applying sealer, 15-20 minutes minimum, or you will trap solvent under the impregnator.
Surface temperature matters too. Cold stone (below 55°F) absorbs sealer poorly. Stone above 90°F can cause the sealer to flash off before it penetrates. The working window most sealer manufacturers specify is 60-90°F stone temperature, with 65-80°F being the sweet spot [1].
How do you apply sealer to granite slabs in a shop setting?
The basic application sequence is: pour, spread, wait, wipe. Every impregnator brand refines this slightly, but the core never changes.
For a polished granite in good condition, pour a modest amount of sealer directly onto the stone (some applicators prefer a low-lint cloth or foam applicator pad). Spread it in overlapping passes until the entire surface has a uniform wet sheen. Do not flood the stone. You are not trying to build up a pool.
Let the sealer sit and penetrate. Check the product's dwell time, which varies by formulation, but 3-8 minutes is common for a polished granite [1]. Watch for dry spots: if the sealer absorbs faster in one area and that zone looks matte before the rest, add a small amount there so the full surface dwells for the full time.
Wipe the excess completely with a clean dry cloth before the sealer can skin over and haze. This is the step most applicators rush and then regret. If you see streaks or a dull film after the sealer dries, that is unwiped excess. You can usually re-dissolve it by applying fresh sealer (same product), letting it soften the haze for 30-60 seconds, then wiping aggressively with a clean cloth.
For honed or leathered finishes, absorption is faster and more aggressive. You may need a second coat. Apply the second coat immediately after wiping the first while the stone surface is still slightly damp from the first application. Two thin coats outperform one thick coat every time.
For full slabs before cutting: some shops seal remnants before shelving them. For cut pieces destined for a specific job, seal after the final edge work is done so you are not sealing surfaces that will be re-cut or re-polished. And always seal the underside too, especially the sink cutout edges and any exposed end grain at the slab perimeter. Those cut edges are more porous than the polished face and often get ignored.
If your shop tracks jobs through fabrication software, this is a natural step to log as a production milestone. SlabWise, for example, lets you build custom production stages so sealing gets checked off before a slab moves to the delivery queue, which means it never accidentally ships unsealed.
How long does granite sealer need to cure before you can wrap and deliver?
This is where most shop mistakes happen. Fabricators apply sealer at quitting time, then wrap the slabs for an early-morning delivery truck and wonder why the countertop has a foggy haze or soft spots when the homeowner calls.
The off-gas window matters. Solvent-based impregnators need 12-24 hours of open-air curing before you wrap them in foam or moving blankets. The solvents need somewhere to go. Wrap them too soon and you trap the off-gassing vapors against the stone, and that is what causes haze on delivery.
Water-based impregnators are faster. Most are safe to handle (lightly) in 1-2 hours and safe to wrap in 4-6 hours. But check the specific product sheet, because "dry to touch" and "ready to wrap and transport" are not the same thing.
Full cure (where the sealer achieves its rated performance) is typically 24-72 hours from application for most products. The stone can be delivered within that window, but the homeowner should avoid heavy use (cutting, setting hot pots) for the remainder of the cure window after install.
For a shop running two shifts or tight delivery schedules, water-based impregnators solve the timing problem. Seal in the morning, wrap by afternoon, deliver next day. Solvent-based still wins on longevity in most cases, so some shops use water-based for tight-schedule jobs and solvent-based when they have overnight cure time. That is a perfectly reasonable split.
How do you test whether granite actually needs sealing?
Not all granite needs sealing, and over-applying sealer to a very dense stone wastes product and time without adding any real protection. The water test (also called the absorption test) is the industry standard for deciding.
Put a few tablespoons of water on the polished surface. Watch what happens over 15-30 minutes. If the stone darkens quickly (within 5-10 minutes) and does not dry back to its original color after the water evaporates, the stone is absorbent and needs sealing [4]. If the water beads up and the stone shows no darkening after 15-30 minutes, it is dense enough that sealing provides minimal benefit.
Do the same test with a drop of cooking oil if the stone is going near a cooking surface. Oil penetrates differently than water, and a stone that passes the water test can still fail the oil test.
Very dense granites like Absolute Black, Black Galaxy, and some dark blues will often bead water right off the saw. They have such low porosity that a penetrating impregnator has almost nothing to penetrate. Sealing them anyway does not hurt, but it also does not really help. Spending shop time sealing dense black granite when that time could go to something else is a judgment call.
Lighter colored granites, especially whites and creams, are almost always porous enough to warrant sealing. So are granites with large visible crystal structures (larger mineral grains usually mean more void space). When in doubt, seal. The downside of unnecessary sealing is minimal.
What temperature and humidity conditions does your shop need for sealing?
Temperature and humidity directly control how well the sealer absorbs and cures. Treat them as part of the recipe, not a footnote.
The target range is 60-90°F ambient, with the stone surface itself in the 65-80°F range. Below 55°F, the sealer's viscosity increases, penetration slows, and you risk incomplete absorption. Above 95°F, evaporation outpaces absorption and the sealer can skin over before it penetrates, leaving surface residue that hazes.
Humidity matters too. High relative humidity (above 70%) slows cure on water-based products and can introduce moisture into the stone just before sealing, which reduces penetration. Most sealer manufacturers recommend working below 65% relative humidity. In a humid climate, this may mean running a dehumidifier in the sealing area or scheduling sealing during drier parts of the day.
For shops in cold climates doing winter work: if your shop drops below 50°F overnight, the sealer you applied during the afternoon warm-up may re-liquefy at the surface as the shop cools, and the wipe-off step you completed beautifully at 4pm may have left residue that migrates as temperatures drop. Solution: either maintain shop temp above 60°F for the full 12-hour initial cure, or use a water-based product with a shorter cure window so it is past the sensitive stage before the shop cools.
How do you seal sink cutout edges and complex profiles in the shop?
Cutout edges deserve special attention. The cut edge of a granite slab is significantly more porous than the polished face because the saw exposes raw crystal structure and breaks up whatever natural micro-surface the stone had. Sink cutouts, cooktop cutouts, and any inside corner are often left unsealed because they are awkward to reach. That is a mistake.
For inside the sink cutout: apply sealer with a small foam brush or an acid brush. The edge profile (usually a slight relief or a polished edge) needs the same dwell time as the face. Then wipe with a small cloth or a tight foam pad. You are working in a tight rectangle, so a 2-inch foam brush from a hardware store is the right tool.
For routed edge profiles (ogee, waterfall, bullnose): apply sealer with a cloth, getting into the concave areas of the profile. These concave areas collect the most sealer and are also where unwiped excess pools and hazes. Wipe them more carefully than the flat face, not less.
For mitered edges on thick tops or waterfall islands: the miter joint itself should be sealed before the adhesive goes in. Some fabricators skip this because the joint gets glued anyway, but the edge faces inside the joint can still wick moisture if the adhesive ever fails or allows micro-infiltration at the seam. Seal before assembly.
Underside sealing: run a light coat on the underside of the slab, especially around cutouts and along the perimeter. The underside is rarely the problem area for stains, but it is the area most exposed to cabinet moisture and cleaning product overspray from inside cabinets.
What safety and ventilation requirements apply to sealers in a shop?
Solvent-based impregnators are flammable and produce VOCs that are hazardous to breathe in enclosed spaces. In a shop, this is not a casual concern.
OSHA's General Industry standard 29 CFR 1910.94 covers ventilation requirements for operations generating harmful vapors and mists [5]. For solvent-based stone sealers, you need either general mechanical ventilation (a minimum of 7.5 cubic feet per minute of outside air per person plus dilution ventilation per the product's SDS) or local exhaust ventilation at the source. Check the product's Safety Data Sheet (SDS) for the specific exposure limits, which should list the OSHA Permissible Exposure Limit (PEL) and recommended controls for each solvent used.
Personal protective equipment at minimum: nitrile gloves (solvent-resistant), safety glasses, and a half-face respirator with organic vapor cartridges when working in any space where vapors can accumulate. A paper dust mask does nothing against solvent vapors.
For water-based sealers, the hazard profile is much lower. Most require only nitrile gloves and adequate air movement (not necessarily mechanical exhaust). Still read the SDS; some water-based products include alcohols or glycol ethers that have their own exposure concerns.
Flammability: keep solvent-based sealers away from grinders, torches, and any ignition source. The flash point on common petroleum-distillate-based stone sealers is typically in the 100-140°F range [6], which means they will not ignite at room temperature but will ignite with a spark or open flame. Follow NFPA 30 storage and handling guidelines for flammable liquids if you keep more than a small quantity on hand.
Waste disposal: spent application cloths soaked in solvent-based sealer can self-heat and ignite (spontaneous combustion). Lay them flat or submerge them in water in a closed metal container until disposal. Never pile them in a trash can.
How should you handle and store sealed slabs before delivery?
Once the sealer has cured past its off-gas window, the main risks are mechanical: chips, scratches, surface contamination from dirty straps or blankets.
Wrap polished faces in clean, non-abrasive foam. Moving blankets work but can harbor grit from previous loads. Dedicated clean-foam wrapping is better for high-polish slabs. Do not let two polished faces contact each other, even through foam, on long hauls. The vibration of transport can cause micro-scratches.
Store sealed slabs vertically on padded A-frames if possible. Horizontal storage risks cross-contamination from other shop materials and makes slabs harder to move without dragging. Vertical A-frame storage also lets any remaining off-gas vapors escape rather than pooling under the slab.
Label each slab clearly with the job name, the sealer product and date applied, and the number of coats. When the installer or homeowner asks "was this sealed?" you want a definitive answer, not a best guess. A simple laminated card attached to the slab, or a job note in your production tracking system, takes 30 seconds and prevents a lot of confusion.
On countertop installation day: brief the installer on cure status. If the sealer went on 18 hours ago and needs 24 hours for the initial cure, the installer should know not to let the client cook on it that evening. A short printed card left on the counter for the homeowner ("your countertop was sealed on [date], avoid heavy use until [date]") adds professionalism and reduces calls.
How often should fabricators re-seal granite, and what should you tell homeowners?
The honest answer: it depends on the stone's density and the sealer product used, and most re-sealing gets done far more often than the stone actually needs.
For a typical mid-porosity granite sealed with a quality solvent-based fluoropolymer impregnator, actual re-sealing needs range from 10-15 years on dense stones to 3-5 years on softer, more porous material [1][2]. The old advice of "re-seal every year" was driven partly by marketing from companies selling sealer, not by material science.
Tell homeowners to use the water test (the same one you use in the shop) to check if re-sealing is needed. Put some water on the counter, wait 20 minutes. If it still beads, the sealer is still working. If it absorbs and darkens, it is time. No need to count calendar years.
For everyday care, a pH-neutral cleaner is all the granite needs. Avoid acidic cleaners (vinegar, citrus), alkaline degreasers (bleach-based products), and anything with ammonia. All of these will degrade an impregnating sealer faster than normal use does.
For more detail on cleaning routines, how to clean stone countertops covers the basics that apply to granite and similar natural stones. And if a homeowner asks about other natural stone options nearby, marble countertops and quartzite both follow similar sealing logic but with different porosity and acid sensitivity considerations.
For a broader sense of how granite compares to engineered alternatives like cambria countertops, the short answer is that quartz surfaces require no sealing at all, which is worth mentioning when homeowners are deciding between the two.
What can go wrong when sealing granite in the shop, and how do you fix it?
Hazy or streaky finish after curing: this is almost always unwiped sealer residue on the surface. Re-apply the same sealer product to the affected area (the fresh product re-dissolves the dried residue), let it sit 30-60 seconds, then wipe aggressively with a clean dry cloth. On very bad haze you may need two or three attempts.
White powdery residue: more common on calcium-rich granites. The sealer may have interacted with calcite veins or filler material in the stone. Use a stone-safe residue remover (most sealer manufacturers make one) or a neutral pH cleaner with light mechanical agitation. Do not use acidic cleaners because they will damage the stone itself.
Sealer not beading water after application: either the sealer did not penetrate (surface was contaminated or too cold), or the stone is so dense the sealer had nowhere to go. Re-test. If the water test shows no darkening, the stone was probably just too dense and the sealer, even though it did not penetrate deeply, may still provide some surface-level protection. No action needed. If the stone absorbs water immediately as if unsealed, strip with sealer remover and re-apply on a properly prepared surface.
Yellowing or color change: some older or low-quality silicone-based impregnators yellow over time, especially on white granite. The fix is prevention: use fluoropolymer or newer-generation silicone impregnators on light-colored stone. If yellowing has already occurred, you may need a sealer stripper followed by re-application with a better product.
Delamination or peeling: this should not happen with a true penetrating impregnator. If you see peeling, someone used a topical/coating product. Strip it completely with an appropriate stripper before applying a proper impregnator.
For a broader look at what these decisions mean in a full granite countertops project, the fabrication and sealing choices connect closely to how the stone was selected, cut, and finished.
Frequently asked questions
Do you have to seal granite before delivery, or can the homeowner do it after install?
You do not have to seal in the shop, but it is strongly preferred. Shop sealing gives you controlled temperature, a clean flat surface, and guaranteed cure time before anyone uses the counter. Homeowner sealing after install is possible, but the conditions are less controlled, and if they do it wrong (too cold, wiped too late), you get a callback. Most professional fabricators seal in the shop as a standard step.
How many coats of sealer does granite need?
Most polished granites need one coat. Honed and leathered finishes, and more porous granites, often benefit from two coats applied back-to-back during the same session (apply the second while the first is still slightly damp). Apply the second coat before the first has fully dried. Two thin coats beat one heavy coat for both penetration and appearance. Very dense granites may not need even one coat, so do the water test first.
What is the best granite sealer for shop use?
There is no single universal answer, but fluoropolymer-based impregnators (like Tenax Hydrex or StoneTech BulletProof) consistently top fabricator preference for durability and oil resistance. Solvent-based formulas last longer, typically 10-15 years on dense stone. Water-based versions are better for ventilation-limited shops and have faster cure times, typically 4-6 hours to wrap-safe. Match the product to your VOC requirements and your shop's ventilation setup.
How long after sealing granite can it be delivered?
For solvent-based sealers, wait at least 12-24 hours before wrapping for delivery. Trapping off-gas vapors under foam or blankets causes haze. Water-based sealers are typically wrap-safe in 4-6 hours. Either way, the stone can be installed and lightly used within 24 hours of application, but homeowners should avoid heavy cooking or acidic contact until the sealer reaches full cure at 24-72 hours from application.
Do you seal the underside and edges of granite countertops too?
Yes. The underside and especially the cut edges are more porous than the polished face and often get ignored. Sink and cooktop cutout edges are particularly vulnerable because they are raw cut stone. Seal all exposed edges with a small brush, get into any routed profile, and run a light coat on the underside. This takes an extra 5-10 minutes per piece and eliminates a common source of moisture damage near sinks.
What temperature does the shop need to be for sealing granite?
The stone surface should be between 65 and 80°F for best results. Below 55°F, sealer viscosity increases and penetration slows. Above 90-95°F, the sealer can flash off before it absorbs, leaving residue on the surface. Maintain shop ambient temperature in this range for both application and the first 12 hours of cure, especially in winter when shop temps drop overnight.
Can you seal granite right after cutting and polishing in the same session?
You can, but clean the slab thoroughly first to remove polishing slurry and compound residue, and let it reach room temperature if the polishing machine left it warm. Warm stone and contaminated pores both reduce sealer penetration. A 20-30 minute cooling and cleaning window after final polish is enough in most cases. Do not apply sealer on a stone still warm to the touch from the polishing wheel.
Is sealing granite required, or is it optional?
Required is too strong. Dense granites like Absolute Black genuinely do not need sealing. But for most granite colors and textures, sealing is strongly recommended because it dramatically reduces oil and water absorption, which is what causes most staining. From a business standpoint, sealing before delivery is also a liability question: unsealed granite that stains right after install is a customer service problem that costs far more to resolve than a quart of sealer.
What PPE do shop workers need when applying solvent-based granite sealer?
At minimum: nitrile gloves, safety glasses, and a half-face respirator fitted with organic vapor cartridges. A dust mask does nothing against solvent vapors. Ensure mechanical ventilation is running during application and for at least the first hour after. OSHA 29 CFR 1910.94 covers general ventilation requirements for solvent operations. Check the product's SDS for specific PEL thresholds and recommended controls for each solvent in the formula.
How do you know if the sealer application worked?
After full cure (24-72 hours), do the water test: put a few tablespoons of water on the sealed surface and wait 15-20 minutes. Properly sealed stone will bead or repel the water with no darkening. If the stone darkens immediately, re-apply sealer. Also check visually for haze or streaks, which indicate unwiped residue. Clear, even appearance plus the bead test is your confirmation the application succeeded.
How does sealing granite in the shop affect the homeowner's maintenance schedule?
A quality shop-applied impregnator on mid-porosity granite typically lasts 3-15 years before re-sealing is needed, depending on stone density and product quality. Tell homeowners to use the water test annually rather than following a fixed calendar schedule. A pH-neutral cleaner for daily use and avoidance of acidic products (vinegar, citrus, bleach) will extend the sealer's life significantly. No special product is needed between sealing intervals.
Can sealer damage granite or change its appearance?
A penetrating impregnator applied correctly to a compatible stone should not change the appearance. On very dense stones, excess sealer sitting on the surface can haze if not wiped fully. Some older silicone-based products yellow on white granite over time; use fluoropolymer-based products on light stone to avoid this. Topical sealers (film-forming, not penetrating) can change sheen and eventually peel. Never use topical sealers on polished granite.
Should you use the same sealer on granite, quartzite, and marble?
A quality penetrating impregnator works on all three, but the porosity and acid sensitivity differ significantly. Marble and some quartzites are much more reactive to acidic cleaners and need the sealer intact more urgently than most granite. Quartzite in particular varies wildly in porosity; some pieces absorb sealer faster than marble does. Always test with water and oil before application, and follow product guidance on which stone types each formula is approved for.
Sources
- Miracle Sealants Company, Product Application Guide for 511 Impregnator: Penetrating impregnators should be applied at 60-90°F; solvent-based formulas typically provide 10-15 year protection on dense granites; dwell time ranges 3-8 minutes on polished granite
- Tenax USA, Stone Sealer Product Information: Water-based impregnators cure faster and have lower VOC but may require reapplication in 3-5 years on more porous stones
- California Air Resources Board, Consumer Products VOC Regulations: CARB regulations cap VOC content in consumer stone sealers sold in California, effectively favoring water-based formulations
- Marble Institute of America, Care and Cleaning Guidelines for Natural Stone: The water absorption test: if stone darkens within 5-10 minutes and does not recover its original color after drying, it is absorbent and requires sealing
- OSHA, 29 CFR 1910.94 Ventilation Standard: OSHA General Industry standard 1910.94 covers ventilation requirements for operations generating harmful vapors, including solvent-based coatings applied in shop environments
- OSHA, Hazard Communication Standard 29 CFR 1910.1200 and SDS requirements: Safety Data Sheets must disclose flash point and exposure limits; petroleum-distillate stone sealers typically show flash points in the 100-140°F range
- Natural Stone Institute (formerly MIA+BSI), Dimension Stone Design Manual: Industry guidance on impregnating sealers for natural stone, including application methods, porosity testing, and product selection for granite, marble, and quartzite
- EPA, Safer Choice Program: EPA Safer Choice program evaluates and lists lower-hazard coating and sealer formulations suitable for commercial shop applications
Last updated 2026-07-09