TL;DR
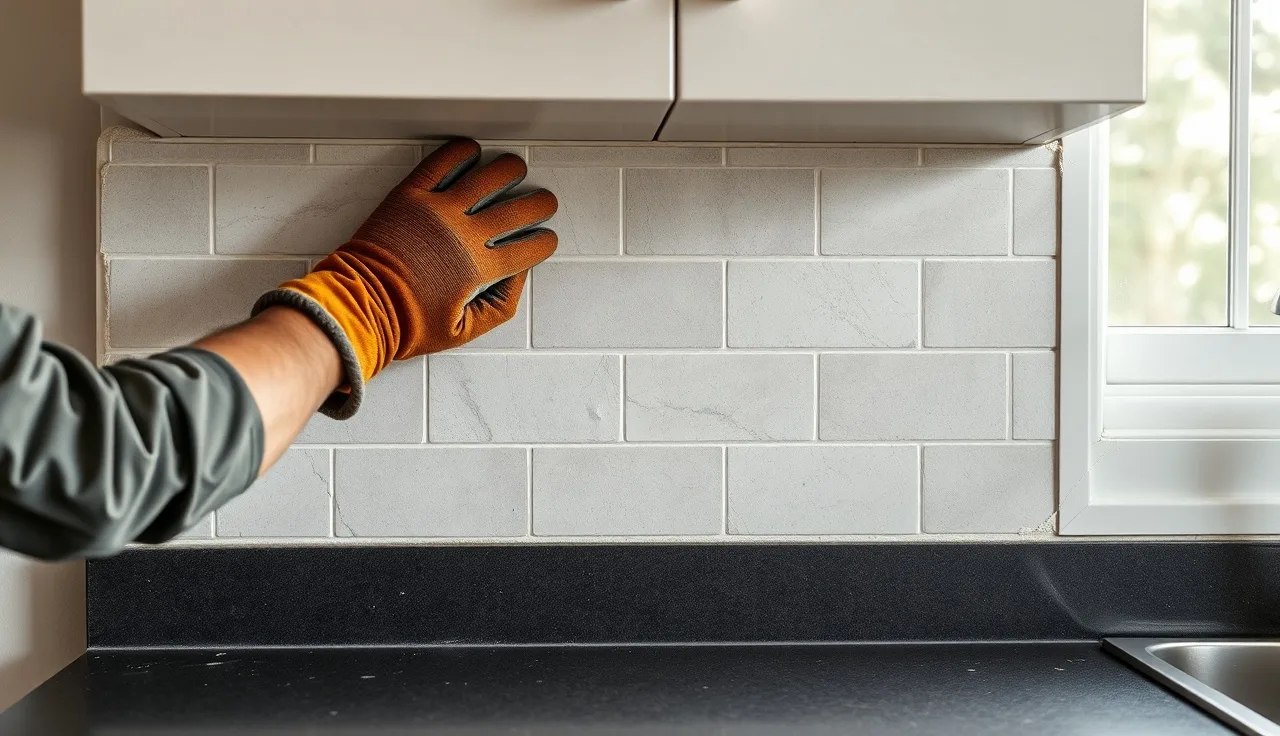
- You can set a stone backsplash straight onto painted drywall or over existing ceramic tile as long as the surface is flat, firm, and clean.
- Use polymer-modified thinset, back-butter every piece, and seal the finished job within 48 hours.
- Budget $8 to $30 per square foot for materials and $10 to $25 per square foot for professional labor.
Can you install a stone backsplash directly on drywall?
Yes, with one condition. The drywall has to be regular gypsum board rated for dry areas, or cement board if there's any chance of moisture. Standard half-inch drywall handles a kitchen backsplash above the countertop fine, because that zone rarely sees direct water. What it cannot handle is a shower surround, a wall behind a pot-filler, or any surface that gets wet on the regular. Those spots need cement backer board or a waterproofed substrate.
The one thing drywall needs before tile goes on is de-glossing. Thinset does not grip satin, semi-gloss, or high-gloss paint. Sand the surface lightly with 80-grit paper, wipe off the dust, and you're set. If the paint is flat or eggshell, you can usually skip sanding and just clean the wall well. Some installers prime with a bonding primer like Mapei ECO Prim Grip before tiling on painted drywall. That's a smart move when you want maximum confidence in the bond.
One thing worth knowing. The Tile Council of North America's Handbook for Ceramic, Glass, and Stone Tile Installation splits substrates into "dry areas" where standard drywall is acceptable and "wet areas" where it is not. [1] A kitchen backsplash is a dry area. Follow that line and moisture problems stay off your radar.
Can you tile over existing ceramic or porcelain tile?
You can, and for a backsplash it's one of the smartest options a homeowner has. Ripping out old tile is messy, slow, and it usually shreds the drywall behind it. Tiling over skips all of that, as long as the existing tile passes a few checks.
First, every existing tile has to be bonded. Tap across the whole surface with a grout float or a wood dowel. A hollow thud means the tile has already come loose underneath, and tiling over a loose tile guarantees the new work fails with it. Pull any loose tiles, patch the substrate, and let the patch cure before you go further.
Second, the surface has to be flat. Run a four-foot level across the wall. Lippage greater than one-eighth of an inch between tiles is too much. Grout joints create a texture that can telegraph through new large-format stone. A skim coat of wall patch or a latex-modified leveling skim flattens that out.
Third, check the added thickness. Each layer of tile and thinset adds roughly three-eighths to half an inch to the wall. That matters at outlet boxes, at the countertop edge, and at window returns. You may need to extend outlet box ears and add trim at the edges. The TCNA Handbook allows tiling over existing tile in residential applications when the total assembly weight stays under the structural limits of the substrate. [1] A backsplash runs about two to four square feet of tile per linear foot, so weight is almost never the problem.
What tools and materials do you actually need?
Here's a realistic list. You don't need a wet saw for every stone job, but for natural stone you almost always do.
Tools
- Wet tile saw with a diamond blade rated for stone
- Notched trowel (V-notch for mosaic sheets, 3/16-inch V-notch or 1/4-by-3/16-inch square-notch for individual pieces up to 4 inches)
- Rubber mallet and beating block
- Level (four-foot preferred)
- Tile spacers or wedge spacers
- Grout float
- Sponge and bucket
- Caulk gun
- Pencil and tape measure
Materials
- Stone tile (order 10 percent extra for cuts and breakage; 15 percent for diagonal layouts)
- Polymer-modified thinset mortar, gray or white depending on stone color
- Grout (sanded for joints wider than 1/8 inch, unsanded for joints 1/8 inch or narrower)
- Stone sealer (penetrating impregnator, not a topical coating)
- Painter's tape
- Silicone caulk to match grout color, for all inside corners and the joint where backsplash meets countertop
A small but real note on thinset color. Light or translucent stones like white marble, onyx, or pale quartzite let the gray of standard thinset ghost through the face of the tile. White thinset costs a little more and it's worth every cent on those materials. [2]
What type of mortar works best for natural stone?
Polymer-modified thinset is the right answer for almost every natural stone backsplash. The polymer (usually a latex or acrylic additive) gives the mortar better bond strength, flexibility, and resistance to movement than unmodified thinset. Unmodified thinset, mixed with water only, handles ceramic tile in plenty of situations, but it's not what you want under stone.
For heavy stone (thick travertine, slate, or quartzite pieces bigger than 12 inches) a medium-bed mortar beats standard thinset. Medium-bed goes on up to three-quarters of an inch thick without slumping, so you can flatten substrate irregularities without floating a coat first.
Epoxy mortars exist. Their bond strength is phenomenal, but they cost more, fight you the whole time, and they're built for industrial and commercial work. Skip them on a residential backsplash.
Mix ratio matters too. Most thinsets call for a slake time of five to ten minutes after the first mix, then you re-stir and use. Skip the slake and you leave dry pockets in the batch. Mixed thinset has a pot life of roughly 30 to 60 minutes depending on temperature. In a hot kitchen or a summer job, work in small batches. [3]
How do you prepare the wall before setting stone?
Good prep is most of the job. The tile-setting itself goes fast once the surface is ready.
Start by killing power at the breaker for any outlets in the backsplash area. Pull the covers and switch plates. Tape them off, or remove the outlets entirely and cap the wires so you can tile flush to the box.
Clean the wall. On drywall, wipe with a damp sponge to lift dust and grease. On existing tile, degrease with a TSP substitute or a commercial tile cleaner. Grease is the number one reason thinset fails to bond over old tile in a kitchen. Let the surface dry completely before you mix any mortar.
Find your layout lines. A backsplash looks best when the tiles center on the focal point, whether that's the range, the window, or the longest run of wall. Snap a vertical centerline with a chalk line, then snap a horizontal line one tile-height above the countertop. That horizontal line is your working ledger. Some installers screw a straight board along it to rest the first row on while the mortar sets, then pull it once the row has cured overnight.
Check plumb and level on the wall itself. A wall that looks straight often carries a bow. Hold your level in several spots and mark the high and low areas. Sand or grind down the high spots. Skim the low spots with setting-type joint compound or thinset, feather it flat, and let it cure before you tile.
How do you actually set the stone tiles, step by step?
Work in sections about two to three square feet at a time. Spread thinset on the wall with the flat side of the trowel for full contact, then comb it with the notched side held at roughly 45 degrees. The ridges should hold their shape and not collapse when you press a tile. [3]
Back-butter every stone piece before it touches the wall. Back-buttering means spreading a thin coat of thinset on the back of the tile, then pressing it into the combed adhesive on the wall. On natural stone this step is non-negotiable. Stone backs run slightly uneven, and skipping the back-butter leaves air pockets behind the tile that crack it later.
Press the tile firmly with a slight twist, then set the rubber mallet and beating block on top and tap it home. Pull the tile off the wall on your first few pieces and look at the back: you want at least 95 percent coverage, meaning mortar transferred across 95 percent of the surface. "A minimum of 95% mortar coverage is required for exterior and wet areas" and the same 95 percent target applies to stone in residential dry areas under ANSI A108. [4] Seeing less than that means your trowel notch is too small or you need to back-butter harder.
Use spacers to keep joints consistent. A 1/16-inch joint reads tight and contemporary; 1/8 inch gives you more forgiveness on irregular stone. Avoid going wider than 3/16 inch unless the stone pattern calls for it.
Let the mortar cure a minimum of 24 hours before grouting. Don't let anyone lean tools on the fresh tile. Don't grout until the thinset is fully hard.
How do you grout a natural stone backsplash without staining the stone?
This is where a lot of DIY stone jobs go sideways. Many natural stones, tumbled marble, travertine, and limestone especially, are porous enough that grout pigment soaks into the face of the tile and leaves a haze or stain that's brutal to remove.
The fix is to seal the stone before you grout. Wipe a penetrating stone sealer onto the tile faces, let it soak for the time the label specifies (usually 15 to 30 minutes), then buff off the excess. Keep sealer out of the grout joints. Once the sealer cures (usually 24 hours), grout normally. That sealer barrier keeps grout pigment from absorbing into the stone face.
Hold a rubber grout float at roughly 30 degrees and work the grout diagonally across the joints so you don't drag it back out. Mix grout to a peanut butter consistency. Don't add extra water to loosen it. Watery grout is weak grout.
Clean the haze with a damp (not soaking) sponge in a circular motion, then follow with a clean pass. Move fast. Grout starts to set within 20 to 30 minutes in warm conditions. [5] Let it cure the full time on the bag, typically 24 to 72 hours, before you apply a second coat of sealer over the stone and the grout joints together.
The joint where the backsplash meets the countertop is the one line you never grout. Fill it with a silicone caulk that matches your grout color. A countertop and a wall move independently, and rigid grout in that joint cracks inside a year.
How do you seal a stone backsplash and how often does it need re-sealing?
Use a penetrating impregnating sealer, not a surface coating. Penetrating sealers soak into the pores and repel oil and water from inside the stone. Surface coatings sit on top, look plastic, and peel over time. Fluoropolymer and silicone chemistries are the most durable options. [6]
Application is simple. Wipe the sealer on with a clean cloth or foam applicator, wait 15 to 30 minutes, then buff off all the excess before it dries on the surface. Dried sealer residue leaves a white haze that takes a stripper to remove, so don't wander off during that window.
Re-seal frequency depends on the stone and the use. Polished granite or quartzite might need it only once every three to five years. Tumbled marble or travertine, being thirstier, may want it every one to two years. The water test tells you when. Drop a tablespoon of water on the sealed stone. If it beads for a few minutes, the sealer still works. If it soaks in within 30 seconds, reseal now. [7]
The same logic applies to horizontal surfaces. See how to clean stone countertops for the countertop version.
What does a stone backsplash installation cost?
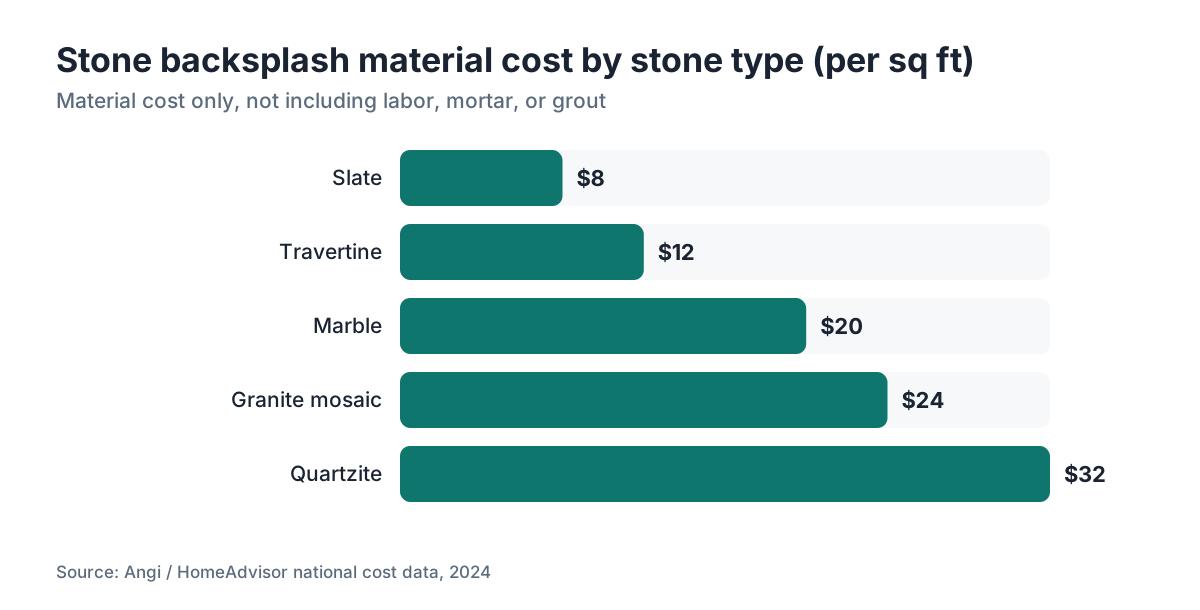
Material cost for natural stone tile runs about $5 to $25 per square foot for slate or travertine, $10 to $30 for marble, and $15 to $40 for quartzite or premium granite mosaic. [8] The average kitchen backsplash covers roughly 30 to 35 square feet, so materials alone land between $150 and $1,400 depending on the stone.
Professional labor adds $10 to $25 per square foot in most U.S. markets, with coastal cities higher. An average backsplash takes a pro four to eight hours, so total labor usually falls between $300 and $900. Tile removal, if you need it, adds $3 to $5 per square foot.
DIY skips the labor cost but adds tool rental. A wet saw rents for $40 to $80 a day at a home center. Plan a half day for prep and layout, a full day for setting tile, and a half day for grouting and sealing. That's realistically three days of weekend time.
Here's the full breakdown:
| Item | DIY cost | Pro cost |
|---|---|---|
| Stone tile (30 sq ft, mid-grade) | $400-$600 | $400-$600 |
| Thinset, grout, sealer | $60-$100 | $60-$100 |
| Tool rental (wet saw, etc.) | $80-$120 | included in labor |
| Professional labor | $0 | $300-$875 |
| Total range | $540-$820 | $760-$1,575 |
Those ranges are estimates. Local prices swing hard, and complex layouts with lots of cuts, outlets, or crooked walls cost more. If a countertop installation is happening at the same time, some fabricators fold the backsplash measurement into the same site visit, which trims the overall project cost.
What are the most common mistakes and how do you avoid them?
The number one mistake is skipping the back-butter. Installers who only spread thinset on the wall and mash tile into it routinely get 60 to 70 percent coverage instead of the required 95. The tile looks fine for months, then a corner pops off because the bond bridged over air.
The second mistake is grouting too soon. Thinset that hasn't fully cured is still slightly flexible. Grout over it and you shift tiles and create lippage. Wait 24 hours minimum. 48 is better if your kitchen runs cool or humid.
The third mistake is the wrong joint size for the stone. Natural stone isn't dimensionally precise the way porcelain is. Tumbled marble and slate vary by an eighth of an inch piece to piece. Set those with 1/16-inch joints and you'll fight the material the entire install. Go to 1/8 or 3/16 and give yourself room.
The fourth mistake is grouting the countertop-to-backsplash joint. That's a change of plane between two materials that move differently. Caulk it. Every time.
One more. Not buying enough tile. Running short and going back for a second box is a gamble, because dye lots differ and the new box may not match. Order 10 to 15 percent overage up front, and keep the leftovers for future repairs.
Do you need a permit to install a stone backsplash?
In almost every U.S. jurisdiction, no. A tile or stone backsplash is cosmetic work. It doesn't touch structural elements, electrical systems (beyond covering existing outlets, which you're not moving), or plumbing. Most building codes treat it like painting.
The exception shows up if you're doing electrical work in the same project: adding an outlet, moving a switch, or wiring under-cabinet lighting on a new circuit. That electrical work usually needs a permit no matter what the tile does. Check with your local building department if you're unsure. Contact information for local permitting offices is searchable through the U.S. Census Bureau's Building Permits Survey state and local contacts. [9]
Homeowners associations sometimes run aesthetic review requirements separate from municipal permits. If you're in an HOA community, read your CC&Rs before you commit to a stone type or color, especially on anything visible from outside.
When should you hire a pro instead of doing this yourself?
Natural stone is less forgiving than ceramic. The material costs more, the cutting takes more skill, and a bad layout costs more to fix. Still, this is a project most reasonably handy homeowners can pull off.
Hire a pro if the backsplash uses large-format stone (12 inches or bigger), the substrate has damage or moisture issues, or the job needs cuts around complex shapes like arched openings or oddly placed outlets. Large-format stone magnifies every substrate flaw and demands better technique to dodge lippage.
For the fabricators reading this: SlabWise's quoting software handles remnant pricing and square-footage estimating, which makes it easier to price a backsplash add-on next to a countertop quote, especially on smaller jobs where material waste runs high as a share of the total.
Do it yourself if you've set ceramic backsplash tile before, the stone is a mosaic or a smaller individual format, and the substrate is sound. The jump from ceramic to stone is real, but it's small if you honor the back-buttering and coverage rules.
For adjacent work, a granite countertop or marble countertop installed by the same fabricator can often include a backsplash quote in one visit, which is handy and sometimes cheaper.
How do you cut stone tile to fit around outlets and corners?
A wet saw handles straight cuts with no drama. Set the fence, keep the tile flat on the table, and feed it slowly into the blade. Let the blade do the work. Don't push.
For a notch around an outlet box, you've got options. A simple L-shape takes two straight cuts on the wet saw (one from each side) and a snap, or nibble the corner out with tile nippers. For a cleaner result, mark the cut line, make a series of score cuts up to the line, and snap out the waste.
For curves or holes (say, around a pipe), reach for an angle grinder with a diamond cup wheel or a rotary tool with a diamond bit. These cuts are slow and dusty. Wear a respirator rated for stone dust (N95 or better) and work outside or with real ventilation. The NIOSH hazard review on crystalline silica warns that "exposure to respirable crystalline silica" from stone cutting carries serious long-term risk, including silicosis. [10] One DIY project won't hurt you, but wear the respirator anyway. Fine stone dust hangs in indoor air, so ventilation and respiratory protection matter for any indoor cutting. [11]
Outside corners (where two walls meet) go three ways: bullnose tile with one factory-finished edge, metal tile trim (a J-channel or Schluter-style strip), or a 45-degree mitered cut on two pieces. On natural stone, metal trim or bullnose is usually easier and cleaner than a miter unless your saw has a tilting table.
Frequently asked questions
Do I need cement board behind a kitchen backsplash?
No. Standard half-inch drywall works fine behind a kitchen backsplash because it's a dry area. Cement board or a waterproofed substrate is only required in wet areas like showers or behind pot-fillers. The TCNA Handbook draws that line explicitly. If your drywall is sound and free of moisture damage, it's a perfectly good substrate for kitchen stone tile.
Can I install stone tile over painted drywall without removing the paint?
Yes, if the paint is flat or eggshell and the wall is clean and sound. Glossy paint needs a scuff with 80-grit sandpaper so the thinset can grip. A bonding primer adds insurance. What you cannot tile over is loose, peeling, or bubbled paint. Scrape those areas down to the paper face and prime before tiling.
How long does a stone backsplash installation take?
For a typical 30-square-foot kitchen backsplash, plan three days as a DIY: a half day for prep and layout, a full day for setting tile, and a half day for grouting and sealing, with overnight curing between phases. A professional usually finishes the tile-setting in four to eight hours, then comes back the next day to grout.
What grout should I use for a natural stone backsplash?
Use sanded grout for joints wider than 1/8 inch and unsanded for joints 1/8 inch or narrower. For darker or more porous stones, a premixed epoxy grout resists staining better but is harder to work with. Seal porous stone faces before grouting so pigment can't soak into the tile. Always seal the grout joints after curing for long-term stain resistance.
Why is my stone tile cracking after installation?
The usual cause is thin mortar coverage under the tile. Air voids leave the tile unsupported, and temperature swings or minor settling flex it until it cracks. Confirm you're back-buttering every piece and hitting at least 95 percent coverage. Substrate movement is the second cause. On a backsplash, a rigid crack often traces back to grouting the countertop joint instead of caulking it.
How do I remove old stone tile from drywall without destroying the drywall?
Slowly and carefully. Cut the grout joints with a reciprocating saw and a grout-removal blade, then work a wide putty knife or floor chisel behind each tile. The drywall paper face almost always tears somewhere. Patch torn paper with a skim coat of setting-type joint compound and cure it fully before tiling. For big damaged areas, replacing the drywall section beats patching it.
Can I use mastic adhesive instead of thinset for a stone backsplash?
No. Mastic (organic adhesive) softens and can re-emulsify with moisture or heat, like the steam off a stovetop. It's also not strong enough for the weight of natural stone. Polymer-modified thinset is the correct adhesive for all natural stone, on drywall or over existing tile. Mastic on stone is a known failure mode that tile industry guidelines warn against directly.
How do I keep grout lines straight when setting irregular natural stone?
Use adjustable wedge spacers instead of fixed cross spacers, since natural stone varies in size. Snap chalk lines horizontally every few rows and check against them constantly. It also helps to dry-lay a section on a flat surface first, so you can pre-sort pieces by size and tweak your joint width to compensate. Accept that hand-cut or tumbled stone will never line up as perfectly as porcelain.
What's the best stone for a kitchen backsplash that's easy to maintain?
Polished quartzite and granite are the low-maintenance picks. Both are dense, scratch-resistant, and need sealing only every few years. Marble looks gorgeous but etches from acidic foods and wants careful cleaning. Travertine and tumbled limestone are charming but porous and need frequent sealing. For a busy kitchen with daily spills, granite or quartzite is the practical answer. Compare options in our kitchen countertops guide.
Do I need to seal stone backsplash tile before grouting?
For porous stones like travertine, tumbled marble, slate, or limestone, yes. A penetrating sealer on the tile face keeps grout pigment from absorbing into the stone during grouting. Polished granite and quartzite are dense enough that pre-grouting sealing is optional, though it doesn't hurt. After grouting and curing, seal again over both the tile and the grout joints for full protection.
Can a homeowner install a stone backsplash without professional help?
Yes, for most standard backsplash projects. You need basic comfort with tools, patience for layout, and attention to the back-buttering step. Mosaic stone sheets on a mesh backing are the easiest starting point for first-timers. Large-format stone (12 inches or bigger), unusual layouts, or damaged substrates are better left to a pro. For a first attempt, pick a forgiving stone like slate or tumbled marble.
How do I handle the transition where the backsplash meets the countertop?
Always use silicone caulk there, never grout. The countertop and the wall are separate structural elements that move slightly with temperature and humidity. Grout in that joint cracks within months. Pick a silicone caulk that matches your grout color; most grout makers sell matching caulk. Apply it last, after all grouting is done and cured, and tool it smooth with a wet finger for a clean line.
What if my existing tile backsplash is not flat enough to tile over?
Grind down high spots between tiles with an angle grinder and a diamond cup wheel. Fill low spots and grout-joint texture with a skim coat of polymer-modified thinset, feather it smooth, and let it cure 24 hours before new tile goes up. If the variation runs more than about a quarter inch across a four-foot span, you're better off removing the old tile and starting on a fresh substrate.
Sources
- Tile Council of North America (TCNA), Handbook for Ceramic, Glass, and Stone Tile Installation: Standard gypsum drywall is acceptable substrate in dry areas; cement board or waterproofed substrate required in wet areas. Also permits tiling over existing tile in residential applications when substrate limits are not exceeded.
- Mapei, Technical Data Sheet: Ultraflex LFT White Thinset Mortar: White thinset recommended for light-colored or translucent stone to prevent gray color telegraphing through the tile face.
- American National Standards Institute, ANSI A108.5 - Installation of Ceramic Tile with Dry-Set Portland Cement Mortar or Latex-Portland Cement Mortar: Thinset should be combed with notched trowel and back-buttered on stone tile; pot life typically 30 to 60 minutes; slake time of 5 to 10 minutes required after initial mixing.
- American National Standards Institute, ANSI A108.02 - General Requirements for Tile Installation: Minimum 95 percent mortar contact coverage required for stone tile in residential dry areas; the same coverage applies to exterior and wet areas.
- Custom Building Products, Technical Bulletin: Grout Application and Open Time: Grout begins to set within 20 to 30 minutes in warm conditions; clean haze promptly with a damp sponge.
- Natural Stone Institute (formerly Marble Institute of America), Care and Maintenance of Natural Stone: Penetrating impregnating sealers are recommended for natural stone; surface coatings are not recommended for long-term use.
- Natural Stone Institute, Dimension Stone Design Manual: Water bead test: if water absorbs into stone within 30 seconds, resealing is needed. Polished dense stones may need sealing every 3-5 years; porous stones every 1-2 years.
- Angi (formerly Angie's List / HomeAdvisor), Cost to Install a Tile Backsplash (2024 national data): Natural stone tile backsplash materials range from $5 to $40 per square foot depending on stone type; professional labor adds $10 to $25 per square foot nationally.
- U.S. Census Bureau, Building Permits Survey - State and Local Contacts: State and local building department contact information for permit inquiries is available through the Census Bureau's Building Permits Survey.
- National Institute for Occupational Safety and Health (NIOSH), Hazard Review: Health Effects of Occupational Exposure to Respirable Crystalline Silica: Repeated unprotected exposure to respirable crystalline silica from stone cutting poses serious long-term health risks including silicosis; N95 respirator or better recommended.
- U.S. Environmental Protection Agency, Indoor Air Quality: Stone cutting generates fine respirable dust; adequate ventilation and respiratory protection are recommended for indoor cutting work.
Last updated 2026-07-11