TL;DR
- A 4-inch stone backsplash is a narrow strip of countertop material that runs up the wall behind the counter.
- You cut it from the same slab as the top, profile and polish the front edge, then glue it to the wall with 100% silicone.
- Hands-on work runs about 15 to 30 minutes per linear foot once your tools are dialed in.
What exactly is a 4-inch stone backsplash?
A 4-inch stone backsplash is a narrow strip of stone, usually 3.75 to 4.25 inches tall, that runs along the wall just above the countertop. It covers the gap between the counter and the wall, protects the drywall from water and grease, and finishes the kitchen without committing to full tile or a tall slab.
Most fabricators cut it from the same slab as the countertop so color and veining match. That continuity is the whole reason people pick it over tile. If you have a dramatic piece of marble or granite, a matching 4-inch splash carries the stone up the wall just enough to complete the look.
It is not the same as a full-height slab backsplash, which runs 18 inches or more and forces you to work around outlets, switches, and a lot more material. The 4-inch version is simpler, cheaper, and far more common in everyday remodels.
Height is not strictly standardized. Some designers spec 3 inches, some spec 6. But 4 inches is the number on most fabrication tickets, and cabinet and tile suppliers treat it as standard. The rest of this guide uses it as the reference dimension.
What tools and materials do you need to fabricate it?
Here is the honest list. You do not need a full fabrication floor, but a few things are not negotiable.
For cutting:
- A bridge saw or angle grinder with a continuous-rim diamond blade rated for your material. A wet saw handles straight cuts on granite or quartz fine. Quartzite and quarried marble chip on cheap blades, so buy a good one.
- A straight edge or fence clamped to the slab for guided cuts.
- Water to cool the blade. Dry cutting stone wrecks the blade and throws silica dust, which is a serious health hazard. OSHA's silica standard for construction (29 CFR 1926.1153) requires engineering controls including wet methods when cutting stone [1].
For shaping:
- A router table or hand router with a stone-rated profiling bit, if you want an ogee, bullnose, or eased edge on top.
- A random orbital polisher and wet/dry resin pads from about 50 grit up to 3000.
- A flat-lap or hand pads for tight spots.
For installation:
- 100% silicone caulk. Not construction adhesive, not epoxy, for the final bead between counter and splash. Silicone stays flexible and handles thermal movement. Some fabricators dab a little epoxy on the back to tack the piece, then silicone the exposed seam.
- A level, pencil, and tape measure.
- Blue painter's tape to protect the countertop.
- Safety glasses, ear protection, and an N95 or better respirator any time you grind or cut.
For material, you need the strip itself. Cut it from the drop-off of the countertop slab if there is enough, or pull a small remnant. A 4-inch splash for a 10-foot run needs about 10 linear feet of strip at 4 inches tall, roughly 0.33 square feet per linear foot. Most shops have plenty of remnant for that.
How do you template and measure for a 4-inch backsplash?
Measure at the wall, not at the front of the counter, and mark every outlet before you cut anything. Those two habits prevent most 4-inch splash mistakes.
The measurements that matter:
- Length of each run, taken at the wall. Walls are rarely plumb, and the back of the counter can differ from your rough tape read by a quarter inch or more.
- Any inside or outside corners.
- Outlet and switch box locations. These need cutouts, and a missed outlet is an expensive mistake on finished stone.
- Whether the wall is plumb. A wall that bows out at the middle leaves your splash gapping at the top or not sitting flat.
The fastest template is a digital system or 1/4-inch luan strips hot-glued into an exact replica of the wall run. High-volume shops use laser templating like Proliner from Prodim [2], which captures the wall geometry digitally and feeds it straight into the CNC. For a one-off job, luan strips work fine and cost almost nothing.
Mark outlet centers on the template, then verify height. Standard kitchen outlets sit with the box bottom about 44 inches off the floor, which lands the box face right in the middle of a 4-inch splash [3]. Cut those openings before the piece goes up.
If you are a homeowner doing this DIY, templating is where most mistakes start. Photograph the wall with a tape measure in the frame. Note every bump, pipe chase, or wall anchor that might interfere.
How do you cut the strip from the slab?
Set your fence so the blade runs at 4 inches (or your spec) from the back edge of the strip, then cut slowly with plenty of water. Feed rate is the thing to get right. Push too fast and you chip the edge. Push too slow and you glaze the blade.
On a bridge saw, about 10 to 15 inches per minute is typical for 3/4-inch granite on a quality blade. Quartz runs slower because it is harder on blades. Marble cuts faster but chips more easily, so lean toward slow.
After the straight cut, check the piece. The bottom edge sits on the countertop, so a machine finish is fine there and it needs no polishing. The top edge is what people see and touch, so it gets a profile and a polish.
Corners give you two choices. Miter them at 45 degrees so the outside corner shows a clean mitered joint, or butt the pieces and fill an inside corner with color-matched caulk. Mitered corners look sharper but demand a precise 45-degree cut and tight fitting. Butted inside corners with caulk are perfectly acceptable, and they are what most fabricators do inside. Outside corners on a 4-inch splash are rare, since most kitchens have inside corners at the splash. When you do hit one, a mitered or clipped corner looks best.
For outlet cutouts, use a diamond blade or a CNC router bit. By hand, drill a 3/8-inch hole at each corner of the opening, then connect the cuts with a wet angle grinder. Work slowly and support the piece so the cutout section does not snap out and crack the run.
What edge profile should you put on a 4-inch backsplash?
Only the top edge of the splash gets profiled. The bottom sits on the counter and the back sits against the wall, so your one decision is what the top visible edge looks like.
The common profiles for a 4-inch splash:
| Profile | Look | Fabrication difficulty | Notes |
|---|---|---|---|
| Eased (flat with slightly softened corners) | Clean, modern | Low | Default choice for most kitchens |
| Pencil round | Subtle convex curve | Low-medium | Slightly softer than eased |
| Bullnose (full round) | Classic, smooth | Medium | Adds some material removal |
| Ogee | Traditional, decorative | High | Rarely specified on a 4-inch splash |
| Raw/sawn | Industrial, unfinished look | Very low | Intentional on some leathered stones |
Match the splash profile to the countertop edge. If your counter has a bullnose, the splash should too. Mixing profiles looks like an oversight, not a design choice.
For granite countertops, a bullnose or eased edge holds up best. For softer stones like marble, an eased edge chips less over time than a tight bullnose.
You grind the profile in with a router and a stone-rated bit, then polish through the grit sequence: 50, 100, 200, 400, 800, 1500, 3000. At 3000 grit you have a mirror finish on polished stone. Honed finishes stop around 400 to 800 grit on purpose.
How do you polish a 4-inch stone backsplash?
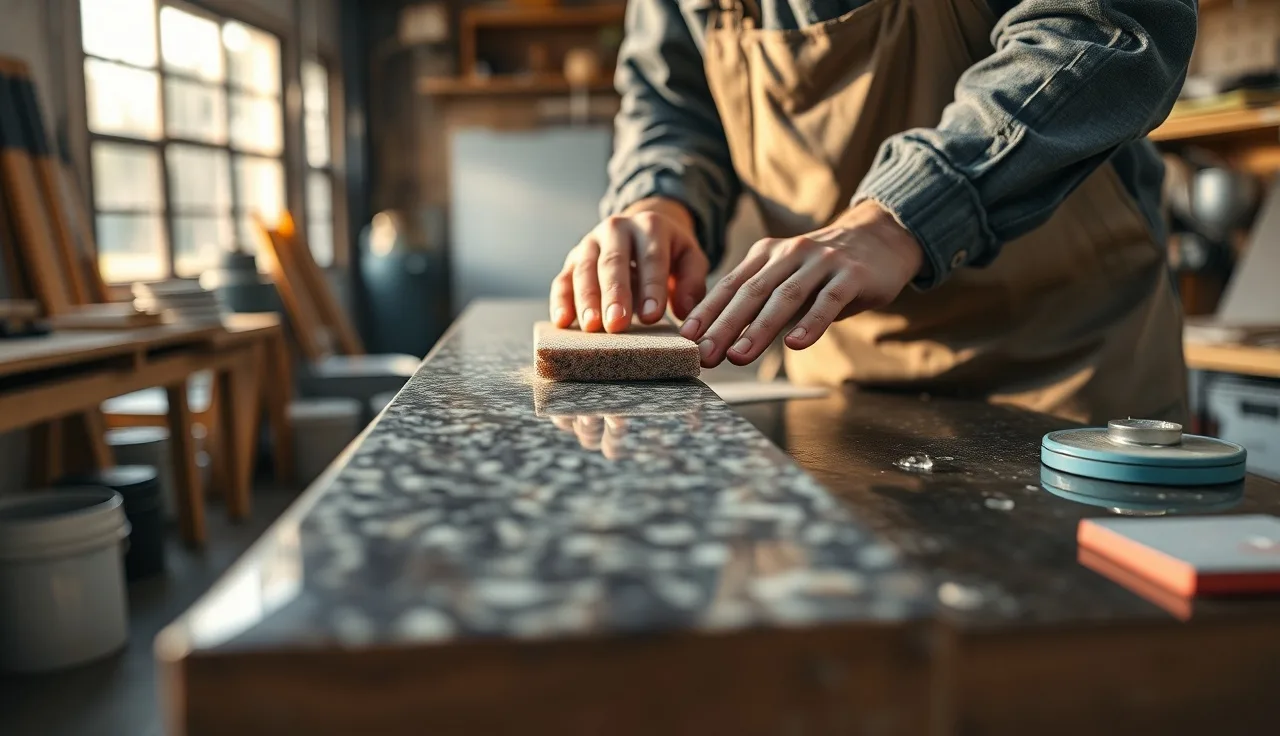
Polishing turns the strip from construction material into a finished product. On a 4-inch piece you are polishing the top face and the top edge profile, nothing else.
Start with a flat polisher, either a random orbital or a variable-speed angle grinder with a backer pad. Use wet resin pads and work the grits: 50, 100, 200, 400, 800, 1500, 3000. On a factory-polished face where you only ground the edge, you can often start at 200 or 400 and skip the coarse grits. If you had to regrind any of the top face to kill a saw mark, start at 50.
Keep the pad moving. Sit in one spot too long and you burn the surface or leave a low flat spot. Light pressure. Let the abrasive do the work.
Granite often gets a final buff with a granite polishing powder on a white buffer pad. Quartz is different: the resin binders sometimes polish to a slightly different sheen than the factory surface, so avoid grinding areas that did not need it.
Quartzite and other hard natural stones take longer and eat more pads because the material is genuinely hard. Budget extra time and extra pads.
Check the finish in raking light. Hold a flashlight at a low angle across the surface. Swirl marks and scratches you missed head-on jump out at that angle.
How do you install a 4-inch stone backsplash?
Clean the wall and the back edge of the countertop, dry-fit the piece, then bond it with a serpentine bead of 100% silicone and tape it in place while it cures. That is the whole sequence, and each step earns its keep.
Any dust, grease, or old caulk kills adhesion. Silicone bonds well to new drywall and paint. On glossy tile or a sealed surface, scuff it lightly with 80-grit sandpaper first.
Dry-fit before any adhesive. Set the piece and check that it sits flat against the wall, corners fit, and outlet cutouts line up with the boxes. If something is off, grind or trim now.
Once it fits, run a serpentine bead of silicone on the back face. Do not coat the whole back. You want air gaps so squeeze-out has somewhere to go when you press the piece in. A single wavy bead about 1/2 inch from each edge, plus one down the middle, is plenty.
Press firmly and hold for 30 to 60 seconds. Blue tape holds the piece in position while the silicone cures. Most construction-grade silicones reach handling strength in 30 minutes to an hour and full cure in 24 hours, with cure time swinging on temperature and humidity [4].
After the piece is up and taped, run a small bead of color-matched or clear silicone along the joint where the bottom of the splash meets the counter. Tool it smooth with a wet finger or a caulk tool. That joint is an expansion joint. Do not fill it with grout or epoxy. Stone moves with temperature and humidity, and a rigid fill cracks. The Marble Institute of America's installation guidelines call for a resilient sealant at this joint rather than a rigid fill [5].
For the countertop installation as a whole, this backsplash step usually happens after the top is fully set and the sink is in, so you are not fighting around open holes.
How do you handle inside corners and outlet cutouts?
Run one piece all the way into an inside corner, butt the next piece against it, and caulk the joint with color-matched silicone. Skip mitering inside corners unless you have CNC-level accuracy, because a 45-degree miter on a 4-inch-tall piece is almost impossible to get gap-free by hand.
Inside corners are the most common tricky spot, and that butt-and-caulk method is what most fabricators do. Done with matched caulk, most homeowners cannot tell the difference.
Outlet cutouts have to be precise. Standard single-gang electrical boxes in the U.S. are 2 inches tall by 3 inches wide, and duplex receptacle boxes run about 3.5 inches wide [6]. The cutout has to accommodate the box plus the cover plate. Measure from the end of the run to the center of the box, then transfer that to the stone before cutting.
When you install, the outlet boxes should project through the cutouts. The cover plate overlaps the stone slightly and hides the gap. Aim for about 1/8 inch of gap on all sides. Tighter risks cracking the stone if the wall shifts. Looser and the cover plate may not cover it.
For boxes set too far back into the wall (common in older homes), use a box extender. It is a plastic frame that snaps onto the existing box to bring the face flush with the stone. These run about $2 to $3 each at any electrical supply or home center.
What does it cost to fabricate and install a 4-inch stone backsplash?
Cost turns on material, who does the work, and your region. Here is an honest breakdown.
Buying stone and paying a shop to fabricate and install:
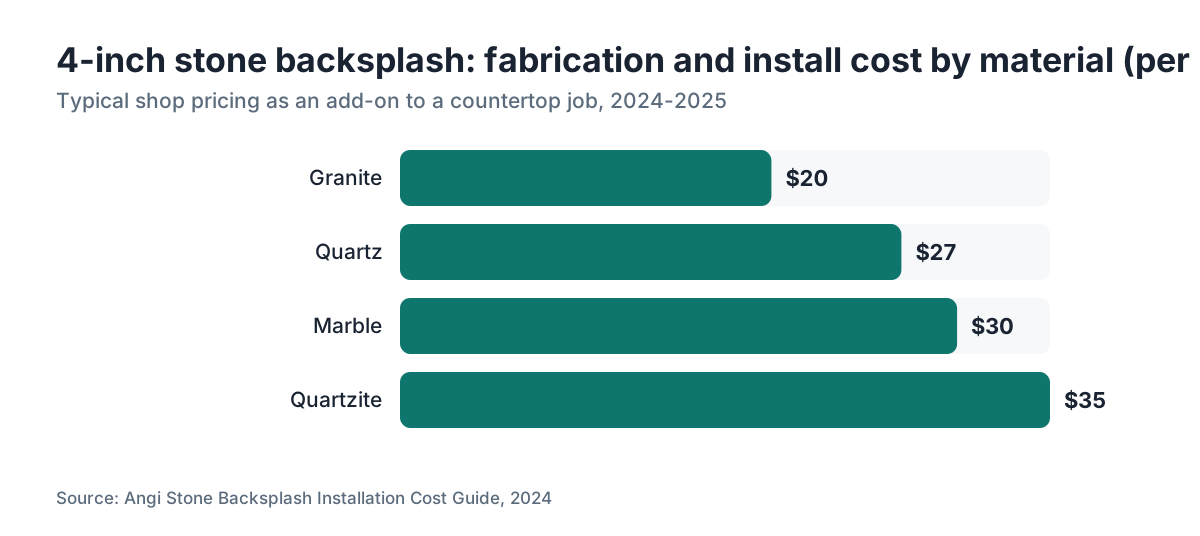
- Granite: roughly $15 to $25 per linear foot as an add-on to a countertop job. Some shops fold it into the countertop price if the drops cover it.
- Quartz: $20 to $35 per linear foot, a little higher because engineered stone is harder on blades and pads.
- Marble: $20 to $40 per linear foot, with the top end for rarer material.
These are shop prices for 2024 to 2025. Regional swing is big. A shop in a high cost-of-living metro can charge 30 to 40% more than a rural shop [7].
If you are a fabricator doing this in-house, material cost is close to zero when you use drops from the main slab. Labor runs 15 to 30 minutes per linear foot depending on corners and outlets. Pads and blade wear are the main variable cost.
For a homeowner going DIY, the barrier is tooling, not material. A wet-cutting tile or stone saw rents from most home centers for $50 to $80 per day [8]. Polishing pads for a 4-inch splash run $30 to $60 for a full grit set. Add silicone at $8 to $12 a tube and you are under $200 in supplies for a typical kitchen run, assuming you already own a drill and basic tools.
Shops that run estimating and nesting software like SlabWise can price the splash automatically as part of the countertop job, since the software tracks remnant inventory and calculates whether the drops cover the splash yardage without ordering extra material.
| Material | Fabrication + install (per LF) | DIY supply cost (whole kitchen) |
|---|---|---|
| Granite | $15-25 | $80-200 |
| Quartz | $20-35 | $80-200 |
| Marble | $20-40 | $80-200 |
| Quartzite | $25-45 | $80-200 |
What are the most common mistakes when fabricating a 4-inch backsplash?
The mistakes that come up over and over, and what to do about each.
Cutting the strip too narrow. A piece that lands at 3.5 inches when the spec was 4 looks wrong next to a properly cut run. Set your fence and double-check the measurement at both ends of the slab before you cut.
Ignoring wall bow. Walls are not always flat. A strip that fits at the ends can gap in the middle. Hold a level against the wall first and note any deviation. You may need to scribe the back edge of the splash to match the wall.
Skipping silica dust controls. Cutting or grinding stone without wet methods or a respirator exposes you to crystalline silica, which causes silicosis. OSHA's permissible exposure limit for respirable crystalline silica is 50 micrograms per cubic meter as an 8-hour time-weighted average [1]. NIOSH has documented elevated silicosis rates among countertop fabrication workers, especially those cutting engineered quartz [11]. Silicosis is irreversible and fatal. Use water, use ventilation, wear a fitted N95 or P100.
Using the wrong adhesive. Construction adhesive and epoxy cure rigid. Stone and wall surfaces move. A rigid bond can shear the piece off the wall or crack the stone. Use 100% silicone for the install and leave the counter-to-splash joint as a soft caulk joint.
Poor outlet cutout placement. Outlets that end up off-center behind a cover plate look bad. Measure from both ends of the run, more than one.
Over-polishing into a hollow. Staying too long in one spot removes extra material there and leaves a slightly concave area you can feel with your hand. Keep the pad moving.
Should a homeowner DIY this or hire a fabricator?
It depends on the material and how complex the run is. Soft stone on a simple straight run is a reasonable DIY. Hard stone with outlets and corners belongs with a fabricator.
For a straight run with no outlets and soft stone like limestone or soapstone, a handy homeowner with a wet saw and some patience can pull this off. The cuts are simple. Polishing takes practice but is learnable. The soapstone care community has plenty of DIY documentation showing how accessible small-scale stone work can be.
For granite, quartz, or quartzite with outlet cutouts and inside corners, hire a fabricator. The material is unforgiving. A crack in a 4-inch strip of $80-per-square-foot quartzite is more than an eyesore, it is an expensive redo. Pros have the right blades, the right pads, and the reps to fit corners cleanly on the first try.
For engineered quartz, check the warranty first. Some manufacturers like Cambria (see Cambria countertops) require fabrication and installation by a certified fabricator to keep the warranty valid [9]. DIY can void coverage.
If you go DIY, rent a quality saw (not a cheap tile saw), buy real stone polishing pads instead of drywall sanding discs, and practice your cuts on scrap first. Most mistakes happen on the first cut of a new run. Waste a scrap before you touch your finished material.
For everything else in the kitchen countertops project, the same logic holds: the pricier the material, the more the professional labor is worth paying for.
How do you maintain and clean a stone backsplash after installation?
A 4-inch stone backsplash catches water, cooking grease, and soap. The care routine depends on the stone, and the base joint is silicone, so you clean it like the counter, not like grout.
Granite and quartzite: seal the stone before installation, then reseal every 1 to 2 years depending on porosity and the sealer. Most penetrating sealers (StoneTech, Dry-Treat, and similar) have manufacturer-specified reapplication intervals, commonly every 1 to 5 years [10]. A water bead test tells you when: drop water on the surface, and if it soaks in instead of beading, reseal.
Quartz: no sealing. Engineered stone is non-porous. Wipe with mild soap and water. Skip abrasive cleaners and high-pH degreasers, which can dull the surface.
Marble: seal it and accept some etching over time from acidic foods and cleaners. An etched marble splash is a permanent surface change (the acid dissolves the calcium carbonate), not a stain you can clean off. If that bothers you, pick a harder stone.
For general stone countertop cleaning, stay away from bleach, vinegar, and any cleaner with a pH above 10 or below 5 on natural stone. The joint at the base of the splash is silicone, not grout, so wipe it down the same way you wipe the counter. Mold in that joint cleans up with a little diluted 3% hydrogen peroxide on a cotton swab, not bleach, which degrades silicone over time.
For care by stone type, see how to clean quartzite countertops and how to clean soapstone countertops.
How does fabricating a 4-inch splash differ from a full-height slab backsplash?
The process rhymes, but a full-height slab raises the stakes. A full-height backsplash can run 18 to 24 inches tall, so you are handling a large, heavy piece that has to fit around outlets, switches, cabinets, and maybe a window. The weight alone reaches 60 to 100 pounds for a 10-foot run in 3/4-inch granite.
A 4-inch splash weighs maybe 8 to 12 pounds per linear foot. One person handles installation. A full-height slab takes two or three people and sometimes suction cup lifters.
The cutting method is the same (bridge saw, wet blade, fence), but a tall piece has a longer cut and more chance for the blade to wander. Cutouts on a full-height slab are more complex because you may cut a full outlet, a switch, and a GFCI, all with different box dimensions.
Cost scales with all of that. A full-height slab backsplash typically costs $60 to $150 per linear foot fabricated and installed, against $15 to $45 for a 4-inch splash [7]. For a practical kitchen, the 4-inch version is almost always the better value. The full-height slab is a design choice for high-end or dramatic spaces.
Stone stays the dominant countertop category in U.S. remodels, with natural and engineered stone together holding the majority of premium purchases [12], so most of these splash jobs run in granite, quartz, or quartzite.
Shops that run jobs through software (like SlabWise's quoting and nesting tools) can see whether the slab remnant covers a 4-inch splash without extra material, which makes the splash an easy upsell that costs the shop almost nothing.
For homeowners who want the full-backsplash look at lower cost, laminate countertops and Formica countertops both offer coordinating backsplash pieces that install like stone but cost a fraction as much.
Frequently asked questions
Can I cut a 4-inch backsplash from my countertop remnant?
Yes, and this is the standard approach. Most countertop jobs produce drop-off pieces along the back edge of the slab after the top is cut to depth. A 4-inch splash for a 10-foot run needs about 0.33 square feet of material per linear foot, so a typical 3.3-square-foot drop covers the whole run. Ask your fabricator before the job whether the drops will be held for the splash.
What height should a backsplash be: 3 inches, 4 inches, or 6 inches?
There is no code-mandated height. Four inches is the industry convention because it covers the counter-to-wall gap without competing with wall tile or paint above it. Three inches looks thin and sometimes leaves a gap at the top. Six inches starts to read as a design statement. For a standard kitchen, 4 inches is the right call unless you have a specific reason to go taller.
Do I need to seal a 4-inch stone backsplash before installing it?
For porous natural stones like granite, marble, quartzite, and limestone, yes. Apply penetrating sealer to the face and top edge before the piece goes up. Once it is installed, the bottom edge and back are inaccessible. For engineered quartz, no sealer is needed because the material is non-porous. Reseal natural stone every one to two years depending on use and product instructions.
What adhesive should I use to attach a stone backsplash to the wall?
Use 100% silicone sealant on the back of the splash to bond it to the wall. Some fabricators add a small amount of two-part epoxy for initial tack, then silicone for the visible seam. Do not use rigid construction adhesive as the only bond. Stone and walls expand and contract with temperature, and a rigid bond transfers that stress into the stone or the wall surface.
How do I cut an outlet hole in a stone backsplash?
Mark the outlet location precisely on the stone before cutting. Drill 3/8-inch starter holes at each corner of the rectangular cutout with a diamond core bit. Connect the holes with a wet angle grinder and a diamond blade, cutting slowly. Support the cutout section so it does not snap out and crack the run. A standard single-gang box cutout is roughly 2 inches by 3 inches, but verify your actual box dimensions before cutting.
How do I handle inside corners on a 4-inch backsplash?
Run one piece fully into the corner, butt the adjacent piece against it, and caulk the joint with color-matched silicone. Mitering inside corners at 45 degrees is technically possible but hard to execute gap-free by hand. A butted joint with caulk is the fabricator's standard approach and looks clean when the caulk color matches the stone. Most homeowners cannot tell the difference.
Does a stone backsplash need grout at the bottom joint?
No. The joint between the backsplash and the countertop should be filled with flexible silicone caulk, not grout. Grout is rigid and cracks when the stone moves with temperature or humidity. The Marble Institute of America's installation standards call for a resilient sealant at this joint. Match the caulk color to the stone or to the grout color used elsewhere in the kitchen.
Can I install a 4-inch stone backsplash myself without professional tools?
For soft stone on a simple straight run, yes. You need a wet-cutting saw (rentable at home centers for $50 to $80 per day), stone polishing pads ($30 to $60 for a set), and silicone. For hard stones like granite or quartzite, or any run with outlet cutouts and inside corners, professional fabrication is the safer bet. A cracked piece of expensive stone costs more to replace than the labor would have cost.
How long does silicone take to cure on a stone backsplash?
Most construction-grade silicone sealants reach handling strength in 30 to 60 minutes and full cure in 24 hours, though this shifts with temperature and humidity. Cold and high humidity slow the cure. Do not put weight on the splash or expose it to water until it has cured for at least 24 hours. Check the product data sheet for your specific silicone brand.
What is the silica dust risk when cutting stone, and how do I protect myself?
Cutting or grinding stone without water or ventilation generates respirable crystalline silica, which causes silicosis, an irreversible and fatal lung disease. OSHA's permissible exposure limit is 50 micrograms per cubic meter as an 8-hour time-weighted average. Always use wet cutting methods, work in ventilated spaces, and wear a properly fitted N95 or P100 respirator. This applies to professional fabricators and DIY homeowners alike.
How do I match the edge profile on the backsplash to my countertop?
Use the same router bit profile on the top edge of the backsplash as was used on the front edge of the countertop. If your counter has a bullnose, run a bullnose on the splash. If the counter has an eased edge, use an eased edge. Mismatched profiles look like an error, not a design choice. If you do not know your counter's profile, hold a flexible profile gauge against the edge to read the shape.
Does fabricating a 4-inch backsplash void an engineered quartz warranty?
It can. Some engineered quartz manufacturers, including Cambria, require that fabrication and installation be done by a certified fabricator to keep the warranty valid. Check the warranty terms for your specific brand before attempting DIY fabrication. This matters most for expensive engineered stone, where a defect claim could be worth hundreds of dollars in replacement material.
How much does a 4-inch stone backsplash add to the total countertop cost?
When ordered as part of a countertop job and cut from the slab drops, the material cost is often near zero. Fabrication and installation labor typically adds $15 to $45 per linear foot depending on material hardness, number of corners, and outlet cutouts. For a 10-foot kitchen run, expect $150 to $450 for the splash as an add-on, though some shops fold it into the base countertop price.
What is the difference between a backsplash and a cove base on a stone countertop?
A 4-inch flat backsplash is a straight vertical strip of stone set against the wall. A cove base has a curved transition at the bottom where the splash meets the countertop, instead of a flat right-angle joint. Cove bases are harder to fabricate because they require a concave grind on the bottom edge of the splash. They are common in commercial kitchens where sanitation matters, but rare in residential work.
Sources
- OSHA, Silica Rule for Construction (29 CFR 1926.1153): OSHA requires engineering controls including wet methods when cutting stone to limit worker exposure to respirable crystalline silica; the permissible exposure limit is 50 micrograms per cubic meter as an 8-hour TWA.
- NKBA, Kitchen Planning Guidelines: Standard kitchen outlet placement puts box faces in the range that intersects with a 4-inch backsplash height, requiring cutouts in the stone.
- Dow, Dowsil 795 Silicone Sealant Product Data Sheet: Most construction-grade silicone sealants reach handling strength in 30-60 minutes and achieve full cure within 24 hours, varying with temperature and humidity.
- Marble Institute of America (now Natural Stone Institute), Dimension Stone Design Manual: MIA installation guidelines specify that the joint between a stone backsplash and the countertop surface must be filled with a resilient sealant, not a rigid fill like grout or epoxy.
- NEMA, Standard Outlet Box Dimensions (NEMA OS 1): Standard U.S. single-gang electrical outlet boxes are 2 inches tall by 3 inches wide; duplex receptacle boxes are approximately 3.5 inches wide.
- Angi, Stone Backsplash Installation Cost Guide: Regional labor rates for stone fabrication and installation vary by 30-40% or more between high cost-of-living metros and rural markets; stone backsplash pricing ranges from $15 to $45 per linear foot for 4-inch versions and $60-150 per linear foot for full-height slabs.
- The Home Depot, Tool and Equipment Rental: Wet stone and tile saws are available for rent at major home centers at roughly $50-80 per day.
- Cambria, Warranty and Care Terms: Cambria's warranty terms require fabrication and installation by a certified fabricator; DIY fabrication may void coverage.
- StoneTech (Laticrete), BulletProof Sealer Product Data: Penetrating stone sealers have manufacturer-specified reapplication intervals; most require reapplication every 1-5 years depending on stone porosity, use, and specific product.
- NIOSH, Silicosis Among Engineered Stone Countertop Workers: NIOSH has documented elevated rates of silicosis among countertop fabrication workers, particularly those cutting engineered quartz, reinforcing the need for wet methods and respiratory protection.
- NKBA, 2024 Kitchen and Bath Market Index: Stone (granite, quartz, marble) remains the dominant countertop material category in U.S. kitchen remodels, with natural and engineered stone together representing the majority of countertop purchases in the premium segment.
Last updated 2026-07-11