TL;DR
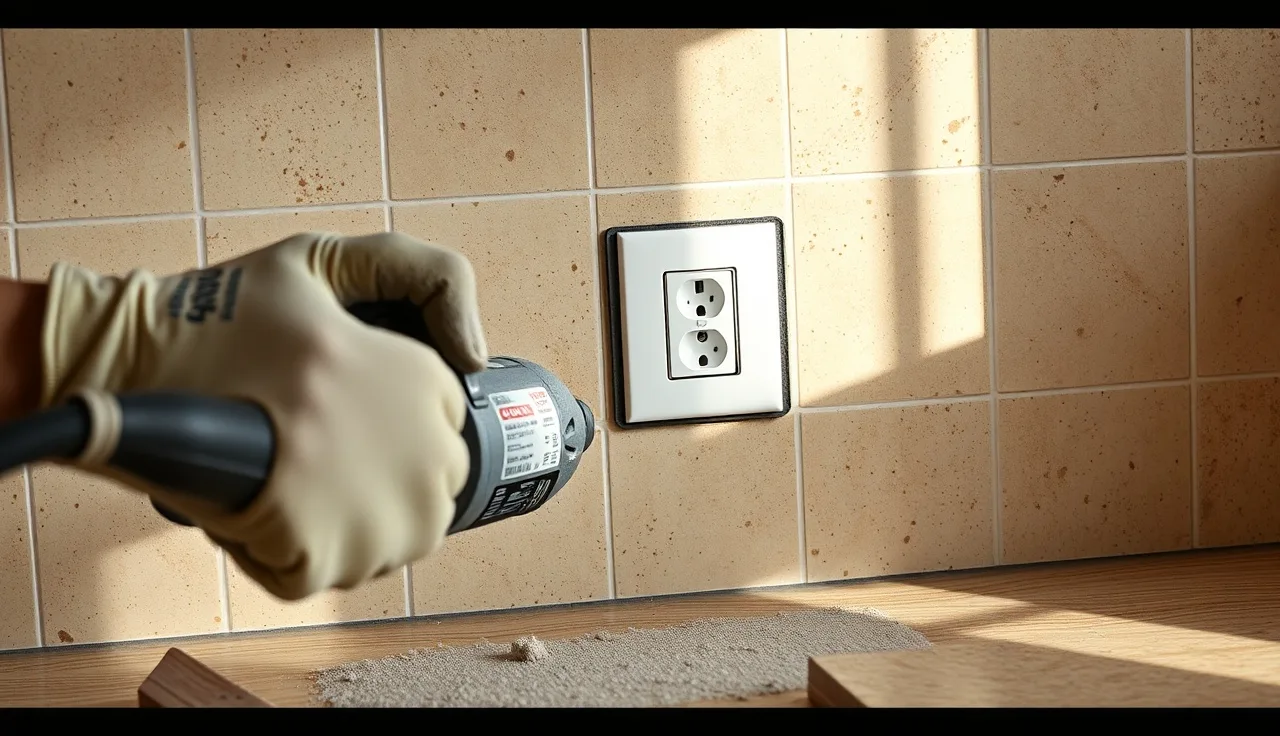
- To cut stone backsplash around an outlet, trace the box onto the tile, then remove material with an angle grinder fitted with a diamond blade or a plunge-cut wet saw.
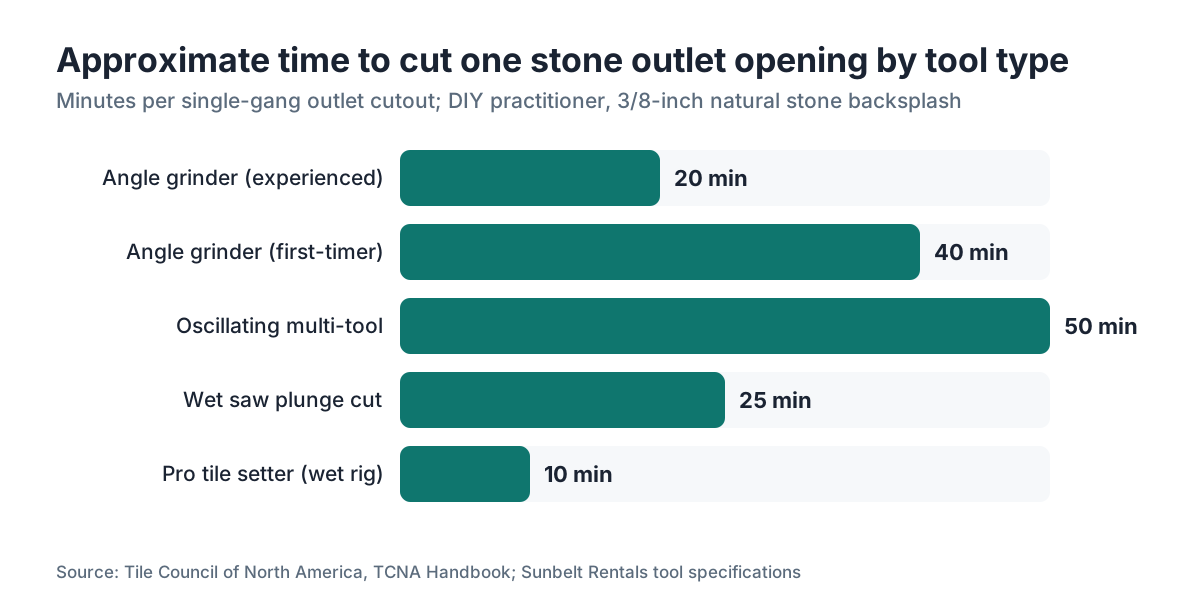
- A 4.5-inch angle grinder handles most field cuts in 15 to 25 minutes.
- Leave 1/16 to 1/8 inch of clearance around the box, and keep the cutout inside the cover plate's overlap.
Why cutting stone around outlets is harder than cutting around cabinets
A straight rip through granite or porcelain is already unforgiving. An outlet cutout is worse. It demands four clean interior corners and a shape that has to land within maybe 3/8 of an inch on every side. The standard single-gang cover plate is 2.75 inches wide and 4.5 inches tall [1]. Your cut has to sit smaller than that on each edge, or the gap shows around the plate. Cut it too small and the tile won't drop over the box. There's almost no margin either way.
Stone fractures differently than ceramic or porcelain. Natural stone, granite especially, has grain and micro-fractures that run toward a corner if you push the blade too fast. Marble can pop a chip the size of a quarter the instant you change cutting angle mid-pass. Engineered quartz behaves more predictably, but it still punishes a dull blade with burn marks and gummed resin.
Here's the reassuring part. This cut looks hard and isn't, once you know the sequence and pick the right tool for your material. Most of the horror stories trace back to three things: the wrong blade, too much speed, or trying to finish a corner in one aggressive plunge.
What tools do you actually need to make this cut?
You have three realistic options, and each carries a different risk. An angle grinder with a diamond blade is what most tile setters reach for in the field. A wet saw is cleaner and more precise but clumsy on installed tile. An oscillating multi-tool is the slowest but gives a beginner the most control.
Angle grinder with a continuous-rim diamond blade. This is the field standard. A 4.5-inch grinder with a 4-inch dry-cut diamond blade runs $40 to $80 for a basic combo, and blades cost $8 to $25 depending on quality [2]. You freehand the cut, which is fast but wants a steady hand. The dust is heavy, so wear an N95 or P100 respirator every time. NIOSH classifies respirable silica from stone cutting as a serious respiratory hazard [3].
Wet tile saw with a plunge-cut fence. More precise, far less dust. The catch with outlet cutouts is that a standard wet saw cuts from the edge inward, so you make four plunge cuts and meet them at the corners. That works cleanly on porcelain and larger-format stone tile. It's awkward on installed backsplash because the saw needs a flat, stable surface. Save it for cuts made on the bench before the tile goes up.
Oscillating multi-tool with a diamond blade. Slowest of the three, best control. Good for a first-timer or for stone that chips aggressively. Blades wear fast on natural stone, so budget two or three per backsplash job. Run it at 10,000 to 20,000 OPM; higher settings overheat the blade [4].
For most homeowners doing their own backsplash, I'd use the angle grinder for natural stone thicker than 3/8 inch and the oscillating tool for thin mosaic sheets or fragile marble under 1/4 inch. The wet saw is the pro move when you're cutting tiles before they go on the wall.
| Tool | Best material | Dust level | Corner quality | Approx. cost to rent/buy |
|---|---|---|---|---|
| Angle grinder + diamond blade | Granite, quartzite, thick porcelain | High (use water guard or vacuum) | Fair, needs cleanup | $40-$80 buy, $20-$35/day rent |
| Wet tile saw (plunge cut) | Porcelain, marble, engineered stone | Low | Good with care | $80-$200 buy, $35-$60/day rent |
| Oscillating multi-tool + diamond blade | Thin marble, mosaic, travertine | Medium | Best control | $60-$150 buy, $25-$45/day rent |
| Carbide hole saw (circles only) | Ceramic, soft stone | Medium | N/A (round cuts) | $15-$40 per bit |
How do you measure and mark the outlet cutout on stone tile?
Get the layout right and the rest is just following your lines. Rush it and you'll chip a tile you can't easily match. Turn off the circuit, hold the tile in its exact installed position, and mark the four edges of the box (not the receptacle) onto the tile face.
First, kill the power at the breaker. This is more than caution. A grinder blade that deflects into a live outlet box is a real electrocution risk. OSHA's electrical safety standard, 29 CFR 1910.303, requires that work near energized conductors happen only when deenergizing is infeasible [5]. For a DIY backsplash, deenergizing is never infeasible. Shut it off.
Hold the tile in its exact installed position against the wall. The box sticks out from the wall; the tile butts against it. Mark the four edges of the box directly onto the tile face with a pencil or a fine-tip paint marker. Paint marker reads better on dark stone.
Pull the tile off and check your marks. You want a cutout that's 1/16 to 1/8 inch larger than the box opening on all four sides. That gives you room to seat the tile over the box without forcing it, and the cover plate hides the gap completely. NEC Article 314.20 requires that boxes sit so the front edge is flush with, or no more than 1/4 inch behind, the finished wall surface [6]. So if the box was set correctly, your tile face lands right at or just behind the cover plate plane.
Cutting several tiles that each cover part of one outlet? Stack them, align them, and mark through them together. That keeps the opening square across the joint.
One detail trips people up constantly. The outlet box and the receptacle are two different rectangles. Mark to the box edges. The cover plate hides the box edge, and the receptacle face is smaller, so marking to the receptacle gives you a cutout that's too tight.
Step-by-step: how to make the cut with an angle grinder
-
Secure the tile on a stable surface, marked side up. Clamp it or set it on a non-slip mat. If you're cutting in place (tile already set), protect adjacent surfaces with painter's tape and a drop cloth. Wet the tile surface lightly if you're not running a water attachment; that alone cuts the dust a lot.
-
Put on your PPE: N95 or P100 respirator, safety glasses or face shield, hearing protection, and gloves. Silica dust from a single cutting session can deliver a real lung dose [3]. Don't skip it.
-
Set the blade depth so it just clears the tile thickness. For a 3/8-inch backsplash tile, the blade needs to cut about 1/2 inch to clear cleanly. Going deeper on an angle grinder raises kickback risk.
-
Start with one of the long cuts (a side of the rectangle). Place the blade just outside your line, on the waste side. Bring the grinder to full speed before the blade touches stone. Move steadily toward the corner and stop about 1/4 inch short. The corner is where chips happen, so you'll come back to it.
-
Make the opposite long cut the same way.
-
Cut the two short edges (top and bottom), again stopping 1/4 inch from each corner.
-
Now the corners. Freehand a small curve or nibble in: approach each corner from both directions with light pressure, shaving thin layers until the cuts meet. Never plunge straight into a corner.
-
Knock out the waste. It should drop free or need only a gentle tap from behind with a rubber mallet. If it won't move, one of your kerfs isn't fully through. Go back and deepen it rather than prying.
-
Clean up the edges with a small diamond hand pad (around 80-grit) or a rotary tool with a diamond bit. The cover plate hides the inside edge, but rough peaks can chip the tile face over time as the plate flexes against them.
A practiced DIYer needs 15 to 25 minutes per single-gang cutout on natural stone. First-timers should budget 30 to 45 minutes and one practice tile.
How do you cut the outlet hole in stone tile that's already installed?
This comes up more than people expect. An electrician moves an outlet after the tile is up, or the original installer skipped a cutout and left a gap to finish later. In-place cuts are harder: you can't flip the tile, you can't clamp it, and the grout joints are already set.
The angle grinder is really the only practical tool here. An oscillating multi-tool works too, but it takes much longer.
The method matches the bench version above with two changes. Tape the surrounding tile heavily to catch chips, and run a cut-and-vacuum setup if you have one. A shop vac with the hose held near the cutting line by a helper captures a large share of the silica before it goes airborne. Some grinders take a dust shroud attachment built for exactly this; they run about $20 to $35 and earn their keep on in-place stone work [2].
Work the corners slowly. Installed tile has no give, and a forced corner cut can crack the tile well past the cutout. If a crack starts to travel, stop the trigger immediately and let the blade quit spinning before you lift it off. A blade dragged across tile by its own momentum does more damage than the original cut.
If the tile cracks during an in-place cut, you're removing and replacing that piece. That's the real risk. If the pattern is discontinued or you have no extras, this turns into an expensive mistake fast. When the stakes are that high (rare marble, a complex pattern), hire a tile setter who does in-place cutting for a living.
Does it matter if the outlet is on a double-gang or triple-gang box?
Yes. A double-gang box measures 4.5 inches wide and 4.5 inches tall, and its cover plate is 4.5 by 4.5 inches [1]. A triple-gang box is 6.3 inches wide at the same height. These wider boxes often span a grout joint between two or more tiles, which means partial cutouts in separate tiles that have to line up across the joint.
When a cutout spans two tiles, mark both while they're held together in exact installed position. A slight misalignment shows as a step in the cutout edge, even though each cut looks fine on its own. Dry-fit both tiles over the box before any adhesive goes down. That's the step people skip, and it's behind most visible mistakes on multi-gang cutouts.
A triple-gang across three tiles follows the same rule. Some installers set the outer tiles first, let them cure, then scribe the center tile in place off the set edges. Either approach works. The whole game is checking the fit before the adhesive locks up.
What blade and grit should you use for different stone types?
Blade choice matters more than most guides let on. The wrong blade on natural stone doesn't just wear out faster. It seeds microfractures in the cut edge that surface as chips weeks later, when the wall shakes from a slammed cabinet door.
For granite and quartzite: a continuous-rim or segmented diamond blade rated for hard stone. Turbo-rim blades (wavy edge) cut faster but leave a rougher edge. For an outlet cutout where the edge hides behind the plate, a turbo rim is fine. For exposed edges, use continuous rim.
For marble and travertine: marble is soft but chips badly. Use a continuous-rim blade, lower speed, and keep it wet if you can. Travertine has natural voids that create unpredictable fracture lines, so score lightly on the first pass and deepen on the second.
For engineered quartz: the resin binder turns gummy under heat. Keep the blade wet or take frequent breaks to stop resin buildup. A blade marketed for quartz (sometimes labeled "resin bonded stone") cuts noticeably better [2].
For porcelain and ceramic: any diamond blade cuts, but porcelain is hard and eats cheap blades fast. A blade with at least a 10 mm segment height lasts much longer on porcelain [4].
Blade diameter sets your cut depth. A 4-inch blade on a 4.5-inch grinder gives about 1.25 inches of maximum depth, plenty for any backsplash tile. A 4.5-inch blade adds a little depth but may need a guard adjustment on some grinders, so check the manual.
The material call for your backsplash ties back to the decisions behind your kitchen countertops and granite countertops, since the same stone often runs from the counter up the wall.
How do you handle the NEC code requirements around outlet boxes and tile depth?
The National Electrical Code shows up here in two ways. First, NEC Article 314.20 says the box front must sit flush with, or within 1/4 inch behind, the finished wall surface [6]. Second, NEC Article 406.6 requires a listed cover plate on every outlet and switch box [6].
That first rule bites when your tile is thicker than 1/4 inch. Most stone backsplash runs 3/8 to 1/2 inch, so if the box was set for drywall only, its face ends up recessed too far behind the tile face. That's a code problem and a practical one: the cover plate won't seat flat, and the screws may not reach.
The fix is a box extender, also called an electrical box extension ring. These are listed metal or plastic devices that add 1/4, 1/2, or 3/4 inch of depth to the existing box. They cost $3 to $8 each and are required by code in this situation [6]. Some inspectors enforce it, many won't on an unpermitted backsplash swap. The practical reason to use one stands regardless: a cover plate rocking on a recessed box will crack stone tile over time.
On Article 406.6, the code also requires the cover plate be made of listed materials. A custom-cut chunk of scrap stone is not a listed cover plate. Use a standard plate and let your cutout sit cleanly behind it.
Doing a full kitchen renovation? Ask your local building department about permits directly. Many jurisdictions skip the permit for tile replacement that doesn't move outlets, but adding an extension ring counts as electrical work that triggers an inspection in some places.
What are the most common mistakes people make cutting stone around outlets?
The failure modes are predictable, and every one is avoidable. Marking to the wrong reference and rushing the corners cause the most cracked tiles. Skipping dust control causes the damage you don't see until years later.
Marking to the wrong reference. Marking the receptacle instead of the box edge is probably the single most common mistake. The receptacle is smaller than the box, so the cutout comes out too tight and the tile won't fit over the box.
Not dry-fitting before adhesive sets. The cutout looks right until the tile hits the wall and you find a 1/16-inch interference that chips the tile when you force it. Dry-fit every tile with a cutout before any adhesive goes down.
Rushing the corners. The four interior corners are where chipping is most likely. Every fast-push corner cut I've seen has a chip. Slow down at the corners specifically.
Using a dull blade. A dull diamond blade makes more heat, more vibration, and more microfractures. If the blade is skating on the surface instead of cutting, it's done. A fresh 4-inch continuous-rim blade for $12 is cheaper than a cracked tile.
Forgetting dust control. Silica dust builds up in your lungs silently. NIOSH data shows workers cutting stone without dust controls can face respirable crystalline silica at 10 to 100 times the OSHA permissible exposure limit [3]. A homeowner cutting two or three outlets is lower risk, but the N95 is non-negotiable.
Not extending the box. Tiling over a box that's already at the edge of the 1/4-inch tolerance pushes the box face behind the legal limit. Add the extension ring before the tile goes up, not after.
Cutting in place without protecting adjacent tile. One grinder slip scratches a whole run. Tape everything you're not cutting.
How should you finish and seal the cut edges inside the outlet opening?
The inside edges of a stone cutout catch a little kitchen humidity and the occasional splash. They also show if someone pulls the cover plate, and rough peaks can chip the plate. Smooth them with a diamond hand pad, then seal natural stone with a penetrating sealer.
Work the cut edges with a diamond hand pad (50 to 400 grit from most tile suppliers, about $8 to $15). Go from 80-grit to 120-grit to knock off the sharpest ridges. You don't need a polish. You just want no sharp peaks.
For natural stone, a quick pass of stone sealer on the cut edge makes sense. The cut exposes the stone's interior, which is more porous than the face. A penetrating sealer (silicone or fluoropolymer based) keeps moisture from migrating into the stone matrix [7]. Use the same sealer you'd use on the face: brush it on the cut edge and wipe the excess after 5 to 10 minutes. This is worth doing on marble and travertine especially, since both are calcium carbonate and react poorly to acidic cooking residue.
Engineered quartz doesn't need sealing on the cut edge. The resin binder is non-porous [8]. Smoothing the edge is still worthwhile for cover plate longevity.
Once the tile is set and the grout has cured, run a thin bead of paintable silicone caulk where the tile edge meets the box interior. This isn't structural. It's a moisture and bug barrier. Keep it thin, since it disappears behind the cover plate anyway.
Fabricators tracking material yields across jobs like this often find outlet cutouts are where small wastage stacks up. Tools like SlabWise handle nesting and remnant tracking so those pieces don't vanish from the cut sheet.
Can you cut a stone backsplash outlet hole without a power tool?
Technically yes. Practically, it depends on the material, and for real stone the answer is basically no.
For ceramic tile (not stone), a manual carbide scorer and snap won't handle interior cuts. But a tile nipper, worked patiently, can nibble out an outlet opening in 20 to 30 minutes. The edge comes out rough and needs cleanup, but it works.
For natural stone, a manual approach isn't realistic. Granite, quartzite, and marble need diamond tooling. Marble is soft enough that a hand file or diamond hand pad could finish an already-scored cut, but starting from scratch by hand is hours of work for a result no cleaner than a power-tool cut.
For thin travertine or soft limestone under 1/4 inch, a diamond hand pad and patience can clean up edges after a scored line. Even soft limestone won't snap cleanly on an interior cut, though.
If you truly don't want to buy power tools, rent an angle grinder for the day. Home Depot Tool Rental and Sunbelt Rentals charge roughly $20 to $35 a day for a 4.5-inch grinder [9]. The time you save justifies it on its own. When you're shopping tile that might affect the difficulty, marble countertops pages usually describe hardness and workability in terms that translate straight to cutting difficulty.
When should you hire a tile setter instead of cutting stone outlet holes yourself?
Four situations make DIY genuinely risky. Irreplaceable tile, more than four outlets or any multi-gang boxes, tile that's already set or cracked, and boxes so far out of flush they need multiple extension rings plus electrical work.
First, irreplaceable or discontinued tile. One cracked piece in a rare stone or a custom blend means patching with a visibly different tile or redoing a whole wall section. Hiring a pro for four outlet cuts (typically $150 to $400 depending on your market and material) [10] is cheap next to sourcing and reinstalling discontinued stone.
Second, more than four outlets on the same run, or any double- or triple-gang boxes. The skill demand compounds fast, and a professional tile setter has the in-place wet-cutting rig that removes most of the chipping risk.
Third, tile that's already set and cracked, or that has an existing repair. Cutting near a crack propagates it. A pro can read grain direction and steer around fracture lines.
Fourth, boxes significantly out of flush that need multiple extension rings plus possible electrical work. At that point you're coordinating an electrician and a tile setter anyway.
For a first-timer tackling a straightforward single-gang outlet in standard 3/8-inch granite or porcelain, doing it yourself is genuinely reasonable. Practice on one extra tile, go slow at the corners, and protect your lungs. This cut is learnable.
For a sense of where tile work sits in the broader fabrication process, the countertop installation guides walk through what a professional job involves start to finish.
Frequently asked questions
What's the best blade for cutting granite backsplash around an outlet?
Use a continuous-rim or turbo-rim diamond blade rated for hard stone, 4 to 4.5 inches in diameter, on an angle grinder. Continuous-rim leaves a cleaner edge; turbo-rim cuts faster with a rougher edge. For an outlet cutout where the edge hides behind the cover plate, either works. Expect to pay $10 to $25 for a quality blade. Cheap blades fail faster and cause more vibration-related chipping.
How much gap should I leave between the stone tile and the outlet box?
Leave 1/16 to 1/8 inch on all four sides of the box opening. That gives enough clearance to fit the tile over the box without forcing it, and the standard cover plate (2.75 inches wide by 4.5 inches tall for a single-gang) overlaps the tile edge by at least 3/8 inch on each side, hiding the gap completely.
Do I need to turn off the power before cutting tile around an outlet?
Yes, always. Turn off the circuit at the breaker before any cutting near an outlet box. A diamond blade that deflects or slips into a live box can cause electrocution. OSHA standard 29 CFR 1910.303 requires deenergizing for work near energized conductors unless it's infeasible. For a DIY backsplash, deenergizing is never infeasible.
My outlet box is recessed behind the tile. What do I do?
Install an electrical box extension ring before you tile. These listed devices add 1/4, 1/2, or 3/4 inch of depth to bring the box face within the 1/4-inch maximum recess allowed by NEC Article 314.20. They cost $3 to $8 each and are stocked at any hardware store. Without one, your cover plate won't sit flush and may rock, eventually cracking the tile.
Can I use a jigsaw to cut stone backsplash around an outlet?
No, not for natural stone. Jigsaws with diamond-grit blades exist for ceramic tile, but they're slow, and the reciprocating motion creates more vibration than rotary diamond cutting, which raises chipping risk on granite, marble, or quartzite. For ceramic-only backsplash, a jigsaw with a carbide or diamond blade works in a pinch, but an angle grinder or oscillating tool gives a better edge.
How do I cut stone backsplash around an outlet that spans two tiles?
Hold both tiles in their exact installed positions, aligned across the joint, and mark the box opening onto both faces at once. Each tile gets a partial cutout, and the two halves must line up across the joint. Dry-fit both tiles over the box before setting them in adhesive. Even a 1/16-inch misalignment shows as a step in the opening, so take your time on the layout.
What respirator do I need when cutting stone tile?
At minimum, an N95 filtering facepiece respirator. NIOSH recommends N95 or higher for tasks that generate respirable crystalline silica. For repeated or extended cutting, a P100 half-face respirator is better. Paper surgical masks and cheap construction masks don't filter fine enough to stop silica. Silica exposure from stone cutting is linked to silicosis, an irreversible lung disease.
Should I cut outlet holes before or after I set the tile?
Before, whenever possible. Cutting a loose tile on a workbench is safer, cleaner, and easier to fix if something goes wrong. You can clamp the tile, control dust better, and take your time without risking adjacent set tiles. Cut in place only when the tile is already up and a cutout got missed, or when precise in-situ measurement is required.
Does the tile thickness affect how hard this cut is?
Yes. Thicker tiles (1/2 inch and up) need more blade passes or deeper single cuts, which makes more heat and raises chipping risk. Standard backsplash stone runs about 3/8 inch, which is manageable. Very thin mosaic sheets (under 3/16 inch) are fragile and chip at the corners easily, so use an oscillating tool with light passes rather than an angle grinder for those.
Do I need to seal the cut edge of the stone inside the outlet opening?
For natural stone, yes, it's a good idea. The cut exposes the stone's interior, which is more porous than the sealed face. Brush a penetrating stone sealer onto the cut edge and wipe off the excess after 5 to 10 minutes. Use the same sealer as the face. Engineered quartz doesn't need sealing since the resin binder is already non-porous, but smoothing the edge with a diamond hand pad still helps prevent chipping against the cover plate.
How long does it take to cut a stone outlet hole?
With an angle grinder, a practiced DIYer takes 15 to 25 minutes per single-gang outlet on natural stone. First-timers should plan 30 to 45 minutes and cut a practice tile first. In-place cuts take a bit longer because of setup and dust control. Oscillating tools take 35 to 60 minutes per cut. A professional tile setter with a dedicated wet-cutting rig can do a clean cutout in under 10 minutes.
Can I use a hole saw to cut a round opening for an outlet in stone?
Only if the cover plate is round, which is non-standard for residential outlets. Standard outlet boxes and cover plates are rectangular, so a round hole won't work. Diamond core hole saws are useful for plumbing or range hood penetrations through stone, but not for outlet boxes.
What if I chip the tile while cutting the outlet hole?
If the chip is inside the cutout area (hidden by the cover plate), it doesn't matter. If it's on the face near the opening, judge the size. Small chips under 1/8 inch at the edge can sometimes hide under the cover plate if it overlaps enough. Larger chips visible outside the plate mean replacing the tile. That's why dry-fitting and going slow at corners matters so much.
Is it worth hiring a professional for stone outlet cuts in a backsplash?
If the tile is discontinued, rare, or expensive marble, hire a pro. For standard granite or porcelain backsplash with four or fewer single-gang outlets, a careful DIYer can handle it. Professional tile setters typically charge $150 to $400 for a full backsplash outlet-cutting job depending on material and market, not per outlet. With six or more outlets, the professional cost is easier to justify.
Sources
- Hubbell Wiring Device-Kellems, Standard Electrical Box and Cover Plate Dimensions: Standard single-gang cover plate is 2.75 inches wide and 4.5 inches tall; double-gang cover plate is 4.5 inches wide and 4.5 inches tall
- Home Depot, Diamond Blade Product Category: 4-inch continuous-rim diamond blades cost $8-$25; angle grinder and blade combos run $40-$80; dust shroud attachments run $20-$35
- NIOSH (National Institute for Occupational Safety and Health), Silica Dust Controls for Construction: Respirable crystalline silica from stone cutting is classified as a serious respiratory hazard; workers without dust controls can be exposed at 10-100 times the OSHA permissible exposure limit
- Tile Council of North America, TCNA Handbook for Ceramic, Glass, and Stone Tile Installation: Oscillating tools for stone tile cutting work best at 10,000-20,000 OPM; blades with segment height of at least 10 mm last longer on porcelain
- OSHA (Occupational Safety and Health Administration), 29 CFR 1910.303 Electrical Safety Standards: OSHA requires that work near energized conductors be done only when deenergizing is infeasible
- National Fire Protection Association, NFPA 70 National Electrical Code (Articles 314.20 and 406.6): NEC Article 314.20 requires box front to be flush with or within 1/4 inch behind finished wall surface; Article 406.6 requires listed cover plates on all outlet and switch boxes
- Natural Stone Institute (formerly Marble Institute of America), Care and Maintenance of Natural Stone: Cut edges of natural stone are more porous than sealed faces and benefit from application of a penetrating silicone or fluoropolymer sealer
- Breton S.p.A., Bretonstone Engineered Quartz Technical Data: Engineered quartz surfaces are non-porous due to the resin binder matrix and do not require sealing, including on cut edges
- Sunbelt Rentals, Tool Rental Pricing: Day rental rate for 4.5-inch angle grinder is approximately $20-$35/day
- Angi (formerly HomeAdvisor), Tile Installation Cost Guide: Professional tile setter labor for outlet cutout work on backsplash projects typically ranges $150-$400 depending on market and material
- OSHA, Respirable Crystalline Silica Standard for Construction, 29 CFR 1926.1153: OSHA construction silica standard requires dust controls or respiratory protection for tasks generating silica above the action level of 25 micrograms per cubic meter
Last updated 2026-07-11