TL;DR
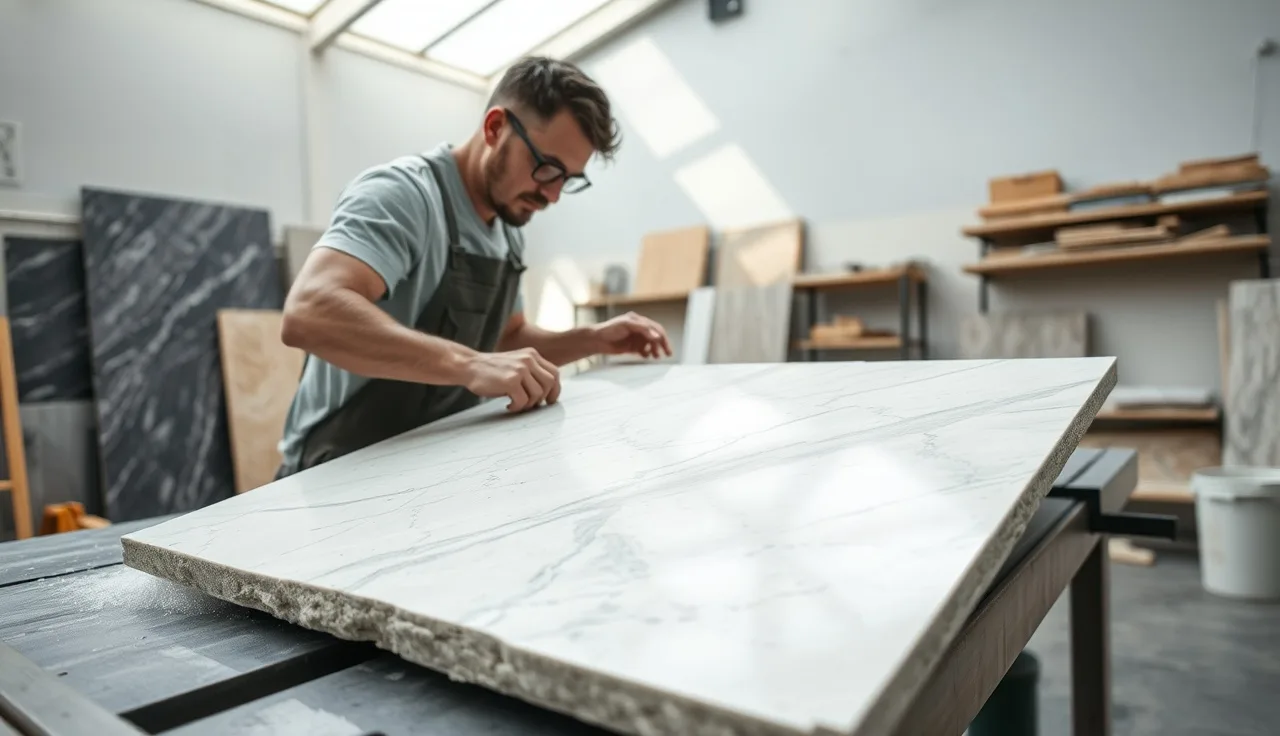
- Cutting a full-height stone backsplash starts with templating the wall precisely, then transferring those marks to the slab, cutting straight lines on a wet saw, and opening outlets with a core drill or grit jigsaw blade.
- Plan on 2 to 6 hours of shop time.
- Mistakes here cost real money, so template carefully and cut from the back face when it protects the finish.
What exactly is a full-height stone backsplash and why is cutting it so different?
A standard backsplash runs 4 inches tall, basically a strip of tile or stone between the counter and the upper cabinets. A full-height backsplash fills the whole wall from the countertop up to the bottom of the upper cabinets, often 15 to 20 inches tall, and sometimes running to the ceiling on an open wall. That extra height changes everything about how you cut it.
With a 4-inch strip, a slight bow in the wall or a quarter-inch measurement error is manageable. With a 20-inch panel, that same error opens a visible gap at the top, throws an outlet cutout off, or leaves a panel that will not fit between two cabinets. The cuts are harder to support, too, because you're handling a piece that might be 20 inches by 36 inches of 3/4-inch quartzite, weighing roughly 12 to 15 pounds per square foot [1]. That is a heavy, brittle piece of stone to push through a wet saw.
Full-height panels almost always come from the same slab as the countertop, so the grain and veining have to flow continuously from the counter up the wall. You book-match or flow-match the cuts, and a mistake in sequencing wastes expensive material. On premium marble or quartzite, that stone might run $80 to $200 per square foot before fabrication [2]. There is no room for a redo.
What tools do you actually need to cut stone backsplash panels?
Here is the minimum tool set for cutting stone backsplash panels safely and accurately.
Wet tile saw with a diamond blade. A 10-inch or 14-inch wet saw handles straight cuts on panels up to about 18 inches wide. The blade has to be a continuous-rim or turbo-rim diamond blade rated for your stone. Granite needs a harder bond than marble. A good blade runs $30 to $150 depending on diameter and quality [3].
Angle grinder with a diamond cup wheel or dry-cut diamond blade. For cuts that won't fit on the wet saw table, like scribing a panel to a textured wall, a 4.5-inch grinder with water delivery (or a handheld wet polisher) does it. This is also the tool for shaping edges on-site.
Core drill bits. Outlet and switch cutouts are round at the corners. The cleanest method is a diamond-tipped core bit sized to your outlet box knockout, usually 3.5 inches. A 3.5-inch diamond core bit runs $25 to $60 [3].
Jigsaw with a diamond or carbide grit blade. For square outlet cutouts without a core drill. Slower and rough on the blade, but it works on softer stones like soapstone or softer marbles.
Oscillating tool with a diamond blade. Good for inside corners and tight notches where nothing else fits.
Template material. Luan underlayment, cardboard, or commercial template board. You need something stiff enough to hold its shape across 36 inches without flexing.
Rubber suction cups or a slab lifter. Moving 20-inch panels of 3/4-inch stone alone is dangerous. A pair of vacuum suction cup handles, the kind sold for tile and glass work, runs $20 to $80 and saves your back and your panels.
A homeowner doing this once can rent a wet tile saw for roughly $50 to $75 a day from most tool rental shops [3]. Core drills are usually available too. The angle grinder you probably already own. Just buy the right blade for it.
How do you template a full-height backsplash accurately?
Templating is where the job is won or lost. Walls are never perfectly flat or plumb. Countertops are not perfectly level. Corners are almost never a true 90 degrees. A template captures all of that real-world crookedness so your stone panel lands without gaps.
Start by pulling the outlet and switch covers. You template to the raw wall, not to the trim plates. Mark the height of the upper cabinets at several points along the wall and draw a level line connecting them. That line is your top cut reference. If the cabinets sit slightly out of level, decide now whether to follow the cabinets or hold the panel level and let the difference gap, which the cabinet usually hides anyway.
Cut your template material to rough size, leaving a half inch of overhang everywhere. Tape it to the wall and trace the exact profile of every obstacle: the countertop surface, inside corners where panels meet, outside corners, the cabinet bottoms, outlet boxes, and any pipes or vents. For outlet boxes, press the template against the wall and tap it over the box to transfer the impression, or measure and mark the box position precisely.
Once the template is cut and test-fit, lay it over your slab on the shop floor or layout table. Trace it onto the slab face with a soapstone marker or china marker. Then step back and look at the veining. If a heavy vein runs straight through an outlet cutout, shift the template a little if you can. If the layout puts a cut through a major feature of the stone, adjust now, not after the blade has run.
On a long wall, say 10 feet, you will cut two or more panels and seam them. Mark the seam locations on the template before transferring to stone. Seams read best at inside corners, near a sink, or wherever the vein pattern naturally breaks [4].
How do you make straight cuts on a stone backsplash panel?
Straight cuts are most of the work: the top cut, the bottom cut, and the side cuts that fit the panel between cabinets.
Load the panel onto the wet saw table with the finished face up. The blade rises from below, so face-up shows any chipping on the good side. Some fabricators cut face-down so any blade chipping stays on the back, then clean up the face edge with a polisher. Either method works. Just be consistent and know where your blade leaves its roughest exit.
Run the water. Always run the water on a diamond wet saw. Cutting stone dry, even briefly, overheats the blade, warps the core, kills the diamond segments, and throws silica dust into the air. OSHA requires wet methods or HEPA vacuum controls for crystalline silica dust in construction and fabrication work [5]. Dry cutting stone indoors without a respirator is genuinely dangerous.
Feed the stone slowly, especially in the last few inches. A fast feed at the exit chips the bottom face. Practice on an offcut first. If the motor bogs down, you're pushing too hard.
For panels too wide for your saw table, you have two options. Score-and-snap works on softer stones like soapstone but is unreliable on granite or quartzite. The better move is a steel straightedge clamped to the panel with an angle grinder and diamond blade run along it in shallow passes, no more than 1/4 inch of depth per pass. That edge will need cleanup with a hand polisher and a diamond pad.
After every straight cut, run a diamond hand pad over the edge. Even a cut hidden behind a cabinet or buried against a wall should be smooth enough to handle without slicing your hand open.
How do you cut outlet and switch openings in stone?
Outlet cutouts are the most stressful part of backsplash fabrication. Get one wrong and you have a cracked panel or an opening too big for the cover plate to hide, and you're back to templating a new piece.
Mark the outlet location on the stone face from your template measurements. Double-check by measuring from a reference point, like the bottom edge or a corner, and compare that number to what the wall actually shows. Then measure again.
For a round-cornered square opening, the cleanest shop method is to drill the four corners with a small diamond core bit (3/8 to 1/2 inch diameter), then connect the corner holes with a straight cut from a jigsaw fitted with a carbide grit blade or a diamond jigsaw blade. Run water over the cut or keep a wet sponge nearby. Go slow.
Another approach: mark the opening and freehand-cut around it with an angle grinder and diamond blade. This takes a steady hand and some nerve. Many fabricators make a series of plunge cuts from the center, removing material in sections instead of chasing the outline in one pass.
For perfectly round knockout holes for circular grommets or specific fixtures, a diamond core drill bit is the right tool. Mark the center, center-punch a small dimple so the bit doesn't wander, and drill with steady, moderate pressure and constant water. A 3.5-inch core bit through 3/4-inch granite takes roughly 3 to 5 minutes.
After any interior cut, smooth all four edges with a diamond hand pad. The cover plate hides most of the edge, but a clean edge keeps sharp corners from cracking under stress [10].
How do you handle inside corners and outside corners?
Inside corners, where two backsplash panels meet at a 90-degree wall corner, get a butt joint: one panel runs all the way into the corner, and the adjacent panel butts against it. Caulk fills the joint. This is the right method because two pieces of stone locked in a rigid miter at an inside corner will crack as the house moves. Silicone caulk in a color matched to the grout or the stone gives the joint room to breathe [4].
The cut itself is just a straight cut on the wet saw. The tricky part is getting the corner panel's dimension right so it sits flush without leaving a gap wider than the caulk can fill. If the wall corner isn't 90 degrees, use a digital angle finder to read the actual angle and adjust one panel to suit. A 1- to 2-degree drift from 90 is common in residential framing.
Outside corners, the kind that wrap a peninsula or a structural column, want a mitered or eased joint. A 45-degree miter on both pieces looks clean but is demanding to cut accurately. Set the wet saw fence to 45 degrees, cut both panels, and test the fit dry before you bond anything. Small gaps in a miter can be filled with epoxy color-matched to the stone, but a visible gap on an outside corner is harder to hide than on an inside corner.
Some fabricators skip outside miters entirely. They run a factory-bullnosed edge on the leading panel and butt the return panel behind it. Easier and more forgiving. The edge detail you chose for the countertop usually tells you what looks right here.
What is the right sequence for cutting multiple panels that need to flow-match?
If your design calls for the countertop veining to run continuously up the wall, you're working with book-matching or flow-matching. Plan the slab layout before a single cut is made.
Lay out the full slab on the shop floor or on sawhorses. With tape or chalk, sketch the footprint of the countertop pieces and the backsplash panels in their installed positions, backsplash sitting above the counter layout, exactly as they'll sit in the kitchen. This is the slab layout, or nesting plan. The goal is to confirm that a vein leaving the top edge of the counter piece enters the bottom edge of the backsplash panel at the same point, so the eye reads one continuous stone surface.
Cut the countertop pieces first. They're usually larger and more expensive, so you protect them first. Leave the backsplash strips on the slab until the counter fit checks out. Then cut the backsplash panels in the same sequence, left to right or right to left, without flipping or rotating any piece relative to the slab.
Label every piece on the back with a paint marker: a number and an arrow pointing to the edge that faces up when installed. Pieces get disoriented during transport and installation. A backsplash panel set upside down breaks the flow-match on the wall.
Higher-volume shops use nesting software to squeeze more yield out of each slab before cutting. SlabWise lets you build the layout digitally before you commit to a cut, which trims offcut waste on expensive material. If you do a lot of flow-matched backsplash work, that kind of planning pays for itself fast.
How do you finish the edges of a stone backsplash panel?
Any edge visible after installation needs finishing. On a full-height backsplash that means the top edge (seen below the upper cabinets unless it's caulked to the cabinet bottom), any exposed side edges at outside corners or at walls with no upper cabinets, and sometimes the edge where the backsplash meets the countertop if a gap shows.
The simplest and most common finish is an eased edge. You soften the factory-sharp cut with a few passes of a 50-grit diamond hand pad, then work up through 100, 200, 400, and 800 grit. The result is a small 1/16-inch bevel that's smooth to the touch and catches light softly. It doesn't try to match the countertop edge profile, and it doesn't need to, because you view the backsplash edge from a different angle.
If the countertop has a full bullnose or ogee profile, some designers want the top of the backsplash to match. That takes a bench router with a diamond-profile bit, or hand-routing with a router sled. This is shop work, not on-site work, and it adds fabrication time.
At the bottom edge, where the backsplash meets the countertop, many fabricators cut the panel slightly undercut, the bottom face pulled back by 1/16 inch, so the panel sits flush to the wall without rocking on a high spot. It's an old finish-carpentry trick applied to stone.
How do you install and set stone backsplash panels after cutting?
Installation is technically separate from cutting, but the two are tied so tightly that some cutting decisions, like whether to undercut a panel to clear a counter edge, only make sense once you picture the install.
The standard method uses a rapid-set or adjustable construction adhesive, like Loctite PL Premium, or a marble-safe neutral-cure silicone, run onto the back of the panel in a serpentine bead. Skip full-coverage adhesive. It traps air and makes the bond nearly impossible to release for a future repair.
The wall has to be clean, dry, and free of old grout, tile mastic, or paint. Prime raw drywall or cement board before you bond stone to it. Heavy panels, anything over roughly 15 pounds per square foot, usually need mechanical support at the bottom, either the countertop surface itself or a small ledger strip temporarily screwed to the wall below the panel.
Set the panel onto the counter (or the ledger), press it to the wall, and use suction cup handles to hold it plumb while the adhesive grabs. Tape or temporary blocks keep it in position through the cure, usually 24 hours. After cure, pull the temporary support, fill inside-corner joints with color-matched silicone, and screw the cover plates over the outlet cutouts.
Seal the stone after installation to protect it from kitchen grease and moisture. Most granite and quartzite backsplashes take a penetrating impregnator sealer, applied and left to dwell per the manufacturer's instructions, typically 20 to 30 minutes, then wiped clean [6]. Polished marble gets the same treatment. There's more on keeping stone surfaces clean in our guide on how to clean stone countertops.
What does it cost to have a shop cut and install a full-height stone backsplash?
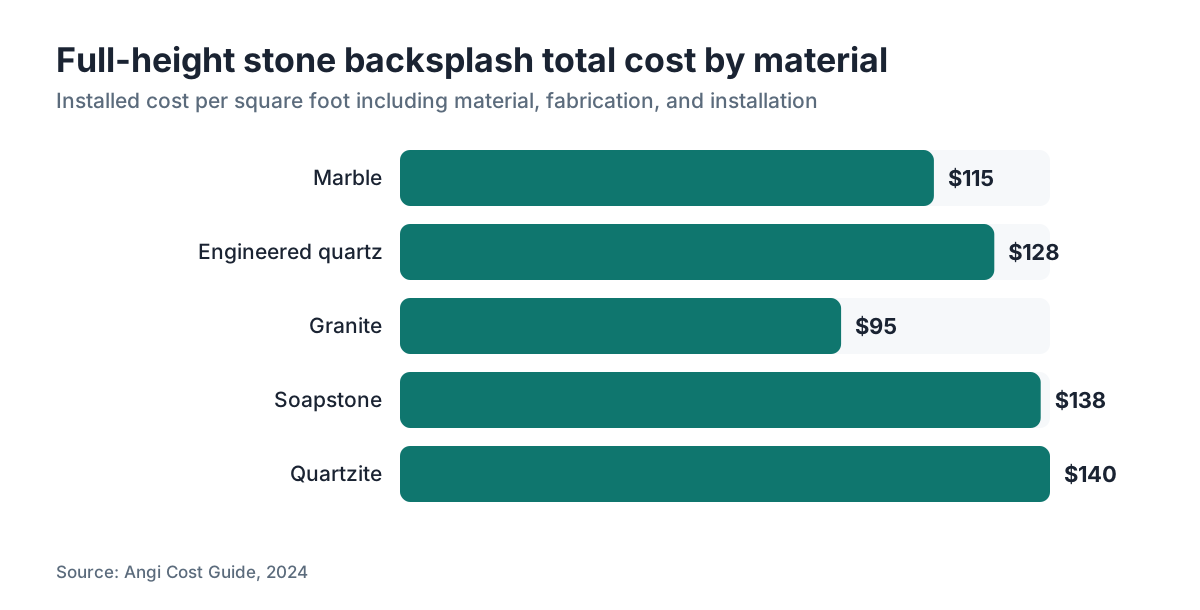
Cost swings hard with stone type, region, and panel complexity. Here are real market ranges pulled from published cost surveys and fabricator pricing data [2][7].
| Stone Type | Material Cost (per sq ft) | Fabrication + Install (per sq ft) | Total Range |
|---|---|---|---|
| Marble | $40-$100 | $30-$60 | $70-$160 |
| Granite | $35-$80 | $25-$50 | $60-$130 |
| Quartzite | $60-$120 | $35-$65 | $95-$185 |
| Engineered quartz | $50-$120 | $30-$55 | $80-$175 |
| Soapstone | $70-$120 | $30-$55 | $100-$175 |
A full-height backsplash behind a typical range wall (say 3 feet wide by 18 inches tall, or 4.5 square feet) might land at $300 to $750 on the low end, or $700 to $1,500 for premium quartzite or exotic marble. Cover all the upper-cabinet walls and you're easily at 20 to 40 square feet, which pushes the total to $1,500 to $6,000 or more.
Complexity adds cost fast. Each outlet or switch cutout typically adds $50 to $100 in fabrication labor [7]. A flow-matched layout adds planning time. Outside corner miters add fitting and polishing time.
Exploring options as a homeowner? You can pull an instant estimate from a local fabricator with SlabWise's quoting tool, which many shops use to turn your measurements into an accurate quote in minutes. Handy before you ever set foot in a showroom.
To see how other stone surfaces stack up on cost and character, the kitchen countertops overview covers the full material spread, and the granite countertops page goes deeper on that one material.
What mistakes are most common when cutting a full-height stone backsplash?
The same errors show up again and again, from a first-time DIYer to a veteran fabricator having a rough day.
Skipping or rushing the template. This is the number one source of panels that don't fit. A sloppy template costs you a panel. Fit the template perfectly before you touch the slab.
Ignoring an out-of-plumb wall. If the wall leans 1/4 inch over 18 inches of height, scribe the panel to match. Cut a panel with perfectly parallel top and bottom edges, press it to a leaning wall, and you get a visible gap at the top or the bottom.
Cutting outlet openings too large. Measure the cover plate first and confirm the cutout will hide behind it. Standard duplex outlet cover plates are 4.5 inches by 2.75 inches. Your cutout has to fit inside those numbers with margin.
Feeding the saw too fast. Chipped edges, broken panels, a warped blade. Patience saves material.
Dry cutting, even briefly. It wrecks the blade and floods the air with silica. Never cut stone dry.
Underestimating silica dust. Stone cutting throws off respirable crystalline silica, which causes silicosis, a serious and irreversible lung disease. OSHA's permissible exposure limit for crystalline silica is 0.05 mg/m³ as an 8-hour time-weighted average [5]. Wet cutting controls the dust. If you dry-cut or work in an enclosed space without real wet suppression, wear a NIOSH-approved N95 respirator at minimum, and an elastomeric half-mask with P100 cartridges is meaningfully better [8].
Not labeling panels. Set a panel in the wrong orientation and the flow-match is gone. Label everything.
Can a homeowner cut a full-height stone backsplash themselves?
Honestly, it depends on the stone and the layout. A straightforward soapstone or softer marble panel with no outlet cutouts and a simple rectangular shape is within reach for a careful DIYer with a rented wet saw and a willingness to practice on offcuts. Soapstone rates around 1 on the Mohs hardness scale [9], and it cuts almost like wood next to granite.
A flow-matched quartzite backsplash with three outlet cutouts, an inside corner, and panels that have to match the countertop vein exactly? That is shop work. Not because the homeowner isn't smart, but because one mistake in that scenario costs hundreds in stone and hours of re-fabrication. Pro fabricators have the saw tables, water delivery, and repetition to do it reliably.
Going DIY anyway? Buy extra material. Plan to cut a piece or two wrong. Do not attempt it on the first try with your only piece of stone. Cut a practice piece from the same slab's offcut. Work with a helper so you're never trying to hold a heavy panel steady and make a precise cut at the same time.
For how other DIY-friendly materials compare, the laminate countertops page and the butcher block countertops page cover options far more forgiving to cut and install yourself.
Frequently asked questions
What thickness of stone is used for a full-height backsplash?
Most full-height stone backsplashes use 3/4-inch (2 cm) stone rather than 1.25-inch (3 cm) countertop material. The thinner slab is lighter for a vertical install, easier to bond to the wall, and still durable. Some designers use 3 cm for a heavy, bold look, especially on a feature wall behind a range. Either thickness cuts the same way. The 3 cm is just heavier to handle.
Do I need special blade for cutting marble versus granite backsplash panels?
Yes. Granite is harder and more abrasive, so it needs a blade with a harder bond that exposes fresh diamonds slowly. Marble is softer but chips more easily at the exit point of a cut, so a blade with smaller, denser diamond segments (often called a smooth or continuous rim blade) leaves cleaner edges. The wrong blade won't always ruin a cut, but it dulls faster and raises the chipping risk.
How do I cut an arched or curved section in a stone backsplash?
Curves in stone want a bridge saw with a CNC attachment, a water jet cutter, or slow, careful freehand grinding with an angle grinder and diamond cup wheel. Tight inside curves (under a 2-inch radius) are very hard without CNC or water jet. Outside curves can be ground progressively and then hand-polished. Curved stone cuts are rough going for a homeowner. This is usually shop or water jet work.
How long does it take a professional shop to fabricate backsplash panels?
For a simple layout with no outlet cutouts and one straight panel, a skilled fabricator can template, cut, and finish a backsplash in 1 to 2 hours of shop time. A full-kitchen backsplash with multiple panels, a flow-match layout, several outlet cutouts, and outside corner miters realistically takes 4 to 8 hours of shop time, plus separate on-site installation time.
What is the best adhesive for bonding a stone backsplash to the wall?
Neutral-cure silicone and polyurethane construction adhesives (like Loctite PL Premium) both work. Silicone wins where the stone sees frequent moisture, like behind a sink, because it stays flexible and doesn't transmit stress into the stone. Polyurethane grabs faster and cures stiffer. Never use standard ceramic tile mastic on stone. It can stain porous stones and isn't rated for the weight of thick stone panels.
Do stone backsplash panels need to be sealed after installation?
Most natural stones, including granite, marble, and quartzite, do better with a penetrating impregnator sealer applied after installation. Polished granite in a low-moisture spot may go a year or more between sealings. Marble and quartzite near a range or behind a sink should be sealed at install and then yearly. Engineered quartz needs no sealing. Test with a few drops of water: if it beads, the sealer is still working.
Can I cut a stone backsplash with a regular angle grinder without water?
Technically possible on very small or thin pieces outdoors with proper respiratory protection, but not recommended as standard practice. Dry cutting throws off a lot of silica dust and overheats blades. OSHA requires either wet methods or HEPA-equipped dust control for silica-generating stone work. If you must use an angle grinder, run a wet blade or a water drip, and wear at minimum an N95 respirator.
How do I make sure the outlet cutouts line up perfectly?
The most reliable method is to measure the outlet box from two fixed reference points (the bottom edge of the panel and a vertical edge), transfer those numbers to the stone, and verify against the template. Drill the corner holes first as pilot guides, then connect them. Test-fit a cover plate over the dry-cut opening before you set the panel. A cutout 1/8 inch off can still hide under the plate. Anything more than that usually can't.
What is the standard height for a full-height kitchen backsplash?
Full-height backsplash height equals the distance from the countertop surface to the bottom of the upper cabinets, which in most U.S. kitchens runs 15 to 20 inches. Standard kitchen design sets upper cabinets 18 inches above the counter, so 18 inches is a common backsplash height. Kitchens with no upper cabinets on that wall can run a backsplash 36 to 48 inches or higher, all the way to the ceiling.
What happens if a stone backsplash panel cracks during cutting?
A crack during cutting almost always means the piece is done for its intended use. Small cracks can sometimes be stabilized with thin epoxy (applied under vacuum in a shop), but a crack in a visible spot is both a structural and a looks problem. Prevention beats repair every time: support the panel fully on both sides of every cut, feed slowly, keep the blade wet, and never let the panel cantilever past the blade unsupported.
Should the backsplash stone match the countertop exactly?
Not necessarily. Matching the same slab for a flow-match look is dramatic and popular, but it costs more in material (you need enough slab for both surfaces) and takes careful layout. A contrasting stone, like a white marble backsplash over a dark granite counter, is a legitimate choice and simpler to fabricate since you skip the vein coordination. Both work. The call is aesthetic and budget-driven.
Is quartzite or granite harder to cut for a backsplash?
Quartzite is generally harder to cut than granite. Most granites rate 6 to 7 on the Mohs scale; quartzite often rates 7 to 7.5 [9]. Harder stone wears blades faster, needs slower feed rates, and generates more heat. Quartzite also tends to delaminate along its natural cleavage planes if a blade catches it at the wrong angle. Neither is a DIY-friendly material for backsplash cutting next to softer stones like soapstone or some marbles.
How do I prevent chipping on the face of a stone backsplash when cutting?
Cut with the finished face up on a wet saw so you can see chipping as it happens. Use a continuous-rim or turbo-rim diamond blade rather than a segmented one for the cleanest exit edge. Feed slowly, especially in the final inch where blade exit causes most chipping. If the face still chips, run painter's tape along the cut line on the face before cutting. The tape stabilizes the surface and cuts down on micro-fracturing at the edge.
Sources
- Natural Stone Institute (formerly Marble Institute of America), Dimension Stone Design Manual: Natural stone slabs at 3/4-inch thickness weigh approximately 12 to 15 pounds per square foot depending on density of the material
- Angi, Backsplash Installation Cost Guide: Material costs for marble, granite, quartzite, and engineered quartz backsplash range from $35 to $120 per square foot depending on stone type
- Home Depot Tool Rental and blade pricing: Wet tile saws rent for roughly $50 to $75 per day; diamond blades and core bits run $25 to $150 depending on diameter and quality
- Tile Council of North America, TCNA Handbook for Ceramic, Glass, and Stone Tile Installation: Inside corners in stone and tile installations should use flexible caulk rather than rigid grout or mortar to allow for movement and prevent cracking
- U.S. Occupational Safety and Health Administration, Crystalline Silica standard (29 CFR 1926.1153): OSHA permissible exposure limit for crystalline silica is 0.05 mg per cubic meter as an 8-hour TWA; wet methods and HEPA dust controls are required for stone-cutting operations
- Natural Stone Institute, Care and Maintenance of Natural Stone: Penetrating impregnator sealers should be applied with 20 to 30 minutes dwell time then wiped clean to protect natural stone from staining
- Angi, Countertop Installation Cost Guide: Fabrication surcharges for outlet and switch cutouts in stone countertops and backsplashes typically run $50 to $100 per opening
- CDC / NIOSH, Silica page: NIOSH recommends N95 respirators at minimum for silica dust exposure; elastomeric half-masks with P100 cartridges provide greater protection for stone-cutting work
- U.S. Geological Survey, Mohs Hardness Scale reference: On the Mohs hardness scale, soapstone rates around 1, most granites rate 6 to 7, and quartzite often rates 7 to 7.5
- Natural Stone Institute, Fabrication Best Practices for Stone Countertops: Sharp corners in stone cutouts create stress concentrations that can lead to cracking; rounded corners with a minimum 3/8-inch radius are recommended for interior cutouts
Last updated 2026-07-11