
TL;DR
- Marble cuts best with a wet-saw or angle grinder fitted with a continuous-rim diamond blade.
- Score at 1 to 2 mm depth first, then make your full pass at 20 to 30 mm/min feed rate.
- Always run water or a misting system to control dust and heat.
- Straight cuts on a slab are doable DIY; L-cuts, radius corners, and sink openings are better left to a fabricator with a CNC or bridge saw.
What tools do you actually need to cut marble?
The short answer: a continuous-rim diamond blade and something to spin it with. Everything else is support equipment.
A 4-inch or 4.5-inch angle grinder with a continuous-rim wet/dry diamond blade handles straight cuts in marble up to about 20 mm thick. For thicker slabs (the standard 3/4-inch or 20 mm, and definitely 1.5-inch or 30 mm jumbo slabs), a table-mounted wet saw gives you far better control and a cleaner kerf. A 10-inch or 14-inch tile wet saw does the job for smaller pieces; a full bridge saw is what fabricators use for whole slabs [1].
Blade type matters more than the machine. Continuous-rim (also called smooth-rim) diamond blades cut without chipping because there are no gaps or segments to catch the stone edge. Segmented turbo blades cut faster but chip soft, crystalline materials like marble badly. Spend the $15, $40 on the right continuous-rim blade. A cheap segmented blade on marble is how you ruin a $200 remnant.
Beyond the cutting tool, you need:
- A stable work surface with full slab support (unsupported spans cause cracking mid-cut)
- Blue painter's tape over your cut line (reduces tearout on the top face)
- A straightedge or aluminum fence clamped to the slab as a guide
- Water, either from the wet saw's pump or a spray bottle held by a helper
- A respirator rated N95 or better, because marble dust contains fine particulates [2]
- Eye protection and hearing protection
Safety note on dust: marble is calcium carbonate, not silica, so it does not carry the silicosis risk that granite and engineered quartz do. That said, fine stone dust of any kind is a lung irritant, and OSHA's general industry dust standards still apply in commercial settings [2]. Wear the respirator regardless.
Which diamond blade is right for cutting marble?
Blade selection trips up a lot of DIYers because the packaging uses vague terms. Here is what to look for:
Continuous-rim (smooth rim): Best for marble, travertine, and other softer stones. The unbroken diamond edge shears the crystal structure cleanly. Look for a blade rated for "marble" or "soft stone."
Turbo rim: Faster cutting, more chipping. Acceptable for granite. Bad for marble.
Segmented: For masonry and concrete. Avoid on any finished stone surface.
Grit concentration also matters. A blade with higher diamond concentration runs cooler and lasts longer on marble's relatively soft surface (Mohs 3 to 4). Cheap blades have thin, sparse diamond layers that glaze over fast.
For a 10-inch wet saw, a good continuous-rim marble blade costs $25, $60 from suppliers like MK Diamond or Lackmond [3]. For a 4.5-inch angle grinder blade, expect $15, $35. Blades marketed for "porcelain" also work well on marble because porcelain fabricators face similar chipping issues.
One practical check: run your thumb lightly along the rim before buying. Continuous-rim feels smooth; segmented blades have obvious gullets. If you are ordering online and the product images are ambiguous, filter by "wet cutting" and "marble/tile" in the application specs.
| Blade Type | Chip Risk on Marble | Typical Cost (4.5") | Best For |
|---|---|---|---|
| Continuous-rim | Low | $15, $35 | Marble, travertine, ceramic |
| Turbo rim | Medium | $12, $30 | Granite, hard stone |
| Segmented | High | $8, $20 | Concrete, masonry |
| Porcelain-rated continuous | Low | $20, $45 | Marble, porcelain, quartzite |
How do you make a straight cut in a marble countertop slab?
Straight cuts are the most forgiving thing you can do with marble, and they still demand discipline. Here is the sequence that works.
Step 1: Measure and mark. Use a pencil or chalk line on the underside of the slab for your reference. On the top face, apply two runs of blue painter's tape along the cut line. This protects the polished surface from the blade guard and reduces micro-chipping at the kerf edge.
Step 2: Clamp a straightedge. A length of aluminum angle iron or a good straightedge clamped firmly to the slab gives you a fence to ride the saw against. Freehand cuts on marble almost always wander. Even experienced fabricators clamp a guide for hand cuts.
Step 3: Score first. Set your saw blade depth to 3 to 5 mm and make one slow pass along the full cut line. This establishes the kerf and prevents the surface from cracking unpredictably when you make the full-depth pass.
Step 4: Full-depth cut. Raise blade depth to full thickness plus 2 to 3 mm clearance. Feed the saw at about 20 to 30 mm per second (roughly the pace of a slow walk). Faster feeds increase heat and chipping; slower feeds can cause the blade to bind or glaze. Keep water flowing continuously.
Step 5: Support the offcut. As you near the end of the cut, the offcut piece needs support so it does not snap downward and take a chip out of the finished edge. Have a helper hold it, or rest it on a foam pad positioned just below the cut line.
Step 6: Finish the edge. A freshly cut marble edge is sharp and raw. For a countertop, you will want to either polish that edge or apply a small chamfer with a handheld diamond hand pad (available in 50 to 3000 grit) or a router with a diamond-profile bit. A simple eased edge takes five to ten minutes of hand polishing with progressive grits.
Expect a cut quality of about ±1 to 2 mm on a guided hand cut. A bridge saw with a fence locks in ±0.5 mm or better. For a countertop that needs to fit against a wall with a tight scribe, that gap matters.
How do you cut a sink hole or cooktop opening in marble?
Sink cutouts are where DIY marble cutting gets genuinely risky. The unsupported center piece is heavy, and if it drops before the cut is complete, it will crack the slab. That failure is expensive and unfixable.
The process, if you are doing it yourself:
Mark the opening carefully. Use the sink's template (most undermount sinks include one) or measure from the manufacturer's specs. The cutout is typically 1/4 to 1/2 inch inside the sink's actual rim on all sides.
Drill a plunge hole at each corner first. Use a 1/2-inch diamond core bit to drill inside the marked corners. These holes let you plunge a jigsaw or circular saw blade in without stress-cracking the stone. The corner holes also eliminate the sharp interior corners that concentrate stress and eventually crack.
Use a jigsaw with a diamond or carbide grit blade for the straight sections between corners, or work your way around with an angle grinder and a continuous-rim blade. Cut from hole to hole. Keep the center piece from dropping by taping boards across the opening before you finish the last cut.
Support the center. Before completing the last segment, tape two lengths of 2x4 across the opening, resting on the slab surface, to hold the cutout piece from beneath. Complete the cut. Lower the center piece slowly.
For curves and radius corners: marble does not bend to a jigsaw the way wood does. Your radius must be cut with a router fitted with a diamond-tipped bit, or a CNC machine. Any interior corner tighter than about a 1-inch radius in marble is a future crack waiting to happen.
Honest assessment: if your sink cutout is centered in the slab with no nearby seams, a careful DIYer can pull this off. If the cutout is close to an edge, if the slab has visible veining running across the opening, or if you have never cut stone before, hire a fabricator. A cracked slab costs $300, $1,200 to replace depending on material and size [4].
Can you cut marble countertop without a wet saw?
Yes, with limits.
An angle grinder with a 4.5-inch continuous-rim diamond blade is the most accessible alternative. It cuts marble fine, but controlling the line is harder than with a fence-guided saw. Without a guide clamped to the slab, the cut will wander. With a clamped aluminum straightedge as a fence, you can get within 1 to 2 mm on a 12-inch cut.
A handheld circular saw fitted with a diamond blade also works and gives better fence control than an angle grinder. The depth capacity of a standard circular saw (about 2.5 inches) is more than enough for any countertop thickness.
What about scoring and snapping? That works for ceramic tile. It does not work for marble slabs. Marble's crystalline structure and natural veining mean it snaps unpredictably along grain lines, not along your scored line. Do not try this.
Oscillating multi-tools with diamond blades are useful for trimming a small amount off a finished edge or making very short plunge cuts, but they are slow and generate a lot of heat. Not a primary cutting tool.
Dry cutting is possible with a continuous-rim blade rated for dry use, but not recommended for marble. Heat builds up fast, the blade glazes quickly, and marble dust goes everywhere. If you must cut dry, work outdoors, wear an N95 respirator [2], make very short passes (6 inches at a time, then stop and let the blade cool), and accept a rougher edge.
What feed rate and water flow should you use when cutting marble?
Feed rate and cooling are the two variables most DIYers get wrong, and both cause chipping and blade damage.
Feed rate: 20 to 30 mm per second is the commonly cited range for marble on a standard wet saw with a continuous-rim blade. That is roughly 1.2 to 1.8 meters per minute. Some fabricators go slightly faster on an 18-inch bridge saw with a high-quality blade. If you push faster than that, the blade deflects, the cut heats up, and you get micro-fractures at the kerf edge. Slower than about 15 mm/sec, the blade can glaze (the diamonds get covered by polished stone paste and stop cutting).
Water flow: A wet saw's recirculating pump should deliver a steady stream to both sides of the blade. If the water is just trickling, increase flow. You want to see a visible water film at the cut. For angle grinder cuts, a helper with a spray bottle aimed at the cut zone works, but it is not as good as a recirculating system. Change the water reservoir every few cuts; the slurry that builds up reduces cooling efficiency.
Blade RPM: Match the blade's rated RPM to your tool. A 4.5-inch angle grinder typically runs 10,000 to 12,000 RPM; blades for that size are rated accordingly. A 10-inch wet saw runs at 3,400 to 4,200 RPM typically. Using a blade on a machine running at the wrong speed causes uneven wear and heat buildup [3].
Signs you are doing it wrong: smoke or steam at the cut, discoloration of the stone near the kerf, a grinding or screeching noise instead of a smooth cutting sound, or chipping wider than 1 mm on the top face.
How do you cut an L-shape or miter joint in marble?
L-shaped countertops need either a miter joint at the inside corner or a full slab that wraps the corner. Full wrapping is heavy and requires precise templating. Miter joints are more common.
A 45-degree miter on a marble countertop edge is cut on a bridge saw with a tilting blade head. The blade is set to 45 degrees and the slab is fed through, creating a beveled edge that meets its mirror-image cut to form a tight, near-invisible corner. This requires:
- A saw that can tilt to 45 degrees accurately (most good tile wet saws cannot; a bridge saw can)
- Precise matching of both pieces so the miter closes tightly
- Epoxy color-matched to the stone to fill any small gap at the joint
DIY miter cuts on marble with an angle grinder are possible but very hard to get right. A 1-degree error in blade angle at a 45-degree miter creates a visible gap or a rocking joint. For a countertop that you will see every day, this is one of those cases where paying a fabricator for the miter cut is almost always the right call.
For an inside radius corner on an L-shape, fabricators typically use a CNC machine with a diamond router bit to cut a gentle radius (usually 3/4 inch minimum) rather than a sharp inside corner. Sharp inside corners in marble crack, often within a year of installation, because thermal expansion and any flex in the substrate concentrate stress at the point. If your current countertop has a sharp inside corner and a crack is developing there, this is why.
For homeowners pricing out an L-shaped marble countertop, marble countertops has good background on material costs and typical project scope.
What mistakes cause marble to crack or chip during cutting?
Most cutting failures come from a small set of repeatable mistakes.
Unsupported offcuts. The single most common cause of a cracked slab mid-cut. The offcut piece is heavy, and as the cut nears completion, gravity wants to pull it down and lever the slab apart. Always support the offcut.
Wrong blade. A segmented or turbo blade on marble creates micro-fractures at the kerf edge that spread. Sometimes the chipping is not visible until the stone is polished or the countertop is in use for a few weeks and the fractures open up.
Dry cutting without managing heat. Heat causes thermal stress in marble, which fractures along crystal boundaries. Even a short dry cut can cause an invisible fracture line that becomes visible later.
No pilot holes at interior corners. Cutting a sharp inside corner without a pilot hole concentrates stress at the corner point and usually cracks the slab toward the nearest edge.
Too much pressure. A diamond blade cuts by abrasion. Pressing harder does not cut faster; it deflects the blade and creates a wavy cut and more heat. Let the blade do the work.
Cutting across heavy veining without accounting for it. Marble's veins are zones of different mineral composition. A vein running perpendicular to your cut line can cause the blade to deflect or the stone to split along the vein. If a prominent vein crosses your intended cut line, consider repositioning the cut slightly or proceeding very slowly through that zone.
Starting the cut from a finished edge. Plunging a blade from a finished, polished edge almost always chips the near corner. Start from the back or from a pre-drilled hole.
When should you hire a fabricator instead of cutting marble yourself?
Be honest with yourself about this. The material is unforgiving and there is no undo.
Hire a professional fabricator for:
- Any full slab cut (slabs are 9 to 12 feet long, 500 to 800 lbs, and impossible to control safely without a bridge saw)
- Miter joints and any cut requiring a precise angle
- Sink cutouts in slabs with nearby seams or prominent veining that crosses the opening
- Radius corners and curved cuts
- Any cutout where the slab is thinner than 20 mm
- When your measurement tolerance requirement is tighter than ±2 mm
DIY is reasonable for:
- Trimming a prefabricated marble tile or small remnant piece
- Cutting a straight line on a slab you bought as a remnant, where you have room for error
- Making a simple notch cut on the back of a tile to fit around a pipe or outlet
Fabrication shops typically charge $50, $150 per cut for custom work on top of the slab cost, depending on complexity and region [4]. A sink cutout runs $75, $200 at most shops. That is cheap insurance against a cracked slab. For context, Carrara marble remnants run $40, $80 per square foot for thinner pieces; a cracked remnant is scrap.
Fabrication software like SlabWise is what shops use to price and plan these cuts efficiently, which is part of why professional pricing on complex cuts is often more reasonable than homeowners expect. The shop has already optimized their material use.
For comparison shopping on material and installation costs across stone types, kitchen countertops covers the landscape well.
How do you polish or finish a cut marble edge?
A freshly sawn marble edge looks raw and gray. Bringing it to a polished finish takes diamond abrasives and patience.
Hand polishing sequence: Start with 50-grit diamond hand pads (wet), then 100, 200, 400, 800, 1500, and 3000. Each grit removes the scratches from the previous grit. You can feel when you are ready to move up: the edge feels smooth and the scratch pattern looks uniform under raking light. Final polish is done with a marble polishing powder (typically oxalic acid-based or tin oxide) applied with a felt pad or cloth.
Honed vs. polished: If you want a honed (matte) finish rather than polished, stop at 400 to 600 grit. Honed is actually more forgiving to achieve consistently on a cut edge.
Router profile bits: For a decorative edge profile (eased, bullnose, ogee), an angle grinder or router fitted with a diamond profile bit grinds the shape before polishing. These bits cost $40, $150 depending on profile [3].
Common mistake: Skipping grits. Going from 100 to 400 leaves scratches from the 100-grit that the 400 cannot fully remove in a reasonable time. The sequence feels tedious, but each step genuinely matters.
Sealer on cut edges: A freshly cut marble edge is unprotected and absorbs liquids readily. Apply a penetrating stone sealer to any exposed cut edge before installation. The same sealer you use on the countertop surface works fine. Most penetrating sealers need 24 to 48 hours to cure [5].
For care and maintenance after the countertop is in, how to clean stone countertops has practical guidance.
How much does professional marble cutting and fabrication cost?
Fabrication cost is usually quoted per square foot of finished countertop and includes all cutting, edge profiling, and sink cutout labor. Material and fabrication are sometimes bundled, sometimes separate.
Typical fabrication-only cost (labor, no material) for marble countertops runs $35, $65 per square foot in most U.S. markets [4]. A standard kitchen with 30 square feet of countertop runs $1,050, $1,950 in fabrication labor. Add sink cutouts at $75, $200 each, cooktop cutouts at $100, $250, and complex edge profiles at $15, $40 per linear foot above the base price.
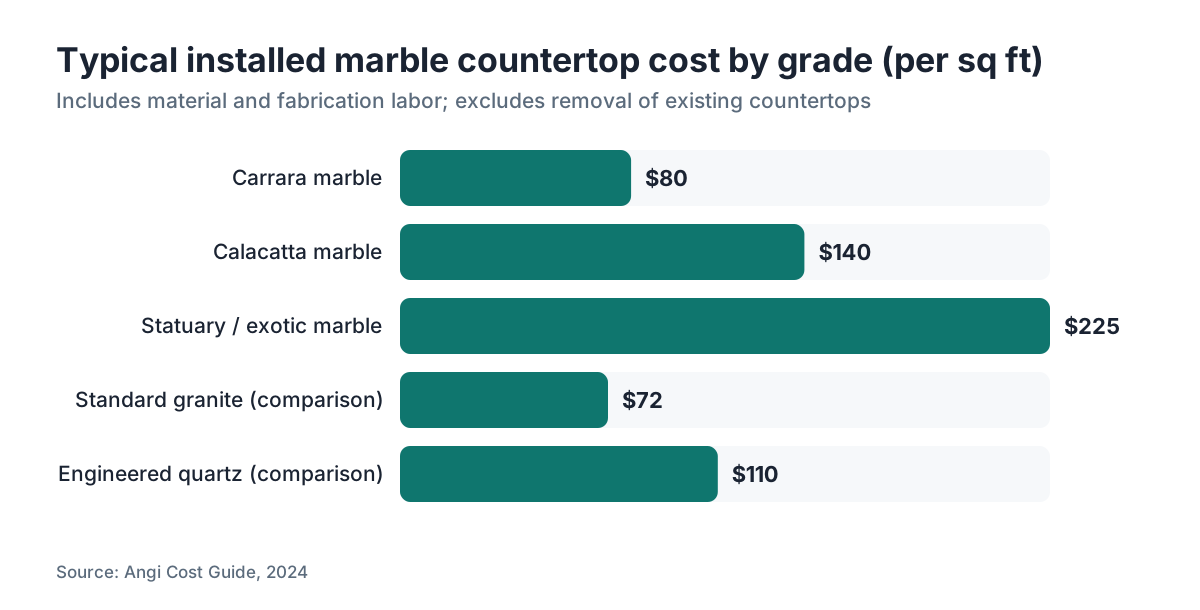
Full installed cost including material varies widely by marble grade:
- Carrara marble (the most common): $60, $100 per square foot installed [4]
- Calacatta (rarer, more dramatic veining): $100, $180 per square foot installed
- Statuary and exotic grades: $150, $300+ per square foot installed
Compare that to alternatives. Granite runs $45, $100 installed for most grades. Engineered options like Cambria run $80, $140 installed. Granite countertops and Cambria countertops have more on those materials if you are comparing.
For fabricators running a shop, job-costing every cut matters for profitability. Tools like SlabWise help shops quote and track material yield across jobs, which is directly relevant when cutting expensive marble where offcut waste is real money.
One thing homeowners often miss: the fabrication price usually assumes standard accessibility. Stairs, tight doorways, and difficult angles in the kitchen add cost and sometimes an extra crew member. Get that discussion in writing before the job starts.
What safety gear do you need when cutting marble?
This section is short because the answer is not complicated, but skipping any of it is a real mistake.
Respiratory protection: An N95 or P100 respirator. Stone dust particles below 10 microns reach the lungs and stay there. OSHA's permissible exposure limit for nuisance dust (non-silica) is 15 mg/m3 for total dust and 5 mg/m3 for the respirable fraction [2]. Cutting marble dry in a confined space can exceed those limits quickly. Wet cutting reduces airborne dust by roughly 85 to 90% but does not eliminate it entirely.
Eye protection: Safety glasses or goggles. Stone chips from a blade failure or kerf blowout can reach 100+ mph. Standard glasses are not enough if there is any gap at the sides.
Hearing protection: A wet saw at close range runs 90 to 100 dB. OSHA's permissible noise exposure allows 2 hours at 100 dB before requiring hearing protection; realistically, just wear it [6]. Earplugs or earmuffs rated NRR 25 or better.
Gloves: Cut-resistant work gloves for handling the stone. Not nitrile, not latex. A fresh-cut marble edge is as sharp as a box cutter.
Footwear: Closed-toe shoes. Marble slabs and large tiles weigh enough to break bones if they fall on feet.
Blade guard: Never remove the blade guard from an angle grinder or wet saw. A diamond blade that delaminates or shatters at 12,000 RPM is a serious projectile hazard. Blade failure is uncommon with quality blades but not zero-probability.
For anyone doing repetitive marble cutting in a shop setting, OSHA's silica and stone dust standards under 29 CFR 1910 (general industry) and 29 CFR 1926 (construction) apply and are enforced [2].
Frequently asked questions
Can I cut marble with a regular circular saw?
Yes, if you replace the standard blade with a continuous-rim diamond blade rated for marble or tile. A standard wood-cutting blade will chip the surface badly and can shatter on contact with stone. With the right blade clamped against a straightedge guide and water cooling applied, a circular saw cuts marble countertop pieces reasonably well for straight cuts.
Does cutting marble release silica dust?
Marble is primarily calcium carbonate, not silica, so it carries far less silicosis risk than granite or engineered quartz. However, some marble varieties contain small amounts of silica minerals, and all fine stone dust irritates lungs. OSHA's general dust standards still apply in commercial settings. Wearing an N95 respirator during any marble cutting is good practice regardless.
What blade size do I need for a 3/4-inch marble slab?
A 4.5-inch angle grinder blade cuts to about 1.5 inches depth, which covers standard 3/4-inch (20 mm) slabs with room to spare. A 10-inch wet saw blade covers it easily. For 1.5-inch (30 mm) jumbo slabs, you need a minimum 7-inch blade on a wet saw or must make two passes from opposite faces with an angle grinder.
How do I cut a curved shape in marble?
True curves in marble require either a CNC machine with a diamond router bit or very careful freehand work with an angle grinder using short, overlapping passes. After rough-cutting the shape, use diamond hand pads (starting around 50 to 100 grit) to refine the curve. Tight curves under about 1-inch radius are a significant crack risk in marble and should be avoided in structural applications like countertops.
How do I prevent chipping on the top surface when cutting marble?
Apply two strips of blue painter's tape along the cut line on the top face before you cut. Use a continuous-rim diamond blade, not a segmented or turbo blade. Score the cut at 3 to 5 mm depth first, then make your full-depth pass. Maintain steady feed speed (20 to 30 mm per second) and keep water flowing. These four steps together reduce surface chipping dramatically.
Can I use a jigsaw to cut marble?
A jigsaw with a diamond or carbide-grit blade can cut marble, but slowly and with some chipping risk. It works best for the straight sections of a sink cutout after drilling corner pilot holes. For long straight cuts, a jigsaw is harder to guide accurately than a circular saw with a fence. Keep the blade wet, use light downward pressure, and expect the blade to wear fairly quickly in marble.
How do I cut marble tile for a backsplash without a wet saw?
An angle grinder with a 4.5-inch continuous-rim diamond blade is the most accessible tool. Clamp the tile firmly, mark your line with tape, and run the grinder against a clamped straightedge as a fence. A dry-rated blade can work for short cuts if you stop frequently to cool the blade, but wet cutting gives better edge quality. A snap cutter designed for tile does not work reliably on marble.
What is the minimum inside corner radius when cutting marble countertops?
Most fabricators use a minimum 3/4-inch (19 mm) radius on interior corners in marble countertops. Sharper corners concentrate stress at the corner point and commonly crack within months to years, especially if the countertop has any flex in the substrate or experiences thermal cycling. A 1-inch radius is more conservative and safer for marble specifically due to its brittleness relative to granite.
How long does it take to cut a marble countertop?
A single straight cut across a 25-inch-deep slab takes 3 to 8 minutes including setup and cooling time. A sink cutout with four corner pilot holes and four straight passes takes 30 to 60 minutes for a careful DIYer, shorter for an experienced fabricator. Edge polishing adds 20 to 45 minutes per linear foot if done by hand. Full countertop fabrication at a professional shop for a standard kitchen typically takes 1 to 3 hours of machine time.
Do I need to seal marble after cutting it?
Yes. Any freshly cut edge exposes unprotected stone that absorbs liquids readily. Apply a penetrating stone sealer to cut edges and any newly exposed surfaces before installation. The same impregnating sealer used on the countertop face works fine. Most penetrating sealers need 24 to 48 hours to cure fully before the surface contacts water or food. Reapply sealer per the product's recommendation, typically every 1 to 3 years depending on use.
Can I cut marble countertop without making a mess?
Wet cutting dramatically reduces airborne dust but creates a slurry of water and stone particles. Contain the work area with plastic sheeting, have a wet-dry vacuum nearby, and work outdoors if possible. For indoor cuts, lay drop cloths well beyond where you think the slurry will reach. The slurry itself is non-toxic but stains grout and etches some finishes if left to dry. Clean up while it is still wet.
What is the difference between cutting marble and cutting granite?
Granite is much harder (Mohs 6 to 7 vs. marble's 3 to 4) and more abrasion-resistant, so it wears blades faster. Marble is softer but more brittle and prone to chipping and fracturing along veining. Granite tolerates turbo and segmented blades better than marble does. Both benefit from wet cutting. Feed rates for granite are typically slower than for marble due to the hardness difference. Marble edges polish to a higher gloss more easily than granite.
How do I cut marble without it cracking?
Support the slab fully on both sides of the cut line so neither piece can sag or flex during the cut. Use a continuous-rim diamond blade. Score first at shallow depth before making the full-depth pass. Drill pilot holes before any plunge cut or interior corner. Keep water flowing throughout. Move at a steady, moderate feed rate. Any sudden drop of an unsupported piece, or flexing mid-cut, is how marble cracks.
Sources
- OSHA - Permissible Exposure Limits for Dust, 29 CFR 1910.1000: OSHA permissible exposure limit for nuisance particulate (non-silica) dust is 15 mg/m3 total and 5 mg/m3 respirable fraction under 29 CFR 1910.1000 Table Z-1.
- MK Diamond - Blade Selection Guide: Continuous-rim diamond blades are recommended for marble and soft stone; blade costs for 10-inch wet saw blades range from approximately $25, $60 from major suppliers.
- HomeAdvisor / Angi - Marble Countertop Cost Guide: Installed marble countertop costs range from approximately $60, $180 per square foot depending on grade; fabrication labor alone typically runs $35, $65 per square foot in most U.S. markets.
- Marble Institute of America - Care and Maintenance of Natural Stone: Penetrating stone sealers should be applied to unprotected cut edges and typically require 24 to 48 hours to cure before contact with water.
- OSHA - Occupational Noise Exposure Standard, 29 CFR 1910.95: OSHA permissible noise exposure at 100 dB is 2 hours per day; hearing protection is required when exposure exceeds permissible limits under 29 CFR 1910.95.
- National Institute for Occupational Safety and Health (NIOSH) - Stone Dust Hazards: Wet cutting methods reduce airborne stone dust by approximately 85 to 90% compared to dry cutting according to NIOSH research on stone fabrication dust control.
- OSHA - Crystalline Silica Exposure in Construction, 29 CFR 1926.1153: OSHA's silica standard 29 CFR 1926.1153 applies to construction settings including stone installation and fabrication; engineering controls such as wet cutting are required where feasible.
- University of Wisconsin Extension - Natural Stone Properties: Marble is composed primarily of calcium carbonate with a Mohs hardness of 3 to 4, making it softer and more brittle than granite (Mohs 6 to 7) and prone to chipping along crystal grain boundaries.
- Marble Institute of America - Fabrication Standards: Minimum recommended interior corner radius for natural stone countertops is 3/4 inch (19 mm) to prevent stress concentration and cracking per MIA fabrication standards.
- Consumer Product Safety Commission (CPSC) - Power Tool Safety: Blade guards must not be removed from angle grinders and circular saws; blade failure at high RPM presents serious projectile hazard per CPSC power tool safety guidance.
Last updated 2026-07-09