TL;DR
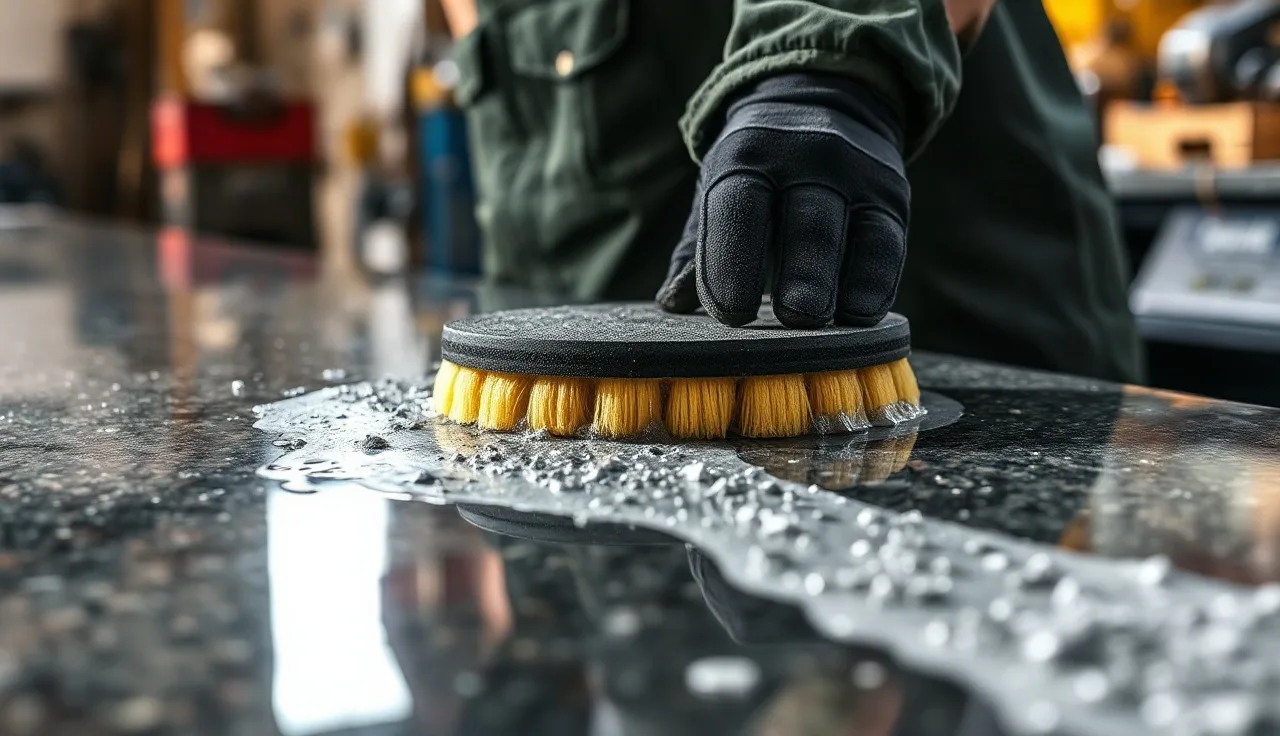
- Granite countertop polishing restores the shine on natural stone by working through finer and finer diamond abrasives, then finishing with a polishing compound.
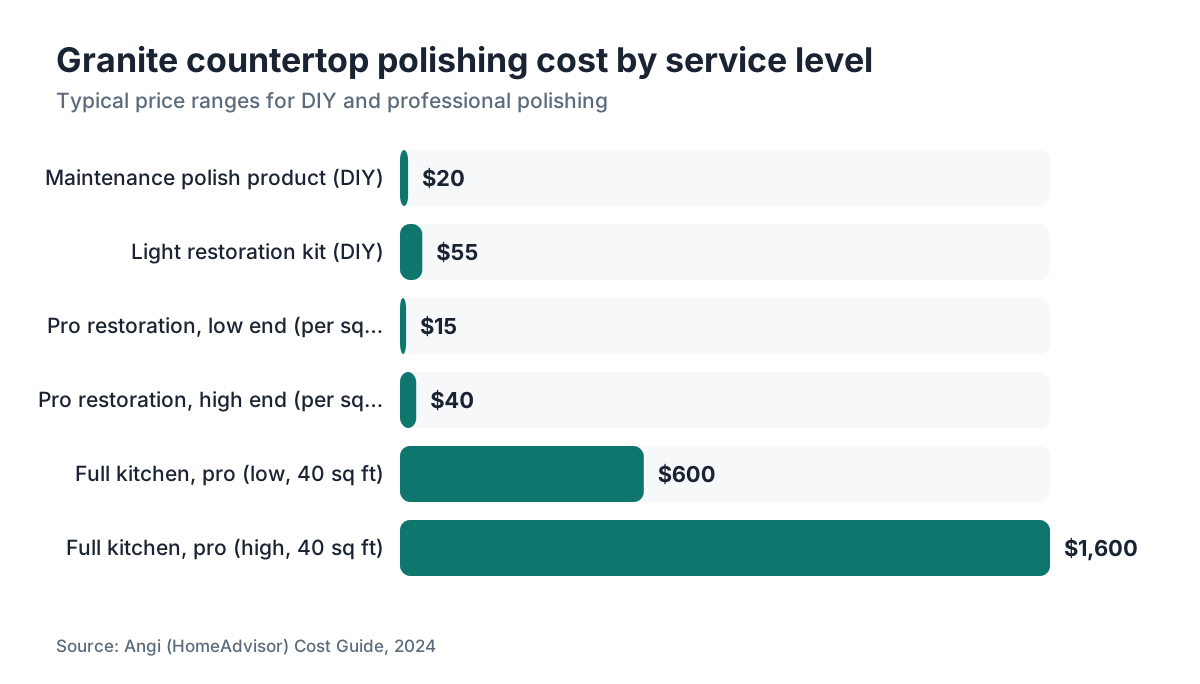
- DIY kits run $30 to $80 and handle light haze.
- Professional polishing costs $15 to $40 per square foot and is the right call for deep scratches, dull etching, or full restoration after fabrication.
What does polishing granite actually do to the stone?
Polishing isn't a coating. It's a physical process. Abrasives shave microscopic peaks off the stone's surface until that surface is flat enough to bounce light back at a tight, mirror-like angle. The shinier the surface, the flatter it is at a microscopic level. That's the whole trick.
Granite is one of the harder natural stones, usually landing between 6 and 7 on the Mohs hardness scale [1]. That hardness is why granite holds a polish for years. It's also why fixing a scratched or dull surface takes real abrasives, not a spray bottle of stone cleaner.
The process follows the same logic as sanding wood. Start coarse to remove material fast, step through intermediate grits to erase the scratches the last grit left behind, and finish fine so the eye reads the surface as glossy. Typical grit sequences for granite run 50 or 100, then 200, 400, 800, 1500, and 3000, capped with a polishing compound or tin oxide paste [2]. Skip grits and you get a surface that looks polished under bad lighting and dull under good lighting.
Here's what people mix up: polishing is not sealing. Sealing soaks a penetrating impregnator into the pore structure to resist stains. Polishing removes surface material to improve reflectivity. You do both on a well-kept countertop, and you always polish first, then seal.
What are the different levels of granite polish and which do you actually need?
There are four practical levels of polish work, and they cost wildly different amounts of time and money. Most homeowners need the cheapest one.
Level 1: Maintenance polish. The granite isn't scratched or dull, it just lost some of its original sheen from cleaning product buildup or minor wear. A topical granite polish (sometimes labeled a polish-and-seal product) buffs on and off with a microfiber cloth. Cost: $10 to $30 for a bottle that lasts a year or more.
Level 2: Light restoration. The surface has visible haze, minor dull spots, or shallow scratches that barely catch a fingernail. A diamond hand pad starting at 400 or 800 grit, followed by a 1500 or 3000 grit pad and a polishing compound, usually clears it. A DIY kit runs $30 to $80 [3]. Figure one to three hours for an average kitchen.
Level 3: Full countertop restoration. Deep scratches, widespread dullness, or etching (rarer in granite than marble, but it shows up near acidic foods). You start at 100 or 200 grit and work the full sequence with a hand-held variable-speed polisher. Pro shops charge $15 to $40 per square foot, depending on region and severity [3]. A 40-square-foot kitchen runs $600 to $1,600.
Level 4: Shop polishing after fabrication. This is what a fabricator does on a CNC polishing head or edge polisher before the slab ever reaches your house. Automated heads run 50 through 3000 grit in a single pass. You can't replicate it at home. Don't try.
Honest read: if you can't feel scratches with a fingernail and the dullness crept in slowly, start with a maintenance polish. Escalate only if that fails.
What does professional granite polishing cost?
Professional granite polishing costs $15 to $40 per square foot, which puts a full 40-square-foot kitchen at roughly $600 to $1,600 [3]. Prices swing by region, severity, and who you call. Stone restoration contractors, not always your original fabricator, usually handle this work.
| Service level | Typical price range | Who does it |
|---|---|---|
| Maintenance polish (topical product) | $10 to $30 DIY | Homeowner |
| Light restoration (hand pads, DIY kit) | $30 to $80 in materials | Homeowner |
| Full restoration, pro service | $15 to $40 per sq ft | Stone restoration contractor |
| Full kitchen (40 sq ft), pro service | $600 to $1,600 | Stone restoration contractor |
| Shop edge polishing, new fabrication | Included in fabrication quote | Fabricator |
Those pro rates come from aggregated contractor data and regional labor markets. No government database tracks stone restoration pricing, so treat these as honest ranges, not firm quotes [3]. A shop in a high-cost metro sits at the top of that range or above. A rural contractor lands lower.
A few things run the cost up fast. Converting honed granite (a matte finish) to a high polish takes far more material removal than restoring an existing polish, and some contractors charge extra for it. Granite with deep quarry veins or heavy mineral variation is harder to polish evenly. And profiled edges like ogee or dupont eat more time per linear foot than flat surfaces.
Get at least two quotes before a full restoration. Ask each contractor which grit they start and end at, and whether the price includes a sealer afterward. If they can't answer that, keep calling.
Can you polish granite countertops yourself, and is it actually worth it?
Yes, you can DIY granite polishing for most maintenance and light restoration work. Whether it pays off depends on what's wrong with the surface.
For a maintenance polish, DIY always wins. Grab a bottle of stone-specific granite polish (StoneTech, Miracle Sealants, and Weiman are widely stocked at hardware stores), apply per the label, and buff out with a microfiber cloth. Twenty minutes. Done.
For light restoration with hand pads, DIY is reasonable if you're patient and methodical. The real risk isn't wrecking the stone (granite shrugs off 400-plus grit pads), it's an uneven finish from rushing the grits. The classic mistake is jumping from 400 straight to 3000 and skipping the 800 and 1500 steps. The surface looks fine at first, then develops a patchy sheen within a few weeks.
For deep scratches or widespread dullness, call a pro. A tech with a variable-speed polisher and a full set of diamond pads does in two hours what takes a homeowner a full day by hand, and the result is more even. The equipment gap is real. A wet polisher with water feed keeps the pads cool and the slurry moving, which leaves a cleaner scratch pattern at every stage [2].
Fabricators, take note: if homeowners are calling to get their countertops restored, this is a legit add-on service worth quoting. A restoration kit, a variable-speed angle grinder or dedicated polisher, and a set of wet diamond pads costs a few hundred dollars and opens a revenue line that doesn't tie up shop time.
For fabricators tracking job costs and margins on polishing work, SlabWise helps you build polishing into your quotes from the start instead of pricing it on the fly.
What tools and materials do you need for DIY granite polishing?
Here's what a proper DIY polish job actually takes, from simplest to most involved. One safety note up front: polishing granite generates respirable crystalline silica, and OSHA calls out wet methods and respiratory protection as controls for exactly this dust [7]. Keep the pad wet.
For maintenance polish:
- A granite-specific polishing product (not multi-surface furniture polish)
- Clean microfiber cloths
- Warm water for cleanup
For light restoration:
- Wet/dry diamond polishing hand pads in a 400, 800, 1500, 3000 grit sequence. Sets cost $20 to $50 online.
- A spray bottle of water (keeps the pad wet, cuts the dust)
- Polishing compound or tin oxide powder for the final step
- Microfiber cloths
- Painter's tape to protect adjacent surfaces
For full restoration (power tools):
- Variable-speed angle grinder (4.5 inch) or dedicated wet polisher, 600 to 1,200 RPM range
- Wet diamond cup wheels and backing pads (backer plus velcro attachment for swapping pads)
- Full grit set: 50, 100, 200, 400, 800, 1500, 3000 grit diamond pads
- Water supply or spray bottle for wet polishing
- Shop vac and slurry towels (wet granite polishing makes a fine gray mud)
- Polishing compound for the final step
- Eye protection and a dust mask rated for fine mineral particles
Wet methods matter for indoor air, more than your lungs. The EPA points to wet techniques as the way to knock down airborne stone dust, which is worth thinking about when you're working in a closed-up kitchen [8].
A note on pad quality. Cheap diamond pads sold in bulk packs wear out fast and leave inconsistent scratch patterns. Mid-tier pads from known stone supply brands (Weha, Alpha, Stadea) cost more but stay consistent and survive a full restoration with pads to spare [2]. Fabricators, buy commercial-grade pads from your slab supplier. Homeowners doing a one-time job, a mid-tier kit is the right call.
Skip the sealer step at your own risk. Once polishing opens up the surface, a penetrating impregnating sealer protects the work you just did. Most granite wants sealing every one to three years depending on porosity [4].
How do you polish granite countertops step by step?
This walks through a full light-to-moderate restoration using hand pads. For power tools, use the same grit sequence with a polisher on low speed. Keep everything wet the whole way through.
Step 1: Clean the surface completely. Use a pH-neutral stone cleaner or dish soap diluted in water. Strip every residue, grease film, and cleaner buildup. Let it dry fully. Polishing over residue traps contamination under the finish.
Step 2: Pick your starting grit. Can you feel scratches with a fingernail? Start at 400. Hazy but smooth? Start at 800. Scratches deep and visible across the room? Start at 200 or lower, and think hard about calling a pro.
Step 3: Wet-polish with your starting grit. Wet the surface, wet the pad, and work in overlapping circular or back-and-forth strokes. Cover each section twice before moving on. The gray slurry is stone dust and water mixed together. That's normal. Wipe it often with a damp cloth to check your progress.
Step 4: Wipe clean and inspect before stepping up. Every scratch from the previous grit has to be gone before you move to the next. Still see coarser scratches? Keep working the current grit. Jumping ahead is the mistake that ruins the job.
Step 5: Repeat through each grit. 400 to 800 to 1500 to 3000. Each step erases the last step's scratches and leaves finer ones. By 3000 the surface should look noticeably brighter.
Step 6: Apply polishing compound. A dab of granite polishing compound or tin oxide paste on a clean white pad, worked in circles, brings up the final gloss. Buff off with a dry microfiber.
Step 7: Seal. Apply a penetrating granite sealer per the label. Most products want a clean, dry surface, a 10 to 15 minute dwell, and the excess buffed off before it hazes [4].
Total time for an average kitchen (30 to 40 sq ft), light restoration by hand: 3 to 5 hours. With a power polisher: 1 to 2 hours.
How do fabricators polish granite edges and surfaces in the shop?
Shop polishing is a different world from homeowner restoration. It's worth understanding even as a homeowner, because it explains what you're paying for with a new fabrication.
For flat surfaces, most shops run a CNC stone polishing machine or a bridge saw with polishing heads. The slab passes under a series of abrasive heads in sequence, each one a finer diamond. High-production shops feed the process at 2 to 5 feet per minute for a full polish. The payoff is a consistent machine finish across the whole slab.
For edges, a dedicated edge polishing machine handles straight runs. The operator feeds the cut edge through a series of profile wheels, each a different grit, shaped to match the edge profile (straight, bevel, eased, bullnose, ogee). A full bullnose on 2 cm granite takes 6 to 10 polishing wheel passes to reach a finished shine [2]. Ogee and other profiled edges take longer because the wheel geometry is more complex.
For sink cutouts, inside corners, and anything an edge machine can't reach, fabricators go to hand polishers with the same diamond pad sequence. This is where shop skill shows. An inside corner polished by hand should be indistinguishable from the machine-polished edge right next to it.
The industry standard for a finished fabrication polish is 3000 grit minimum for high gloss. Some high-end shops push to 5000 or hit it with a buff wheel and compound for an extra-mirror finish [9]. Honed finishes stop at 400 to 800 grit on purpose, leaving a soft matte look.
If you're a fabricator managing polishing time as part of job costing, accurate per-job estimates get a lot easier when your quoting software accounts for edge length, profile complexity, and surface area. SlabWise is worth a look if you're still building quotes by hand in spreadsheets.
Why does granite lose its polish over time and how do you prevent it?
Granite dulls for a few distinct reasons. Figure out which one you've got and you'll know how to fix it.
Cleaning product buildup. The most common cause by far. Many all-purpose cleaners, dish soaps, and sprays leave a thin film on stone. Over months that film piles up and scatters light, so the surface looks dull. This isn't damage, it's residue. A hard cleaning with a pH-neutral stone cleaner plus a maintenance polish usually clears it.
Micro-scratching from abrasive cleaners or rough sponges. Powdered cleansers like Comet or Ajax, and the scrubby side of a kitchen sponge, are abrasive enough to scratch granite's polish over time. Stick to the soft side of a sponge and keep powder cleansers off granite entirely [5].
Etching. Granite resists acid better than marble, but it's not immune. Strong acids (drain cleaners, concentrated lemon juice, vinegar cleaners) can dull certain granites, especially those with more calcium. Etching looks different from a scratch. It's a flat matte spot with slightly ragged edges where the liquid sat.
Wear in high-traffic zones. The strip in front of the sink and around the range takes the most abuse. Over years, pots, cutting boards, and daily cleaning slowly wear the polish. Slow and normal.
Prevention is simple. Clean with pH-neutral products, skip the abrasives, wipe acidic spills fast, and use cutting boards. Reseal every one to three years depending on how porous your stone is [4]. A water bead test tells you when: drop a tablespoon of water on the surface and watch. Beads and sits, the sealer's working. Soaks in and darkens the stone within a few minutes, time to reseal.
For cleaning practices that protect the finish, see how to clean stone countertops.
What's the difference between honed and polished granite and can you switch between them?
A polished finish means the surface went to 3000 grit or higher, giving high gloss and maximum light reflection. A honed finish stops around 400 to 800 grit, leaving a smooth but matte or satin look.
Honed granite has caught on for kitchens where homeowners want a less formal feel, or where they'd rather not see every fingerprint and water spot that a high-gloss surface shows off. Both finishes are equally durable. Honed granite is no weaker or more porous than polished granite of the same stone [10].
Can you convert polished to honed? Yes, and in theory it's simple: stop at 400 to 800 grit instead of continuing to 3000. You're deliberately removing the existing polish. In practice it's almost always a pro job, because doing it evenly across 40 square feet without leaving inconsistent matte patches is genuinely hard.
Going honed to polished is harder. You're doing more than buffing out a scratch. You're picking up a polishing sequence that was intentionally stopped, which means starting at or below the current surface grit and working up through 3000. Totally doable. It just takes more time and material than going the other direction.
If you're planning a new kitchen, settle the finish question before fabrication, not after. See the full breakdown of granite countertops options if you're still choosing, or kitchen countertops for how granite stacks up against other materials.
How does granite polishing compare to polishing other stone countertops?
Granite's hardness makes it one of the more forgiving stones to polish and one of the slowest to dull. Here's how it lines up against the other natural stones you'll run into.
| Stone | Mohs hardness | Etch risk | DIY polish difficulty | Pro restoration cost |
|---|---|---|---|---|
| Granite | 6 to 7 | Low (unless calcium-rich) | Moderate | $15 to $40/sq ft |
| Quartzite | 7+ | Low to moderate | Moderate to hard | $20 to $45/sq ft |
| Marble | 3 to 4 | High | Hard (etches easily) | $20 to $50/sq ft |
| Soapstone | 1 to 2 | None | Very easy | $10 to $25/sq ft |
| Limestone/Travertine | 3 to 4 | High | Hard | $20 to $45/sq ft |
Marble's softness means it polishes faster with finer grits, but it also scratches and etches far faster than granite, so maintenance polishing comes up more often [6]. Soapstone is soft enough to scratch from routine use, but you restore it with fine sandpaper and mineral oil. Real quartzite (not the marble sometimes sold as quartzite) is harder than granite and holds a polish exceptionally well.
Got quartzite that needs attention? The cleaning and maintenance logic tracks with granite, with a few wrinkles. See how to clean quartzite countertops. For marble countertops, the polishing and etching situation is different enough to research before you pick up a diamond pad.
What do fabricators need to know about polishing as part of production?
In a fabrication shop, polishing quality is often where you win or lose the customer. A perfectly cut slab with a dull edge or uneven gloss generates callbacks. A slightly imperfect cut with a great polish rarely does.
Four things matter most at the production level.
Pad wear tracking. Diamond pads degrade gradually. A worn 400-grit pad polishes more like a 600, which means your 800-grit step can't fully clear its scratches. Most shops swap pads on a fixed cycle (linear feet of edge or number of slabs) rather than waiting for an obvious drop-off. The right interval depends on how abrasive the stone is. Harder stones like quartzite chew through pads faster [2].
Water supply consistency. Wet polishing needs steady water flow. Too little water heats the pad and the stone, degrades the diamond bond, and can cause thermal stress fractures. Too much water dilutes the slurry that actually helps the polish. Most pro setups run a regulated water feed at the head.
Matching finish across pieces. On a multi-piece kitchen, edge profile, gloss, and surface finish have to match across every piece. Polish a replacement piece six months after install and matching the aged finish of the existing countertop gets genuinely hard. Flag this to customers upfront on partial replacements.
Final inspection under raking light. Scratches that hide under shop overhead lighting jump out under a low-angle light source. Run a flashlight at a shallow angle across the surface before sealing. It catches problems that would otherwise leave on the delivery truck.
Frequently asked questions
How often should granite countertops be polished?
Maintenance polishing (the topical product, buffed on and off) can be done every few months or whenever the surface looks dull. Full restoration polishing with diamond pads is rarely needed more than once every several years unless the stone sees heavy abuse. Sealing is the more time-sensitive task, typically every one to three years depending on the granite's porosity [4].
Can you use car wax or furniture polish on granite?
Don't. Car wax and furniture polishes carry solvents, silicones, or waxes that aren't made for stone. They can make the surface look shiny for a bit but leave a residue that grabs dirt, may block sealer adhesion, and can dull the surface over time. Use products formulated for natural stone. The ingredient list matters: look for silicone-free, carnauba-free stone polishes.
Will polishing granite remove scratches?
Depends how deep they are. Polishing removes the top layer of stone, so a scratch shallower than the material you remove disappears. Surface scratches that catch a fingernail lightly respond well to 400 to 800 grit hand pad work. Deep gouges that catch hard need professional equipment starting at 50 to 200 grit, and very deep chips or cracks may need epoxy fill before polishing.
Does polishing granite void the sealer?
Yes. Polishing removes the existing sealer along with the top layer of stone. Any time you do restoration polishing, reseal afterward. Apply a penetrating impregnating sealer once the surface is fully clean and dry. Most sealers need 24 to 48 hours to cure before the countertop sees regular use [4].
What grit do you start with for granite countertop polishing?
Match the starting grit to the problem. For light haze with no tangible scratches, start at 800. For scratches you can feel lightly, start at 400. For deep scratches visible from a few feet away, start at 200 or 100. For full restoration after damage, start at 50 or 100. Always work through each intermediate grit. Skipping creates a surface that looks finished but goes patchy fast [2].
Is it safe to use an angle grinder to polish granite?
Yes, with a variable-speed angle grinder at low RPM (600 to 1,200), the right diamond backing pad, and wet diamond polishing pads. High RPM without water overheats the diamond bond and can thermally stress the stone. Never use a fixed-speed grinder at full speed on granite. A dedicated wet polisher is safer and easier to control, though a quality variable-speed grinder works for occasional use.
How do you polish granite edges?
By hand, use the same diamond pad grit sequence as the flat surface, bending the pad to follow the edge profile. Work each grit around the full edge length before stepping up. Profiled edges (bullnose, bevel, ogee) take more patience because you're forcing the pad into the profile shape. In a shop, a dedicated edge polishing machine handles this automatically. Hand-polishing a full kitchen's edges takes 1 to 3 hours.
Can you polish granite that has been sealed?
You can, but the sealer comes off during polishing. Any restoration polishing with abrasive pads removes whatever sealer was on the surface. That's fine, because polishing and sealing go in sequence: polish first, then reseal. Topical maintenance polishes (buff-on, buff-off products) work on top of a sealed surface without touching the sealer underneath.
Why does my granite look dull after cleaning?
Almost always cleaning product residue. All-purpose sprays, dish soaps, and most household cleaners leave a film on granite that scatters light and looks dull. Clean with a pH-neutral stone cleaner, rinse with clean water, dry completely, then apply a maintenance polish. If the dullness sticks around after that, you probably have actual surface scratching that needs abrasive restoration [5].
What's the difference between polishing and sealing granite?
Polishing is a mechanical process using abrasives to create a flat, reflective surface. Sealing applies a chemical impregnator that soaks into the stone's pores to resist liquid absorption and staining. They're separate and complementary: polishing improves appearance, sealing improves stain protection. Always polish before you seal, never the other way. Some products are marketed as polish-and-seal in one step; those are maintenance products, not restoration tools [4].
How long does professional granite polishing take?
A stone restoration contractor doing a full restoration on an average kitchen (30 to 40 square feet) typically spends 2 to 4 hours on-site, plus drying time before sealing. Complex layouts, profiled edges, or deep damage stretch that out. You can usually use the countertop the same day, but most contractors say wait 24 hours before putting heavy or wet items back on the newly sealed surface.
Can you polish granite countertops that have a honed finish?
You can, but converting honed to polished is a real job. You're doing more than removing scratches. You're continuing a polishing sequence that was intentionally stopped at 400 to 800 grit. A full conversion starts below the existing surface finish and works up through 3000 grit. Most fabricators or stone restoration contractors charge a premium for this conversion compared to standard restoration work.
Is polishing granite different from polishing quartz countertops?
Yes. Engineered quartz (like Cambria or Silestone) has a factory resin surface that can't be restored with diamond pads the way natural stone can. Scratches in quartz usually need color-matched epoxy fill or, in bad cases, section replacement. Maintenance polishes sold for granite generally aren't suitable for quartz. For quartz-specific guidance, follow the manufacturer's care instructions. See cambria countertops for brand-specific care notes.
Sources
- USGS Mineral Resources Program, Granite: Granite typically falls between 6 and 7 on the Mohs hardness scale due to its quartz and feldspar mineral composition.
- Marble Institute of America (MIA+BSI), Care and Maintenance of Natural Stone: Professional stone polishing follows progressive diamond grit sequences from coarse to fine, ending with a polishing compound; wet polishing is standard to control heat and slurry.
- HomeAdvisor (Angi), Granite Countertop Repair and Polishing Cost Guide: Professional granite polishing costs approximately $15, $40 per square foot; DIY polish kits run $30, $80.
- Natural Stone Institute, Sealing Natural Stone Surfaces: Granite should be sealed with a penetrating impregnating sealer every one to three years depending on porosity; sealing should follow polishing, not precede it.
- Marble Institute of America (MIA+BSI), Granite Countertop Care: Abrasive powder cleansers and rough scrubbing pads can scratch granite's polished surface over time; pH-neutral cleaners are recommended.
- Natural Stone Institute, Understanding Natural Stone Properties: Marble has a Mohs hardness of 3 to 4, making it more susceptible to scratching and etching than granite; both can be restored by progressive diamond polishing.
- OSHA, Silica Dust in the Stone Fabrication Industry: Grinding and polishing natural stone generates respirable crystalline silica dust; OSHA requires controls including wet methods and respiratory protection in fabrication settings.
- U.S. Environmental Protection Agency, Indoor Air Quality and Natural Stone: Wet polishing methods reduce airborne stone dust, an indoor air quality consideration for DIY restoration in enclosed kitchen spaces.
- Natural Stone Institute, Fabrication Standards for Natural Stone: Industry standard for a high-gloss fabrication finish is a minimum 3000 grit; some shops extend to 5000 grit or buff compound for premium mirror finishes.
- Marble Institute of America (MIA+BSI), Honed vs Polished Finishes: Honed finishes stop at 400 to 800 grit; both honed and polished granite are equally durable, with no difference in porosity or structural strength between the two finishes.
Last updated 2026-07-09