TL;DR
- A slurry settlement tank is a multi-chamber container that holds stone-cutting wastewater long enough for suspended solids, silica dust, and calcium carbonate to settle to the bottom before the clarified water gets recirculated or discharged.
- Most small shops build one from two or three 275-gallon IBC totes for under $500 in materials.
- Raw slurry runs pH 10 to 12 and fails every sewer limit.
What exactly is a slurry settlement tank?
A slurry settlement tank is a container that slows stone-cutting wastewater down enough for gravity to pull the solids out before the water goes anywhere. Cut granite, quartz, or marble with a wet saw and the blade cooling water carries a dense gray slurry back into the drain. That liquid is not plain water.
It has fine silica particles, calcium carbonate, polymer binders from engineered stone, and whatever cleaning chemicals ran off the table. Pour it straight into a floor drain that ties to a municipal sewer, a septic tank, or a storm drain and you are almost certainly breaking the law. The solids cake up inside pipes. They wreck the biology in septic systems. And fresh slurry runs pH 10 to 12, caustic enough to violate most local pretreatment rules on chemistry alone. [1]
The tank fixes this by giving the water somewhere to sit still. Drop the flow velocity below roughly 0.1 feet per second and particles heavier than water start falling. A tank sized right holds the slurry long enough for that to happen, leaving clarified water at the top that you can loop back to the saw or discharge inside permitted pH and TSS (total suspended solids) limits.
None of this is new. Municipal wastewater plants have run clarifier tanks on the same physics for over a century. A shop-built version just shrinks the idea down to one fabrication business. You will hear the thing called a settling tank, a clarifier, a recirculating sump, or a pit. Same job every time: slow the water, let gravity work, pull the cake off the bottom on a schedule.
Why do fabricators legally have to use one?
The legal push comes from two directions. The federal Clean Water Act bans discharging pollutants to waters of the United States without a permit, and for most shops that plays out through a local pretreatment ordinance because the shop drains to a publicly owned treatment works (POTW) instead of straight to a river. [2] Those local ordinances almost always set a pH limit (commonly 6.0 to 9.0) and a TSS limit (often 250 mg/L or lower for industrial users).
Raw stone-cutting slurry routinely tests above 10,000 mg/L TSS and pH above 11. It fails both thresholds by a mile. [1]
The second direction is state industrial stormwater rules. If any slurry reaches a parking lot drain or an outdoor curb, that is likely an unpermitted stormwater discharge, a separate violation from the sewer one.
Enforcement varies wildly by city. Some municipalities inspect fabrication shops on a schedule. Others have never once knocked on a shop door. That inconsistency does not make the liability disappear. A cranky neighbor's complaint, a drain-line backup traced to your building, or a routine business inspection can each trigger a notice of violation. Under Clean Water Act Section 309, penalties for negligent discharges can reach $25,000 per day per violation, and state penalties stack on top. [2]
Some shops run a bare sump pit in the floor with a pump. That works if the pit is big enough and you pull the solids before they build up and carry over. But an above-ground tank system is easier to inspect, easier to clean, and far easier to document when a regulator asks.
How does a settlement tank actually work?
It works on Stokes' law: a particle settles through a fluid at a speed set by its size and density, the fluid's viscosity, and the density difference between particle and fluid. [3] For stone particles in water at shop temperature, anything larger than about 10 microns drops in minutes. Finer particles, including respirable silica dust, can take hours. That is exactly why single-chamber sumps fail. The water leaves before the fine stuff has time to fall, and the pump churns it all back up.
A design that works has at least two chambers, usually three.
Raw slurry enters the first chamber fast and turbulent. Heavy particles drop out quickly. You oversize this chamber on purpose so velocity crashes the moment water arrives, and a baffle plate near the inlet keeps that incoming flow from stirring up solids already on the floor.
Water then moves under or over a baffle into the second chamber, where it crawls and fine particles get time to settle. This is the clarification stage. Residence time here is the number that decides whether the whole thing works. Most small-shop guidelines target 20 to 30 minutes of residence time in the settling chambers at the shop's peak flow. [4]
A third chamber holds water clean enough to loop back to the saw or pass a discharge test. A pump in chamber three pushes it to the blade cooling line, so the shop runs a closed loop and burns almost no fresh water. That is the setup I would build if I were starting from scratch.
pH adjustment happens passively or actively. Some shops add a CO2 injector or a small dose of citric acid to the clean chamber to pull pH down before recirculation. Others find carbonate precipitation during settling drags pH toward acceptable numbers on its own. Test it. Do not guess.
What size settlement tank does a shop actually need?
Size the tank around peak flow, not average flow. A typical bridge saw at full blade cooling uses 2 to 4 gallons per minute (GPM). [4] A CNC router or waterjet runs at different rates, sometimes higher. Add up every machine that runs at the same time and that is your peak.
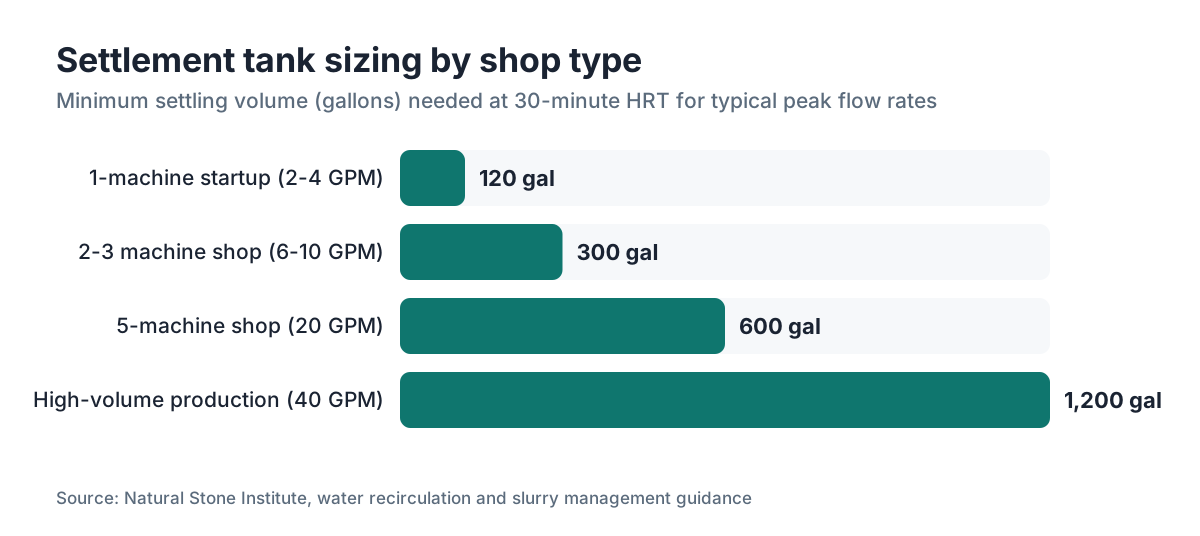
The rule most fabricators use is 20 to 30 minutes of hydraulic retention time (HRT) at peak flow in the settling chambers. At 4 GPM peak flow:
4 GPM x 30 minutes = 120 gallons minimum settling volume
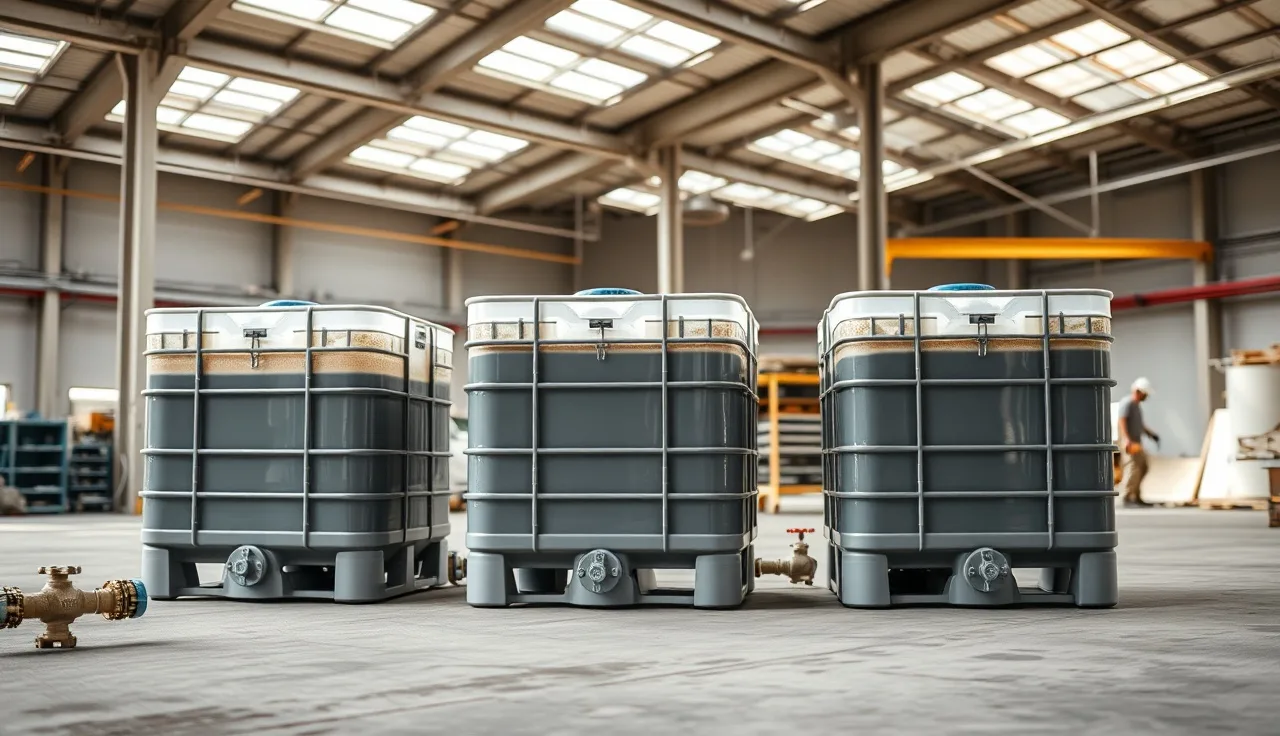
That sounds tiny. It is, until you add headspace, a sludge zone on the bottom, and enough buffer that a short surge does not shove unsettled water into the clean chamber. In practice, a two-machine shop (one bridge saw, one CNC) planning for 6 to 8 GPM combined peak flow should build for at least 500 to 800 gallons of total tank volume. Three 275-gallon IBC totes give you 825 gallons, which is the whole reason the tote system became the default DIY answer.
Bigger production shops running several bridge saws, edge polishers, and waterjets at once may need 2,000 to 5,000-plus gallons. At that scale, prefabricated fiberglass clarifier tanks from the car wash or concrete cutting supply world start to beat building your own.
| Shop size | Peak flow (GPM) | Min HRT volume (gal) | Recommended build |
|---|---|---|---|
| 1-machine startup | 2-4 | 80-120 | 2x 275-gal IBC totes |
| 2-3 machine shop | 6-10 | 180-300 | 3x 275-gal IBC totes |
| 5+ machine production | 20-40 | 600-1,200 | Prefab clarifier or concrete pit |
These numbers assume stone cutting only. Add polishing with abrasive slurries and flow rates climb and particle loads get heavier, which pushes you to the top of each range.
What materials do you need to build an IBC tote settlement tank?
The IBC (intermediate bulk container) tote method is the most common DIY route for shops under about 5,000 square feet. Used food-grade totes cost roughly $100 to $200 each from industrial liquidators, farm supply auctions, or Craigslist. [5] New ones run $300 to $600, but used food-grade totes (previously holding corn syrup, food oils, or water) are clean enough here and structurally fine.
For a three-tote system you need:
- 3x 275-gallon IBC totes (used food-grade, $100-200 each)
- 2-inch PVC bulkhead fittings and nipples (4 to 6 pieces, around $8-15 each)
- 2-inch PVC ball valves (one per chamber drain, plus one on the clean-water outlet)
- PVC cement and primer
- A submersible sump pump rated for 1.5x your peak flow GPM (roughly $80-200 depending on brand and head pressure)
- Flexible discharge hose or PVC pipe to return water to the saw
- Optional: pH meter or test strips (pH meter around $30-80)
- Optional: CO2 injector or citric acid dosing pump if pH adjustment is needed
- 2x 2-inch bulkhead baffle assemblies to create the internal flow path
Total materials for a three-tote system usually run $450 to $750 if you buy used totes and source PVC locally. You can build a welded steel or plywood-with-pond-liner version for similar money, but the tote approach wins on speed and future mobility. If you ever need to expand or move, cutting hose clamps beats jackhammering a concrete pit.
Shops that want software to track production volume and blade usage alongside their water records can use SlabWise to tie job output to operational data, which helps when you need to document average daily flow for a discharge permit application.
How do you build a three-tote slurry settlement tank step by step?
This is the build sequence most shops follow the first time. Two people, a full day, basic PVC plumbing skills, and a hole saw.
Step 1: Position the totes. Put all three totes on a level concrete pad, close enough to connect with short PVC runs. Leave at least 18 inches around each one for access. Orient them so the bottom drain valve on each tote is reachable. The totes sit at the same elevation and flow between them goes through submerged inlets, not over-top overflow. (An over-top overflow can work too, but submerged baffles separate solids better.)
Step 2: Install inlet and outlet bulkheads. For totes 1 and 2, drill a 2.5-inch hole on the high side of the tote wall, 6 to 8 inches below the top, for the outlet to the next chamber. On the receiving side of totes 2 and 3, install an inlet bulkhead at a similar height or slightly lower to create a hydraulic gradient. The inlet to tote 1 comes from your floor drain or saw drain pan and can be a simple PVC elbow pointed at the tote floor to cut turbulence.
Step 3: Install baffle plates. Inside each tote, install a vertical baffle from a piece of HDPE cutting board or a tote-liner sheet cut to fit. The baffle sits 12 inches from the outlet wall and runs from the floor to about 6 inches below the water surface. This forces incoming water down and under before it rises to the outlet, so particles spend more time near the floor where they can drop.
Step 4: Connect the chambers. Run tote 1 outlet to tote 2 inlet with 2-inch PVC. Run tote 2 outlet to tote 3 inlet the same way. Keep every run short and straight. Put a union fitting on each connection so you can break the system apart for cleaning.
Step 5: Install the recirculation pump. Set a submersible pump in tote 3. Connect its discharge to your saw's water supply line. Add a float switch that shuts the pump off if the water level in tote 3 drops too low, so it never runs dry during a high-flow stretch.
Step 6: Install bottom drain valves. Every tote gets a 2-inch ball valve on the bottom drain for sludge removal. Connect these to a portable pump or a short hose that reaches a holding container.
Step 7: Test the system. Fill all three totes with clean water and run the saw for 30 minutes. Watch flow rates, check every connection for leaks, confirm the pump returns enough water to the blade, and test incoming and outgoing pH. Tweak baffle heights and pump speed if needed.
A full build with no shortcuts takes most shops 6 to 10 hours including tote cleaning, plumbing, and testing.
How often do you need to clean a slurry settlement tank?
Clean tote 1 every 1 to 2 weeks, tote 2 monthly, and tote 3 quarterly if the first two chambers are kept up. Sludge piles up on the floor of totes 1 and 2 nonstop, and the rate tracks how much stone you cut. A busy shop running a bridge saw 6 to 8 hours a day can throw off 50 to 100 pounds of dried stone cake per week.
Let that cake sit too long and it eats your effective tank volume, shortens retention time, and eventually causes carryover: settled solids getting swept into tote 3 and into the recirculation pump.
The cleaning process is simple. Close the inlet valve, open the bottom drain, and let the sludge gravity-drain or pump it out with a portable submersible into a holding tank or 55-gallon drums. The cake is mostly calcium carbonate and stone dust. In most places it counts as non-hazardous solid waste and can go in a dumpster, but check with your waste hauler because some areas want a waste profile before they take it. [6] Engineered stone (quartz composite) slurry can carry polymer resins, so check your state environmental agency's guidance if you cut a lot of quartz.
Keep a plain log: date, totes cleaned, rough sludge volume removed. Regulators love paper, and a two-minute logbook entry after each cleaning is cheap insurance against a future inspection.
What do you do with the slurry sludge after you pump it out?
Dried stone cake from a natural stone shop is usually inert. Lab analysis of granite and marble cutting slurry consistently shows the solids are mostly calcium carbonate (from marble or limestone-bearing granite), silica compounds, and aluminum silicates. None of those are listed hazardous wastes under RCRA Subtitle C. [6]
Your legal disposal routes:
- Municipal solid waste (MSW) dumpster. Allowed in most jurisdictions for non-hazardous stone cake. Call your hauler and confirm.
- Construction fill. Some concrete and masonry contractors take dry stone cake as fill. It sets up over time and has little environmental impact.
- Land application. Calcium carbonate slurry is chemically close to agricultural lime. Some rural fabricators arrange with farms to accept it as a soil amendment. Check with your state environmental agency first; most states have a general permit or exemption for land application of lime-like materials. [7]
- Recycling to a concrete batch plant. A few batch plants near fabrication markets take stone slurry as a partial raw material substitute. Not common, but worth a call if there is a plant nearby.
Engineered stone slurry is a different conversation. Quartz composite products like Cambria countertops and other quartz brands hold polymer resins. That slurry is still generally non-hazardous under federal RCRA rules, but some states run stricter definitions. Get a waste characterization from your stone supplier or a testing lab before you assume MSW disposal is fine.
Can you use a simpler single-chamber sump instead of multiple totes?
Yes, and plenty of shops do, but the tradeoffs are real. A single large concrete pit or one tote works for very low-volume work: a small shop cutting one or two slabs a day with a single saw. The whole question is whether the pump-on cycle leaves enough undisturbed settling time before the pump pulls water out.
The trouble with single-chamber systems is that intake turbulence and pump suction fight over the same water. Every time the pump kicks on, it can pull unsettled particles up off the floor. You can soften that by putting the pump inlet on a standpipe 12 to 18 inches off the floor, keeping the inlet and pump on opposite ends of a long tank, and running the pump at lower flow for longer instead of short high-flow bursts.
For compliance, a well-built single large tank (say a 1,000-gallon concrete pit in the floor) with good inlet and outlet separation and a standpipe pump can pass discharge testing and satisfy an inspector. For a shop growing past one saw, the multi-chamber tote system is more reliable and much easier to scale.
Floor pits do have one edge. They never tip over, never freeze the way above-ground totes can in an unheated shop, and you can size them far larger without engineering structural support for tons of water above grade.
What are the most common mistakes fabricators make with settlement tanks?
Building too small is the number one error. A shop buys one 275-gallon tote, feels good about it, then runs a CNC and a bridge saw at the same time. The tank fills in 30 minutes of cutting, the pump holds the level steady by shoving near-raw slurry back to the saw, and nothing actually settles. The saw gets dirty water, blade life drops, and the recirculated abrasive grinds the pump down early. Size for peak simultaneous flow, not average. [4]
Skipping pH testing is next. Plenty of small shops assume the tank works because the water looks clearer. Clarity is not pH compliance. A tank full of fine milky calcium carbonate can look reasonably clear and still test at pH 10. Buy a decent pH meter and test monthly at a minimum, more if your discharge permit has self-monitoring requirements.
Not cleaning often enough is a slow killer. A tank half full of cake is functionally half the tank you designed.
Undersized pipe between chambers bites people too. Two-inch PVC is the floor for most small shops. Inch-and-a-half pipe clogs with stone particles inside weeks, especially with thick slurry from soft marbles or travertines.
Building with no cleaning access is the last one. IBC totes have a big removable top lid, one of their real advantages. Custom concrete pits need a minimum 24-inch access port over each chamber. A tank you cannot easily clean is a tank that eventually fails.
How does a slurry settlement tank connect to the rest of a shop's water management system?
The tank sits between the saw drain and either the municipal sewer (for discharge) or the recirculation loop (for closed-loop operation). Here is the typical flow path in a recirculating shop:
Saw blade cooling water -> drain pan under the saw table -> floor drain or flexible hose -> inlet of tote 1 -> baffled flow through totes 1, 2, 3 -> submersible pump in tote 3 -> back to saw water supply line.
A small makeup water valve (from the building's cold water supply) ties into tote 3 to replace what is lost to evaporation and to the sludge you pull during cleaning. In a closed-loop shop, that makeup water might be only 5 to 20 gallons a day, against the 400 to 800 gallons a shop would burn running fresh water through the saw all day. That is a real water and sewer saving, not a rounding error.
For shops on well and septic (common with rural custom fabricators), closed-loop recirculation is close to mandatory, because dumping high-pH slurry into a septic system kills the biology in the drainfield within weeks. [8]
If the shop does need to discharge to sewer rather than fully recirculate (during tank cleaning, or after a heavy day), that discharge should pass a pH adjustment step. A CO2 bubbler running 10 to 15 minutes drops pH from 11 to below 9 in most stone slurries. Citric acid at low dose rates works too and costs little. Never pour raw slurry down the drain to "just this once" get rid of it. That single decision is usually how a shop ends up in the enforcement pipeline.
Fabricators who track job volume, material type, and daily production hours have a far easier time estimating water use and sludge output for permit applications. Shop management software like SlabWise can generate the production records that back up those estimates without extra paperwork.
Does the type of stone cut change how the tank needs to be designed?
It does, in a few ways that matter.
Marble and limestone-heavy stones (like marble countertops) produce a slurry that is mostly calcium carbonate. That material settles reasonably well and has predictable chemistry. High pH is the main worry.
Granite slurry carries a higher share of silica. Fine silica particles, especially those in the PM2.5 respirable range, settle slower than coarser carbonate particles. [9] A granite-heavy shop needs longer hydraulic retention time and may do well to add a flocculant to tote 1 so fine particles clump up and drop faster. Polyacrylamide-based flocculants come from water treatment suppliers cheap and can cut settling time for fine silica hard. Confirm the flocculant is rated for wastewater use before you add it.
Engineered quartz throws the heaviest particle loads per blade pass, because the blade abrasives work harder against the polymer-and-quartz matrix. Flow rates and sludge accumulation run highest for quartz shops.
Soapstone is a soft magnesium silicate. Its slurry is generally easier to settle than granite or quartz, but a shop cutting soapstone exclusively often fights very fine dark particles that give the water a deceptively dark look even when TSS is within limits.
Portable saw work (on-site templating or install cuts for countertop installation) is a separate problem entirely. A settlement tank back at the shop does nothing for a cut made in a homeowner's kitchen. On-site cuts should capture slurry at the blade with a wet/dry vacuum, not let it run across the floor. Some crews use portable containment bags or on-tool collection systems built for this.
Frequently asked questions
Is a slurry settlement tank required by law for stone fabricators?
Federal law under the Clean Water Act prohibits discharging stone-cutting slurry to sewers or stormwater without treatment, and local pretreatment ordinances typically set pH limits of 6.0 to 9.0 and TSS limits around 250 mg/L. Raw slurry routinely exceeds both by large margins. A settlement tank or equivalent treatment system is the standard method shops use to meet those requirements. Penalties for violations can reach $25,000 per day under federal law.
How much does it cost to build a DIY slurry settlement tank?
A three-tote IBC system built with used food-grade totes runs $450 to $750 in materials for most shops. That covers three 275-gallon totes at $100 to $200 each, PVC bulkheads and fittings, ball valves, a submersible recirculation pump, and basic plumbing supplies. A shop that needs larger capacity and commissions a custom concrete pit can spend $2,000 to $8,000 depending on size, labor rates, and whether pH adjustment equipment is added.
What pH should the water be before it is discharged from a settlement tank?
Most municipal pretreatment ordinances require a discharge pH between 6.0 and 9.0, though some set the upper limit at 8.5 or 9.5. Fresh stone-cutting slurry typically runs pH 10 to 12. A well-designed multi-chamber settling system combined with carbonate precipitation during settling often brings pH down toward acceptable levels, but many shops add a CO2 injection step or a small dose of citric acid in the final chamber to ensure consistent compliance.
Can I use a single large tank instead of multiple chambers?
Yes, for low-volume operations a single large tank works if it is sized generously and the pump inlet is kept well off the floor on a standpipe. The problem is that incoming turbulence and pump suction compete with settling in the same volume of water. Multi-chamber designs separate those competing forces and consistently outperform single-chamber systems at equivalent total volume, especially for shops cutting more than one or two slabs per day.
How often should slurry sludge be pumped out of the tank?
A busy shop (one bridge saw running 6 to 8 hours daily) should clean tote 1 or chamber 1 every one to two weeks. Chamber 2 typically needs monthly cleaning. Chamber 3 usually only quarterly if the upstream chambers are maintained properly. Accumulated sludge reduces effective tank volume, shortens retention time, and eventually causes settled solids to carry over into the clean water chamber and the recirculation pump.
Where can you legally dispose of stone slurry sludge after cleaning the tank?
Dried stone cake from natural stone cutting is generally non-hazardous under federal RCRA rules and can go into a municipal solid waste dumpster in most areas, though you should confirm with your hauler. Other options include use as construction fill, land application as a lime-like soil amendment (check your state environmental agency's rules), or donation to concrete batch plants. Engineered quartz slurry containing polymer resins may require a waste characterization before MSW disposal.
Does a settlement tank work differently for quartz versus granite?
Quartz composite cutting generates the heaviest sludge loads and highest blade cooling water usage, so tank sizing should be at the upper end of the range for a quartz-heavy shop. Granite slurry contains fine silica particles that settle more slowly than marble carbonate particles, so granite shops benefit from longer retention times or from adding a polyacrylamide flocculant to the first chamber to aggregate fine particles. Marble slurry is generally the easiest to settle.
What size pump do you need for recirculating the clarified water back to the saw?
Size the pump for 1.5 times your peak blade cooling flow demand. A single bridge saw at full cooling needs 2 to 4 GPM. A pump rated at 4 to 6 GPM with enough head pressure to lift water back to saw height (typically 8 to 15 feet of head) is sufficient for one machine. A two-saw shop needs 8 to 12 GPM of pump capacity. Most shops use a standard submersible sump pump in the $80 to $200 price range.
Can a shop use a closed-loop system and never discharge slurry water at all?
Yes, and this is the standard to aim for. In a closed-loop system, clarified water in the final chamber recirculates continuously back to the saw. Makeup water replaces only what is lost to evaporation and what leaves with the sludge during cleaning, typically 5 to 20 gallons per day. Shops on septic systems should use closed-loop systems because high-pH slurry discharge destroys the biological activity in a drainfield quickly.
What is hydraulic retention time and why does it matter for sizing the tank?
Hydraulic retention time (HRT) is the average time a unit of water spends inside the tank before exiting. For stone slurry, most small-shop guidelines target a minimum of 20 to 30 minutes of HRT in the settling chambers at peak flow rate. At 4 GPM peak flow, that means at least 80 to 120 gallons of settling volume. Insufficient HRT means fine particles leave the tank unsettled, defeating the purpose of the system and potentially causing permit violations.
Do you need a permit to operate a slurry settlement tank?
The settlement tank itself usually does not require a separate permit. What requires a permit or sewer use agreement is the discharge coming out of it. Contact your local publicly owned treatment works (POTW) or utility department and ask whether your shop qualifies as a significant industrial user or a categorical industrial user under their pretreatment program. Many small shops fall under a minor discharge category and need only to meet numeric limits without formal permits, but you need to ask.
Can you add a flocculant to speed up settling time?
Yes. Polyacrylamide-based flocculants designed for wastewater applications cause fine stone particles to aggregate into larger, faster-settling flocs. They are inexpensive, sold by water treatment suppliers, and work well for granite and engineered stone slurries where fine silica particles otherwise stay suspended for hours. Add the flocculant to the first chamber. Use only products rated for wastewater use, and verify that the treated water still meets your local discharge chemistry requirements before adding any chemical.
How do you handle slurry from on-site saw cuts during countertop installation?
A settlement tank at the shop does nothing for cuts made on-site. For on-site work, use a tool-mounted slurry collection bag, a wet/dry vacuum at the blade, or contain the cutting area with foam backer rod and collect the slurry with a shop vac. Never let on-site slurry run across a homeowner's floor, into a sink drain, or down an outdoor gutter. Transport collected slurry back to the shop for proper processing.
What are IBC totes and where can you buy used ones for a settlement tank build?
IBC (intermediate bulk container) totes are 275- or 330-gallon plastic containers inside a steel cage frame, originally designed for food and chemical transport. Used food-grade totes cost $100 to $200 each from industrial liquidators, farm supply auction sites, Facebook Marketplace, and Craigslist. Avoid totes previously used for hazardous chemicals. Food-grade totes (previously holding corn syrup, cooking oil, or water) are structurally sound and clean enough for stone slurry applications.
Sources
- U.S. EPA, Effluent Guidelines program and general pretreatment program pH limits: Typical municipal pretreatment ordinances set pH discharge limits of 6.0 to 9.0 and TSS limits around 250 mg/L; raw stone slurry typically tests pH 10 to 12 and TSS above 10,000 mg/L
- U.S. EPA, National Pollutant Discharge Elimination System (NPDES) and Clean Water Act enforcement: The Clean Water Act prohibits discharging pollutants to waters of the United States without a permit; Section 309 penalties for negligent discharges can reach $25,000 per day per violation
- U.S. EPA, water data and wastewater treatment references: Stokes' law describes particle settling velocity as a function of particle size, density, and fluid viscosity; particles above roughly 10 microns settle within minutes in calm water
- Natural Stone Institute, water recirculation and slurry management guidance for fabricators: A typical bridge saw uses 2 to 4 GPM of blade cooling water; recommended hydraulic retention time for settling chambers is 20 to 30 minutes at peak flow
- USDA Agricultural Marketing Service: Used food-grade IBC totes are commonly available for $100 to $200 each through industrial liquidators and farm supply markets
- U.S. EPA, Resource Conservation and Recovery Act (RCRA) hazardous waste program: Stone cutting slurry from natural stone is generally non-hazardous under RCRA Subtitle C; calcium carbonate and silicate solids are not listed or characteristic hazardous wastes
- U.S. EPA, biosolids and land application program: Calcium carbonate-rich stone slurry cake is chemically similar to agricultural lime and may qualify for land application under state exemptions for lime-like soil amendments
- U.S. EPA, septic systems (onsite wastewater treatment) program: Discharging high-pH or high-TSS industrial water to a septic system destroys the biological activity in the drainfield
- National Institute for Occupational Safety and Health (NIOSH), CDC: Fine silica particles in the respirable range settle more slowly than coarser carbonate particles and require longer hydraulic retention time to remove from suspension
- U.S. EPA, National Pretreatment Program: Local POTWs implement pretreatment programs that set numeric limits on industrial discharges including pH and TSS; significant industrial users may require individual permits
- OSHA, respirable crystalline silica standard: Stone cutting generates respirable crystalline silica dust; wet cutting methods that produce slurry are one of the accepted engineering controls under the OSHA silica standard
Last updated 2026-07-11