TL;DR
- A countertop outlet notch is a rectangular relief cut in the back edge of a countertop so the slab can slide against the wall without hitting the electrical outlet box.
- You cut it with an angle grinder or bridge saw and a diamond blade.
- Size it to the box, not the faceplate: usually 3.5 to 4.5 inches wide and 1.5 to 2 inches tall.
What exactly is a countertop outlet notch?
A countertop outlet notch is a small rectangular cutout in the rear edge, or sometimes the rear underside, of a countertop slab. Its job is simple. The slab needs to push flat against the wall, but an electrical outlet box sticks out from the drywall by 1.5 to 2 inches. Without a notch, the countertop sits proud of the wall by that much, and you get an ugly gap at the backsplash and an install that looks amateur.
The notch is always sized to the outlet box, never to the faceplate. Standard single-gang outlet boxes are 2 inches wide by 3 inches tall by 2.5 inches deep, so the notch has to clear the box body, not the plug face. Double-gang boxes and GFCI boxes run larger. Old-work boxes vary enough that you should measure the actual box before you pick up a grinder.
You see outlet notches most in kitchen backsplash zones, where code requires outlets. The National Electrical Code (NEC), Article 210.52(C), requires receptacles on kitchen countertop surfaces so that no point along the wall line is more than 24 inches from an outlet [1]. That rule guarantees at least one box sits behind a slab edge in nearly every kitchen.
The notch is different from a full sink or cooktop cutout. It is small, usually 3 to 5 inches wide and 1.5 to 2.5 inches tall, and it only takes material from the very back edge of the slab. It does not open a hole through the full thickness.
Where does a countertop outlet notch go, exactly?
The notch position comes from the box location, which is fixed in the wall before the countertop arrives. Here is the part people forget: you cannot move an outlet box after the countertop is templated without an electrician visit and a permit. Measure carefully at template time.
The notch is cut at the rear edge, running from the back face of the slab forward just far enough to clear the box depth. Most residential boxes stick out 1.75 to 2 inches from the drywall face, so a notch 2 to 2.25 inches deep from the back edge usually clears. Add about 0.25 inches of slop on each dimension so the slab doesn't pinch the box.
Height matters too. The box sits at a fixed elevation from the subfloor, and you need to know whether it intersects the full thickness of the slab or only the bottom portion. In most kitchens the top of the outlet box sits about 4 to 5 inches above the finished countertop surface, which means the box body is below the slab surface and only the lower edge of the slab needs material removed.
For islands or peninsula counters with outlets on the side apron, the geometry is the same idea but oriented vertically into the edge profile instead of the back edge. Some fabricators call these edge notches or side notches to keep them separate from rear notches. The cutting method is identical.
Document every outlet location on your digital or paper template. Good templating software, like the tools in SlabWise's fabrication platform, lets you log outlet box coordinates directly on the slab drawing so nothing gets missed at the saw.
What tools do you need to cut a countertop outlet notch?
The right tool depends on the material.
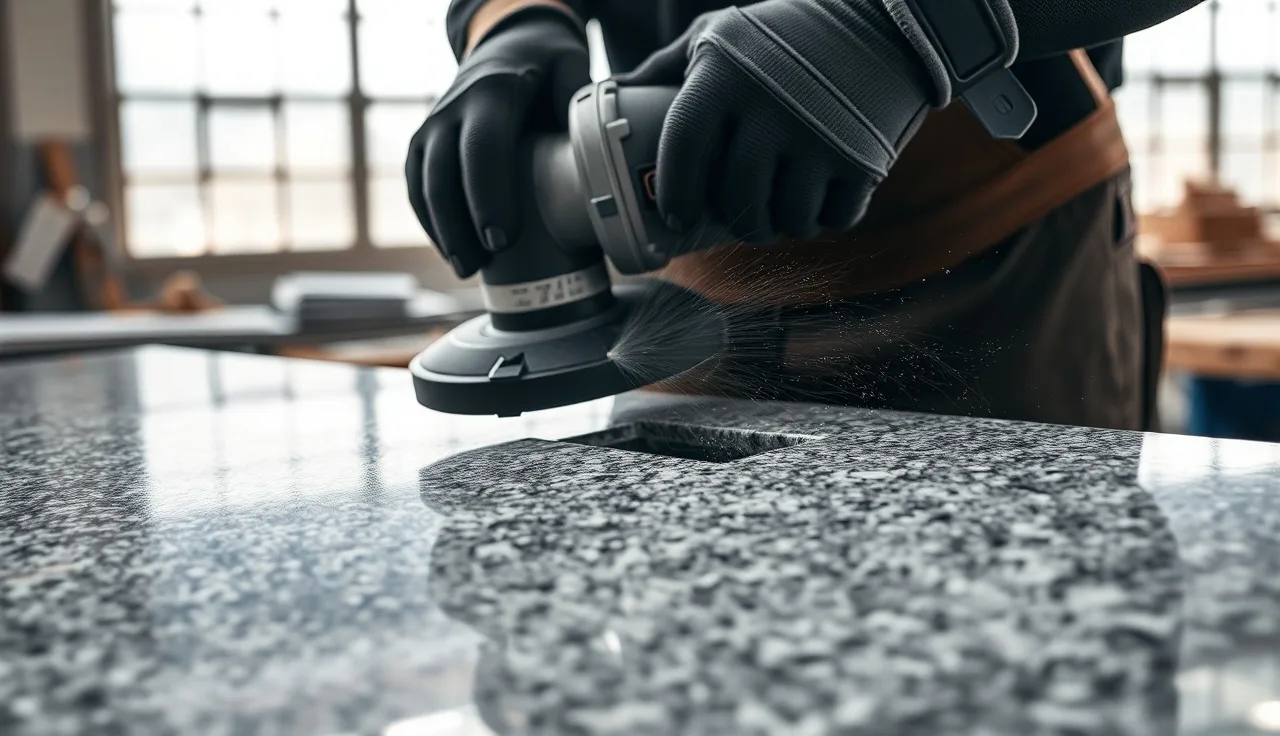
For granite, quartzite, marble, or any natural stone, you need a diamond blade. A 4.5-inch or 5-inch angle grinder with a continuous-rim or segmented diamond blade handles most notches, because the notch is small enough to finish the corners with the grinder's edge. A bridge saw or CNC machine is faster and more precise if the notch is flagged at programming time, but most shops cut outlet notches by hand grinder after the main piece comes off the bridge saw.
For quartz (engineered stone like Cambria or Silestone), the same diamond blade approach works. Quartz is harder on blades than most natural stones, so use a blade rated for engineered stone if you have one. Cambria countertops and similar products run 0.75 to 1.25 inches thick, which keeps the notch cut small.
For laminate countertops or Formica countertops, a jigsaw with a fine-tooth blade cuts the notch cleanly. Laminate chips if you move fast, so slow down and score the cut line first with a utility knife.
For Corian countertops or similar solid-surface materials, a router with a straight bit gives the cleanest result. A jigsaw works too.
For butcher block countertops, a jigsaw or circular saw with a fine-tooth blade is standard. Seal the cut edges right away with food-safe mineral oil or the same finish you used on the rest of the top.
Protective gear is non-negotiable with stone: eye protection, ear protection, and a P100 respirator. OSHA's silica standard (29 CFR 1926.1153) requires engineering controls and respiratory protection when dry-cutting silica-containing stone [2]. Wet-cut whenever you can to keep respirable silica dust out of the air.
How do you measure and mark a countertop outlet notch correctly?
Garbage in, garbage out. The notch is only as good as the numbers feeding it.
Step 1: Measure the outlet box itself. Note the outside width, the outside height, and the depth the box projects from the finished wall surface. Add 0.25 inches to width and height for clearance. Write these numbers down.
Step 2: Measure the horizontal position of the box center from a fixed reference point, usually the nearest cabinet end panel or the countertop corner. Hold the tape at the back wall surface, not at the front face of the box.
Step 3: Measure the vertical position. How far does the bottom of the box sit above the subfloor? Compare that to the finished countertop height, typically 36 inches above finished floor for standard residential kitchens [3]. This tells you how much of the box height intersects the slab edge.
Step 4: Transfer measurements to the slab. Mark the centerline of the notch on the rear edge of the slab. Then mark left and right edges based on the box width plus your clearance. Mark the depth of the notch from the back edge of the slab.
Step 5: Double-check with cardboard. Cut a scrap of cardboard to your notch dimensions and hold it against the box in the wall. If the cardboard fits over the box and the slab edge sits at the wall, your measurements are good. This test takes two minutes and has saved many fabricators a return trip.
For field templating, some shops use a template router jig that captures the exact box dimensions right off the wall. That kills transcription errors, which are the most common reason notches come out wrong.
How do you cut a countertop outlet notch in stone step by step?
These steps assume an angle grinder and a 4.5-inch diamond blade on a granite or quartz slab. Adjust for other materials as noted in the tools section.
Step 1: Secure the slab. If it is already installed, protect the cabinet below and the floor. If you are cutting in the shop, clamp the slab to sawhorses with the rear edge accessible. Stone should never move during a cut.
Step 2: Mark the notch clearly. Use a white china marker or a felt-tip marker on the stone. Mark all four corners and connect them with straight lines. A straightedge keeps your cut lines true.
Step 3: Set up water. Wet-cutting cuts silica dust and keeps the blade cool, which extends blade life. Run a trickle from a spray bottle or garden hose during the cut. Some angle grinders take water attachments. If you must dry-cut, use a vacuum with a HEPA filter and wear a P100 respirator without exception [2].
Step 4: Score the lines first. Make a shallow pass along each cut line before going to full depth. This cuts chipping on the top surface, especially on polished stone. Score about 0.125 inches deep on the first pass.
Step 5: Cut the two side lines to full depth. Plunge along each vertical cut line of the notch. Stop at the back corner of the notch (the deepest point from the rear edge).
Step 6: Cut the front line connecting the two side cuts. This is the horizontal cut that defines the front face of the notch. Move slowly and keep the blade perpendicular to the slab face.
Step 7: Clean the corners. An angle grinder leaves a rounded inside corner because of the blade diameter. Use the edge of the blade, a small diamond hand pad, or a rotary tool with a diamond bit to square up the inside corners. The notch does not need to be perfectly square, since the faceplate hides everything, but the slab must clear the box body with no stress points.
Step 8: Test-fit before final installation. Slide the slab toward the wall and confirm it clears the box. Check that the back edge sits within 0.125 inches of the wall. The backsplash covers any remaining gap.
Start to finish, one notch takes 15 to 30 minutes for an experienced fabricator on stone. A first-timer should budget 45 minutes and cut on the generous side, not the tight side.
How deep should a countertop outlet notch be?
Notch depth equals the amount the outlet box projects past the finished wall surface, plus a small clearance margin. Standard residential outlet boxes project between 1.5 and 2.25 inches from the drywall face depending on box type and install method [4]. Add 0.25 inches of clearance and you land at a notch depth of 1.75 to 2.5 inches from the rear edge of the slab.
Too deep beats too shallow almost every time. A notch that runs 0.25 inches deep sits invisible behind the slab. A notch that is 0.125 inches too shallow either forces a gap at the wall or cracks the slab when you push it into place. Stone does not flex.
For thick slabs, meaning anything over 1.25 inches, the notch may only need to go partway through the slab thickness from the bottom, not all the way through. If the bottom of the outlet box sits above the slab surface height, the notch is a relief cut in the underside of the rear edge, not a cut through the top face. Figure this out before you cut.
One practical check: mark the depth on the slab with a pencil line at the rear edge before you cut. That line is your stop point. Overrun it and you have taken more material than needed, which weakens the edge a little and can show from the front if the notch is wide.
What are common mistakes when cutting outlet notches in countertops?
The most common mistake is measuring from the wrong reference point. Measure horizontal position from the front of the outlet box instead of the back wall and your notch lands off by the box depth, about 2 inches. That is enough to shift the notch past the box entirely or drop it on top of a stud.
The second most common mistake is cutting too narrow. People measure the box and forget to add clearance. The box then contacts the slab edge under load and creates a stress point. Over time, or right away if the fit is very tight, the stone chips or cracks at the notch corner. A 0.25-inch clearance on each side costs nothing and prevents this.
Not squaring the corners causes trouble with box styles that have square flanges. If the blade rounds the inside corner of your notch, check whether that radius will hit the box flange. If it will, square the corner.
Skipping the test-fit is a mistake that shows up at installation time, usually in front of a homeowner. Cut the notch in the shop if you can, then hold the piece against a mockup of the box position, or bring the actual box dimensions to verify fit.
Dry-cutting stone without dust control is both a health and a quality mistake. The dust clogs the blade segment bond, glazes the blade, and makes it cut poorly, and it creates a serious silica inhalation hazard. The OSHA permissible exposure limit for respirable crystalline silica is 50 micrograms per cubic meter as an 8-hour time-weighted average [2].
Notching after installation instead of before is painful. Working a grinder against a wall with cabinets on both sides, holding water, dodging the backsplash, and keeping a straight cut is genuinely hard. Cut in the shop whenever you can.
Does a countertop outlet notch require an electrician or a permit?
The notch itself is just a cut in the countertop material. No permit is required to cut the countertop. No licensed trade is required to make the cut. A fabricator, a contractor, or a capable homeowner can do it.
What does require a permit in most jurisdictions is any electrical work. Moving an outlet box, adding a receptacle, or rewiring behind the box triggers electrical permit requirements under the NEC and local amendments [1]. The countertop notch is a mechanical fit issue, not an electrical one, so the fabricator and the electrician are doing separate work.
GFCI protection for kitchen countertop outlets is a code requirement under NEC 210.8(A), which covers 125-volt, 15- and 20-ampere receptacles serving countertop surfaces in dwellings [1]. The Consumer Product Safety Commission notes that GFCI protection in kitchens and other wet areas prevents electrocution [8]. That is an electrical code item, not a fabrication item, but fabricators should know it because homeowners ask.
If you are a homeowner doing a full kitchen remodel and you find the outlet box is in the wrong spot for your new layout, call the electrician before the countertop template appointment. Repositioning the box after the template is drawn costs time and usually a return template fee.
How does an outlet notch differ by countertop material?
The geometry is the same across every material. The cutting method changes.
| Material | Preferred tool | Blade/bit type | Key concern |
|---|---|---|---|
| Granite / quartzite | Angle grinder or bridge saw | Diamond continuous-rim or segmented | Chipping, silica dust |
| Engineered quartz (Cambria, Silestone, etc.) | Angle grinder or bridge saw | Diamond blade rated for engineered stone | Hard on blades, same dust concern |
| Marble | Angle grinder | Diamond blade, softer bond | Easier to cut, still produces silica dust |
| Laminate / Formica | Jigsaw | Fine-tooth blade (10+ TPI) | Chipping on surface; score first |
| Solid surface / Corian | Router or jigsaw | Straight router bit or fine-tooth jigsaw blade | Heat build-up with router; keep moving |
| Butcher block | Jigsaw or circular saw | Fine-tooth blade | Seal cut edges immediately |
| Porcelain slab | Angle grinder | Diamond blade, wet-cut mandatory | Very brittle; take multiple shallow passes |
Some materials forgive more than others. Solid surface takes a repair with color-matched adhesive if you chip an edge slightly. Granite does not. Porcelain is the least forgiving of all: one aggressive cut can crack a 60-inch slab in half. Take three or four shallow passes on porcelain before going to full depth.
For granite countertops specifically, the grain orientation and crystal structure mean you can get micro-chipping at the front face of the notch even with a good blade. Slow, wet cuts with a fresh blade reduce it. For marble countertops, the material is softer and cuts more easily, but it also scratches more easily during handling after the notch is cut.
More information about kitchen countertops covers the full range of materials and their general fabrication considerations.
Can a homeowner cut a countertop outlet notch themselves?
For laminate and solid surface, yes. A competent DIYer with a jigsaw can do this well. The materials forgive mistakes, the tools are cheap, and the stakes are low because these materials cost little to replace.
For stone, the honest answer is: technically yes, practically risky. An angle grinder is not hard to operate, but grinding stone forgives far less than cutting wood. The blade can grab. Stone can crack from a single bad pass. And respirable silica dust is a real health hazard that needs proper respiratory protection, more than a dust mask. N95 masks filter some silica but do not match a P100 half-face respirator for this work. NIOSH recommends P100 respirators when wet-cutting controls are not fully effective [7].
If you are a homeowner set on doing this yourself in stone, practice on a scrap of the same material first. Most fabricators have offcuts they'll give away. Cut three or four practice notches before you touch the real slab.
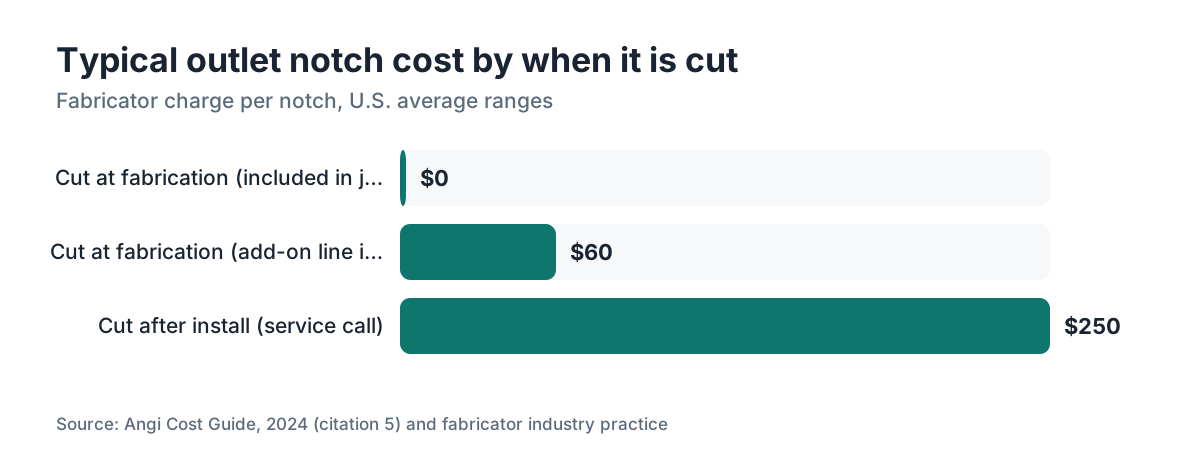
The more sensible move: if a fabricator is already installing your countertop, have them cut the notch. Most shops charge $25 to $75 per notch, and that price buys the expertise, the right equipment, and the responsibility if something goes wrong. That's cheap insurance on a $3,000 countertop.
For a full look at the install process and what fabricators handle versus what homeowners manage, see the countertop installation guide.
How much does it cost to add an outlet notch to a countertop?
Most fabricators charge $25 to $100 per outlet notch when it is added at time of fabrication. The spread comes from shop labor rates, material type, and whether the notch was in the original quote or added as a change order. A change-order notch costs more because it means pulling the job, re-marking, and sometimes re-sequencing the production queue.
If the notch is missed and the countertop is already installed, cutting it in place runs $150 to $350 depending on how accessible the area is, whether the fabricator needs a return service call, and the material. Cutting stone in a finished kitchen with cabinets already set is much harder than cutting in the shop.
Homeowners getting quotes should ask flat out whether outlet notches are included or priced as add-ons. Some shops include up to three notches in a kitchen quote as standard. Others list them separately at $50 each. Knowing this before you sign avoids invoice surprises.
Fabricators running job-tracking and quoting software can log notch counts per job automatically. SlabWise's quoting tools let shops add configurable line items for notches so nothing falls off the invoice. That matters when a kitchen has five outlet boxes along the back wall.
Notch costs are a small line on a big ticket. The average U.S. kitchen countertop project runs $2,000 to $4,500 for mid-range stone [5], so a $50 to $100 notch charge is under 3 percent of the total. It's not where to look for savings.
How do you finish and seal a countertop outlet notch edge?
On polished stone, the cut faces of the notch are raw. They show a matte or rough texture against the polished top surface. For most installs this does not matter, because the notch hides behind the slab and the faceplate covers it from the front. Nobody sees the cut faces.
If the notch is on an exposed side edge of an island, or it runs close to the front face of the slab, you can hone and polish the cut faces with diamond hand pads, working through grits from 50 to 800, to match the surrounding finish. This takes time and is rarely needed.
For stone, sealing the cut edge is optional. Natural stone sealers go on the top surface to reduce porosity, and fabricators sometimes brush sealer onto cut edges in the same pass. It does not hurt and takes ten seconds.
For butcher block, sealing the notch edge is mandatory. An unsealed wood edge absorbs moisture, swells, and eventually delaminates or grows mold. Apply food-safe mineral oil or your chosen wood finish right after cutting and let it cure fully before installation.
For laminate and Formica, a raw cut edge shows the brown substrate. Apply color-matched edge banding tape or touch it up with a matching Formica color marker. This is mostly cosmetic since the notch is hidden, but it also slows moisture wicking into the substrate from behind.
Frequently asked questions
What size should a countertop outlet notch be?
Size the notch to the outer dimensions of the outlet box, not the faceplate. A standard single-gang box is about 2 inches wide by 3 inches tall and projects 1.5 to 2.25 inches from the drywall face. Add 0.25 inches of clearance on each dimension. For a standard box that gives you roughly 2.5 inches wide by a depth of 2 to 2.5 inches from the rear edge of the slab.
Can you cut an outlet notch in a countertop after it is already installed?
Yes, but it is much harder and more expensive than cutting in the shop. You're working in a tight space, often with cabinets on both sides, and dust control is difficult. Fabricators typically charge $150 to $350 for a service-call notch versus $25 to $100 at time of fabrication. If you can, identify outlet locations at template time and cut before installation.
Do all countertop materials need a diamond blade for outlet notches?
No. Diamond blades are required for stone: granite, quartz, marble, quartzite, and porcelain. Laminate and Formica cut well with a fine-tooth jigsaw blade rated for plastics. Solid surface like Corian uses a router or fine-tooth jigsaw blade. Butcher block uses a standard fine-tooth woodworking blade. Match the tool to the material or you risk chipping and poor cuts.
Is cutting a countertop outlet notch dangerous?
The main hazard is respirable silica dust when cutting stone. OSHA's permissible exposure limit for respirable crystalline silica is 50 micrograms per cubic meter as an 8-hour time-weighted average. Wet-cutting controls dust at the source. If you must dry-cut, a P100 half-face respirator is the minimum. Eye protection and hearing protection are also required any time an angle grinder is running.
How do I find where to place the outlet notch when templating?
Measure the horizontal center of the box from a fixed reference point, usually the nearest cabinet end or countertop corner, at the back wall surface. Measure the vertical position from the subfloor. Compare the box height to the finished countertop height to see how much of the box intersects the slab edge. Mark both dimensions clearly on your template and double-check with a cardboard mockup before cutting.
What happens if the outlet notch is cut too small?
If the notch is too narrow or too shallow, the slab contacts the box when pushed against the wall. Since stone does not flex, forcing the fit creates a stress point at the notch corner. That can chip or crack the stone right away or over time with vibration. The fix is to recut the notch slightly larger, which is why cutting 0.25 inches generous on each side is always worth the extra few seconds.
Should the outlet box be installed before or after the countertop?
The electrical rough-in, meaning the box in the wall, should be in place before the template appointment. The fabricator needs the actual box position to template correctly. Outlet covers and receptacles can go in after countertop installation. If the box is not yet installed at template time, get the exact planned position from the electrician and note it clearly, but expect a higher risk of error.
Can a countertop outlet notch weaken the stone slab?
A correctly sized notch removes very little material, typically under 2.5 by 3 inches from a rear edge that is 0.75 to 1.25 inches thick. Cut properly, it does not meaningfully reduce slab strength. Notches with sharp inside corners, cracks, or stress chips are a different story: a cracked corner will propagate. Smooth, rounded inside corners and correct sizing keep the slab structurally fine.
How many outlet notches does a typical kitchen countertop need?
NEC Article 210.52(C) requires kitchen countertop receptacles so that no point along the wall line is more than 24 inches from an outlet. In a typical 10-by-12-foot kitchen with 8 to 12 linear feet of countertop, you usually see 3 to 6 outlet boxes behind the countertop area. Each box behind a slab edge needs its own notch, so 3 to 5 notches per kitchen is common.
What is the difference between an outlet notch and a full countertop cutout?
A full cutout, like for a sink or cooktop, is a hole cut through the entire face of the slab. An outlet notch is a relief cut in the rear or side edge only, removing material from the edge rather than through the top surface. Notches are much smaller, faster to cut, and need no reinforcement. Full cutouts sometimes need mesh backing or support bars to prevent cracking during transport.
Does an outlet notch affect the backsplash installation?
Rarely. The backsplash runs from the countertop surface up to the upper cabinets, and the outlet box sits in that zone. The notch just lets the countertop push against the wall; the backsplash tiles or slab then get cut around the box separately. In a full-height backsplash install, the backsplash fabricator has to cut around the box anyway, which is a standard part of that scope.
Can you fix a badly cut outlet notch in stone?
If the notch is too small, recut it carefully with an angle grinder. If there's a chip or crack at the corner, a skilled fabricator can fill it with color-matched epoxy and polish it smooth. The repair is likely invisible once the faceplate is in place. Structural cracks that run into the slab body are more serious and may require replacing the piece if the crack propagates toward a stress zone.
Do pop-up outlets in kitchen islands need a countertop notch?
Pop-up outlets mount through a round or rectangular hole cut through the top face of the countertop, not a rear-edge notch. That is a different cutout entirely, more like a sink cutout in miniature. The electrical box for a pop-up sits below the countertop surface and needs a clean through-hole, typically 3 to 4 inches in diameter or a matching rectangle, depending on the model.
How long does it take a fabricator to cut an outlet notch?
An experienced fabricator cutting one notch in stone by angle grinder takes about 15 to 30 minutes from marking to cleanup, including water setup and corner finishing. On a CNC machine where the notch is programmed in advance, machine time is under 5 minutes, but programming and setup add time. In laminate or solid surface, a skilled hand with a jigsaw finishes a notch in 10 to 15 minutes.
Sources
- NFPA, National Electrical Code (NEC), Articles 210.52(C) and 210.8(A): NEC 210.52(C) requires kitchen countertop receptacles such that no point along the wall line is more than 24 inches from an outlet; NEC 210.8(A) requires GFCI protection for countertop-serving receptacles in dwellings
- U.S. Occupational Safety and Health Administration, Respirable Crystalline Silica Standard for Construction (29 CFR 1926.1153): OSHA permissible exposure limit for respirable crystalline silica is 50 micrograms per cubic meter as an 8-hour TWA; engineering controls and respiratory protection required when cutting silica-containing stone
- U.S. Department of Housing and Urban Development, Minimum Property Standards: Standard residential kitchen countertop height is 36 inches above finished floor
- NEMA, National Electrical Manufacturers Association, Outlet Box Standards: Standard single-gang outlet boxes project 1.5 to 2.25 inches from drywall face depending on box type
- Angi, Countertop Installation Cost Guide: Average U.S. kitchen countertop project costs $2,000 to $4,500 for mid-range stone materials and installation
- OSHA, Controlling Silica Dust in Stone Fabrication (Silica in Construction section): Wet-cutting and vacuum extraction are primary engineering controls for silica dust during stone fabrication operations
- CDC NIOSH, Silica Dust Exposure and Control in Stone Countertop Fabrication: Respirable silica dust from cutting engineered quartz and natural stone poses a serious occupational health hazard; P100 respirators recommended when wet-cutting controls are not fully effective
- U.S. Consumer Product Safety Commission, Electrical Safety: GFCI-protected outlets are required in kitchens and other wet areas to prevent electrocution risk
- National Kitchen and Bath Association (NKBA), Kitchen Planning Guidelines: NKBA planning guidelines reference NEC outlet spacing requirements for countertop receptacles
- Natural Stone Institute (formerly Marble Institute of America), Fabrication Best Practices: Diamond blades and wet-cutting are the industry standard for cutting natural stone countertops including edge notches and sink cutouts
Last updated 2026-07-11