TL;DR
- You can stain butcher block with oil-based wood stain, gel stain, or stain plus a topcoat.
- Sand to 120-150 grit first, wipe on thin coats, let each coat dry fully, then seal with polyurethane, hardwax oil, or a food-safe oil.
- Expect one to three days total, most of it waiting on dry time.
- Gel stain gives the most even dark color.
What are your goals before you buy a single can of stain?
Butcher block is honest wood. You can stain it almost any color, from a barely-there warm amber to a deep espresso that reads nearly black. But before you crack open a can, settle two questions that shape every step after: will you cut on this surface, or is it decorative? And how much maintenance do you actually want to do?
If you plan to cut on it, staining gets complicated. Most penetrating stains need a food-safe topcoat to be genuinely safe for food contact, and plenty of common topcoats (standard oil-based poly, lacquer) are not certified food-safe once cured unless the manufacturer says so. The FDA regulates indirect food-contact materials, and a fully cured finish can meet those requirements, but you have to read the specific product label. Do not assume. [1]
Treat the block as a countertop instead of a cutting board and your options open up. A penetrating stain plus a hard film finish like polyurethane or lacquer gives you a durable, wipe-clean surface. If food-safe and low-fuss is the goal, a pure hardwax oil or pure mineral oil finish skips staining entirely, but gives you no color depth to work with.
For most people reading this, the practical answer is simple. Treat it like a countertop, not a cutting board. Stain to the color you want, seal with a good topcoat, and keep a separate cutting board by the sink. That is what most kitchen designers recommend, and it is the lowest-friction way to live with wood in a kitchen.
What type of stain actually works on butcher block?
Stains behave differently on end-grain versus face-grain butcher block, and understanding that difference beats any brand recommendation. Most residential block is face grain. End grain (those checkerboard blocks) drinks liquid stain unevenly and blotches, so it wants gel stain instead.
Penetrating oil-based stain is the common choice. Products like Minwax Wood Finish or Varathane Premium Wood Stain soak into the fibers and change their color without building a film. They run roughly $10 to $15 per quart at any hardware store, which usually covers a standard 25-square-foot run. Wipe on, let it sit 5 to 15 minutes, wipe off. More coats mean deeper color.
Gel stain sits on top of the wood instead of soaking in. That makes it the better pick for end grain and for any blotch-prone species. General Finishes Gel Stain is the product woodworkers name most often. It also gets you to a very dark finish without soaking the wood in eight coats of penetrating stain. [9]
Water-based stain dries faster and carries lower VOCs, which matters when you work indoors without great airflow. The catch: water-based products raise the grain, so you sand lightly between coats. They also read slightly cooler than oil-based stain on maple and oak.
Stain plus topcoat versus stain-infused oil. Some products sold as staining oils mix a colorant into a penetrating oil finish. Danish Oil sits in this camp. They are convenient, but the color depth is limited. Chasing a dark walnut or near-black finish? You will not get there with a hybrid oil alone.
Species matters more than most guides admit. The USDA Forest Products Laboratory Wood Handbook notes that density and grain orientation drive how fast and how evenly wood takes finish. Hard maple, the most common block species, is dense and slow to absorb, so it takes color well but blotches without a pre-conditioner. Oak has open grain that grabs stain fast for rich color that needs careful, even application. Walnut block already runs dark brown, so staining it darker (or leaving it alone) is usually the better call. [8]
How do you prep butcher block before staining?
Prep is where most DIY staining jobs fall apart. Wood that is not sanded right shows every scratch, grain shift, and smear of dried construction adhesive the moment stain hits it. There is no fixing that later short of sanding back down.
Start at 80 grit if the surface has deep scratches, old finish, or residue. On relatively clean new wood, start at 100 grit. Work through 120, finish at 150. Going to 180 or finer before staining backfires, because fine grit burnishes the pores closed and blocks stain from soaking in. [2]
Always sand with the grain. Cross-grain scratches turn into dramatic dark streaks under stain. If you run a random-orbit sander, finish with a light hand pass at 150 grit along the grain.
Get every trace of dust off before staining. Vacuum well, then wipe with a tack cloth or a lint-free rag barely damp with mineral spirits (for oil-based stain) or water (for water-based). Never use a wet cloth. Moisture before staining raises the grain and lightens the final color.
On maple, apply a pre-stain wood conditioner and let it soak 15 to 30 minutes before the stain. This is not optional if you want even color. Minwax Pre-Stain Wood Conditioner and similar products partly fill the fibers so stain absorbs evenly, and one quart covers about 125 square feet. [3]
Was your block previously oiled with mineral oil, cutting board oil, or Danish Oil? You have to strip it. Oil left in the wood repels stain in patches. The only reliable method is sanding back to bare wood. A belt sander or a drum sander rental is worth the $40 to $60 when years of oil have soaked in.
How do you actually apply the stain, step by step?
Application is simpler than prep, but rushing it wrecks all the prep you just did. Go slow at the wipe-off stage and you will be fine.
-
Open the shop, crack a window, or set up a fan. Oil-based stains carry real solvent fumes. The EPA is blunt that oil-based finishes need adequate ventilation during use; water-based products cut VOCs sharply but still want airflow. [7]
-
Stir the stain thoroughly. Do not shake it. Shaking whips in air bubbles that show up as small pits in the final finish.
-
Apply with a cheap foam brush, a lint-free cloth, or a chip brush, working with the grain. On a standard 8-foot counter, work 2-foot sections so the stain does not skin over before you wipe.
-
Let it penetrate for the time on the label, usually 5 to 15 minutes. Longer for darker. Wipe earlier for a lighter, more natural look.
-
Wipe off the excess with a clean lint-free cloth, again with the grain. Any stain left sitting turns tacky and dries to an uneven sheen. This is the mistake people make most.
-
Let the first coat dry all the way. Oil-based stains usually want 4 to 8 hours between coats, water-based 1 to 2 hours. Do not push it. [5]
-
Scuff-sand lightly with 220 grit between coats if you are doing more than one. You are knocking down raised grain and dust nibs, not re-sanding the wood. Wipe clean again.
-
Two coats lands most people at a good medium tone. Three gets you toward dark walnut or espresso. For a near-black finish (the black butcher block countertop look), gel stain across three to four coats beats stacking penetrating stain coats.
Handle the rags like they can start a fire, because they can. Oil-soaked rags combust on their own as the oil oxidizes and heats up. The U.S. Fire Administration treats this as a real residential fire risk. Lay used rags flat to dry outdoors on a non-combustible surface, or drop them in water inside a metal can before disposal. [4]
What topcoat or sealer should you use after staining?
Stain alone is not a finish. It has no film strength. Wipe the counter once and the color starts coming off unless you seal it. The topcoat does the protecting; the stain just carries the color.
Your main options:
| Finish | Durability | Food-safe when cured | Maintenance | Sheen options |
|---|---|---|---|---|
| Oil-based polyurethane | Very high | Check label; many yes | Low | Matte to high gloss |
| Water-based polyurethane | High | Most yes when cured | Low | Matte to satin |
| Hardwax oil | Medium | Yes (most brands) | Medium (annual recoat) | Matte to satin |
| Lacquer | High | Check label | Low | Matte to gloss |
| Pure mineral oil | Low | Yes | High (monthly) | None (flat) |
| Tung oil | Medium | Yes (pure tung only) | Medium | Low sheen |
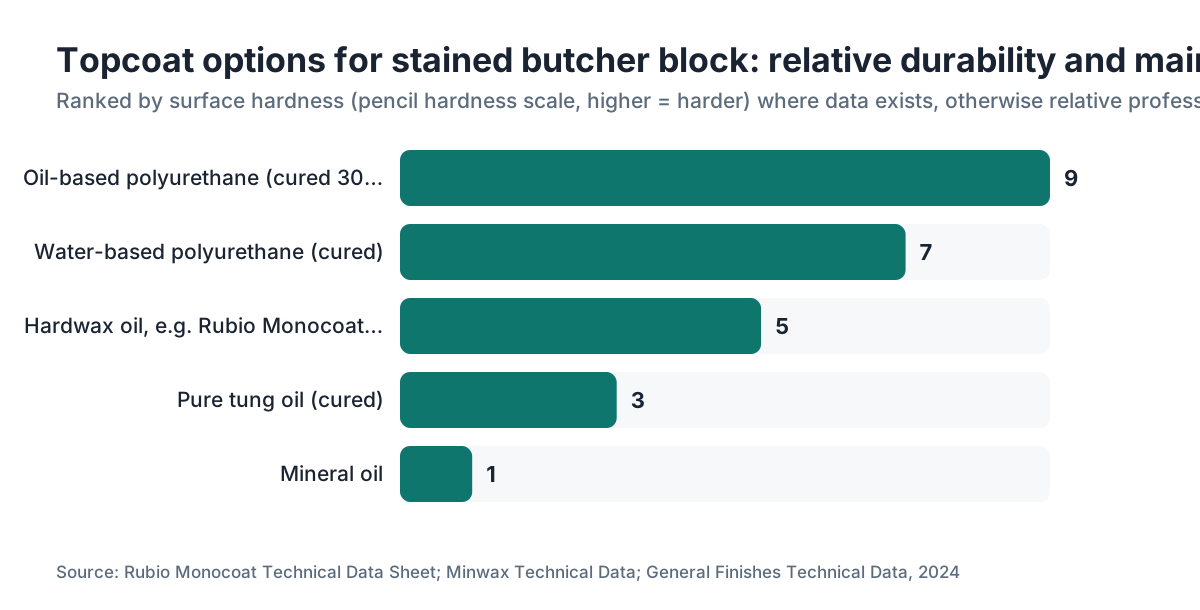
For a stained countertop you want to keep, oil-based polyurethane is the workhorse answer. Three thin coats, light 220-grit sand between each. Plan on 24 to 48 hours before the surface takes normal use, and about 30 days to reach full chemical hardness. [5]
Water-based polyurethane is a fair alternative if fumes bother you or ventilation is poor. It dries faster (2 to 4 hours between coats) and runs lower VOCs, though it lands a touch softer than oil-based poly under heavy daily use.
Hardwax oil earns its place if you want spot-repair without full refinishing. Rubio Monocoat and Osmo Polyx are the two names pros cite. It penetrates the surface instead of building a film, so you can re-oil a single damaged section and it blends. The tradeoff: it is softer than poly and wants a fresh coat about once a year on a busy counter. Rubio Monocoat's own technical data lists a pencil hardness of 4H, decent but below a cured oil-based poly. [6]
Pure mineral oil over stain is not a real option. It clouds the color and protects almost nothing. Skip it.
How do you get a dark or near-black finish on butcher block?
Yes, you can get espresso or near-black butcher block, and the look has held in kitchen design for over a decade. It just takes more steps than a medium walnut tone. The trick is building color on the surface, not forcing it deep with more and more penetrating stain.
The reliable method: three to four coats of a dark gel stain, wiping off excess after each coat and letting each one dry fully. General Finishes Java Gel Stain and Minwax Gel Stain in Espresso are the two people reach for most. Gel builds color faster than penetrating stain because it sits on the surface. [9]
For truly near-black, some finishing carpenters lay down a coat of black dye first, like a TransTint liquid concentrate mixed into a compatible base, then follow with gel stain. The dye soaks deep; the gel stain adds surface color and evens the whole thing out. That is a two-product, multi-day process. Test on scrap from the same board before you touch the counter.
Sand and condition first, build the gel stain in thin coats, then seal with at least two coats of oil-based polyurethane in matte or satin. High gloss on a dark finish reads as plastic. Budget two to three full days for a dark finish once you account for dry times.
For a black butcher block countertop on new wood, some people just buy pre-stained or pre-painted slabs. Specialty lumber dealers and a few national retailers stock them. If you are starting fresh and want very dark, price that against the DIY route against your own time budget.
Can you stain butcher block that is already installed?
Yes, but it is harder than staining before installation. The headaches are getting into corners where the counter meets the wall, keeping sanding dust out of a finished kitchen, and working around sink cutouts and hardware that is already in place.
Remove or mask the sink and faucet hardware if you possibly can. Stain and finish against metal leaves rust spots. Cover the cabinet faces below with plastic sheeting.
Sanding in place takes more patience. A random-orbit sander handles the open field. For the back edge and the strip near the wall, fold 120-grit around a sanding block or a dowel and get as close as you can. Accept that the last inch behind the sink and under the backsplash may never look as perfect as the rest.
Ventilate hard, for both dust and fumes. Cover or block HVAC vents so dust stays out of the ductwork. Count on the kitchen being out of service 24 to 48 hours while the finish cures enough to touch.
For fabricators quoting a refinishing job, the real time driver is dry time between coats, not the application. A one-day visit is possible with a fast-drying water-based product, but two visits (prep and stain one day, topcoat the next) gives a more reliable result.
What do butcher block staining materials actually cost?
Materials for a standard 25-square-foot counter run (roughly 8 feet by 25 inches) are cheap. Time is the real cost.
Sandpaper. An 80, 120, 150, and 220 grit assortment runs about $15 to $25.
Pre-stain conditioner. One quart covers about 125 square feet and costs roughly $8 to $12. [3]
Penetrating stain. One quart covers 75 to 125 square feet depending on species and porosity, about $10 to $15. You will likely use half a quart on one counter.
Gel stain. One quart runs $18 to $25 and goes far, since you apply thin coats.
Oil-based polyurethane. One quart covers about 125 square feet per coat at $20 to $30. Three coats minimum, and one quart usually covers it.
Total DIY materials: $60 to $90 for most single-counter projects.
Hire it out and labor for a professional refinisher usually runs $200 to $500 for a standard kitchen counter, depending on region and whether old finish needs stripping. That is a wide spread because refinishing labor varies a lot by market. No reliable national survey covers this exact service; the range comes from contractor pricing forums and is honestly anecdotal.
For fabricators building quotes on new butcher block installs, SlabWise helps price the slab material alongside any finishing markup you fold into a job, so you skip the back-and-forth on per-project estimates.
How do you maintain a stained butcher block countertop?
Maintenance rides almost entirely on the topcoat you picked. That one decision, made months earlier, sets what you do from here.
A polyurethane-sealed block wants mild soap and water, a prompt dry, and no pooling water near seams or the back edge. The finish itself needs nothing else. When it dulls or picks up scratches that reach the wood, scuff-sand (220 grit is usually enough unless the damage is deep), clean well, and lay down one or two fresh topcoats. A good poly finish on a counter in normal use runs 5 to 10 years before a full refinish.
A hardwax oil finish cleans the same way, but budget an annual re-oil of the whole surface, or at least the high-use zones. Osmo and Rubio both sell maintenance products made for this. The yearly coat takes about an hour and stretches the finish's life a lot. The upside is a scratched or dried-out patch spot-treats without the whole counter going blotchy. [6]
For any stained block, standing water is the enemy. Water sneaking into the wood at a seam, a sink cutout, or a crack swells the wood, which lifts and cracks the finish from underneath. Wipe spills fast. Re-caulk the sink joint every year. This is the single most common way butcher block fails early, and it has nothing to do with which stain you chose.
Skip harsh cleaners, bleach, and acids. They break down polyurethane over time and strip a hardwax oil fast.
Thinking about the whole picture? Comparing butcher block to stone like granite countertops or marble countertops helps set expectations. Stone needs sealing too, but it does not swell, split at seams, or ask for annual oil. Wood is warmer and kinder to dropped dishes, but it asks more of you over the years.
What mistakes do most people make when staining butcher block?
A handful of mistakes come up over and over. All of them are easy to dodge once you know where to look.
Skipping pre-stain conditioner on maple. Hard maple is famous for blotching. Without conditioner the color looks sponged on. Conditioner is $10 and 20 minutes. Use it.
Leaving too much stain on the surface. Stain sitting past its penetration window turns sticky, dries uneven, and muddies the finish. Wipe it off. The color comes from what already soaked in.
Rushing the dry time between coats. A second coat over a first that is not dry traps solvents in the wood, which brings bubbling, cloudiness, or topcoat adhesion failure. Read the label dry time and add an hour if your shop is cool or humid.
Sanding too fine before staining. Going to 180 or 220 before stain cuts penetration and leaves you lighter than you wanted. Stop at 150 for the final sand before staining.
Believing in food-safe stain. Stain is not food-safe in any real sense. The cured topcoat is what decides food-contact safety. If that matters to you, pick a topcoat the manufacturer explicitly certifies as food-safe when fully cured, and confirm the full cure time before you use the surface. [1]
Not testing on scrap or a hidden spot. The color on the can lid or swatch card almost never matches your specific wood. Test. Five minutes now saves a full refinish later.
Fabricators, one more: if you pre-finish slabs in the shop before delivery, the countertop installation sequence matters. Stain and seal before cutting to final length when you can, and protect the finish in transport.
How does staining butcher block compare to other countertop finishing options?
Staining is one of three broad paths for finishing butcher block, and each has honest tradeoffs worth naming.
Stain plus topcoat gives you the most color control and the most durable surface of the three. It also makes the counter behave more like a finished wood floor than a cutting surface. Refinishing means stripping the old film finish, which is real work.
Pure oil treatment (mineral oil, food-grade tung oil, or a dedicated butcher block oil) leaves the wood its natural color or nudges it a warm amber. It is food-safe, spot-repairs easily, and goes on fast, but it wants repeated application (monthly at first, then every few months) and gives limited protection against water, heat, and staining pigments like beets or turmeric. Color depth is minimal.
Paint shows up occasionally for dramatic effect, and it works, but it buries the grain entirely and is the hardest option to undo if you change your mind.
For most homeowners chasing a specific wood tone to match cabinetry, stain plus topcoat is the right call. For a baker who wants a real dough surface, pure oil is the honest recommendation.
Early in the selection process and weighing wood against other materials? The kitchen countertops guide covers the full category, stone, laminate, and solid surface included. Laminate countertops have gotten notably better lately and deserve a real look if low maintenance is your top priority.
How long does it take to stain butcher block countertops from start to finish?
One to three days, depending on your products, shop or kitchen temperature, and humidity. Hands-on time is only 3 to 5 hours. The rest is waiting on dry time.
A realistic one-counter schedule with oil-based stain and polyurethane:
- Day 1 morning. Sand, condition, let the conditioner sit 30 minutes. Apply the first stain coat, let it sit 10 minutes, wipe. Allow 6 to 8 hours dry.
- Day 1 evening. Confirm the stain is dry. Apply a second stain coat if you want more depth. Another 6 to 8 hours.
- Day 2 morning. Light 220-grit sand, wipe clean. First polyurethane coat. Allow 4 to 6 hours.
- Day 2 afternoon. Light sand, second poly coat. Another 4 to 6 hours.
- Day 2 evening or Day 3. Third poly coat. Allow 24 hours before you set anything on it.
Water-based stain and water-based poly can squeeze this into one long day, since those products dry in 1 to 2 hours. But temperatures below 50 degrees Fahrenheit or high humidity slow water-based products a lot, so do not count on the fast schedule in an unheated garage in autumn. [5]
Full chemical hardness, meaning the surface is as hard as it will ever get, takes 30 days for oil-based polyurethane. Treat the counter gently across that window. Keep rubber mats and anything that might leave a mark off a surface that is still curing.
Frequently asked questions
Can you stain butcher block countertops a dark color like espresso or walnut?
Yes. Gel stain is the most reliable product for dark finishes because it builds color evenly on the surface instead of soaking in unevenly. General Finishes Java Gel Stain and Minwax Gel Stain in Espresso are the ones people use most. Three to four coats, dried fully between each, gets you into dark walnut or espresso range. For near-black, add a dye layer under the gel stain for depth.
Is it safe to stain butcher block that is used as a food prep surface?
Stain itself is not food-safe. The safety question falls on the topcoat over it. Many fully cured polyurethane finishes meet FDA indirect food-contact standards, but you have to confirm it on the specific product's label or technical data sheet. Fully cured means the manufacturer's stated cure time has passed, more than surface dry. If in doubt, use a separate cutting board and protect the stained surface with a film finish.
Do you need to sand butcher block before staining?
Yes, always. Sanding to 120 to 150 grit opens the pores for even absorption and clears mill marks, old finish, and contamination that would block the stain. Skip it and you get blotchy, uneven color. Start coarser if the surface has deep scratches or old finish. Stop at 150 grit before staining; going finer cuts how well the stain soaks in.
How many coats of stain does butcher block need?
One coat gives a light, natural tone. Two coats lands you at a medium tone. Three or more, or gel stain instead of penetrating stain, gets you into dark brown or near-black. Let each coat dry fully per the label before the next, and do a light 220-grit scuff-sand between coats for the smoothest result.
What is the best sealer to use after staining butcher block?
Oil-based polyurethane is the most durable option. Three thin coats, light 220-grit sanding between each. Hardwax oil (Rubio Monocoat, Osmo Polyx) is a good alternative if you want spot-repair ability and can commit to an annual re-coat. Water-based polyurethane works with lower fumes but sits slightly softer under daily kitchen use.
Can you stain butcher block countertops that are already installed in the kitchen?
Yes, with more effort. Mask adjacent surfaces, remove or protect hardware, and ventilate well. Sanding is harder near walls and corners. Plan for the kitchen to be down 24 to 48 hours. A two-visit approach, prep and stain one day then topcoat the next, beats rushing it all into one session.
How long does stained butcher block last before needing refinishing?
A polyurethane-sealed stained surface in normal use typically lasts 5 to 10 years before refinishing. That range shifts with water exposure, whether pooling around the sink gets allowed, and how heavy daily use runs. Hardwax oil finishes need annual re-coats but can last indefinitely if maintained. Neglected oil finishes dry out and crack within two to three years.
Can you use Minwax stain on butcher block countertops?
Yes. Minwax Wood Finish penetrating stain is one of the most widely available and tested products for wood surfaces including butcher block. Use the matching Minwax pre-stain conditioner, especially on maple, to avoid blotching. Follow with a food-safe topcoat if the surface will touch food. Minwax polyurethane topcoats are commonly used over their stains.
What grit sandpaper should you use before staining butcher block?
Start at 80 grit if the surface has deep scratches or old finish. Otherwise start at 100 grit. Work through 120, then finish at 150 before staining. Do not go finer than 150 first; it closes the pores and cuts stain penetration. After staining and between topcoat coats, use 220 grit for light scuff-sanding only.
How do you get a black butcher block countertop look by staining?
For near-black, combine a black or ebony dye base coat (TransTint black concentrate is commonly used) with two to three coats of dark gel stain on top. The dye soaks deep; the gel stain evens the surface color. Seal with matte or satin oil-based polyurethane, since high gloss reads as plastic on very dark wood. The full process takes two to three days with dry times.
Does butcher block stain differently on end grain versus face grain?
Yes, a lot. End grain absorbs penetrating stain much faster and deeper than face grain, which makes liquid stain go blotchy. The fix is gel stain, which sits on the surface, or a generous pre-stain conditioner followed by wiping the stain off quickly. Most residential runs are face grain; true end-grain block shows the biggest difference.
How do you maintain a stained butcher block countertop long term?
With polyurethane, clean with mild soap and water, dry promptly, and re-caulk around the sink yearly. No special care until the finish shows wear, then scuff-sand and re-coat. With hardwax oil, apply a maintenance coat of the same oil once a year. Keep standing water off seams no matter the finish; water infiltration at a seam is the most common cause of early failure.
Is gel stain or regular stain better for butcher block?
Gel stain is better for end-grain block and for even, dark color. Regular penetrating stain is fine for face-grain block and lighter tones, especially with a pre-stain conditioner on dense species like maple. For a deep espresso or near-black result, gel stain is the more reliable choice regardless of grain, because it builds color more evenly on the surface.
Can you stain butcher block without sanding if it was previously oiled?
No. Oil in the fibers blocks stain absorption and causes heavy blotching. You have to sand back to bare wood, past the oil-saturated layer. On a counter treated with mineral oil for years, that may need a belt sander or drum sander rental to get deep enough. There is no shortcut that reliably works.
Sources
- U.S. Food and Drug Administration, Code of Federal Regulations Title 21 Part 175 (Indirect Food Additives: Adhesives and Components of Coatings): FDA regulates indirect food contact materials; fully cured coatings can meet these requirements depending on composition
- USDA Forest Service, Forest Products Laboratory, Wood Handbook (General Technical Report FPL-GTR-282), finishing guidance: Over-sanding to fine grits before finishing burnishes wood pores and reduces stain and finish penetration; 120 to 150 grit is recommended before staining
- Minwax Company, Pre-Stain Wood Conditioner Product Page: Pre-stain conditioner should be applied 15-30 minutes before stain to reduce blotching on soft or dense woods like maple; one quart covers approximately 125 square feet
- U.S. Fire Administration (FEMA), fire safety guidance on oil-soaked rags and spontaneous combustion: Oil-soaked rags can spontaneously combust and represent a real residential fire risk; rags should be laid flat to dry outdoors or submerged in water in a metal container
- Minwax Company, Fast-Drying Polyurethane and Wood Finish Technical Data: Oil-based stains typically require 4-8 hours dry time between coats; oil-based polyurethane requires 4-6 hours between coats and 24 hours before light use, with full hardness at 30 days
- Rubio Monocoat, Product Technical Data Sheet for Rubio Monocoat Oil Plus 2C: Rubio Monocoat hardwax oil has a pencil hardness of 4H and is certified food safe when cured; manufacturer recommends annual maintenance application for countertop use
- U.S. Environmental Protection Agency, Indoor Air Quality guidance on volatile organic compounds: Oil-based stains and finishes contain VOCs and require adequate ventilation during application; water-based alternatives have significantly lower VOC levels
- USDA Forest Service, Forest Products Laboratory, Wood Handbook: Wood as an Engineering Material (General Technical Report FPL-GTR-282): Wood species density and grain orientation significantly affect stain absorption rate and evenness; hard maple is among the densest domestic hardwoods and absorbs finish products more slowly than open-grained species like oak
- General Finishes, Gel Stain Application Instructions: Gel stain is specifically recommended for end-grain and blotch-prone species because it controls absorption; apply in thin coats, wipe off excess, allow full dry time between coats
Last updated 2026-07-09