TL;DR
- Installing Formica (high-pressure laminate) countertops is a realistic DIY project.
- You bond laminate sheets to a substrate with contact cement, trim the edges flush with a router, and finish the seams with color-matched filler.
- Material alone runs roughly $1 to 5 per square foot.
- A finished installed countertop lands between $15 and $40 per square foot depending on labor and edge treatment.
What exactly is Formica and is it the same as laminate?
Formica is a brand name, not a material category. The Formica Corporation invented high-pressure laminate (HPL) in 1913, and the name stuck so hard that most homeowners use it the way people say "Kleenex" for tissues. Any brand of HPL, including Wilsonart, Pionite, and Nevamar, installs the same way [1].
High-pressure laminate is made by stacking kraft paper sheets saturated with phenolic resin, then topping them with a decorative sheet and a clear melamine wear layer. The whole sandwich gets pressed under heat and pressure, typically above 1,000 psi. The result is a thin, hard sheet, usually 1/16 inch thick for standard grade, that gets glued to a particleboard or MDF substrate to make a countertop.
If you're comparing your options before committing, the broader laminate countertops guide covers every brand side by side. This article focuses purely on the installation process itself, from applying new laminate to a fresh substrate to re-covering an existing countertop.
The substrate matters as much as the laminate. Industrial-grade particleboard (45 lb density or higher) resists sagging and gives contact cement a solid bite [10]. Cheaper particleboard swells fast around sinks. MDF is heavier but more uniform. Either one works. Just avoid OSB, which is too coarse for a clean bond.
What tools and materials do you actually need?
You can do most of this job with tools you probably own or can rent for under $50 combined.
For cutting the laminate:
- A circular saw with a fine-tooth blade (80-tooth carbide), cutting face-down to avoid chipping the decorative surface
- A jigsaw for cutouts like sinks and cooktops
- A scoring tool and straightedge for narrow strips
For bonding:
- Contact cement, either solvent-based (stronger, more fumes, requires ventilation) or water-based (lower VOCs, slightly less aggressive bond)
- A notched spreader or disposable brush for applying cement
- Wooden dowels or slats, roughly 3/8 inch diameter, spaced 6 to 8 inches apart to act as slip sheets during positioning
For trimming and finishing:
- A laminate router with a flush-trim bit and a bevel bit (22.5-degree bevel for outside edges looks cleaner than dead 90 degrees)
- A file for hand-finishing corners
- J-roller or rubber rolling pin, at least 3 inches wide
- Color-matched seam filler from the laminate manufacturer
Materials list for a 25-square-foot L-shaped kitchen section:
- Laminate sheet: budget roughly 20% overage for waste and mistakes. A sheet sized 4×8 covers 32 square feet before waste.
- Particleboard or MDF substrate: 3/4 inch thickness is standard for countertops
- Wood build-up strips (1×3 or 1×4 pine) to bring the front edge and perimeter to full depth and create a substrate edge to laminate
- Silicone caulk for the backsplash joint
- Mounting screws to attach the countertop to cabinets from below (1-1/4 inch coarse-thread drywall screws work fine for particleboard)
Total material cost for a basic 25-square-foot run: typically $80 to 180 depending on laminate pattern and substrate choice [2].
How much does it cost to install Formica countertops?
Cost breaks into three buckets: materials, labor if you hire out, and add-ons like edge profiles or integrated backsplashes.
| Cost component | DIY range | Pro-installed range |
|---|---|---|
| Laminate sheet material | $1 to 5 per sq ft | $1 to 5 per sq ft |
| Substrate (particleboard/MDF) | $1 to 2 per sq ft | $1 to 2 per sq ft |
| Contact cement + supplies | $30 to 60 flat | included in labor |
| Labor (fabrication + install) | $0 | $10 to 25 per sq ft |
| Edge treatment (postform vs. custom) | $0 to 8 per linear ft | $5 to 15 per linear ft |
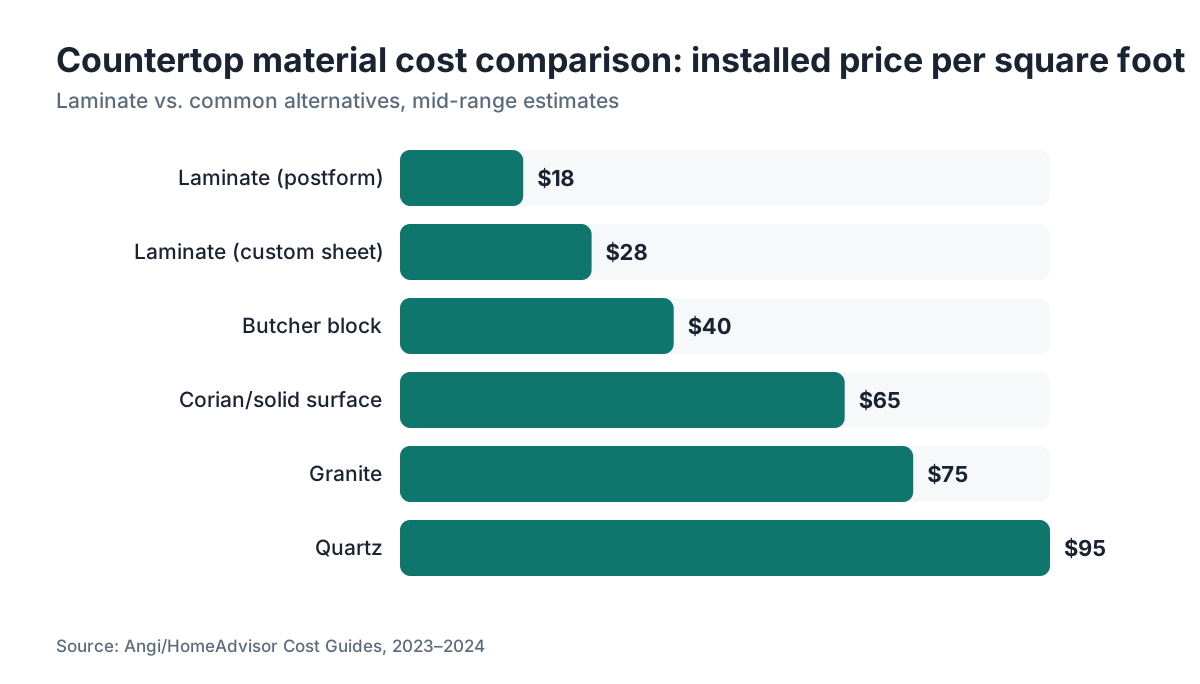
| Total installed | $3 to 8 per sq ft | $15 to 40 per sq ft |
Those pro labor numbers come from contractor cost surveys and vary by region [2]. The cheapest pro jobs use postform countertops, which are pre-manufactured with the laminate already bonded and a rounded front edge rolled on at the factory. You just cut them to length and attach them. Custom laminate work, where a shop builds the substrate and applies sheet laminate to a specific layout, commands higher labor rates because of the skill and time involved.
Laminate sits well below the alternatives. Quartz runs $70 to 130 per square foot installed; granite runs $50 to 100 [3]. If budget is the primary driver, laminate is the most affordable finished surface you can put in a kitchen. Period.
For homeowners planning a full kitchen remodel, the kitchen countertops guide has a broader cost comparison table across all material types.
How do you cut Formica laminate without chipping it?
Chipping is the most common rookie mistake with laminate. The decorative surface is brittle, and any blade that catches the face side tears it.
The fix is simple: always cut with the decorative face down when using a circular saw, because circular saw blades cut on the upstroke and the chip-out happens on the top surface. Flip that logic. Face down means the top surface of the laminate, the part you want to protect, sits against the saw base and away from the blade teeth as they exit the cut.
With a jigsaw, the blade also cuts on the upstroke, so face down applies there too. Use a fine-tooth blade designed for laminates, often called a reverse-tooth or down-cutting blade, which cuts on the downstroke and lets you keep the face up if you prefer.
For scoring and snapping narrow strips (under 2 inches wide), score deeply with a utility knife along a metal straightedge, then snap away from the score line. This works cleanly for edge strips.
Leave your rough-cut pieces about 1/4 to 1/2 inch oversized on all sides. You trim to final dimension with the router after gluing. Trying to cut laminate to exact final size before bonding is asking for a misaligned mess.
Sink cutouts: mark the opening from below, drill a starter hole just inside the line (1/4 inch or larger), and use a jigsaw. Work slowly. If the laminate sheet is already bonded to the substrate, score the top surface along the cut line with a utility knife first to reduce tearout.
How do you use contact cement to glue Formica down?
Contact cement is not like wood glue. You apply it to both surfaces, wait for it to get tacky (not wet), then join the two surfaces. The bond forms on contact, instantly and with real force. You get no second chances once the surfaces touch, which is why the slip-sheet method matters so much.
Step 1: Prepare both surfaces. They must be clean, flat, and free of dust, oil, and old adhesive. Lightly sand the substrate face with 80-grit if it has any high spots or dried glue. Wipe down with a dry cloth.
Step 2: Apply cement to both the laminate back and the substrate top. Use a notched spreader or brush for even coverage. Work in a ventilated space if using solvent-based cement. Water-based versions still need airflow.
Step 3: Wait. Touch the cement lightly with your knuckle every couple of minutes. When it no longer transfers to your skin but still feels slightly tacky, both surfaces are ready. Solvent-based cement typically flashes off in 10 to 20 minutes depending on temperature and humidity. Water-based cement can take 20 to 40 minutes.
Step 4: Lay wooden dowels or 3/8-inch wooden slats across the substrate at 6-inch intervals. Set the laminate on top of the dowels, cemented side down, and align it carefully. The dowels keep the two cemented surfaces apart while you position.
Step 5: Pull the center dowels first. Press the laminate down firmly in the center, then pull each outer dowel and press outward toward the edges. This pushes air bubbles out as you go.
Step 6: Roll with a J-roller using firm pressure across the entire surface. Roll in multiple directions. Pay extra attention to edges and corners.
Got a bubble? If the cement is still wet, you may be able to lift a corner carefully and reposition. If it's fully cured, a small bubble can sometimes be fixed by drilling a tiny hole, injecting a little contact cement with a syringe, letting it tack, and rolling. For anything larger, you're probably cutting the panel and restarting.
Water-based contact cement, sold under brands like Loctite and DAP, meets low-VOC standards in most states [4]. Solvent-based cement contains flammable solvents and needs adequate ventilation and respiratory protection [9].
How do you trim and finish the edges of laminate countertops?
After the laminate is bonded, you have overhanging material on all edges. This gets trimmed with a laminate router (or a standard trim router with a laminate bit kit).
For countertop tops: use a flush-trim bit, which has a bearing that rides the substrate edge and cuts the laminate exactly flush. Make a full pass around the perimeter. Move the router left to right (climb cutting can grab; standard direction is safer for beginners).
For edge laminate: countertop edges also need laminate applied. The sequence matters. Apply and trim the front edge strip first, then apply the top sheet so it overhangs the edge strip. When you trim the top, the edge strip underneath acts as the reference surface and you get a clean, nearly invisible seam.
Edge profiles:
- Flush square edge: simplest, laminate on top and a separate edge strip, routed flush. Visible seam line.
- Bevel edge: trim with a 22.5-degree bevel bit after flushing. Slightly softer look, hides minor glue lines.
- Roundover: use a small roundover bit (1/8 or 1/4 inch radius) for a gentle curved edge. Can pull away at corners if the laminate bond isn't perfect.
- Postform: this profile (the big sweeping curve from backsplash down to the counter and around the front) is factory-made only. You can't achieve it in the field with sheet laminate.
- Wood edge banding: glue a solid wood strip to the substrate edge, profile it on a router table, then apply the top laminate sheet over it. This is the premium DIY approach and looks genuinely nice.
Seam filler: laminate manufacturers sell color-matched caulk-style seam filler. Apply a thin bead along any seam between panels, tool it smooth, and wipe the excess. It won't make a seam invisible, but it fills the gap so it doesn't collect debris.
File work: after routing, run a fine single-cut file at a 45-degree angle along every routed edge to knock off the sharp wire edge. Takes 30 seconds per edge and prevents the laminate from micro-chipping later.
How do you install a postform Formica countertop?
Postform is the pre-laminated countertop you buy in stock lengths from a home center. It comes in standard depths (25.5 inches is the most common, accounting for a slight overhang past 24-inch cabinet bases) and gets cut to your wall length on site [8].
The postform install runs faster than sheet laminate work:
-
Measure the run carefully. For L-shaped kitchens, postform corners require either a mitered joint cut with a circular saw and a miter guide, or a separate corner piece sold by the manufacturer.
-
Mark and cut to length. A circular saw with a fine blade, face down, gives the cleanest cut. Postform end caps (color-matched plastic strips that glue to cut ends) seal exposed particleboard. Apply with contact cement.
-
Cut the sink opening with a jigsaw, using the sink template provided by the sink manufacturer. Support the cutout piece with painter's tape below so it doesn't fall and crack the laminate at the end of the cut.
-
Set the countertop on the cabinets and check for level. Shim as needed. Most installs use corner brackets or the cabinet's own corner bracing to attach from below with 1-1/4-inch screws. Don't over-drive, as particleboard strips out easily.
-
Scribe to the wall. Postform has a built-in backsplash that typically runs 4 inches high. Walls are rarely perfectly flat, so run a compass along the wall to scribe the laminate backsplash, then sand or belt-sand to the scribe line so it sits flush.
-
Caulk the backsplash-to-wall joint with a color-matched or clear silicone caulk.
Postform is the fastest route to a finished kitchen counter. A single-wall kitchen with no inside corners can be done in an afternoon. The tradeoff is limited color and pattern selection compared to sheet laminate, plus the signature rounded profile, which some people love and some associate with older kitchens.
What are the most common mistakes when installing laminate countertops?
These show up repeatedly, and all of them are avoidable.
Misaligning the sheet before the cement grabs. This is the big one. Once contact cement touches, it holds. Always use the dowel/slip-sheet method for anything larger than a 12-inch strip. There is no workaround if you get it wrong.
Applying cement too thick. A heavy coat bubbles, runs, and takes forever to flash off. You want thin, even coverage. Two thin coats (letting the first tack before applying the second) give better results than one thick coat on porous substrates.
Not checking substrate flatness. Any high spot in the substrate telegraphs through to the laminate surface. A 6-foot straightedge dragged across the substrate before laminating catches problems. Sand or scrape high spots down.
Cutting the decorative face up with the wrong blade. Already covered, but it's the most visible mistake because you can't un-chip laminate.
Forcing a tight butt joint between sheets. Laminate expands slightly with heat and humidity. Leave a hairline gap at seams, fill with seam filler, and don't force sheets tightly together.
Skipping the file pass after routing. The router leaves a sharp arris that chips off in flakes over months. Thirty seconds with a file eliminates this.
Using drywall compound to level the substrate. It absorbs moisture, swells, and destroys the bond. Use a wood filler rated for exterior or kitchen use, or a two-part epoxy filler.
For fabricators managing multiple laminate installs, tracking material waste and labor times across jobs is where software helps. SlabWise's quoting tools let shops price laminate work accurately by the square foot, including edge treatments, without building a new spreadsheet for every job.
Can you install Formica over existing countertops?
Yes, under specific conditions. This is sometimes called a laminate overlay or re-laminate, and it saves the work of demolishing and replacing the substrate.
It works when:
- The existing surface is flat, solid, and firmly attached to the cabinets
- The existing surface isn't laminate that's peeling or bubbling
- The added thickness (1/16 inch for the new laminate plus any adhesive) won't create a problem at edges, appliances, or existing backsplash
It doesn't work well when:
- The substrate is water-damaged or soft
- The existing surface is ceramic tile (too uneven for a clean bond without skim coating)
- You're overlaying existing laminate that has delamination anywhere, because the new cement bonds to the old laminate but the old laminate isn't bonded to the substrate underneath
Over laminate, sand the existing surface with 80-grit to rough it up, clean thoroughly, and apply contact cement to both surfaces. The bond quality is slightly lower than laminate-to-raw-substrate, but for flat, clean existing laminate in good condition, it holds fine under normal kitchen use.
Over solid wood (like an old butcher block), overlay laminate works well. Sand the wood smooth, fill grain gaps with wood filler, and proceed normally. If you're curious how butcher block countertops compare as a standalone choice, that's covered separately.
How do you handle corners, seams, and inside cuts?
Corners and seams are where DIY laminate installs either look professional or look homemade. The difference is almost entirely prep and patience.
Inside corners (L-shaped kitchens): Sheet laminate can't turn an inside corner without a seam. Position the seam so it falls in a less visible location, away from the main prep area if possible. Cut both sheets so the seam is dead straight and the edges are factory-cut (laminate factory edges are straighter than most DIY cuts). Apply each sheet separately, let the cement cure, and fill the seam with color-matched filler.
Outside corners: Apply the front strip to both faces of the outside corner, overlap one strip onto the adjacent face by about 1/4 inch, then trim flush after cementing. File the corner smooth to a slight bevel. This is where most chips happen, so the file pass matters most here.
Sink cutouts in sheet laminate: Template the opening after the laminate is bonded to the substrate. Use the sink rim as the template, trace the inside of the rim, subtract 1/8 inch (you want the rim to overlap the laminate edge), drill a starter hole, and cut with a jigsaw. Seal laminate edges around sink openings with a thin bead of clear silicone to keep moisture off the substrate.
Cooktop cutouts: Same process as sinks. The one difference is that cooktops don't have a soft gasket like sink rims, so the fit tolerance is tighter. Score the cut line with a knife before jigsawing.
Building up substrate thickness for seam alignment: if you're joining two sections and the substrate pieces are slightly different heights, you'll see a step at the seam. Clamp the sections together and use a belt sander or hand plane to flush them before laminating. This is much easier than trying to fix height differences after the laminate is glued.
How long does Formica last and how do you maintain it?
Well-installed laminate countertops last 10 to 20 years in typical kitchen use, sometimes longer if the substrate stays dry [5]. The limiting factor is almost always edge wear, substrate moisture damage around sinks, or surface burns from hot pans, not the wear layer itself.
Formica's own care guidance says to avoid abrasive cleaners and cleaners with sodium hypochlorite (bleach) at full concentration, which can dull the wear layer over time [6]. For daily cleaning, soap and water or a diluted all-purpose cleaner is enough. Dry spills promptly, especially near seams and edges where water can wick into the substrate.
What laminate can't recover from:
- Burns. Laminate scorches and cannot be repaired short of replacing the panel. Use trivets.
- Deep cuts. The substrate shows through. Use a cutting board.
- Swollen substrate from prolonged water exposure. Once the substrate puffs up, the laminate over it bubbles and separates. The fix is replacement.
For comparison, surfaces like quartz and granite countertops handle heat and cuts better, but at three to five times the installed cost. Laminate makes sense when budget matters more than those specific properties.
To compare long-term maintenance across a wider range of surfaces, the countertop installation overview has that breakdown.
When should you hire a pro instead of doing it yourself?
Be honest with yourself here. DIY laminate installation saves real money but has a few scenarios where hiring out makes more sense.
Hire a pro when:
- Your kitchen has more than two inside corners. Each seam is a new opportunity for misalignment, and complex layouts require more precise scribing, fitting, and sequencing than most first-timers handle cleanly.
- You need a custom radius or curved edge. Sheet laminate does not bend cold around tight curves (minimum radius is roughly 9 inches for standard-thickness HPL without heat forming). Shops with profile wrappers or post-form equipment do this routinely.
- The existing cabinets are severely out of level. Shimming works up to a point, but cabinets more than 1/2 inch out of level across a run require more work than shims alone, and getting this wrong means your countertop rocks.
- You're uncomfortable with contact cement in a poorly ventilated space. Solvent-based cement is genuinely hazardous without proper respiratory protection and airflow [9].
DIY is the right call when:
- You have a simple single-wall or two-wall run with one or two seams
- You're doing a postform install (honestly one of the more approachable DIY countertop projects)
- You've done trim carpentry or cabinetry before and are comfortable with a router
Professional laminate installation typically runs $10 to 25 per square foot for labor alone, on top of materials [2]. On a 40-square-foot kitchen, that's $400 to 1,000 in labor savings if you do it yourself. That's meaningful. Just be realistic about the job's complexity before committing.
Frequently asked questions
Can I install Formica countertops myself with no woodworking experience?
A postform countertop install, where the laminate is pre-bonded at the factory, is genuinely accessible for a careful first-timer. Sheet laminate on a custom substrate is harder: contact cement is unforgiving, and routing requires a steady hand. If you've never used a router, practice on scrap first. Budget an extra half-sheet of laminate for mistakes.
What's the difference between Formica and Wilsonart laminate for installation purposes?
There is no meaningful difference in installation. Both are high-pressure laminate sheets that bond with contact cement, cut with the same tools, and trim with the same router bits. The brands compete on color and pattern selection, warranty terms, and price. Wilsonart's standard sheet price tends to run slightly lower; Formica's pattern library skews larger. Install process is identical.
How do I cut a perfect straight line in Formica laminate?
Clamp a metal straightedge to the sheet and run a circular saw along it with a fine-tooth blade, face down. For narrower strips, score deeply with a sharp utility knife along the straightedge and snap cleanly away from the scored side. Factory edges are straighter than most saw cuts; if an edge will be visible, orient a factory edge there when possible.
What kind of contact cement works best for Formica installation?
Solvent-based contact cement (like DAP Weldwood original) gives a stronger initial bond and a faster flash time, usually 10 to 20 minutes. Water-based formulas (like DAP Weldwood water-based or Loctite's version) have lower VOCs and comply with California's air quality rules. For kitchen countertops, either works if surfaces are clean and cement goes on in thin, even coats.
How long does contact cement need to dry before I join the laminate to the substrate?
Wait until the cement is tacky but doesn't transfer to your knuckle when touched lightly. Solvent-based cement typically reaches this stage in 10 to 20 minutes at room temperature. Water-based cement takes 20 to 40 minutes. Join too early and the bond is weak. Wait too long (over an hour for solvent-based) and the cement may no longer bond without a fresh coat.
Can I install new Formica over old laminate countertops?
Yes, if the existing laminate is flat, firmly bonded, and free of bubbles or peeling sections. Sand the old surface with 80-grit to improve adhesion, clean thoroughly, and apply contact cement to both surfaces. The bond to old laminate is slightly less aggressive than to raw particleboard, but holds under normal use. Don't overlay laminate that has any water damage or delamination.
How do I attach a Formica countertop to cabinets?
Drive screws up through the corner braces or mounting strips inside each cabinet into the substrate from below. Use 1-1/4-inch coarse-thread drywall screws; don't exceed that length or you'll poke through the top. Space screws roughly every 18 to 24 inches. Don't use construction adhesive between the countertop and cabinet tops; it makes future removal nearly impossible and adds no structural benefit.
How do I make Formica seams less visible?
Keep seams away from high-visibility areas and use factory-cut edges where possible, as they're straighter than field cuts. Apply color-matched seam filler (available from Formica and Wilsonart) immediately after install. A seam between two sheets will always be slightly visible on close inspection; there's no method that makes it disappear. A solid-color or low-contrast pattern hides seams better than a busy stone-look pattern.
What router bit do I need to trim laminate?
You need two bits at minimum: a flush-trim bit with a top or bottom bearing (1/2-inch or smaller shank) for trimming the overhang after bonding, and a bevel bit (usually 7 or 22.5 degrees) for finishing the trimmed edge so it doesn't feel sharp. A 3-in-1 laminate bit set from most router bit brands costs $20 to 40 and covers both needs.
How do I prevent Formica from chipping at the edges over time?
Three things help: file every routed edge at 45 degrees immediately after routing to remove the sharp arris; use a bevel or roundover bit rather than a straight 90-degree trim; and choose a thicker laminate grade (3/32 inch instead of 1/16 inch) for high-wear areas [7]. Square outside corners chip more than rounded ones regardless of how well the install went.
How do I cut the sink hole in a Formica countertop?
Trace the sink cutout template (supplied with the sink) on the substrate after the laminate is bonded. Drill a starter hole inside the line, at least 1/4 inch diameter. Cut with a jigsaw using a fine-tooth blade, with the countertop face up if using a down-cutting blade or face down if using a standard blade. Support the cutout with tape so it doesn't crack the laminate at the end of the cut.
Does Formica countertop installation require a permit?
In most U.S. jurisdictions, replacing countertops is cosmetic work and doesn't require a building permit. Permits are typically triggered by structural changes, new plumbing rough-in, or electrical work. If you're also moving the sink location, that plumbing work may require a permit. Check with your local building department; rules vary by city and county.
How do I scribe a postform countertop to an uneven wall?
Set the countertop in place and push it tight to the wall at its highest point. Set a compass to the widest gap between the backsplash and the wall. Run the compass along the wall with the metal point on the wall and the pencil on the backsplash; this traces the wall's contour onto the laminate. Sand or belt-sand the backsplash to that line, then push the top back against the wall for a tight fit.
What's the minimum radius Formica can bend to without cracking?
Standard 1/16-inch-thick high-pressure laminate bends to a minimum radius of about 9 inches cold. Thicker grades (3/32 inch) are stiffer and crack at tighter radii. For tighter curves, the laminate needs to be heated with a heat gun or strip heater until pliable, then bent around a form. Postform machines in shops use heat to achieve the smooth rounded front edge you see on pre-made countertops.
Sources
- Formica Corporation, brand history and product overview: Formica Corporation invented high-pressure laminate in 1913; the brand name is commonly used generically for HPL products.
- HomeAdvisor (Angi), Laminate Countertop Cost Guide: Professional laminate countertop installation runs approximately $15 to 40 per square foot installed, with labor at $10 to 25 per square foot.
- HomeAdvisor (Angi), Countertop Installation Cost Guide: Quartz countertops run $70 to 130 per square foot installed; granite runs $50 to 100 per square foot installed.
- California Air Resources Board, Consumer Products Regulations: Water-based contact cement formulations meet low-VOC standards under California consumer products regulations; solvent-based cement may not comply in regulated jurisdictions.
- U.S. Department of Housing and Urban Development, Residential Rehabilitation Inspection Guide: Laminate countertops have an estimated useful life of 10 to 20 years under normal residential use conditions.
- Formica Corporation, Care and Maintenance Guidelines: Formica guidance states to avoid abrasive cleaners and undiluted bleach (sodium hypochlorite) which can dull the laminate wear layer.
- Wilsonart LLC, High-Pressure Laminate Fabrication Guide: Standard HPL thickness for countertop applications is 1/16 inch; thicker grades (3/32 inch) are recommended for high-wear horizontal surfaces.
- National Kitchen and Bath Association (NKBA), Kitchen Planning Guidelines: Standard countertop depth for residential kitchens is 25.5 inches to allow slight overhang past 24-inch base cabinet depth.
- Occupational Safety and Health Administration (OSHA), Chemical Hazards: Contact Adhesives: Solvent-based contact cements contain flammable solvents and require adequate ventilation and respiratory protection during application.
- American Wood Protection Association / Particleboard Standard ANSI A208.1: High-density particleboard (45 lb/ft3 or greater) is recommended for countertop substrate applications to resist sag and provide adequate screw holding.
Last updated 2026-07-09