TL;DR
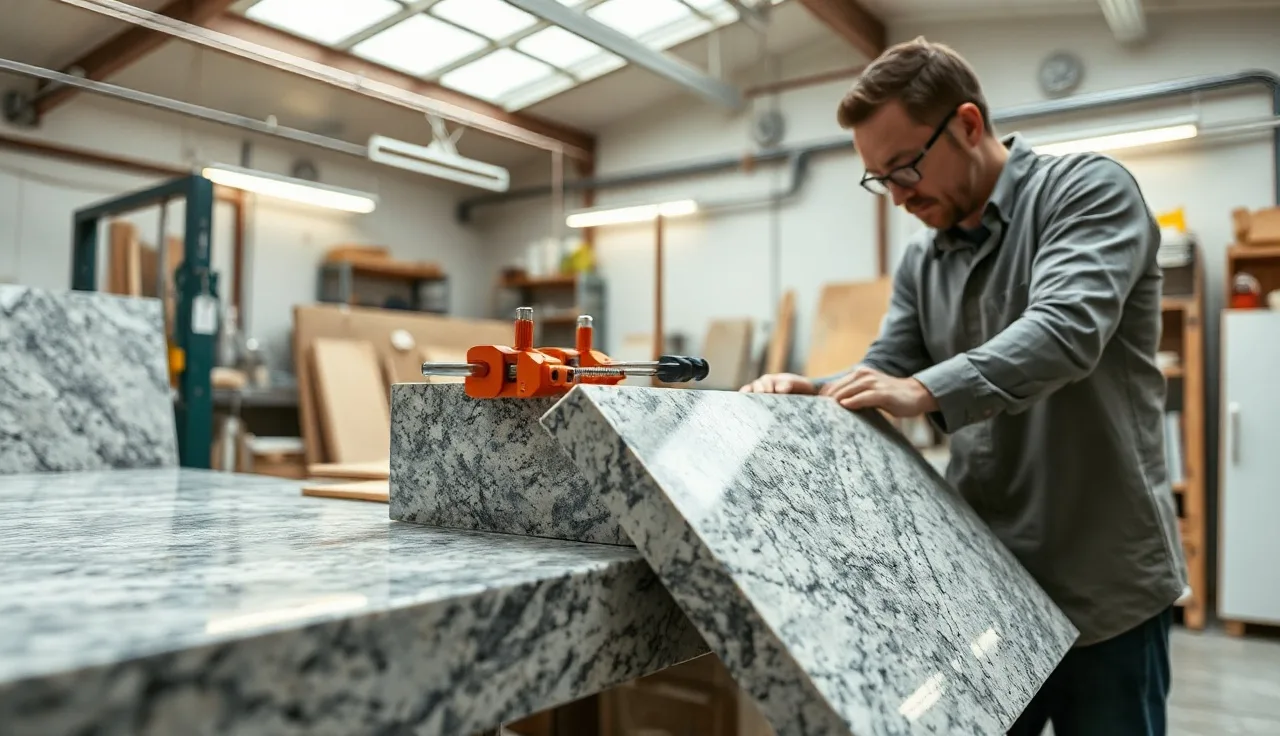
- A seam setter is a suction-cup clamp that pulls two stone slabs to the same height and draws them tight while epoxy cures.
- You suction the cups to each slab, then turn a center cam or screw to close the height gap and pull the joint together.
- Most sets take 5 to 15 minutes to place and hold for 20 to 45 minutes while the adhesive sets.
What is a seam setter tool and what does it actually do?
A seam setter holds two pieces of stone at the same height and at zero gap while a color-matched epoxy or polyester adhesive cures underneath. That's the whole job. It doesn't cut the stone, it doesn't apply the adhesive, and it won't rescue a badly mitered or poorly ground joint. What it does is take the human hand out of the equation during the wait, and the wait is where most seam problems start.
The tool has three parts. Two suction pads (four on wider models) anchor to the top face of each slab. A bridge or rail connects them across the seam line. A center adjustment, either a cam lever, a threaded screw, or a ratchet depending on the brand, pulls the slabs together horizontally and forces both pad assemblies to the same vertical plane at the same time. Engage the center mechanism and the slabs lock in place until you release it.
Before seam setters, installers relied on shims, tape, and a lot of hands pressing down on both sides. Results were all over the map.
Stone is heavy, epoxy is slippery when wet, and a half-millimeter height difference across a seam is both visible and rough to the touch. The seam setter made flush seams repeatable, which is why it became standard equipment in most stone shops through the 1990s. It's now considered non-negotiable on natural stone and engineered quartz alike [1].
What types of seam setter tools are available?
There are three tool families, and the differences matter depending on the material and where the seam sits. Cam-style for speed, screw-style for control, pneumatic or hydraulic for production floors.
Cam-style seam setters are the most common in residential fabrication. A rotating cam lever at the center bridge applies the clamping pressure. They're fast, cheap (most 4-cup kits run $80 to $200), and work well on slabs 3/4 inch to 1-1/4 inch thick. The catch: a cam applies a fixed amount of force and won't let you fine-tune horizontal pull separately from vertical alignment.
Screw-style seam setters use a threaded center bolt instead of a cam. They're slower to set but give you more precise control, which matters on very thin material (some engineered stone runs 12mm or thinner) or on irregular surfaces where suction is hard to hold. Shops doing high-end marble work often reach for screw-style for exactly this reason.
Pneumatic or hydraulic seam setters exist for production shops and larger commercial jobs. These are shop-floor tools, not installer-van tools. They apply consistent, measurable force and earn their keep when a shop sets many seams a day and consistency across technicians beats portability.
Beyond the mechanism, you'll find seam setters with 2, 4, or 6 cups. Two-cup sets handle short seams under about 18 inches. Four-cup sets are standard for most kitchen seams. Six-cup or extended-rail sets handle longer seams or L-shaped transitions where the seam runs to a corner.
Suction pad diameter varies too. Larger pads (4 to 5 inches) grip better on honed or leathered finishes where suction is harder to get. Smaller pads (2.5 to 3 inches) fit tight spots near sinks or cooktops. Most kits include two sizes. If yours doesn't, buy the spare pad sets before you need them on a job, not after.
What tools and supplies do you need before you start?
The seam setter is step one. The rest of the list is short, and every item on it earns its place.
You need a color-matched stone epoxy or polyester adhesive. For natural granite, quartzite, or marble, a two-part polyester or epoxy tinted to match the stone background is standard [2]. For engineered quartz (Cambria, Silestone, and the rest), most manufacturers name a specific adhesive type in their installation guidelines, and the wrong chemistry can hurt both bond strength and appearance. Read the spec sheet before you buy.
You need acetone or a stone-safe degreaser to clean the mating edges and the top face where the cups will sit. Oil, dust, or debris on the suction surface drops holding power fast, and any contamination on the mating edges weakens the epoxy bond.
Solid support under both pieces is not optional. A seam setter corrects height differences between two slabs, but it can't fix slabs that aren't properly supported. If one piece bridges a gap in the cabinet below, it flexes under clamping pressure, and the seam opens the moment you release the tool.
You also want mixing sticks, a putty knife or margin trowel for the adhesive, masking tape for both sides of the seam line, a razor blade for cleanup, and a timer. Nothing fancy. Most fabricators keep all of it in a dedicated seam kit that rides to every job.
How do you prepare the seam before placing the tool?
Prep is where the seam is won or lost. The seam setter holds what you give it. It doesn't fix a bad edge.
First, dry-fit both pieces with no adhesive. Push them together and read the joint from every angle. There should be no gap you can see with the naked eye along the face, and the heights should land within about 1/16 inch of each other (the setter closes the rest). See a visible gap in the dry fit? Stop and regrind the edge. Trying to fill a gap with extra epoxy gives you a seam that looks thick and foggy.
Clean the mating edges with acetone on a clean rag. Let it flash off, about 30 seconds. Then clean the top surface of each slab in the 6-inch zone where the cups will land. Any wax, sealer, or oil there makes the cups slip under load, and a cup that lets go mid-cure is a ruined seam.
Run masking tape along both sides of the seam line on top, leaving about 1/8 inch of bare stone on each side of the actual joint. This speeds cleanup and keeps adhesive smears off the slab face.
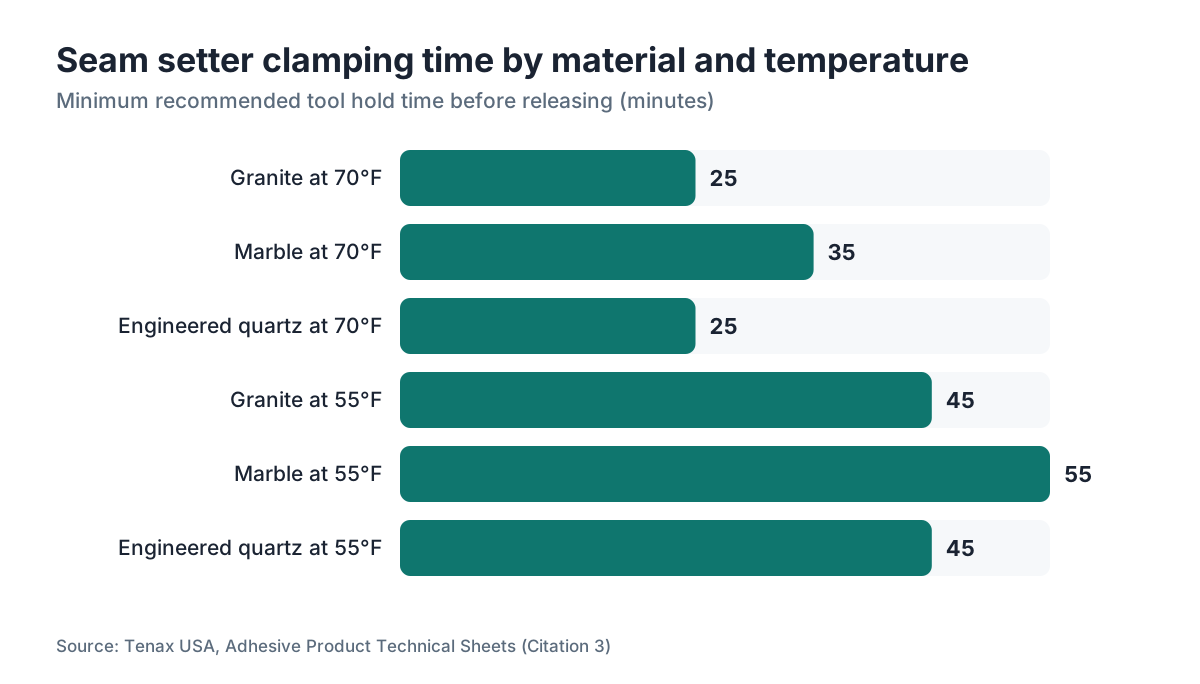
Mix your adhesive and stage it before you place the tool. Two-part epoxy has a working time that shifts with product and temperature, usually 5 to 15 minutes at 70°F [3]. In a cold shop or on a cold slab (below 50°F), working time stretches but so does cure time. In direct sun or on a warm slab, working time shrinks fast. Know your product's pot life before you mix a drop.
How do you place and operate a seam setter step by step?
Here's the procedure, in the exact order you run it.
Step 1: Position the tool on the dry seam. Place the seam setter across the joint with the cups on the top face of each slab, roughly equal distance from the seam line. The bridge sits directly over the seam. On a standard 4-cup tool, you'll have one cup left of the seam and one right on the front half, then the same toward the back.
Step 2: Engage the suction on each cup. Press each cup firmly onto the stone and work the lever or pump that pulls the vacuum. You should feel real resistance when you try to lift it. If a cup releases easily or hisses air, reposition it. A leaking cup is not safe to trust.
Step 3: Test the dry-fit alignment. With the cups suctioned but before you clamp, confirm both slabs still sit in the right spot relative to each other. This is your last easy chance to nudge horizontal placement.
Step 4: Remove the tool, apply adhesive, and re-set. Lift the tool off (release the cups one at a time), run a thin bead of mixed adhesive onto one mating edge, and push the pieces together. Reset the cups exactly as before.
Step 5: Engage the clamping mechanism. On a cam tool, rotate the center lever until you feel firm resistance. On a screw tool, turn the center bolt until both pads sit at the same height and the seam closes horizontally. Don't overtighten. More force doesn't mean a better seam. It means you're more likely to lift one slab off its substrate or crack thin material.
Step 6: Check the seam while you can still fix it. Drag a finger across the joint. If one side stands proud, adjust the mechanism. Wipe squeeze-out with a putty knife before it skins over.
Step 7: Let it cure with the tool in place. Most installers leave the setter on for 20 to 45 minutes depending on adhesive and temperature [3]. Don't rush it. Releasing early is the single most common cause of failure on an otherwise clean joint.
Step 8: Release and clean up. Release the cups, pull the masking tape in one motion, and shave any cured adhesive flush with a fresh razor blade. Blend the seam area with a polishing pad if it needs it.
How tight should a properly set seam be, and what does a good seam look like?
Industry practice, based on guidance from the Marble Institute of America (now the Natural Stone Institute), puts a finished countertop seam at no wider than 1/16 inch (about 1.5mm), and closer to 1/32 inch when you can get it [4]. The Natural Stone Institute's installation standards describe a seam that should be "inconspicuous" and "level across both surfaces," which in the field means no height step you can feel with a fingertip.
A good seam reads as a thin line of color-matched filler and nothing more. You notice the pattern in the stone, not the joint. The two slabs feel like one surface. You only get that when the edge prep is accurate, the adhesive matches the stone color, and the setter held both pieces in plane for the full cure.
A bad seam shows one or more tells: a visible gap, a step you can feel, a white or wrong-color filler line, or a hairline crack through the filler from load hitting a joint that wasn't done curing. None of those come from the seam setter itself. They come from weak edge prep, wrong adhesive, or letting go of the tool too soon.
On patterned stones like book-matched marble or a heavily veined quartzite, where you put the seam matters as much as how you execute it. No amount of clamping precision hides a seam that cuts straight through a high-contrast vein. Good fabricators plan seam locations during templating and cutting, not during install. If you want to see how that planning happens at the layout and quoting stage, SlabWise handles seam placement during nesting and quoting so fabricators can flag hard seam locations before the job ever reaches the installer.
What can go wrong and how do you fix it?
Suction cup failure during cure is the most common problem. Either the cup never sealed right or the vacuum bled out over 20 minutes. Prevention is the whole answer: clean the slab surface before every placement and test each cup before you touch adhesive. If a cup lets go mid-cure and the adhesive hasn't fully set, you can sometimes press the slab back by hand and hold it, but the result rarely matches a properly tooled seam. If the adhesive already set crooked, you're grinding it out and redoing it.
Slab lifting is the second issue. If the substrate under one piece isn't solid, the clamping force pulls the floating slab up instead of pulling the two pieces level. Check substrate support before you place the tool. On a cabinet run with an unsupported span near the seam, drop in a temporary support block from below before clamping.
Epoxy squeeze-out that cures before you wipe it leaves a ridge you then have to shave with a razor or grind with a polishing pad. Not structural, just annoying and slow. The fix is easy: wipe squeeze-out within the first 60 seconds after clamping, before it starts to skin.
Color mismatch in the filler line is a finishing problem, not a tooling one. It comes from an untinted adhesive or a tint that doesn't match the slab background. Buy pre-tinted kits matched to your stone, or learn to tint your own with pigment powders. Most stone suppliers sell matching kits right alongside the slabs.
On engineered quartz like Cambria countertops and other branded surfaces, the warranty may specify an approved adhesive. Cambria's care and installation guidance names approved adhesive products, and a visible seam failure with the wrong product can void coverage [6]. Worth knowing before the homeowner calls.
One more thing worth saying: grinding a seam edge to fit generates crystalline silica dust, and engineered stone runs high on silica content. NIOSH flags engineered stone fabrication as a source of elevated silica exposure [8], and OSHA's construction silica standard (29 CFR 1926.1153) applies to cutting and grinding operations, seam edge prep included [7]. Wet-grind or use dust control. This is a real health issue, not a formality.
Do homeowners ever use seam setter tools, or is this strictly a fabricator skill?
Honest answer: seam setting is almost always a fabricator or professional-installer job, not a homeowner one. The tool itself isn't hard to run. The context around it takes time to build: edge grinding to a precise fit, adhesive color matching, reading working time, and knowing when a joint is good enough versus when it needs a regrind.
Some motivated homeowners do tackle a small seam, usually on a DIY outdoor kitchen or a utility area where cosmetic perfection isn't the point. For those, a basic 4-cup cam-style setter runs about $100 to $150, an adhesive kit adds $20 to $40, and the learning curve is real but manageable on forgiving material. Granite forgives more than marble. Engineered quartz forgives less than either, because the pattern is printed and a color miss in the filler jumps out.
For most homeowners, knowing how seam setters work matters mainly for judging an installer's work and asking sharp questions. If an installer promises an invisible seam, that's an overclaim. Stone seams are always visible on close inspection. If they say the seam will be tight and flush with matched-color fill, that's a fair promise, and the seam setter is the tool that delivers it.
For the bigger picture on what drives seam quality and visibility during a full job, the countertop installation overview shows where seam planning fits in the project sequence.
How does seam setting differ between granite, marble, quartz, and quartzite?
The procedure barely changes across stone types. What changes is adhesive choice, working time, and how visible the seam ends up given the material's pattern.
| Material | Preferred adhesive | Typical working time at 70°F | Seam visibility |
|---|---|---|---|
| Granite | 2-part polyester or epoxy | 8-12 min | Low to moderate, depends on pattern |
| Marble | 2-part epoxy (slower cure preferred) | 10-20 min | High on veined material |
| Quartzite | 2-part epoxy | 10-20 min | High on complex patterns |
| Engineered quartz | Manufacturer-specified epoxy | 5-15 min | Moderate; color match is critical |
| Porcelain slab | Epoxy; larger suction cups needed | 10-20 min | Low on solid colors; high on stone-look |
Marble is the most demanding. It's soft enough to chip at the edge during dry-fitting, and highly veined material like Calacatta shows even a tight seam. On marble countertops with strong veining, the conventional advice holds: put the seam in the least conspicuous spot you can, and tell the customer it'll be visible rather than promise it away.
Granite forgives more. Many granites carry a tight speckled or granular pattern that hides a well-colored seam line. Granite countertops are also denser and harder at the edge than marble, so dry-fitting chips less often.
Caesarstone's installation documentation, for reference, specifies both adhesive type and seam gap tolerances for engineered quartz [10]. For quartzite specifically, see the cleaning notes at how to clean quartzite countertops, since a freshly set seam needs time to cure before any acidic cleaner touches it.
How do you maintain and care for seam setter tools?
Seam setters aren't complicated machines, but they fail in predictable ways if you ignore them.
The suction cup is the highest-wear part. The rubber or silicone pad degrades over time, and fast if it ever meets acetone or other solvents. Wipe cups with a damp cloth only, never solvent. Replace pads when a cup stops holding on a clean, smooth surface. Replacement pads run $5 to $20 per cup, and suction cup pads are a standard consumable in stone shops, replaced by condition rather than on a fixed schedule [9]. Keep a spare set in the van.
The cam lever or screw mechanism wants occasional lubrication. A light shot of dry PTFE lubricant keeps it moving. Skip WD-40; it attracts dust and leaves a film that can foul slab surfaces. Do this every few months on a heavily used tool.
Store seam setters flat, never hanging from the cups. Hanging deforms the rubber and wrecks the seal face over time. A padded tray in a drawer or a dedicated slot in a job box is the right home.
After every use, wipe off stone dust and adhesive before it hardens on the mechanism. Cured epoxy in the cam pivot or the screw threads will seize the tool. A quick dry-rag wipe right after use heads off most maintenance headaches.
A quality set lasts many years in a production shop if you look after it. Buying your first one? Brands you'll see at stone supply distributors include Tenax, Integra, and a range of Chinese-made generics. The generics work, but cup quality varies a lot. Buy from a stone supply house, not a general hardware store, so the cup rating actually matches stone weight.
How much do seam setter tools cost, and where do you buy them?
Entry-level 4-cup cam-style sets run $80 to $150 from stone supply distributors. Mid-range sets with larger cups, a screw mechanism, and a carrying case land at $150 to $300. Professional sets with aluminum rails, heavy-duty cups, and replacement pad kits included reach $400 to $600 for a full configuration [5].
You won't find quality seam setters at Home Depot or Lowe's. The right channels are stone fabrication supply distributors (M3 Technologies, Integra Adhesives, Park Industries supply divisions) or online suppliers like BB Industries and Tenax USA. Buying from a distributor also means you can get adhesive, replacement cups, and technical support from someone who actually knows stone fabrication.
For shops tracking tool costs against job costs and overhead, those numbers feed your quote margin. Skip tool depreciation and you're underpricing. A $300 set spread across 200 jobs adds about $1.50 per job in tool cost, small but real, and it belongs in a complete job cost model.
Want to see how tool costs and labor fold into a full countertop quote? SlabWise has a demo that walks the cost structure of a complete job at slabwise.com.
Frequently asked questions
How long should I leave a seam setter on before removing it?
Most fabricators leave it on for 20 to 45 minutes at room temperature (around 70°F). The exact time depends on the adhesive and the conditions. Cold slabs or cold shops slow the cure; if the slab or shop sits below 55°F, add 15 to 30 minutes. Always check your specific adhesive's technical data sheet for recommended cure time before you release clamping pressure.
Can a seam setter fix a gap between two stone slabs?
It closes and holds a gap while adhesive cures, but it can't compensate for a poorly ground or badly mitered edge. If the dry-fit gap is visible to the naked eye (roughly more than 1/32 inch), regrind the edge before you set the seam. Filling a large gap with extra epoxy gives you a filler line that looks thick, foggy, and obvious, especially on dark stones.
What adhesive should I use with a seam setter for quartz countertops?
For engineered quartz, follow the manufacturer's specified adhesive. Cambria, Silestone, and Caesarstone each publish installation guides that name approved products. An off-spec adhesive can hurt bond strength, seam appearance, and warranty coverage. Your stone supplier should stock the correct kit for the specific quartz brand you're installing.
Why does my suction cup keep releasing during the cure period?
Usual causes: residual wax, sealer, or oil on the slab surface, a damaged or hardened rubber pad, or a rough or honed finish that blocks full seal contact. Clean the surface with acetone and let it dry before placing cups. Inspect the cup rubber for cracking or deformation. On honed or leathered surfaces, try larger-diameter cups that cover more area.
How do I know if my seam meets industry standards?
The Natural Stone Institute specifies a seam no wider than 1/16 inch, level across both surfaces, with no height step you can feel when you drag a finger across the joint. The adhesive fill should be color-matched to the stone. A seam that clears those three checks (tight, flush, color-matched) is acceptable by professional installation standards.
Can I use a seam setter on porcelain slab countertops?
Yes, but porcelain needs larger-diameter cups because the material is harder and denser, so suction is harder to hold, and the edges can be more fragile. Use a screw-style or slow-cam setter for controlled force. Porcelain also runs thin (often 12mm), so overtightening is more likely to crack the slab at the seam edge. Go slow and don't force the mechanism.
Should the seam setter bridge sit directly over the seam line?
Yes. Center the bridge over the seam so both cup assemblies sit equidistant from the joint. That keeps the clamping force symmetrical and lets the vertical correction pull both pieces to the same height off the same reference point. Off-center placement puts uneven force on the joint and can tilt one slab slightly.
What is the difference between a 2-cup and a 4-cup seam setter?
A 2-cup setter has one cup per slab and handles short seams under about 18 inches. A 4-cup set has two cups per side, which spreads clamping force over a longer span and holds both slabs more stably during cure. For standard kitchen seams, a 4-cup set is the right call. For very long seams over 36 inches, some fabricators run two 4-cup sets in tandem.
Does the seam setter go on before or after applying adhesive?
You position and test it during the dry fit before adhesive, then remove it temporarily while you apply adhesive to the mating edge, then reset it immediately after pushing the pieces together. That sequence lets you confirm cup placement and slab position on a clean joint first, so any adjustment is easy before adhesive is in play.
How do I remove cured adhesive from the seam after releasing the tool?
Use a fresh, sharp razor blade held nearly flat against the surface and shave the cured squeeze-out flush. Work slowly and keep the blade angle low to avoid scratching the stone. On polished surfaces, follow with a light buff using a polishing pad. Pulling the masking tape from both sides while the adhesive is still rubbery, not fully hard, makes this step much easier.
Can a seam setter be used on outdoor countertop projects?
Yes, with caveats. Outdoor conditions (direct sun, wind, temperature swings) compress adhesive working time unpredictably. On a hot day with the slab in the sun, a 10-minute pot-life adhesive may start setting in 5 minutes. Work in shade if you can, use a longer-working-time formulation, and stage everything before you mix. The seam setter procedure itself is the same as indoors.
How visible will my countertop seam be after it's properly set?
Properly set seams are visible on close inspection but not distracting from normal standing distance. Tightly speckled granites hide seams best. Strongly veined marbles and quartzites show them most. Engineered quartz with a repeating pattern can show a seam if the pattern alignment isn't planned during cutting. Visibility gets decided at design and cutting; the seam setter only controls whether the joint is tight and flush.
Sources
- Natural Stone Institute, Dimensional Stone Design Manual: Seam setters are standard equipment in stone fabrication and required for producing flush, tight seams on installed countertops
- Integra Adhesives, Stone Adhesive Technical Data: Two-part polyester and epoxy adhesives tinted to match stone are the standard for natural stone seaming applications
- Tenax USA, Adhesive Product Technical Sheets: Epoxy and polyester stone adhesives typically have working times of 5 to 15 minutes at 70°F and require 20 to 45 minutes of clamping for adequate initial cure
- Natural Stone Institute, NSI Fabrication and Installation Standards: Industry standard specifies countertop seams should be no wider than 1/16 inch and level across both surfaces with no perceptible height difference
- BB Industries, Stone Fabrication Tool Catalog: Professional-grade seam setter sets are priced from approximately $150 to $600 depending on cup count, rail material, and mechanism type
- Cambria, Cambria Countertop Care and Installation Guide: Cambria specifies approved adhesive products for seaming engineered quartz; using non-approved adhesives can affect warranty coverage
- Occupational Safety and Health Administration (OSHA), Silica Standard for Construction (29 CFR 1926.1153): Stone fabrication and installation operations involving cutting or grinding engineered stone are subject to OSHA silica exposure standards
- National Institute for Occupational Safety and Health (NIOSH), Engineered Stone Fabrication Hazard Review: NIOSH identifies engineered stone countertop fabrication as a source of elevated crystalline silica exposure, relevant to grinding operations including seam edge preparation
- Park Industries, Stone Fabrication Equipment and Tooling Guide: Suction cup replacement pads for seam setters are a standard consumable in stone fabrication, with typical replacement cycles based on rubber condition rather than fixed intervals
- Caesarstone, Installation Guidelines for Engineered Quartz: Caesarstone installation documentation specifies adhesive type and seam gap tolerances for engineered quartz countertop installation
Last updated 2026-07-10