TL;DR
- To send accurate dimensions to a countertop fabricator, measure each countertop run separately in inches (not feet), record the width at the front and back of every section, note sink and cooktop cutout locations, sketch the layout with labeled segments, and include photos.
- A single measurement error can shift your quote by hundreds of dollars or cause a fabricated slab to be scrapped.
Why does sending accurate dimensions matter so much?
A fabricated countertop is permanent. Unlike tile or paint, stone cannot be extended if a piece comes out short. Once a fabricator cuts a slab, that material is gone. A misjoint, a seam in the wrong place, or a sink cutout two inches off center means either a patch job or a full replacement, and most fabricators will charge you for both the ruined material and the remake.
Fabricators use your submitted dimensions to write the quote, plan the cut layout on the slab, and schedule the job. If your numbers are off at the quote stage, the price you agree to is based on fiction. Then the templater arrives, finds the real measurements, and the price changes. Sometimes by a lot.
Shops that skip a physical template appointment and cut from customer-supplied dimensions are betting on your accuracy. That bet fails more often than most homeowners expect. A 2021 survey by the Marble Institute of America found that measurement errors were among the top reasons for post-fabrication callbacks and remakes [1]. Good dimensions protect you and the shop.
What information does a fabricator actually need from you?
A fabricator needs more than the total linear footage of your counters. Here is the full list of what they expect before they can write a reliable quote or cut plan.
Overall layout sketch. A hand-drawn top-down sketch of your kitchen or bathroom is fine. It does not need to be to scale. What matters is that every section is labeled and every corner is shown.
Individual segment dimensions. Measure each straight run separately. For a standard L-shaped kitchen, that means at least two measurements: one for each leg of the L. Do not add them together and send a single number.
Width at both the front and back. Walls are rarely perfectly parallel. Measure the depth of the counter at the wall and again at the front edge. If those numbers differ by more than a quarter inch, flag it.
Backsplash height if integrated. If you want an integrated stone backsplash, specify the height. Four inches is common; full-height is different material and changes the quote significantly.
Sink and cooktop locations. Measure from the nearest cabinet end to the center of each cutout. Include the model number of the sink and cooktop if you have them. Fabricators use spec sheets to confirm the cutout template.
Edge profile. Straight eased, beveled, ogee, waterfall, or another profile. This affects labor and sometimes material waste.
Corner treatments. Are inside corners clipped? Do you have a peninsula with a finished end? Show it on the sketch.
Overhang. Standard overhang on base cabinets is 1.5 inches at the front. If you want a breakfast bar with a larger overhang, note the dimension. Overhangs over 10 to 12 inches typically need support brackets, which affects the fabrication plan [2].
Photos. Take shots from multiple angles. A photo of a problem corner is worth three minutes of back-and-forth phone calls.
If you are pricing kitchen countertops for the first time, the list above will feel like a lot. It gets faster with practice, and most of it you can capture in about 30 minutes with a tape measure and a phone.
How do you measure a countertop correctly?
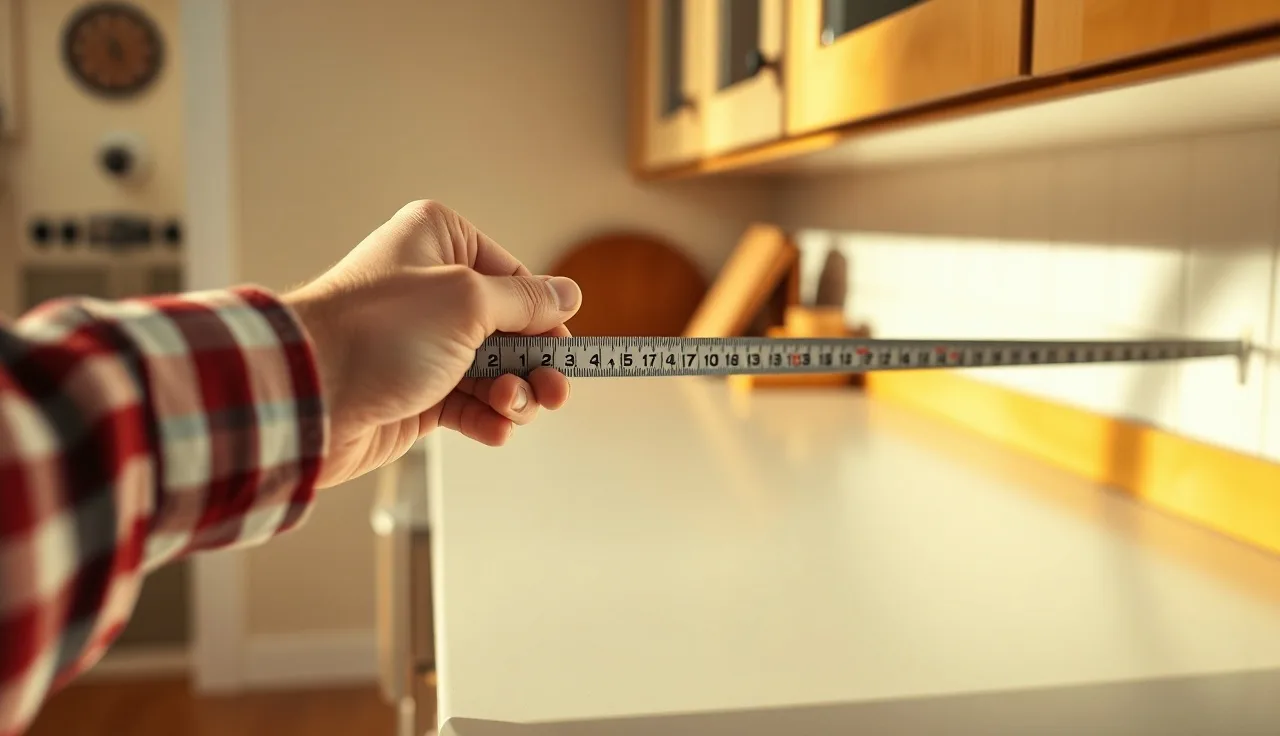
Use a steel tape measure, not a cloth tape. Cloth tapes stretch. A 25-foot locking steel tape is the right tool.
Measure in inches. Not feet and inches written as mixed numbers, not decimal feet. Just inches. If a run is 107.5 inches, write 107.5". This removes unit-conversion errors entirely.
Start at the wall. For each countertop section, hook the tape on the back wall and pull it to the end of the cabinet run. Record that number. Then measure the depth from the wall to the front of the cabinet frame (not the door face). Standard base cabinet depth is 24 inches, but real cabinets vary.
Measure at counter height. Do not measure the floor or the ceiling and assume the counter is the same. Walls bow and rooms are out of square. Measure at the actual height where the stone will sit, about 34 to 36 inches off the floor [7].
Take three measurements for long runs. For any run over 60 inches, measure at the wall, in the middle, and at the front edge. If the numbers disagree, record all three and note it on the sketch. The fabricator needs to know the room is out of square.
Mark where walls end and cabinets end. If the cabinet run stops at an open space (a doorway, a gap, an appliance), note whether the stone should be flush with the cabinet, overhang slightly, or have a finished waterfall end.
Corners. For an L-shaped counter, measure each leg all the way into the corner, including the portion the other leg will overlap. The fabricator resolves the corner math; your job is to give them the full leg lengths.
For granite countertops and other natural stone, the fabricator needs these numbers to plan how the slab grain will run and where seams will fall relative to the stone's natural pattern. That makes your dimensions matter even more than they do for engineered surfaces.
What are the most common measurement mistakes homeowners make?
Rounding to the nearest inch. A 107.75-inch run rounded to 108 seems harmless. Multiply that across four sections and your quote is based on 4 extra inches of material you may not need, or 4 inches short if you rounded down.
Measuring the wrong surface. Some homeowners measure the cabinet door face rather than the counter depth. Cabinet doors typically stick out 0.75 inches past the cabinet frame. Your counter sits on the frame, not on the doors.
Counting inside corners twice. In an L-shaped kitchen, the corner square belongs to only one leg. If you measure the full length of both legs including that shared corner, you have counted it twice. The fabricator will catch it, but it slows the quote and creates confusion.
Forgetting the return. A "return" is a short section of counter that turns a corner and runs to a wall, a range, or an open end. Returns are easy to miss on a quick sketch. If your counter turns a corner and you leave off the short leg, the fabricator may not even know to ask.
Skipping depth measurements. Many fabricators assume 25.5 inches total depth (24-inch cabinet plus 1.5-inch overhang) if you do not specify [6]. If your cabinets are non-standard or you want a different overhang, you have to say so.
Not noting the range or refrigerator gap. A freestanding range sits in a gap between cabinets. The counter does not cross that gap, but the two pieces on either side need to be dimensioned to the edge of the gap, not to the wall behind the range.
Should you sketch the layout, and how detailed does it need to be?
Yes. A sketch is the single most useful thing you can send. Even a rough, not-to-scale drawing on notebook paper beats a list of numbers with no context.
Label every segment with its measured length. Show which walls are solid and which stop at a doorway or appliance. Mark the sink location with a circle or X and note its distance from the nearest cabinet end. If there is a cooktop, do the same.
Show the direction each segment runs. An L-shape, a U-shape, a peninsula, a single straight run: these are all very different jobs. A good sketch makes the layout obvious in two seconds.
You do not need CAD software. A phone photo of a hand sketch is fine. Some fabricators have a preferred format or a measurement form they email to customers. If yours does, use their form. It exists because it captures the things their shop needs.
If you want to go further, apps like MagicPlan or RoomScan let you sketch a floor plan with measured dimensions using your phone. The exported PDF is easier for a fabricator to read than a photo of notebook paper. These tools are not required, but they help on complex layouts with many corners.
Fabrication software like SlabWise (used by shops, not homeowners directly) imports customer-supplied dimensions and checks them against slab yield before cutting. The cleaner and more structured your sketch, the faster the shop can turn around a quote and cut plan.
How do you indicate sink and appliance cutouts?
A sink cutout is the single most error-prone part of a countertop job. A hole in the wrong place is unrecoverable.
The standard way to specify a sink location is to give the distance from the nearest cabinet end to the center of the sink cutout. Do that measurement at the front of the counter and again at the back (the wall). If the cabinet run is at all out of square, those two distances will differ slightly.
For undermount sinks, the fabricator also needs the sink model number or the physical sink in hand. Different sinks, even the same nominal size, have different rim profiles and different clip systems. A Blanco Precis medium single-bowl has different undermount dimensions than a Kohler Whitehaven, even if both are described as 30-inch sinks [11]. If you can, have the sink on-site before the template date.
For drop-in sinks, the process is similar but a bit more forgiving because the rim covers any minor overage.
For cooktops, measure from the nearest cabinet end to the center of the cooktop opening, and also note the distance from the front of the counter to the center of the cooktop. Most cooktops are not centered front-to-back; the spec sheet gives the exact cutout size and position.
If you have both a sink and a dishwasher, note whether the dishwasher is to the left or right of the sink. This affects the location of the sink drain and the apron of the countertop on that side.
What file formats and delivery methods do fabricators prefer?
Ask. Shops vary more than you would expect on this.
Most shops accept email with attachments. A scanned or photographed sketch as a JPEG or PDF, plus a numbered list of dimensions in the email body, is the minimum viable submission. Keep the sketch and the dimension list consistent: if the sketch shows segments A, B, and C, the list should use those same labels.
Some larger shops have a web form or a customer portal where you input dimensions field by field. These are easier for the shop's quoting workflow and less likely to result in a misread measurement.
Some shops ask for AutoCAD DXF files, especially for complex commercial jobs. For residential projects, that is rare. You would not be expected to produce DXF files unless the shop specifically asks.
If you hire an interior designer or a kitchen designer, they will typically produce a proper floor plan the fabricator can work from. This is the cleanest route for a complex kitchen renovation. The designer's plan also includes appliance placements, which cuts the chance of a cutout error.
Video walkthroughs sent through text or WhatsApp have become common since 2020. They are useful supplemental material but not a substitute for a dimensioned sketch.
For countertop installation jobs still in the planning stage (cabinets not yet installed), give the fabricator your cabinet layout drawings and let them decide what they need. Cutting stone to rough dimensions before cabinets are in is risky; most shops prefer to template after cabinet installation.
Does the fabricator still need to template even after you send dimensions?
For most natural stone jobs, yes. Physical templating is standard practice for granite, marble, quartzite, and most quartz surfaces. Your submitted dimensions are used for the quote. The physical template is used for the cut.
Templating involves either a physical cardboard or luan template made on-site, or a digital laser template using a device like a Proliner or a Leica Geosystems laser distance tool [9]. Digital templating is faster and produces a DXF file the CNC machine reads directly. Both methods capture the actual, as-built dimensions of your space.
If your submitted dimensions and the templated dimensions match closely, the job flows smoothly. If they differ a lot, the fabricator may need to revise the quote before cutting.
Some shops cut laminate countertops or butcher block countertops from customer dimensions only, without a physical template, especially for simple straight runs. This is more common in the budget segment. It is faster and cheaper but relies entirely on your measurement accuracy.
For full-height backsplashes, waterfall edges, or any countertop with curves, a physical or digital template is non-negotiable. The complexity is too high to trust a tape measure.
The short answer: send accurate dimensions so the quote is right, and expect (and welcome) a physical template visit before the stone is cut.
How do material choices affect what dimensions you need to provide?
Different materials have different slab sizes, seam sensitivity, and fabrication limits. This changes what you need to communicate.
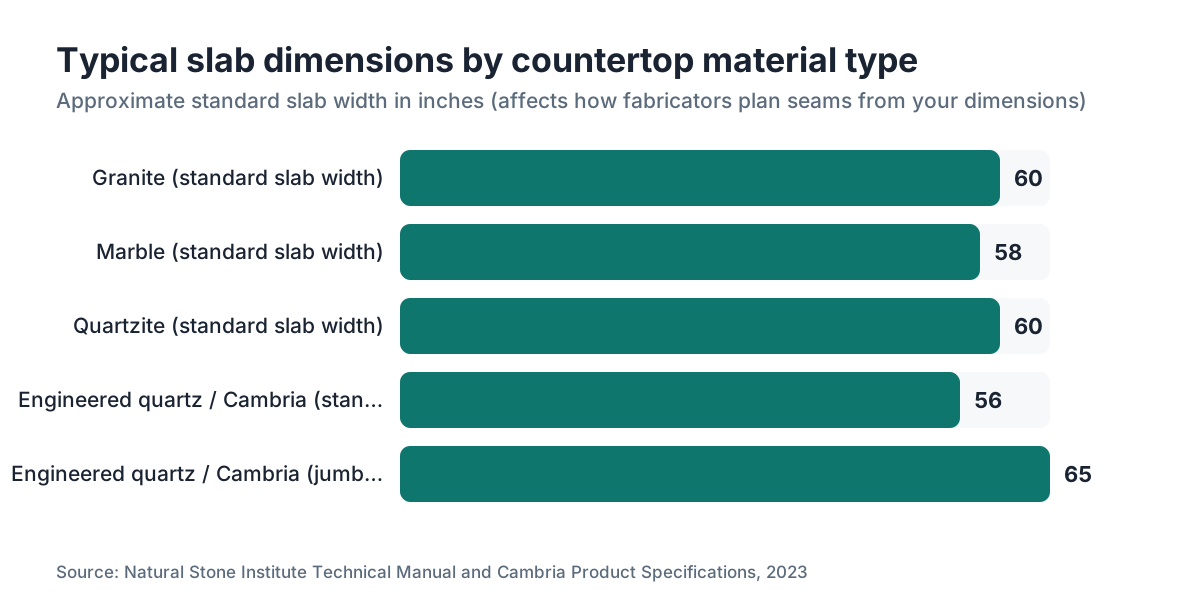
Natural stone (granite, marble, quartzite). Standard slabs are roughly 55 to 65 inches wide and 110 to 130 inches long, though jumbo slabs run larger [4]. Long runs often require seams. Your dimensions tell the fabricator whether a seam is needed and where best to place it, usually at a less visible point or at a sink. For marble countertops, grain matching across seams matters aesthetically, so dimensions that show slab orientation help.
Engineered quartz (like Cambria). Cambria countertops and other engineered quartz brands offer consistent slab sizes, usually around 56 by 120 inches for standard slabs or larger for jumbo formats [10]. Seam placement is still a discussion, but grain matching is less of a concern for most patterns.
Laminate and Formica. Laminate countertops and Formica countertops are often cut from 4x8 or 4x12 sheet goods. The dimension math is different, and the precision tolerance is a bit more forgiving than stone. Still, accurate dimensions prevent waste and re-orders.
Corian and solid surface. Corian countertops are joined with inconspicuous glue seams, so seam placement matters less visually. But the fabricator still needs precise dimensions to cut pieces that join correctly.
Butcher block. Width-glued panels come in set widths. Your depth dimension determines whether the shop cuts one panel or glues two. For butcher block countertops, also note grain direction preference (face grain, edge grain, end grain) since it affects how the shop orders and cuts material.
The table below shows typical slab sizes by material type for reference.
What is a reasonable tolerance, and what happens if dimensions are off?
The fabrication industry generally works to a tolerance of plus or minus 1/16 inch on a cut piece. Your submitted dimensions do not need to be that precise (the template handles final precision), but they should be within a quarter inch of reality to avoid quote discrepancies and material planning errors.
If your submitted dimensions are off by more than half an inch on any individual segment, a few things can happen:
The quote changes after templating. You may have been quoted for slightly less material than is needed, or more, if you over-measured. Price adjustments after templating are common and legitimate, but large swings frustrate everyone.
The slab layout may not work. If your numbers showed a run fitting on one slab and the actual dimensions require two, you may face a longer wait time and a different seam plan.
A seam may land in an unexpected place. If the fabricator planned based on your numbers and the actual kitchen runs two inches different, a section you pictured with no seam may now need one to make the slab work.
None of these outcomes are catastrophic, but they all add time and sometimes cost. The closer your dimensions are to reality, the smoother the job goes.
For complex materials with strong veining, like book-matched marble or dramatic quartzite, even a one-inch discrepancy can shift a seam into a visible location. That is a real problem. With those materials, be as precise as you can and say plainly where you are unsure.
What should the dimension sheet look like when you send it?
Here is a simple, practical format that works for most fabricators. You do not need a template; you need to cover these elements.
Header. Your name, phone number, email, and the project address. If you have an appointment date, include it.
Sketch. Top-down drawing of the full counter layout. Label each segment A, B, C, and so on. Show sink, cooktop, dishwasher, and range positions. Show which edges are exposed (will need a finished edge profile) and which are against walls or appliances.
Dimension list. For each labeled segment: length in inches, depth at wall in inches, depth at front in inches. Flag any segments where the depth varies along the run.
Cutout details. Sink brand and model, distance from cabinet end to sink center (measured from both the left end and the right end to cross-check). Same for any cooktop.
Overhangs. Note any overhangs that differ from the standard 1.5 inches at the front. Note any cantilevered breakfast bar sections and their overhang length.
Edge profile preference. One line: "eased edge on all exposed sides" or whatever you want.
Backsplash. Note if you want a stone backsplash and its height, or write "no stone backsplash."
Photos. At least four: one from each corner of the room. Plus a close-up of any tricky areas (odd angles, columns, windows that intersect with the counter zone).
This takes 30 to 45 minutes to produce for a typical kitchen. Fabricators who receive a complete package like this can return a quote the same day. Shops that receive incomplete information usually have to call or email back with questions, which adds days to the process.
For fabricators running quotes at scale, tools like SlabWise let you input customer dimension sheets directly into a quoting workflow and see how different slab sizes nest against the layout before committing to material. That step, invisible to the homeowner, is where good dimensions save real money on the shop side.
When is it worth hiring a professional to measure instead?
If your kitchen has more than eight distinct counter segments, bay windows or columns that intersect with the counter zone, radius curves, or a layout that is well out of square, consider paying for a professional pre-template visit. Some fabricators offer this as a paid service, $75 to $200, that gets applied to the project if you move forward [5].
Interior designers and kitchen designers routinely produce measured drawings as part of their service. If you are already working with a designer on a renovation, ask whether their drawings include counter dimensions in the format the fabricator needs.
For a straight, two-wall kitchen with no unusual features, a careful homeowner can produce dimensions accurate enough for a solid quote. Most mistakes happen on complex layouts, not simple ones.
If the countertop material is expensive (think rare quartzite or book-matched marble), the cost of a professional pre-measure is trivial next to the cost of a remade slab. Do not skip it.
Frequently asked questions
Can I just send photos instead of a measured sketch?
Photos help but are not enough on their own. A fabricator cannot pull dimensions from a photo without a reference object of known size in the frame. Photos are excellent for showing corner conditions, problem areas, and existing hardware, but they should accompany a dimensioned sketch, not replace it.
What unit should I use when sending countertop measurements?
Use inches, period. Write 107.5", not 8 feet 11.5 inches and not 8.958 feet. Inches kill unit-conversion errors on both ends. Most fabricators and their software work in decimal inches. If you send mixed units, someone has to convert them, and that is where errors creep in.
How do I measure an L-shaped or U-shaped kitchen?
Break it into individual straight segments and measure each one separately. For an L-shape, you get two segments. For a U-shape, you get three. Measure each segment from wall to wall (or wall to cabinet end), including the corner section on one of the legs. Label each segment on your sketch so the fabricator can match the numbers to the drawing.
Do I need to account for the thickness of the countertop in my measurements?
No. Countertop thickness (typically 3cm for stone, about 1.25 inches) does not affect the plan-view dimensions you submit. The fabricator handles thickness in their material spec. What you are measuring is the footprint: the length and depth of each counter section as seen from above.
How far in advance should I send dimensions to the fabricator?
Send dimensions before you expect a quote, which is usually the first conversation. Most shops need at least three to five business days to produce a detailed quote, and busy shops may have a two to four week lead time from quote approval to template visit. Submitting complete dimensions up front compresses that timeline a lot.
What if my cabinets are not yet installed?
Fabricators prefer to template after cabinets are in place because installed cabinets reveal the real dimensions of the space. If you send pre-installation dimensions for a quote, flag them clearly as preliminary. Some shops will quote from cabinet drawings; just know the quote may change once installation is done and the physical template is taken.
How do I measure for a bathroom vanity countertop?
Same approach as a kitchen: measure the length of the vanity cabinet top (wall to wall, or end to end if freestanding), the depth front to back, and the sink location. For a single-sink vanity, note the distance from each end of the cabinet to the center of the sink basin. Include the sink model number, because undermount bathroom sinks vary a lot in their cutout requirements.
What is a Proliner and should I ask if my fabricator uses one?
A Proliner is a digital templating device made by Prodim that uses a contact arm to trace the exact shape of a space and output a DXF file the CNC can read directly. It is more accurate than a cardboard template and faster for complex shapes. Shops with Proliners or similar laser tools tend to have tighter cuts and fewer fit-up issues. It is reasonable to ask whether your fabricator uses digital templating.
Does the edge profile change how I should measure?
Not the raw measurement, but it affects the exposed-edge notation on your sketch. Mark every edge that will be visible and get a finished profile: typically the front edges, any peninsula ends, and any side that is not against a wall or appliance. Unexposed edges (against walls) get a rough or sawn edge, which is faster and costs less.
What if my walls are out of square?
Note it and measure both sides. If the depth of a counter section is 25.5 inches at one end and 26.25 inches at the other, write both numbers and mark which end is which. The fabricator will scribe the back edge to the wall during installation, or the templater will capture the exact wall shape. Your job is to flag the variation so it is not a surprise [12].
Do I need to measure the backsplash separately?
If you want a stone backsplash, yes. Measure the height you want (typically 4 inches for a standard slab backsplash) and the length of each section. If the backsplash runs behind a range or cooktop, note that separately; those sections often have cutouts or different treatments. Full-height backsplashes need their own square footage calculation and much more material.
How do I send dimensions for a kitchen island?
Treat the island like any other counter section: length, depth, and overhang on each finished side. Note how many sides have a finished edge (islands often have all four sides exposed). If the island has a waterfall end, show it on the sketch with the drop dimension (the height of the waterfall, typically equal to the cabinet height, around 34.5 inches).
Will the fabricator tell me if something looks wrong with my measurements?
A good fabricator will. Experienced shops cross-check your numbers: the two legs of an L plus the corner should add up consistently, and the total square footage should be plausible for the described space. If something looks off, they will call and ask. This is a normal part of the quoting process, not a criticism. It is one reason sending a sketch alongside raw numbers matters so much.
Is there a standard form I can download for submitting countertop dimensions?
No universal standard exists. Most fabricators have their own form or measurement checklist they prefer. Ask your specific shop whether they have one before you create your own sketch. If they do not have a preferred format, a labeled top-down sketch with a separate dimension list (length, front depth, back depth, cutout locations) covers everything most shops need.
Sources
- Marble Institute of America (now Natural Stone Institute), Industry Survey Data: Measurement errors are among the leading causes of post-fabrication callbacks and remakes in the stone countertop industry.
- International Code Council, International Residential Code (IRC), Section R301 and cabinet/countertop industry guidance on overhang support: Countertop overhangs beyond approximately 10 to 12 inches typically require support brackets due to cantilever load limits.
- Natural Stone Institute, Technical Manual for Stone Countertops: Standard granite and marble slabs are typically 55 to 65 inches wide and 110 to 130 inches long; jumbo slabs may be larger.
- Angi (formerly HomeAdvisor), Countertop Measurement and Templating Cost Guide: Professional pre-template measurement visits for countertops typically cost $75 to $200, often credited toward the project if the homeowner proceeds.
- National Kitchen and Bath Association (NKBA), Kitchen Planning Guidelines: Standard base cabinet depth is 24 inches, producing a finished countertop depth of approximately 25 to 25.5 inches with overhang.
- National Kitchen and Bath Association (NKBA), Kitchen Planning Guidelines, Standard Counter Heights: Standard kitchen counter height is 34 to 36 inches from finished floor, the correct height at which to take counter depth measurements.
- Leica Geosystems, Disto Laser Distance Measurement Tools: Laser distance tools are used by fabricators and designers to capture accurate field measurements for countertop templating.
- Cambria, Product Specification Sheets: Standard Cambria engineered quartz slabs are approximately 56 by 120 inches; jumbo formats are available at larger dimensions.
- Blanco USA, Sink Specification and Installation Documents: Different sink models within the same nominal size category have distinct undermount cutout dimensions and clip system requirements.
- U.S. Department of Housing and Urban Development, Residential Construction Quality Standards: Residential construction tolerances acknowledge that walls and rooms are routinely out of square, requiring field measurement rather than reliance on plan dimensions.
Last updated 2026-07-11