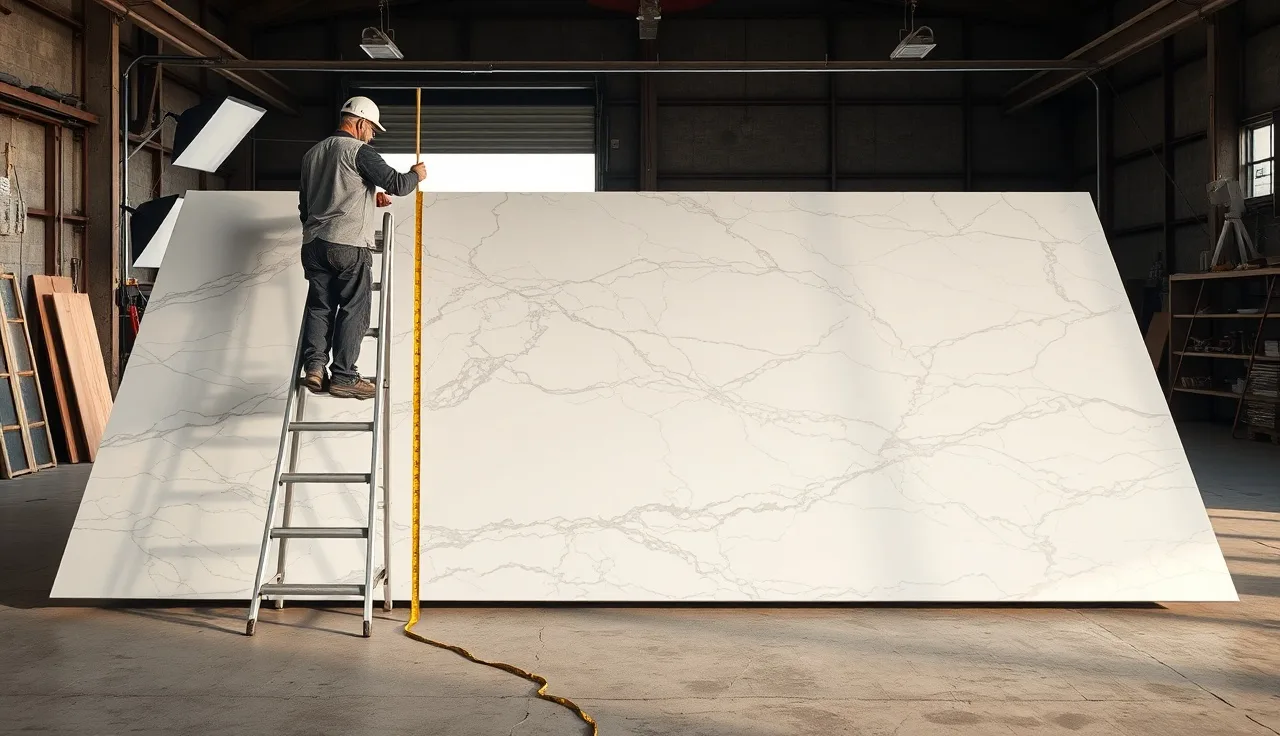
TL;DR
- Shoot slabs in diffuse natural light or with two softboxes angled at 45 degrees.
- Put a scale reference in every frame.
- Stitch overlapping shots (30% overlap minimum) into a panorama, then present it next to a dimensioned cut diagram.
- Get the customer's written approval before you cut.
- This workflow cuts revision requests and protects you if the layout gets disputed later.
Why does slab photography matter for layout approval?
A customer who says "I love the movement in that slab" in your yard and then says "the veining doesn't match in the kitchen" after installation is a customer who costs you money. Stone is not uniform. Two slabs from the same quarry lot can look wildly different once they're cut and placed.
Slab photography for layout approval is your written record that the customer saw the material, approved the cut placement, and agreed to how the veins run across their kitchen. Without it, every dispute is your word against theirs. With it, you have timestamped evidence.
There's a quality angle too. When you force yourself to photograph a layout clearly enough for someone to judge it remotely, you catch your own mistakes before they reach the field. A seam that looks fine while you're standing over the slab jumps out in a stitched overhead photo. That's the correction you want to make in the shop, not at install.
Fabricators who standardize this report fewer callbacks and faster decisions. No good industry-wide survey exists on this specifically, but the logic tracks with broader construction documentation research: detailed pre-work photo records lower dispute costs [1].
What camera and equipment do you actually need?
You don't need a professional camera. A recent smartphone with a 12 megapixel or higher sensor is enough for customer approval photos, as long as you control the lighting. Fabricators go wrong when they think gear will fix problems that come from bad light and sloppy technique.
A few items genuinely help.
Camera options, roughly ranked by usefulness:
| Equipment | Useful for | Notes |
|---|---|---|
| Smartphone (recent model) | Most shops, customer email | Turn on grid lines, shoot in the native app, skip digital zoom |
| Mirrorless or DSLR with wide angle | Large slab panoramas | 16-24mm equivalent covers the slab without distorting the edges |
| Drone (DJI Mini series, etc.) | Full slab birds-eye, large format stone | FAA Part 107 required for commercial use [2]; indoor use avoids this |
| Tripod or monopod | Any shot where you need frame-to-frame consistency | Essential for stitching; handheld panoramas drift |
| Bluetooth remote shutter | Killing camera shake when you trigger the shot | Under $10, no blur from pressing the button |
A 12-foot stepladder gets you high enough to shoot most residential slabs overhead without a drone. Pair that with a smartphone and a cheap tripod adapter and you're set for under $150.
One thing worth paying for: a color reference card. A gray card or a ColorChecker Passport ($50 to $120) dropped into one frame lets you correct white balance accurately in editing, so the stone's color in the photo matches what the customer sees installed [3].
What is the best lighting setup for photographing stone slabs?
Lighting is the only thing that really matters. Get it wrong and no amount of editing saves the shot.
The best light source for slab photography is overcast daylight. Shoot near an open bay door on a cloudy day. Cloud cover acts as a giant softbox, wrapping light around the surface and killing the hot spots that wash out the stone's color and texture.
Direct sunlight is the enemy. It throws harsh reflections across polished surfaces, blows out white areas, and makes the real color impossible to judge. If you're shooting during peak sun, block the direct rays with a translucent white tarp or move inside with your own lights.
For interior shots when natural light is poor, use two continuous LED softboxes at 45 degrees on either side of the slab, roughly at slab level or slightly above. Don't put lights straight overhead. That creates specular reflections on honed and polished finishes. Angling from the side lets texture show without glare.
Here's a trick that works: bounce one light off a white foam-core panel on the far side of the slab. That fills shadows without adding another hard source. A two-light softbox setup good enough for shop work runs $150 to $400 [4].
Leathered and brushed finishes need raking light, a single source from a low angle almost parallel to the surface. It makes the texture readable so customers understand what they're buying. Treat raking light as a supplemental shot, not your primary approval photo.
How do you stitch multiple photos into one layout image?
Unless a slab is smaller than about 3 feet by 4 feet, you can't capture it in one smartphone frame at an angle that avoids distortion. So you shoot overlapping frames and stitch them.
The overlap rule is 30 percent minimum, and 50 percent is safer. Shooting a 10-foot slab in four frames means each frame shares about a third of its content with the frame next to it. Less than that and the software can't find enough matching reference points, so the seam shows.
Keep the camera position consistent across frames. A tripod matters here. Move the camera in a straight line, or rotate from a fixed point if you're overhead, and shoot at the same height and angle every time.
Stitching software options:
- Microsoft ICE (Image Composite Editor): Free, Windows only, handles flat slab shots well [5].
- Adobe Photoshop Photomerge: Reliable, already there if you pay for Creative Cloud.
- Lightroom panorama merge: Similar to Photoshop, good for correction before merging.
- Hugin: Free, open source, handles complex stitches but has a steep learning curve.
- PTGui: Paid, about $99 one-time, best for high-volume shops doing this daily [9].
After stitching, crop to the slab and leave a small border. Export at full resolution. A stitched 10-foot slab from a modern smartphone usually lands in the 20 to 40 megapixel range, big enough that a customer can zoom in and inspect the veining.
One common mistake: shooting from far away to dodge distortion, then cropping hard. You throw away resolution. Get as close as you practically can from overhead, keep the camera parallel to the surface (not angled), and let the stitch cover the width.
How do you show the customer exactly where their cuts will fall?
A photo of the slab isn't enough on its own. The customer needs to see the cuts on top of the stone. Without that, they're approving the material but not the layout, and those are two different things.
The simplest method is physical. Tape chalk lines or lay 1.5-inch painter's tape right on the slab to mark cut lines, seam locations, and the direction of any cooktop or sink cutouts. Shoot the slab with the tape in place. The tape reads clearly in photos and costs nothing.
For a cleaner presentation, photograph the slab bare, then draw the cut lines over the image with basic editing (even the Markup tool in iPhone Photos does it). Label the lines with measurements. Export and send.
The most professional approach, and the one that heads off disputes best, is to overlay a dimensioned cut diagram on the stitched slab photo using CAD or layout software. This is the workflow tools like SlabWise are built around: you generate a nesting layout digitally and the customer sees a to-scale diagram of where each piece falls on the actual slab they picked. Doing this by hand on every job will slow a high-volume shop to a crawl.
Whatever method you use, include:
- The piece label (island top, left wall section, etc.)
- The finished dimensions of each cut piece
- Seam locations and orientation
- Sink and cooktop cutout positions
- Which edge of the slab becomes the exposed finished edge
Email or text the marked-up image to the customer. Ask them to reply with explicit written approval. "Looks good" is enough. What you want is a date-stamped written record.
How do you include a scale reference so the customer understands slab size?
Photographs lie about scale unless you hand the viewer a reference. Someone looking at a stitched slab photo has no idea whether the stone is 4 feet wide or 10 feet wide unless something in the frame tells them.
The fastest fix is to lay a tape measure along the longest dimension and photograph it there. A fully extended 25-foot tape reads easily in a photo and can't be misread.
A cleaner option for customer-facing images: use a folding ruler or place labeled dimension cards at the slab edges before shooting. Print "10'4" left to right" in a large font on white cardstock, set it at the bottom edge of the slab, and shoot it in frame. This survives compression and small-screen viewing better than a tape measure.
For overhead stitched panoramas where you're showing the full slab, a grid overlay in post (one square per foot, say) makes size relationships obvious at a glance. Photoshop, and even Canva, can drop a grid on an image in under a minute.
Never skip the scale reference on bookmatched or veined slabs. Customers misjudge how dominant a vein is, or where the visual center of the stone sits, and scale is almost always the reason. A bold diagonal vein in a full-slab photo can read completely differently once the customer grasps that the photo shows 96 square feet of stone.
How should you handle bookmatched slabs in photos?
Bookmatch photography is harder than single-slab work because you have to show two slabs at once in a way that makes clear how they meet at the seam.
The ideal setup: place both slabs face-up on the shop floor with their matched edges touching, exactly as they'll be installed. Shoot from directly overhead. This is the single most persuasive image you can show a customer weighing a bookmatched installation. They see the butterfly mirror before they commit.
If you can't lay both slabs flat at once because of weight or floor space, shoot each slab separately from the same height and camera position, then composite them side by side in any image editor. Match the scale between both images or the composite lies about proportions.
Bookmatched wall applications need a vertical composite more than a horizontal one. Rotate both slab images 90 degrees in the composite to match the installed orientation. This sounds obvious, and it's exactly the step shops skip, then they end up with a customer who says the slab "looks different than I expected" after install.
Label the seam edge clearly in the photo. A customer who approves a bookmatched layout as a horizontal composite and then sees it installed vertically has legitimate grounds to be confused, even when the fabrication was perfect.
What file format and delivery method works best for customer approval?
You're balancing two things: quality high enough for the customer to zoom in on the veining, and file size small enough to send without trouble.
For email, export JPEG at 85 to 90 percent quality. A stitched slab panorama at that setting usually runs 4 to 8 MB, which most email servers pass without stripping quality. If your images get compressed on arrival (Gmail, Outlook, and Apple Mail all compress large attachments in some modes), send a file-sharing link instead. Google Drive, Dropbox, or a direct link from your shop management system all work.
For text (SMS), compress harder, around 1 to 2 MB. Phone screens have limited resolution and customers rarely zoom a text photo the way they zoom an emailed file. Save the high-res version for final approval.
PDF is underrated here. A one-page PDF with the stitched slab photo, the cut diagram overlay, and basic job info (customer name, job number, slab lot number, date) gives the customer something to print, share with a spouse, or save for good. It also looks professional in a way a raw JPEG never does.
Whatever format you use, name the file on purpose. "Slab_Layout_Johnson_Kitchen_Lot4217_2025-08-14.pdf" beats "IMG_0042.jpg" every time you're in a dispute. File naming is boring. It also decides who wins an argument two years later about what got approved.
For jobs with granite countertops or marble countertops where veining is the whole sale, send a short video walkthrough along with the stills. Thirty seconds of slow panning over the surface shows movement, depth, and color in a way no single photograph fully captures.
What are the most common photography mistakes fabricators make?
The mistake that causes the most callbacks: shooting at an angle. A slab shot from standing height with the camera tilted down turns into a trapezoid, where the far edge looks narrower than the near edge. The customer sees that and misreads the proportions. Shoot from directly overhead, or correct the perspective distortion in post before you send it.
Mistake two: glossy polished slabs under fluorescent shop lights. The tubes reflect as bright streaks across the surface and bury the color. Kill the overhead fluorescents, bring in a softbox or diffuse daylight, and reshoot.
Mistake three: no date and no job number in the image or filename. You'll photograph hundreds of slabs. So will your customers. When someone calls six months later about their layout, "the slab photo" needs context. Build a naming and metadata convention before you need it.
Mistake four: sending photos before you mark the cuts. A clean, gorgeous slab photo with no cut lines is not layout approval. The customer is approving the material, not the plan. Different things.
Mistake five: low contrast between the markings and the stone. White painter's tape on white Calacatta marble vanishes in a photo. Use bright blue tape, or switch to a digital overlay. Test your marking method against the actual stone before you shoot.
For engineered stone like Cambria countertops, photography is a bit easier because the pattern stays consistent across the slab. Layout approval photos still matter for seam placement and cutout positioning.
How do you get explicit written customer approval and protect yourself legally?
A photo without sign-off is just a photo. The legal protection comes from the customer's explicit response.
The simplest process: email the layout photos with one clear sentence at the top. Something like "Please reply confirming you approve the slab layout as shown. We'll begin fabrication once we have your written approval." Then wait. Don't cut until you have a written reply.
This matters because fabrication is one-way. Once you cut a slab, you can't uncut it. If a customer later claims they never approved the layout, a timestamped email chain with their "Approved, go ahead" reply settles it.
For customers who are hard to reach by email, a text reply works. Screenshot the thread and save it to the job file.
If you run a customer portal or job management system, built-in approval workflows with electronic signature beat email chains, because the record attaches to the job automatically and can't get separated from it.
Some shops add a one-paragraph layout approval clause to the contract at the time of sale, stating that the customer's written approval of slab photos is final acceptance of the layout and that changes after that point are at the customer's expense. Email exchanges carry legal weight as written agreements under the Uniform Electronic Transactions Act, adopted in 49 states and the District of Columbia [8]. Even so, run your clause past a local attorney first. Construction contract law varies by state, and the American Bar Association's construction law resources make clear that enforceability depends on your specific terms and jurisdiction [6].
The fabrication and countertop installation process has multiple hand-off points where disputes flare up. Layout photo approval is the one you control completely.
How does this workflow change for quartzite, soapstone, or other distinctive stones?
The core technique holds across all natural stone. A few materials need specific adjustments.
Quartzite ranges from nearly uniform to dramatically veined. For veined quartzite, the overhead stitched panorama is essential, because the customer can't judge vein continuity across a seam any other way. Sending how to clean quartzite countertops care documentation alongside the approval photos is a nice value-add.
Soapstone is dark and matte, and it photographs very differently from how it looks in person, because camera sensors struggle with dark, low-contrast surfaces. Shoot it in raking light so the texture registers. Include a frame with a white reference card so the customer reads the real color. Soapstone also shifts a lot once oiled, so a before-and-after oil photo next to your layout images sets expectations. The same idea carries into any how to clean soapstone countertops guides you share.
Granite with strong movement or color shift across the slab (think Blue Bahia, or Ubatuba with patchy gold flecking) needs several close-ups on top of the overall panorama. A customer who approved the full slab and then notices the area near the cooktop has almost no gold flecking, because the flecking sat in the waste section, will feel surprised even when the layout was technically correct.
Light-colored stones, white marbles and quartzites especially, are the highest-stakes subjects, because the customer's expectations about veining are highest. Spend more time on these. Send more angles. If the job is over $5,000 and the stone is complex, ask the customer to come to the shop for in-person approval. The photo is a record. In-person approval is better protection.
Is there a standard slab photography checklist shops can follow?
No governing body publishes a standard specification for this process. The Marble Institute of America (now part of the Natural Stone Institute) has fabrication standards for installation, but shop photography workflow isn't covered in published guidance [7].
Here's a practical checklist that covers what experienced fabricators actually do.
Before shooting:
- Clean the slab surface (dust and debris photograph as flaws that aren't really there)
- Remove any bunks or blocking that will land in the frame
- Set up lighting (diffuse natural or two softboxes at 45 degrees)
- Lay painter's tape or chalk marks showing all cut lines, seam locations, and cutouts
- Place a scale reference (tape measure or labeled dimension cards) along the longest edge
- Set a color reference card in one corner (pull it before the final delivery shots if you want)
Shooting:
- Camera parallel to the slab surface, not angled
- 30 to 50% overlap between frames for stitching
- Minimum 3 frames for a standard kitchen slab; more for large format
- One raking-light shot for texture (leathered and brushed surfaces especially)
- One close-up of each seam location showing vein continuity
- One shot with a person or familiar object for human scale (optional but effective)
After shooting:
- Stitch the panorama frames
- Correct white balance against the reference card
- Correct perspective distortion (straighten horizontal and vertical lines)
- Overlay the digital cut diagram, or annotate cut lines if you didn't use tape
- Add dimension labels to the cut pieces
- Export as a labeled JPEG and/or PDF with job information
- Send to the customer with a written approval request
- Save the customer's written approval to the job file
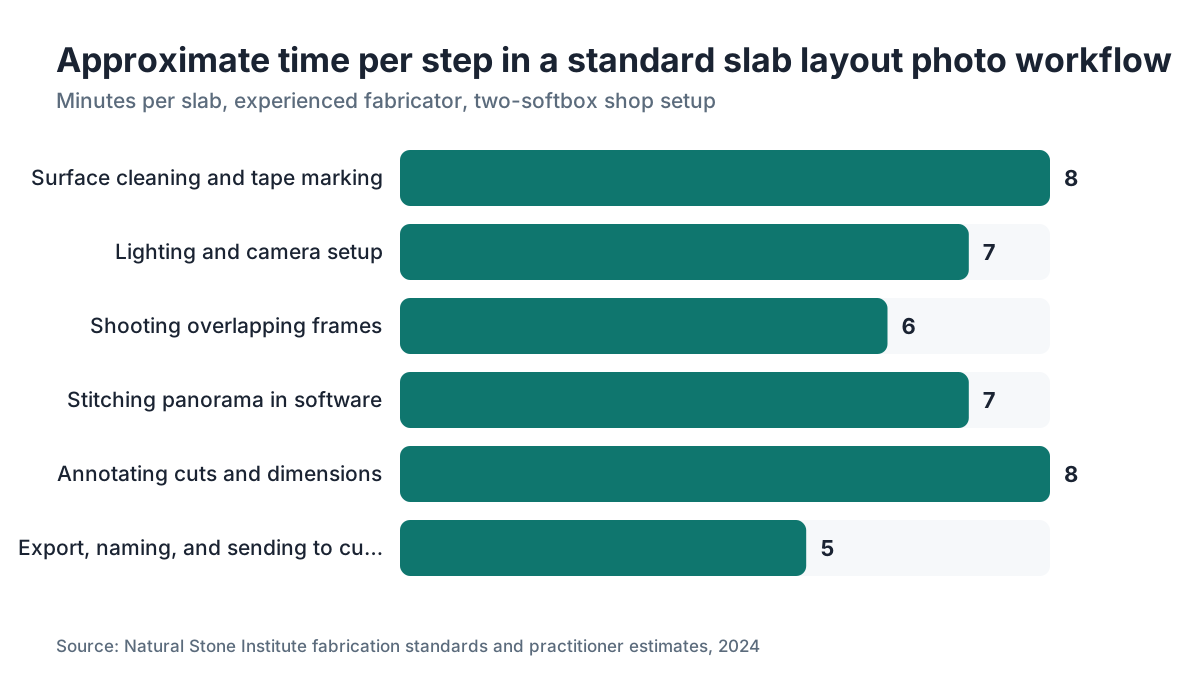
This runs 20 to 40 minutes per slab once the equipment is set and the workflow is routine. Keep in mind that overhead shooting means ladder work over hard stone, so OSHA's general industry housekeeping and ladder safety standards apply on the shop floor [10]. The time investment is smaller than one callback or one disputed install.
Frequently asked questions
Can I use a smartphone for slab photography or do I need a professional camera?
A recent smartphone works fine for most shop layout photography. The limiting factor is almost never the sensor. It's lighting control and camera position. A tripod adapter ($10 to $20), a two-softbox setup ($150 to $400), and shooting from directly overhead beat a professional camera used casually in bad light. If you shoot high volumes of complex bookmatched stone, a mirrorless camera with a wide-angle lens is a worthwhile upgrade.
How many photos should I take of a single slab for a layout approval package?
Plan for five to eight images: the full stitched panorama with cut lines marked, one close-up per seam location, a texture shot (raking light), a scale reference shot, and one image with cut dimensions labeled. For bookmatched layouts, add overhead shots of both slabs together. For complex veined stones and a customer who's particular about pattern placement, more close-ups of specific vein features are worth taking.
What software is best for stitching slab photos together?
For most shops, Microsoft ICE (free, Windows) or Adobe Lightroom's panorama merge are the easiest starting points. PTGui (about $99) is faster and handles difficult stitches better, which matters if you do this daily. For iPhone users, the native camera's panorama mode works for quick reference photos but produces lower-quality results than shooting overlapping frames and stitching in software. Hugin is free and powerful but has a steep learning curve.
How do I photograph a polished slab without getting reflections and glare?
Polished surfaces are the hardest to shoot well. Kill overhead fluorescent lights, which create streak reflections. Use two softboxes at 45 degrees to the slab at roughly slab height, not above it. Overcast natural light from an open bay door is even better. A circular polarizing filter on a camera lens cuts glare on polished stone a lot, though it won't eliminate it. Keep direct sunlight off any polished surface.
What should I include in the email when I send layout photos for customer approval?
Keep it short and direct. Name the job and slab lot number so there's no ambiguity. Include one sentence asking for explicit written confirmation: something like "Please reply confirming you approve the layout as shown before we proceed with cutting." Attach the labeled PDF or high-resolution JPEG. If the customer requests changes after approval, treat it as a change order and document it the same way.
Do I need the customer to sign anything, or is an email reply enough?
An email reply with clear written approval is generally enough in most states, since email exchanges can qualify as written agreements under the Uniform Electronic Transactions Act (UETA), adopted in 49 states and the District of Columbia. But construction contract law varies by state and by your contract terms. If your customer contract already has a layout approval clause, the email reply reinforces it. A local attorney can advise on what your specific contract needs.
How do I show a customer where the seams will be in a photo?
The clearest method is to place blue painter's tape along the seam line directly on the slab before shooting. The tape reads obviously in the photo and is easy to label with a measurement card next to it. For the digital overlay approach, a bold colored line drawn over the stitched panorama in any photo editor works well. Always label which side of the seam belongs to which cabinet run or piece so the customer sees the full picture.
Should I photograph the back of the slab as well as the front?
Generally no, not for customer approval. The back face isn't visible after installation and customers don't need to approve it. The exception is natural fissures or mesh backing repairs that might affect fabrication decisions, which you'd photograph for your own records and share with the customer only if they change the layout. Your shop quality records should include back-of-slab photos for any material with significant fissures.
How do I handle layout approval when the customer cannot come to the shop in person?
Send a high-resolution stitched panorama by email with a dimensioned cut diagram overlaid. For customers with specific concerns about veining or pattern placement, a short video walkthrough (30 to 60 seconds, no audio needed) shot while slowly panning the slab beats any still photo. Ask the customer to reply in writing with explicit approval before you begin cutting. Remote approval works fine with good documentation.
What is the best way to photograph a slab when it is still on the A-frame in the yard?
Upright slab photography on an A-frame is harder than overhead, but workable. Shoot in flat, diffuse light (overcast sky or a shaded area) to hold down reflections. Stand far enough back that the whole slab fits without tilting the camera much up or down. Use the grid lines to keep horizontal lines straight. Lay a tape measure along one edge. You'll need to correct slight perspective distortion in post. Overhead is always better when you can lay the slab down.
How long should I keep layout approval photos and customer confirmation on file?
Keep them at least as long as any reasonable warranty or dispute period, which for most residential countertop work means a minimum of five years. Many fabricators keep digital records indefinitely because storage is cheap and disputes can surface years after installation. Store files in a named folder system by customer and job number, and back up to the cloud. A record you can't find fast is nearly as useless as one you never made.
Can layout photos double as marketing material?
Sometimes, with the customer's permission. A well-lit stitched panorama of a beautiful veined quartzite or bookmatched marble makes strong content for a shop's Instagram or website. Always get explicit written permission before using job photos publicly, and never include identifiable personal information in the image or caption. The approval photos themselves are usually too utilitarian (tape marks, dimension cards) to use directly, so shoot a separate set for marketing after approval.
Does this process apply to engineered stone and quartz the same way it does for natural stone?
The workflow applies, but the stakes are lower for uniform engineered stone where the pattern repeats consistently. Seam placement and cutout positioning still matter and still warrant photo approval. Where layout photography really earns its keep is with natural stone, where every slab is unique and pattern continuity across seams is visible. For a basic uniform quartz like solid white or gray, a cut diagram with a slab number reference may be enough, though a photo record still protects you.
Sources
- National Institute of Building Sciences, "Pre-Construction and Documentation Best Practices": Detailed pre-work photo records reduce construction dispute costs
- FAA, "Part 107 Small Unmanned Aircraft Systems" (14 CFR Part 107): FAA Part 107 certification is required for commercial drone use in the United States
- X-Rite, "ColorChecker Passport Photo" product specification: A ColorChecker Passport enables accurate white balance correction in photo editing; retail price in the $50-$120 range
- B&H Photo, LED softbox lighting kits for product photography: Two-light LED softbox kits suitable for shop photography retail for $150-$400
- Microsoft Research, "Image Composite Editor (ICE)" software page: Microsoft ICE is a free Windows panorama stitching application
- American Bar Association, Construction Law resources: Construction contract law and enforceability of written approval clauses varies by state
- Natural Stone Institute, "Fabrication and Installation Standards": The Natural Stone Institute publishes fabrication and installation standards but does not specify shop photography workflow requirements
- Uniform Law Commission, "Uniform Electronic Transactions Act (UETA)": UETA has been adopted in 49 states and the District of Columbia, giving email exchanges legal standing as written agreements
- PTGui, panorama stitching software pricing page: PTGui panorama stitching software is available for a one-time purchase of approximately $99
- OSHA, "General Industry Housekeeping and Workplace Organization" (29 CFR 1910.22): OSHA workplace standards apply to shop floor operations including slab handling and ladder safety during overhead photography
Last updated 2026-07-11