TL;DR
- Quartz seams never fully disappear, but good fabricators get close by matching dye lots, hiding the seam away from sight lines, cutting both edges from one blade path, filling with color-matched epoxy, and polishing the joint flush.
- The gap between an obvious seam and one you have to hunt for comes down to about six decisions made before the blade touches stone.
Why are quartz seams harder to hide than natural stone seams?
Quartz seams fight you because the material is engineered to look uniform, and uniform patterns punish any break. Engineered slabs are crushed quartz aggregate bound with polymer resin, pressed under vacuum and heat. Resin content sits around 6 to 10 percent by weight depending on the brand [1]. That percentage matters at a seam because resin bends light differently than the quartz around it, so a polished cut edge can catch light in a way the open field does not.
Granite and marble have random crystalline noise that swallows a seam line. Quartz often has repeating linear veining or a tight, consistent aggregate that reads as one continuous surface. Interrupt that with a seam and the eye finds it fast. The soft white marbled styles, the Calacatta-look products, are the worst of the bunch, because a broken vein screams.
Solid colors seam beautifully. A pure white, a charcoal grey, a small-chip aggregate: all of these hide a joint with almost no effort. The material is not your enemy. Pattern scale and orientation are.
Where should you place quartz seams to minimize visibility?
Seam placement is the highest-leverage decision on the whole job. A well-placed seam in an okay color match beats a perfect color match in a bad spot every time. Get the location right and the rest is cleanup.
The rules fabricators live by:
- Keep seams off the primary sight line. Someone standing at the sink looks straight across the counter. A seam running front-to-back (perpendicular to that line) hides far better than one running left-to-right across the field.
- Land seams over cabinet walls or structural supports, never over open span. A seam over a cabinet wall is stronger, and the cabinet edge shadow helps break up the line.
- Stay away from corners and cooktops. Thermal cycling near a cooktop and mechanical stress at inside corners both open epoxy joints over time.
- On islands, run the seam along the long axis if the island takes two pieces, and pull it off center so it does not split the top down the middle.
The Natural Stone Institute (formerly the Marble Institute of America) has published fabrication standards for decades that name seam location as a primary quality factor [2]. Their guidance is to align seams with design features where possible, like tucking a seam under a window mullion or at a natural cabinetry break.
Slab size sets the hard limit. Most quartz manufacturers produce slabs in 120 x 55-inch or 128 x 63-inch formats [1]. A 130-inch run gets a seam no matter how good you are. The job becomes choosing where along those 130 inches the seam goes, not whether it goes.
How does matching quartz dye lots and slab orientation affect seam visibility?
Dye lot match is the single most important step after placement. Quartz slabs come out of the press in batches, and pigment ratios, aggregate spread, and vein pattern drift slightly between runs even under the same product name and color. Two slabs from different lots sitting side by side read as a visible seam no matter how tight the cut.
Most manufacturers encode the dye lot in the barcode or label on the slab back. Check it before you cut. A color temperature difference of even a few points on a colorimeter shows up as a line at the joint, and no amount of filling fixes it.
Orientation matters almost as much. Engineered quartz has a manufacturing direction. The press travels along one axis, which leaves a faint directional texture in the resin matrix. Cut two pieces from slabs oriented differently and the sheen splits at the seam even when the color is dead-on. Book-matching (flipping one piece so the pattern mirrors) can look great on heavily veined quartz, but both slabs still have to come from the same lot.
Order all slabs at once from one production run and go hand-select at the yard. Do not let the distributor swap in a same-color slab from another batch. That substitution is where most visible-seam complaints start.
What cutting technique minimizes the quartz seam gap?
A tight seam starts with a tight cut. Target a gap of 1/16 inch or less at the joint, and the sharper shops push for 1/32 inch [2]. Getting there takes a few specific habits.
Run a diamond blade rated for engineered stone. Quartz is harder and more abrasive than granite thanks to high silica content in the aggregate, up to 90 percent or more in some engineered slabs per NIOSH data [10]. A blade worn on granite jobs leaves a rougher kerf on quartz, and a rough edge means a wider visible gap after filling.
The zero-clearance cut separates good seams from great ones. Clamp both pieces and cut them at once on the bridge saw, or cut sequentially with the seam piece flipped so one blade pass shapes both mating faces. Because both edges come from the same path, they mate almost perfectly. Some shops call this a matched-cut or gang-cut seam.
After cutting, dress both edges with a 400-grit pad to knock off micro-chipping from the blade. A chipped edge fills with epoxy and reads as a dark line.
For CNC-routed tops, set the path tolerance to 0.005 inches or better on seam cuts. A path that wanders 0.010 inches across a 30-inch seam leaves a visible gap at one end.
What type of epoxy or adhesive gives the best color match on quartz seams?
Two-part polyester or epoxy adhesives made for engineered stone are the standard. The major brands sold through stone supply distributors come in cartridges that mix at the nozzle and offer tints from white to black, with greys, beiges, and creams in between.
The color-match process:
- Pull a chip or offcut from the actual slabs, not a sample book.
- Mix small test batches tinted toward the dominant background color of the quartz.
- Apply the test mix to the offcut edge, let it kick off (usually 10 to 20 minutes at room temperature), dress it flat, and compare in natural light and shop light. Both matter, because the customer will see the seam under both.
- Adjust tint until the cured fill sits within a shade or two of the slab surface.
On heavily veined quartz, one tint color will not fake the vein. The pro move is to fill with base-color epoxy, let it cure, then use a fine artist's brush and compatible pigment to hand-paint the vein across the joint. This takes skill and time. It also produces seams you genuinely have to inspect to find.
Some shops skip epoxy for a UV-cure adhesive to move faster. UV adhesives make very thin, clean seams, but they need a UV lamp and run less flexible than two-part epoxy, which can matter near heat sources.
Skip standard silicone caulk as seam filler. Silicone flexes and shrinks, so it pulls away from the quartz edge and leaves a visible groove. It also cannot be polished flush.
How do you polish a quartz seam flush without leaving witness marks?
Polishing is where a lot of good work dies. The factory surface on either side of the seam sits around 1,800 to 3,000-grit equivalent. Any sanding that drops below that finish leaves a dull haze on the surrounding stone, and the customer reads that haze as a wide smudge around the seam line.
The correct sequence:
- After the adhesive cures, use a sharp hand scraper or a seam setter blade at a low angle to shave off the bulk of the overfill without touching the stone. Remove 90 percent of it mechanically, not with sandpaper.
- Work a 400-grit diamond hand pad on the adhesive only, moving along the joint rather than across it. Keep the pad off the slab.
- Step up through 800, 1,500, and 3,000-grit, confirming the fill is flush before each jump.
- Finish with a polishing compound matched to the factory sheen. On a polished top, that means a high-gloss compound on a felt pad or a variable-speed angle grinder set to its lowest speed.
A seam setter (a rigid guide that holds the pad parallel to the slab) is not optional for pro work. Freehand polishing almost always dishes the seam, because epoxy is softer than the stone and sands faster.
For shops running real volume, planning cuts and seam locations before the job hits the floor saves both material and rework. Tools like SlabWise map piece layouts against slab dimensions, so you can pick the seam placement that uses the most slab while still hitting the visual and structural targets the job needs.
Watch the heat. Quartz resin hazes from friction during polishing. Keep a wet sponge handy and run water as coolant on the polishing steps.
Does quartz color and pattern choice affect how visible seams will be?
Yes, dramatically. Have this talk with homeowners before they fall for a slab, not after installation.
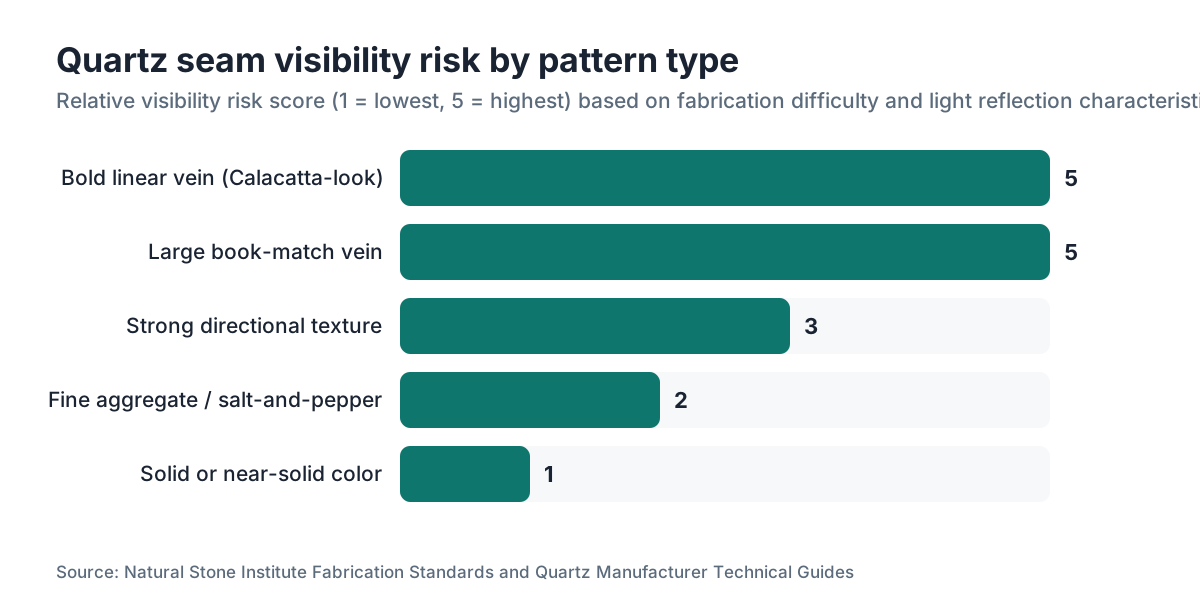
A practical breakdown by pattern type:
| Quartz pattern type | Seam visibility risk | Reason |
|---|---|---|
| Solid or near-solid color (whites, greys, blacks) | Low | No pattern to interrupt; color match is the only variable |
| Fine aggregate / salt-and-pepper | Low to medium | Random pattern forgives slight color variation |
| Bold linear veining (Calacatta-look) | High | Vein must align across seam or the break is obvious |
| Large format book-match vein | Very high | Requires precise orientation and dye-lot matching |
| Strong directional texture | Medium to high | Manufacturing grain reflects differently across a seam |
Solid white quartz like Silestone Blanco Zeus or a small-aggregate Cambria Torquay seams far better than a dramatic Statuario vein. If the homeowner has a 150-inch run and wants the bold vein, be direct: the seam will probably show, and here is the placement plan to soften it. That conversation, before the sale, kills the callback after installation.
For more on how specific brands engineer their surfaces, the Cambria countertops overview covers manufacturing standards and available patterns.
What causes quartz seams to become more visible over time?
A seam that looked clean at install can drift worse. Four things drive it.
Epoxy shrinkage. Every adhesive shrinks a little as it cures, and it keeps curing for days after application. A seam flush on install day can show a faint groove by day three. Modern two-part epoxies do this less than the old polyester products, but it still happens. Overfill slightly, leave the seam proud by a hair, then polish down after full cure (24 to 48 hours per Tenax product data [8]).
Differential thermal movement. Quartz and epoxy expand and contract at different rates. The coefficient of thermal expansion for engineered quartz runs roughly 15 to 25 x 10^-6 per degree Celsius [3], and polyester resin adhesives tend to run higher. Near a cooktop or under a sun-drenched window, repeated cycling opens a micro-gap at the seam edge. This is exactly why seams near cooktops are discouraged.
Cleaning product damage. Some acidic or abrasive cleaners break down the polymer resin over time. If the homeowner uses anything besides mild dish soap or a cleaner listed as quartz-safe, the seam adhesive can degrade faster than the slab and widen the contrast. The how to clean stone countertops guide covers safe cleaners in detail.
Settlement or cabinet movement. Houses move. A seam supported over a solid cabinet wall shrugs this off. A seam spanning a gap between cabinets can crack when the substrate shifts.
Can you repair a visible quartz seam after installation?
Yes, and the outcome depends on why the seam shows and how bad it is.
For a seam that opened slightly (a hairline gap that was not there at install), clean the joint with isopropyl alcohol, let it dry completely, then re-inject color-matched adhesive through a fine tip. The hard part is matching the original fill without the original mixed batch. Take a slab chip to a stone supply distributor and mix from scratch.
For a seam that was poorly color-matched from the start, the fix is harder. You can float a thin layer of tinted adhesive over the existing fill, but matching cured color to wet color is tough. Some shops reach for a two-part tinted stone touch-up kit (Tenax and similar brands) for minor corrections after the fact.
For a seam that sits unlevel, meaning one slab edge is higher than the other, you have to on-site polish the high side down with diamond hand pads. That almost always leaves witness marks and is genuinely hard to pull off in a finished kitchen without dusting cabinetry and appliances with compound.
Prevention is much easier than repair. A seam callback burns more time and more goodwill than doing it right the first time.
What industry standards govern quartz seam quality?
The Natural Stone Institute (NSI), formerly the Marble Institute of America, publishes the most widely cited fabrication standards in the countertop trade. Their Fabrication and Installation Manual specifies that seams should be filled with a compatible adhesive and that the seam surface should be flush within acceptable tolerance to the surrounding material [2].
The ANSI A108.19 standard covers interior stone tile installation and references acceptable bonding materials, though it applies more to tile than countertop fabrication [4]. Some shops cite it for adhesive compatibility language.
Quartz manufacturers publish their own installation guidelines with seam specs. Cambria, for example, specifies that seams must be supported by a substrate and that the adhesive must be compatible with polymer-bonded stone [5]. Cosentino (Silestone) and Caesarstone publish similar documents through their professional portals [6][7].
There is no single federal standard for countertop seam quality in the United States. Quality gets governed by the fabricator's contract, any state contractor licensing rules, and the manufacturer's published guidelines. In a homeowner dispute over seam quality, the NSI standards are the most defensible benchmark.
What do homeowners actually see vs. what fabricators focus on?
Fabricators track gap width, color match, and surface flush, because those are measurable. Homeowners track one thing: can they see the seam from where they stand, in the light they have.
Related, but not the same. A seam can be technically perfect, a 1/64-inch gap, dead color-matched, absolutely flush, and still look awful under raking light from a west window at 5 pm. A seam with a slightly wider gap tucked in a dark corner under a cabinet overhang may never get noticed.
The move for fabricators: walk the room with the homeowner before templating. Note where light enters and at what angles through the day. Use that to place seams in low-raking-light zones. A seam running away from a window instead of across the sill line almost never catches raking light.
For homeowners: ask to see exactly where each seam will land before templating. Have the fabricator mark it with tape on your existing counter or the floor. Stand at your normal working spot and you will know instantly whether it bothers you. That conversation is free. Moving a seam after fabrication starts is not.
Still in the planning stage for a full kitchen project? The countertop installation overview covers the timeline and what to ask before any stone gets cut.
Is invisible seaming possible with quartz, and when should you promise it?
No quartz seam is invisible under close inspection, so stop promising it. Fabricators who market 'invisible seams' create real problems. What good fabrication delivers is a seam you cannot notice at normal viewing distance in normal light.
The wording matters for expectations. Promise invisible, deliver not-noticeable, and some customers feel cheated even when the work is excellent.
The honest standard a shop can commit to: a seam the customer cannot spot standing upright at normal working distance (roughly 3 to 4 feet) under typical kitchen lighting. That is achievable every time with the techniques here. A seam visible only when you crouch and hunt at raking angles sits well within industry standards.
The NSI fabrication standards acknowledge that seams are inherent to stone countertop installation and set no zero-visibility benchmark. They set thresholds for flush, fill, and support [2].
Seams on solid colors and small-aggregate quartz get genuinely close to invisible at normal distance. Seams on bold-vein patterns will usually be catchable by a careful eye. Being clear about that split before a homeowner picks a dramatic slab is part of doing the job right.
Shops running multiple seam jobs a week should track which color and pattern combos generate the most seam-appearance callbacks. Even kept informally, that data shapes better pre-sale conversations and better layouts. SlabWise helps teams track job outcomes alongside quoting and nesting, keeping seam placement tied to the costs and patterns that actually drive rework.
Frequently asked questions
How wide should a quartz seam gap be?
Target 1/16 inch or less, with high-end fabricators aiming for 1/32 inch. Gaps wider than 1/8 inch are hard to fill cleanly without the adhesive shrinking visibly. The gap is controlled mostly by blade quality and cut technique, specifically a matched-cut or gang-cut method so both mating edges come from the same blade path.
What color epoxy should I use for white quartz seams?
Start with a white or off-white base adhesive and tint toward your specific slab shade using the tint kit from the same manufacturer. Test on an offcut and check the cured color in both natural and artificial light before applying. Pure white quartz often needs a very slightly warm or cool grey tint rather than straight white, because the factory polish makes the surface look warmer than the raw pigment.
Should quartz seams be placed over cabinet walls or between them?
Always over a cabinet wall or solid structural support. A seam over open span has no substrate beneath it and relies entirely on the adhesive joint for support. If the adhesive fails or the cabinet shifts, a seam over open space cracks. Over a cabinet wall, even a failed adhesive leaves both pieces physically supported.
Can you seam quartz at an inside corner?
You can, but it adds risk. Inside corners concentrate stress, and a seam there is more likely to crack over time than one in the middle of a run. If layout forces a seam near an inside corner, place it at least 6 inches from the corner itself, and make sure the substrate support extends fully under both sides of the joint.
Does quartz seam visibility depend on the finish (polished vs. honed)?
Yes. Polished quartz shows seams more clearly because the glossy surface reflects light at a consistent angle, so any discontinuity pops. Honed or leathered finishes scatter light and can hide seams slightly better. But matching epoxy to a honed surface is harder, because the cured adhesive needs to be de-glossed to the same flat sheen as the surrounding slab.
What is a book-match seam on quartz and does it work?
A book-match seam uses two consecutive slabs flipped so the vein pattern mirrors across the joint, like an open book. It can look spectacular on heavily veined quartz when both slabs come from the same dye lot and the seam is cut and filled precisely. The risk is high: even a small color deviation between the slabs or a slightly misaligned vein is very obvious on a mirrored pattern.
How long should you wait before polishing a quartz seam?
Two-part polyester seam adhesives typically reach handling strength in 15 to 30 minutes at 70 degrees Fahrenheit, but full cure takes 24 to 48 hours. Polishing before full cure can pull the adhesive and create a micro-groove. Best practice is a rough scrape and flat removal of excess within the first hour, then final polishing after full cure. UV-cure adhesives can be polished within minutes of lamp exposure.
Why does my quartz seam look fine in the shop but visible at the installation site?
Lighting. Shop lighting is usually overhead and diffuse. Kitchen lighting often includes windows that throw raking light at low angles right across the countertop surface. Raking light shows every minor level change and color shift that overhead light masks. Check seams in the shop with a handheld LED held at a low angle before delivery, and walk the kitchen at different times of day when assessing complaints.
Are quartz seams covered under the manufacturer's warranty?
Generally no. Most major quartz warranties, including Cambria, Caesarstone, and Silestone, cover defects in the slab material but exclude damage from installation, including seam quality, adhesive failure, or improper support. Seam workmanship falls under the fabricator's and installer's own warranty, not the material manufacturer's. Clarify this with your fabricator before signing a contract.
How many seams should a typical 10-foot L-shaped kitchen have?
An L-shaped kitchen with a 10-foot run on each leg usually needs one seam per leg, or sometimes two total if one leg exceeds slab length. Most quartz slabs run up to 128 inches (about 10.7 feet), so a standard 10-foot run can sometimes be done in one piece. Islands and peninsulas add seams based on their size relative to available slab dimensions.
Can quartz seams be made invisible with color-matched grout instead of epoxy?
No. Grout is a cement-based product for tile joints. It is not compatible with quartz countertop seaming. Grout shrinks, cannot be polished flush to a factory surface, and fails mechanically in a countertop application. Only two-part polyester or epoxy adhesives made specifically for engineered stone should be used for quartz seams.
Does the direction of a quartz seam (parallel vs. perpendicular to the counter edge) affect how visible it is?
Yes. A seam running perpendicular to the counter's long axis (front to back) is less visible than one running parallel (left to right), because the eye follows the long axis and a perpendicular seam crosses that line of sight quickly. A parallel seam runs along the field of view and the eye traces it naturally. Perpendicular seams are almost always the better choice when layout allows.
What tools do professional fabricators use to improve seam quality?
A quality bridge saw with a fine diamond blade, a seam setter or rigid sanding guide to polish flush without cupping, a calibrated colorimeter or a good offcut for color-match testing, and a low-angle LED for final inspection before delivery. CNC routers with tight path tolerances are increasingly common for matched-cut seaming on high-end jobs. None of these replace careful technique, but each one cuts variability.
Should homeowners be present when quartz seams are being made?
Not during fabrication, which happens in the shop. But homeowners should be involved in seam placement before templating. The templating appointment is the right time to walk the space, identify where seams fall, and get agreement in writing. Some fabricators mark seam locations on the template and have the homeowner sign off before cutting. That step eliminates most post-installation disputes.
Sources
- Natural Stone Institute, Fabrication and Installation Manual (Dimensional Stone Design Manual): Industry fabrication standards identify seam location, flush fill, and structural support as primary quality factors for stone countertop seams; acceptable seam gap targets approximately 1/16 inch or less.
- Engineered Stone Technical Data Sheets, Caesarstone Professional Resources: Coefficient of thermal expansion for engineered quartz is approximately 15 to 25 x 10^-6 per degree Celsius, higher than most polymer adhesives used in seaming.
- ANSI A108.19, American National Standard for Interior Stone Tile Installation and Grout: ANSI A108.19 specifies adhesive compatibility requirements for interior stone installation, referenced by some fabricators for seam adhesive guidance.
- Cambria, Professional Installation Guidelines (Fabricator Resources): Cambria's published installation guidance specifies that seams must be supported by substrate and that adhesive must be compatible with polymer-bonded engineered stone.
- Cosentino (Silestone), Technical Installation Manual for Professionals: Cosentino publishes seam placement and adhesive compatibility requirements for Silestone quartz in their professional technical documentation.
- Caesarstone, Professional Fabrication and Installation Guide: Caesarstone's fabrication guide specifies that manufacturer warranty covers material defects in the slab but excludes installation quality issues including seam workmanship and adhesive failure.
- Tenax USA, Stone Care and Adhesive Product Technical Sheets: Tenax publishes two-part polyester and epoxy seam adhesive specifications including cure times of 15 to 30 minutes to handling strength and 24 to 48 hours to full cure at standard shop temperature.
- OSHA, Occupational Exposure to Respirable Crystalline Silica (29 CFR 1926.1153): Engineered quartz cutting produces respirable silica dust subject to OSHA permissible exposure limits; wet cutting and engineering controls are required for fabricators. (Context: silica content of quartz slabs is relevant to understanding material hardness and abrasive properties that affect seam cutting.)
- National Institute for Occupational Safety and Health (NIOSH), Silica in Countertop Fabrication: NIOSH documentation identifies engineered stone as having very high crystalline silica content (up to 90+ percent), relevant to blade wear rates during seam cutting.
Last updated 2026-07-10