TL;DR
- Granite pits are natural voids left where feldspar or other minerals fell out during quarrying or cutting.
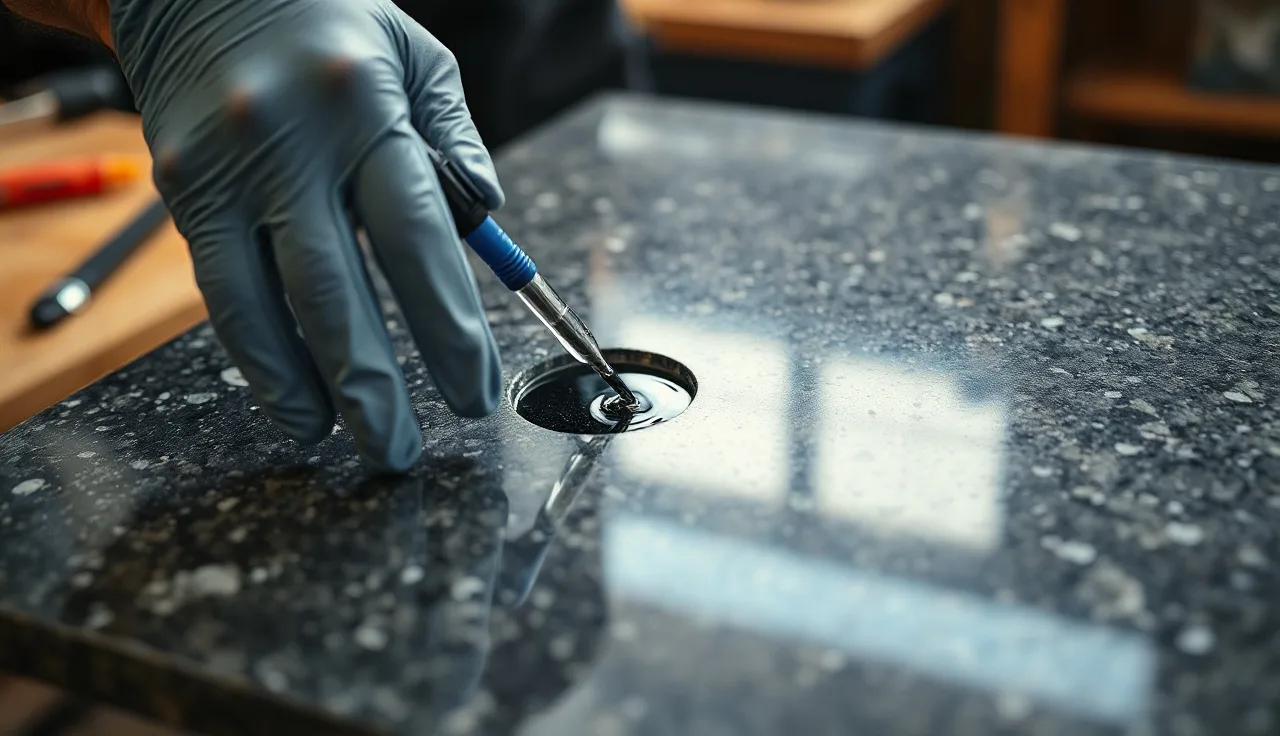
- Fabricators fill them with low-viscosity epoxy or UV-cure resin, tinted to match, then scrape flush and polish back.
- The work takes 15 to 30 minutes per area.
- Most pits are cosmetic and fully fixable.
- Deep structural voids need stabilizing resin, not cosmetic filler.
What are pits in granite and why do they happen?
Granite is an igneous rock built from interlocking crystals, mostly quartz, feldspar, and mica. Those crystals don't all bond with equal strength. Some of the softer ones, particularly large feldspar crystals, pop out during quarrying, transport, or fabrication. What's left is a small void, anywhere from a pinhole to several millimeters across. Fabricators call these pits or voids. They're normal.
The quarrying process runs diamond wire saws and gang saws that drag blades across stone at speed. Any crystal that's already a little loose gets knocked free. Pitting shows up more in coarser-grained granites, especially those with large feldspar phenocrysts, and in stones carrying natural micro-fractures [1]. Blue Pearl, Absolute Black, and some Brazilian blues are notorious for surface pits. Exotic slabs with dramatic movement pit more than uniform greys.
Pits are not cracks. They're not a sign the stone is defective either. The Natural Stone Institute describes surface pits as a characteristic of natural stone that is separate from structural damage [2]. Still, a pit wider than about 5 mm, or one that runs deep below the polished surface, needs more than a quick fill.
What materials do fabricators use to fill granite pits?
Two product families do most of the work: two-part epoxy fillers and UV-cure resins. Each has its place.
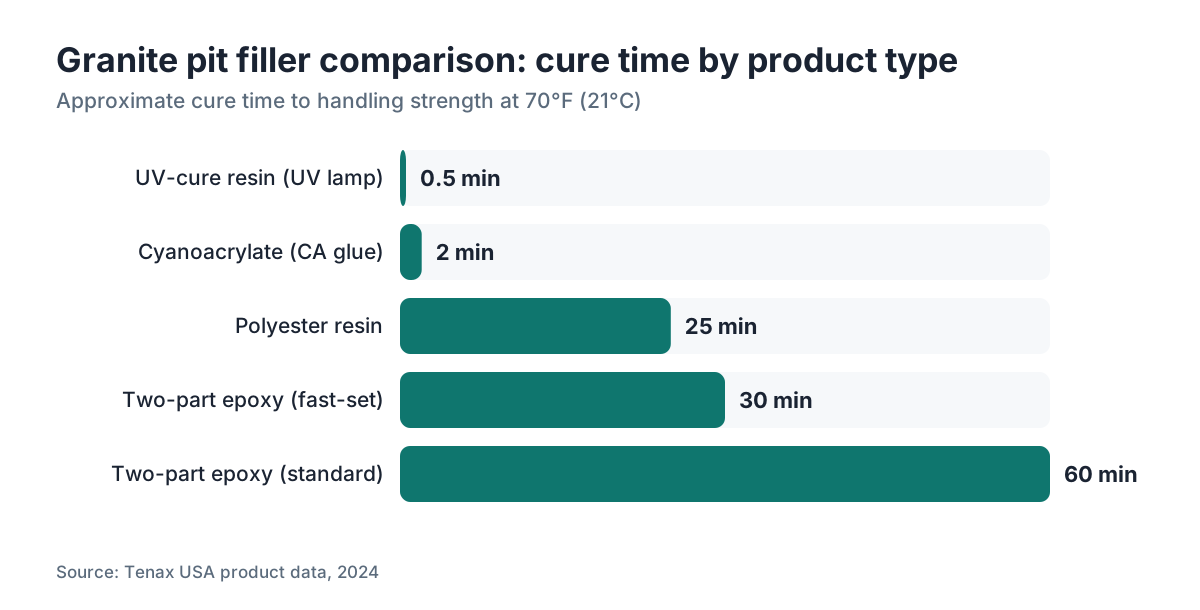
Two-part epoxies (A and B components, mixed in a set ratio) are the standard for deeper pits and anything structural. They cure slowly, 30 minutes to several hours depending on the formulation, which gives you time to work. Tenax Tefill, Akemi stone products, and Integra Adhesives are brands you'll actually find on a working shop's shelf. These epoxies come in dozens of tints, and most shops keep a set of colorants to blend custom shades on the fly [3].
UV-cure resins set in seconds under a UV lamp, which makes them fast for shallow cosmetic pits when you're running through a big batch of slabs. The tradeoff: you work fast, and the bond can be a touch more brittle than a well-mixed two-part epoxy. For polished slabs moving down a production line, UV resins are hard to beat on throughput.
A third option is polyester resin, which many shops leaned on before better products arrived. Polyester shrinks slightly as it cures, so fills can read as subtle depressions after polishing. Most experienced fabricators have moved off it for anything but rough work. It's still on shelves and still works for very shallow surface marks.
Here's a quick comparison:
| Material | Cure time | Best for | Shrinkage risk | Cost per kit |
|---|---|---|---|---|
| Two-part epoxy | 30 min to 4 hr | Deep pits, structural voids | Low | $40-$120 [3] |
| UV-cure resin | 5-30 seconds | Shallow cosmetic pits | Very low | $25-$80 [3] |
| Polyester resin | 15-45 min | Surface scratches, rough fill | Moderate | $15-$40 |
Color matters as much as chemistry. A fill that cures to an off-white blob in black granite is worse than no fill at all. Most epoxy kits include black, white, and a few earth tones. For complex granites with several colors you'll mix tints together, test on an off-cut, and adjust before you touch the slab.
Step-by-step: how do you actually fill a pit in granite?
The process isn't complicated, but sequence matters. Rush an early step and you make more work for yourself later.
Step 1: Clean the pit. Any dust, slurry, or oil inside the void stops the filler from bonding. Blow it out with compressed air, then wipe with acetone on a cotton swab. Let it flash off, usually 2 to 3 minutes. Skip this and the fill pops right back out.
Step 2: Assess depth. Probe the pit with a toothpick or thin wire. Shallow pits, under about 2 mm, take a single application. Deeper voids sometimes need a base layer that cures first, then a top layer, because deep fills can slump or trap bubbles if you pour them in one shot.
Step 3: Mix and tint your epoxy. Follow the ratio exactly. Off-ratio mixes stay tacky or cure brittle. Add colorant in small amounts. Test the color on scrap from the same slab when you can. Aim slightly darker than the surrounding stone in the wet state, because it lightens as it cures.
Step 4: Apply with a toothpick or syringe. Overfill the pit a little. You want the filler proud of the surface by half a millimeter or so. Surface tension helps on small pits. On larger voids, tape a dam around the edge so the fill doesn't spread onto the polished surface.
Step 5: Cure fully before touching. This is where impatience kills jobs. Check the stated cure time and add 20% in cold or humid shop conditions. Cold slows epoxy chemistry hard. A shop at 55°F may need double the stated cure time [4].
Step 6: Scrape flush. A sharp razor blade (a standard utility blade or a dedicated stone scraper) held at a low angle takes off the proud fill without scratching the polish around it. Some fabricators reach for a small hand grinder with a fine disc on larger fills, but that's easy to overdo.
Step 7: Polish back. Start with a 400-grit hand pad, then 800, then 1500, then a final buff with polishing compound. The goal is to match the sheen of the surrounding stone, not to hit the whole area with a polishing wheel. If the pit was small, 800 and 1500 might be all you need before it blends in.
For UV resins, steps 3 through 5 collapse into about 45 seconds: apply, expose to the UV lamp for the stated time (usually 10 to 30 seconds), then move to scraping. The cleanup steps are the same.
How do you match the filler color to the granite?
Color matching is the skill that separates a clean repair from one that shouts "this was fixed." There's no shortcut. You develop an eye for it.
Start with the base color of the surrounding stone, not the brightest fleck or the darkest one. On a grey-and-white granite, the base is usually a medium grey. Mix white and black tint to land there. Then read whether the stone runs warm or cool. Most black granites sit slightly cool. Most beige granites run warm.
On complex multi-color stones, match the color that sits directly around the pit, not the average of the whole slab. If the pit lands in a dark mineral vein, match the vein. If it lands in a white quartz zone, match that.
Test on off-cut scrap, never on the slab. Apply a small dot, let it set, then compare wet and cured. The fill often reads lighter wet and darker once fully cured, so adjust for that.
Some fabricators keep a color log: index cards with cured dabs labeled by tint ratio, photographed next to known stone samples. Low-tech, but it cuts guesswork on repeat stone orders.
When is a pit too big or too deep to fill with standard epoxy?
Most surface pits fill cleanly. Some voids are a different kind of problem, more than a bigger one.
A pit wider than about 8 to 10 mm with irregular edges may be a spall rather than a crystal-pop void. Spalling happens when the surface layer of stone separates, often along a natural micro-fracture. You can fill a spall with epoxy, but if the surrounding stone isn't stable, the fill eventually pops out again.
Voids deeper than about 5 mm below the polished surface usually need a stabilizing resin rather than a cosmetic fill. Stabilizers are lower in viscosity and are built to wick into the micro-fractures around the void and cure in place, essentially pinning the surrounding crystals. Tenax Prosecco and similar consolidants are the right tool here [3]. Once the stabilizer cures, you do a cosmetic fill on top.
Cracks that look like pits are a separate problem. Run a fingernail across the feature: a true pit drops below the surface plane, while a crack cuts across it. Cracks sometimes need epoxy injected under pressure, or if they're hairline, a penetrating consolidant followed by a surface fill.
If a slab shows dense pitting across a large area, that's a material quality issue worth a conversation with the supplier before fabrication starts. Stone that pits badly on the saw table may keep pitting after installation, especially under thermal shock or point impacts.
Should pits be filled before or after polishing?
Before. Always before final polishing.
The logic is simple. Fill first, polish second, and the polishing step blends the repair into the surrounding finish. Try to fill a fully polished slab and you're working on a mirror that shows every fingerprint, and any abrasion you use to blend the fill cuts back the polish you already put in.
The standard sequence in most shops runs: saw, grind to rough profile, inspect for pits and structural issues, fill and cure, then move through the polishing grits (typically 50, 100, 200, 400, 800, 1500, and 3000 pads on a wet polisher, finishing with a buffing compound). The fills polish right along with the stone.
There's one exception: pits found after the slab is installed. Now you're doing a field repair on finished stone. The technique is the same, but the polishing is by hand with progressively finer pads, and the result rarely reaches shop-invisible. Say so to homeowners before they sign off on a slab with obvious natural pitting.
What tools do you need for granite pit filling?
You don't need much. The expensive part is experience, not gear.
Basics: a compressed air gun, acetone, cotton swabs, toothpicks or wooden skewers, mixing cups, tongue depressors for mixing, razor blades or a scraper, and your filler with colorants. Add a UV lamp if you're using UV resins (any commercial lamp in the 365 to 395 nm range works; nail curing lamps do in a pinch, though dedicated stone repair UV lamps are calibrated better for thicker fills).
For polishing back: a variable-speed angle grinder or polisher (3,000 to 10,000 RPM range), wet polishing pads in grits from 400 up to 3000, and a buffing pad with polishing compound. On a field repair, the same tools but battery-powered, and a spray bottle for water instead of a running hose.
For larger structural voids: a syringe or squeeze bottle to deliver consolidant into the void without a mess, plus heat tape or a heat gun if you're in a cold shop and need to bring the stone surface up to temperature for proper epoxy adhesion.
One piece of gear pays for itself: raking side-light. Overhead fluorescent light hides shallow pits. A work light angled low from the side shows everything. Cutting, grinding, and polishing stone releases respirable crystalline silica, so run dust controls and wear rated respiratory protection during repair work too [7]. Acetone and epoxy solvents give off VOCs, so ventilate the area [8]. Finding pits in the shop beats having the homeowner find them after installation.
How do you tell a customer about pits in their granite slab?
Proactively, and before fabrication, not after.
Walk the slab with the customer, or have photos taken during inspection, and point out any visible pits. Explain that natural stone pitting is normal and that your shop fills pits as part of the standard process. Show them what a filled pit looks like on scrap or a display piece. Most customers accept it once they understand it's built into the material.
Trouble starts when a customer spots a filled pit after installation and nobody warned them. They read the repair as damage the fabricator caused. A simple note in the work order, "slab inspected, X pits identified at locations A/B/C, filled and polished per standard process," protects the shop and sets expectations.
For slabs with heavy natural pitting, ask the customer to confirm they understand the stone's character. Some people choose a stone for its natural, imperfect look. Others want something that reads smooth and uniform, and a heavily pitted stone is a bad fit for them. Steering them toward a denser, finer-grained granite, or toward an engineered quartz surface, beats a callback dispute. Our guide to granite countertops covers how grain size affects what you can expect from a slab.
Shops running high volumes of natural stone track this slab-level detail in their quoting and job management workflow. SlabWise, for example, lets shops attach inspection notes to specific slabs during quoting, so the sales team and the shop floor read the same record.
Can pits in granite get worse after installation?
A well-filled pit is stable. Unfilled pits can grow under certain conditions.
Water is the main culprit. Water that sits in an unsealed pit expands on freezing (relevant for outdoor granite, less so for interior counters), and acidic liquids can chemically attack the minerals next to the void. The Natural Stone Institute recommends sealing natural stone countertops, partly because sealers fill micro-voids and cut moisture ingress [2].
Thermal cycling matters outdoors. Granite on exterior kitchen counters, BBQ surrounds, or outdoor bars sees wide temperature swings. Any void holding moisture becomes a freeze-thaw target, and freeze-thaw progressively enlarges micro-fractures and voids in exterior stone [9]. For outdoor work, fill every visible pit with an exterior-rated epoxy (check for UV stability, since many interior epoxies yellow outdoors) and seal with a penetrating sealer.
Indoors, a properly filled pit is essentially permanent. The epoxy in a clean, well-bonded fill doesn't degrade under normal kitchen conditions. It may amber very slightly over decades, but you rarely see it.
If a customer reports that a filled pit opened back up within months, the fill wasn't bonded properly, usually because the void wasn't cleaned of dust or slurry first. That's a shop process issue, not a material issue, and a field repair fixes it.
Are there pits that shouldn't be filled, and how do you decide?
Yes. Some pits are best left alone, or at least evaluated carefully before you touch them.
Very shallow pits, sometimes called pinhole pitting, smaller than about 0.5 mm and spread uniformly across the surface, are a texture of the stone, not a defect. Chasing thousands of pinholes is a losing game. The fills rarely look better than the natural surface, especially on honed or leathered finishes where the texture is part of the look.
Leathered and brushed finishes are a special case. These finishes keep surface texture on purpose, including small voids. Fill every pit and you defeat the point. Most fabricators skip filling on leathered work except for voids big enough to catch a fingernail.
On polished surfaces, the threshold drops. Any pit you can feel with a fingertip is worth filling, because polished granite reads as smooth and a tactile void surprises the hand. Anything you can see but not feel is a judgment call based on how much it reads in the finished piece.
For countertop installation decisions more broadly, see our guide to countertop installation, which covers substrate prep, seam placement, and the handoff between fabrication and final installation.
What's the quality standard for filled pits, and how do inspectors evaluate them?
There's no federal standard for granite pit filling specifically. The closest benchmark comes from the Natural Stone Institute (formerly the Marble Institute of America), whose fabrication standards state that natural stone surfaces should be free of defects to the extent inherent in the material, and that repairs should read as inconspicuous under normal viewing conditions at arm's length [2][6].
In practice: a repair that's invisible at 18 to 24 inches under normal interior lighting passes. A repair visible at arm's length as a color patch or sheen difference does not.
Most disputes trace to two failure modes: color mismatch (the fill reads as obviously foreign) and sheen mismatch (the fill polished to a different gloss than the surrounding stone). Both are fixable in the shop if caught before the slab ships. Under raking light, both jump out. Under flat overhead light, both hide, which is exactly why inspection lighting matters.
The Tile Council of North America's ANSI A137.1 standard covers ceramic and porcelain, not granite, but its principle of judging finishes at specific viewing distances under specific lighting is a reasonable analog that many shops have picked up informally [5].
For shops quoting jobs with significant natural stone repair, a documented line item for "void filling" with visible time and material costs beats bundling it silently into the square footage price. Software like SlabWise makes it straightforward to itemize these services at the quoting stage so the work doesn't disappear into margin.
Frequently asked questions
Can I fill granite pits myself, or does this have to be done by a fabricator?
You can do a basic cosmetic fill yourself with a consumer stone repair kit, sold online or at tile stores for $20 to $60. The hard parts are color matching and polishing back properly. A fill done without the right polishing steps looks patchy. For a pit you can't feel with your fingernail, sealing the stone and leaving it alone beats a DIY fill that makes it worse.
How long does it take for epoxy pit filler to fully cure in a shop?
Most two-part epoxy stone fillers reach handling strength in 30 to 60 minutes and full cure in 4 to 8 hours at 70°F. In a cold shop below 60°F, add significant time, sometimes double. UV resins cure in 10 to 30 seconds under a UV lamp but need the right wavelength (typically 365 to 395 nm). Don't sand or polish any fill before full cure; partial cure smears and finishes poorly.
Will the filled pit be visible after polishing?
A well-executed fill on a polished surface should be invisible at arm's length under normal lighting. Under raking side-light or a flashlight held low, a slight sheen difference sometimes shows. No fill is truly zero-trace in every lighting condition. On honed or leathered finishes, fills show more, because the matte surface reveals texture differences that a gloss finish tends to hide.
What causes pitting in some granites but not others?
Crystal size and mineral composition drive it. Coarse-grained granites with large feldspar crystals pit more because bigger crystals are easier to dislodge. Fine-grained stones like Absolute Black (technically a gabbro) pit less but aren't immune. Stones with natural micro-fractures or high mica content also pit more during sawing and polishing. The country of origin matters less than the specific geology of the quarry.
Does a pit in granite affect the structural integrity of the countertop?
A surface pit, one that doesn't run through the slab, has no meaningful effect on structural integrity. Granite countertops run about 3 cm (1.2 inches) thick; a pit 2 to 3 mm deep removes a tiny fraction of that cross-section. Pits become a structural concern only when they're unusually deep, clustered at a stress point like a cutout edge, or a sign of underlying fractures. In those cases, a fabricator should assess whether the material is suitable.
Should granite pits be disclosed to the homeowner before purchase?
Yes, clearly. Walk the slab with the customer or send photos showing any significant pits before fabrication. Note in the work order that pits exist, where they are, and that your shop fills them as a standard step. This protects you from disputes after installation where a customer claims the pit was damage you caused. Most customers are fine with natural pitting once they understand it's a characteristic of the material.
Is pitting covered under any warranty for granite countertops?
Pitting from natural mineral voids counts as a characteristic of the material, not a manufacturing defect, so most fabricator warranties exclude it explicitly. The slab supplier's warranty, if one exists, usually follows the same logic. The exception is pitting caused by an identifiable fabrication error, like improper blade speed fracturing crystals. Check the exact language in both the slab purchase agreement and the fabrication contract.
What grit do you use to polish back a filled granite pit?
Start at 400 grit to level the fill flush, then work through 800, 1500, and 3000 wet polishing pads. Finish with a polishing compound and a buffing pad. For a small pit on an already-polished slab, you can sometimes start at 800 if the fill is well-scraped and nearly flush. Going coarser than needed just creates more work blending the surrounding polish back to the slab's original sheen.
Can I use super glue (CA glue) to fill granite pits?
Cyanoacrylate (CA) glue shows up in stone work, mainly for small crack repair and stabilizing loose edges, and some fabricators use thin CA for pinhole pits in a pinch. It cures clear, fine on lighter stones but obvious on dark granite. It's also brittle next to flexible epoxy and pops out more easily. For anything bigger than a pinhole, a tinted two-part epoxy is the right choice. CA is a stopgap, not a standard repair.
How do pits in granite compare to pitting in marble or quartzite?
Marble pits differently: the stone is softer (Mohs 3 to 4 versus granite's 6 to 7) and voids tend to run shallower but more numerous in some varieties. Quartzite is denser and pits less, though stones sold as quartzite vary widely. The filling technique is the same across all three: clean, fill with tinted epoxy, cure, scrape, and polish back. Color matching is harder on marble with complex veining. See our related guides on marble countertops and how to clean quartzite countertops.
How much does pit filling add to the cost of a granite fabrication job?
One pit costs almost nothing in materials: a little epoxy, some colorant, five minutes of labor. For a typical slab with a handful of pits, it absorbs into standard fabrication cost with no separate line item. If a slab has significant voids needing structural stabilizer or heavy color-match work, some shops charge a pit repair fee of $25 to $100 depending on scope. Get that documented in the quote so there are no surprises.
Can pits in granite be prevented during quarrying or fabrication?
Partly. Quarry operators can adjust wire saw tension and speed to reduce crystal loss, and fabricators can run saws slower on known problem stone. Because pitting is largely driven by the specific stone's geology, you can't eliminate it. Some fabricators apply a stabilizing resin to the back of a slab before polishing to consolidate loose crystals before they fall out during machining. That's more common on exotic imports known for pitting.
Sources
- U.S. Geological Survey, Mineral Resources Program: Granite is composed of interlocking crystals of quartz, feldspar, and mica; coarser-grained varieties are more susceptible to surface pitting during cutting.
- Natural Stone Institute (formerly Marble Institute of America), Care and Handling Guidelines: Surface pits are a characteristic of natural stone, distinct from structural damage, and repairs should be inconspicuous under normal viewing conditions.
- Tenax USA, Stone Repair Product Catalog: Two-part epoxy stone repair kits range from approximately $40-$120; UV-cure resins range from $25-$80; Tenax Prosecco is a low-viscosity penetrating consolidant for structural voids.
- Illinois Institute of Technology: Epoxy cure rate slows significantly below 60°F; cold conditions can double or more the time required to reach full mechanical strength.
- Tile Council of North America, ANSI A137.1 Standard Specifications for Ceramic Tile: ANSI A137.1 establishes that tile surface quality should be evaluated at specified viewing distances under standard lighting; industry professionals apply analogous criteria to natural stone finish repairs.
- Natural Stone Institute, Dimension Stone Design Manual: Fabrication standards specify that natural stone surfaces should be free of defects to the extent inherent in the material.
- Occupational Safety and Health Administration (OSHA), Crystalline Silica: Stone fabrication operations involving cutting, grinding, and polishing generate respirable crystalline silica; proper PPE and dust controls are required during all surface repair work.
- U.S. Environmental Protection Agency, Indoor Air Quality: Acetone and epoxy solvents used in stone repair emit VOCs; adequate ventilation is required during application in enclosed shop environments.
- National Institute of Standards and Technology: Freeze-thaw cycling causes water in stone voids to expand, progressively enlarging micro-fractures and voids in exterior stone applications.
- Akemi (Akemi Stone Care), Technical Data for Stone Adhesives and Fillers: Two-part polyester and epoxy stone fillers are available in multiple tints and can be blended to match a wide range of natural stone colors during fabrication.
Last updated 2026-07-10