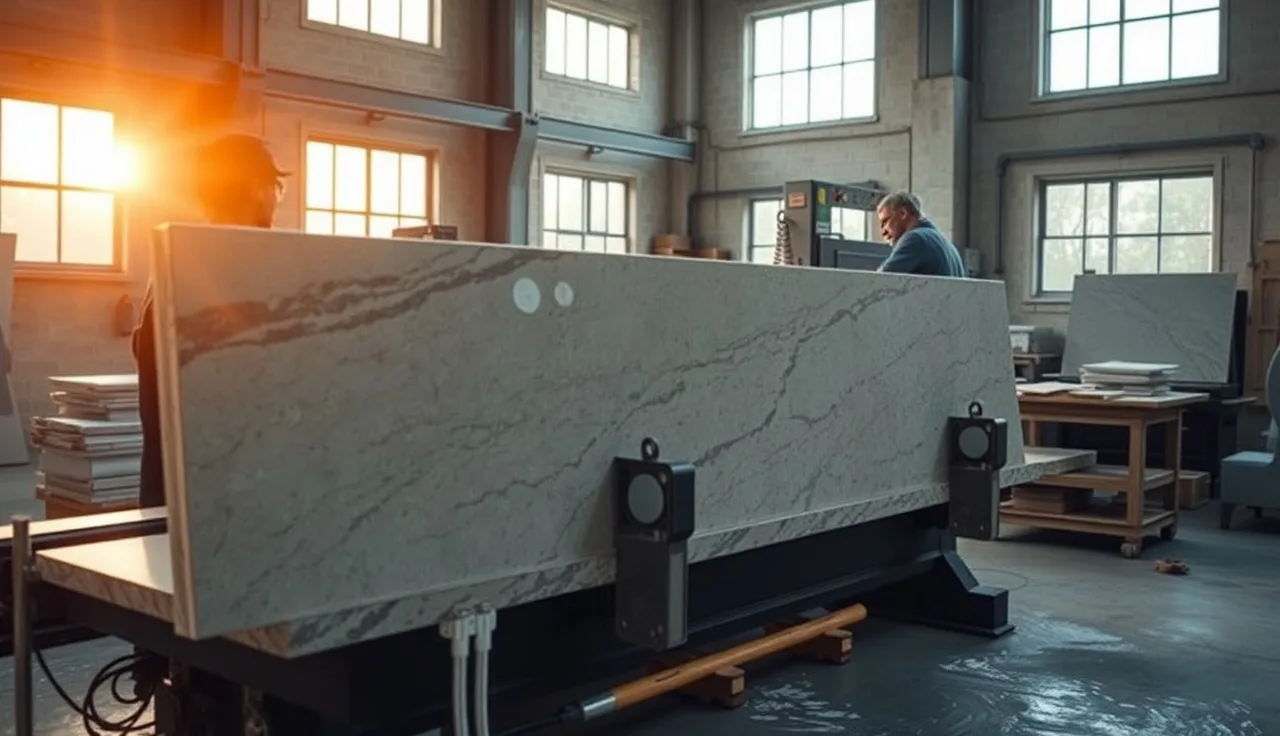
TL;DR
- Fabricating a stone island countertop takes 1 to 3 weeks and moves through six stages: slab selection, digital templating, CNC cutting, edge profiling, surface finishing, and installation.
- Islands are harder than perimeter countertops because the piece is large, often has no wall to lean against, and seams must be planned carefully.
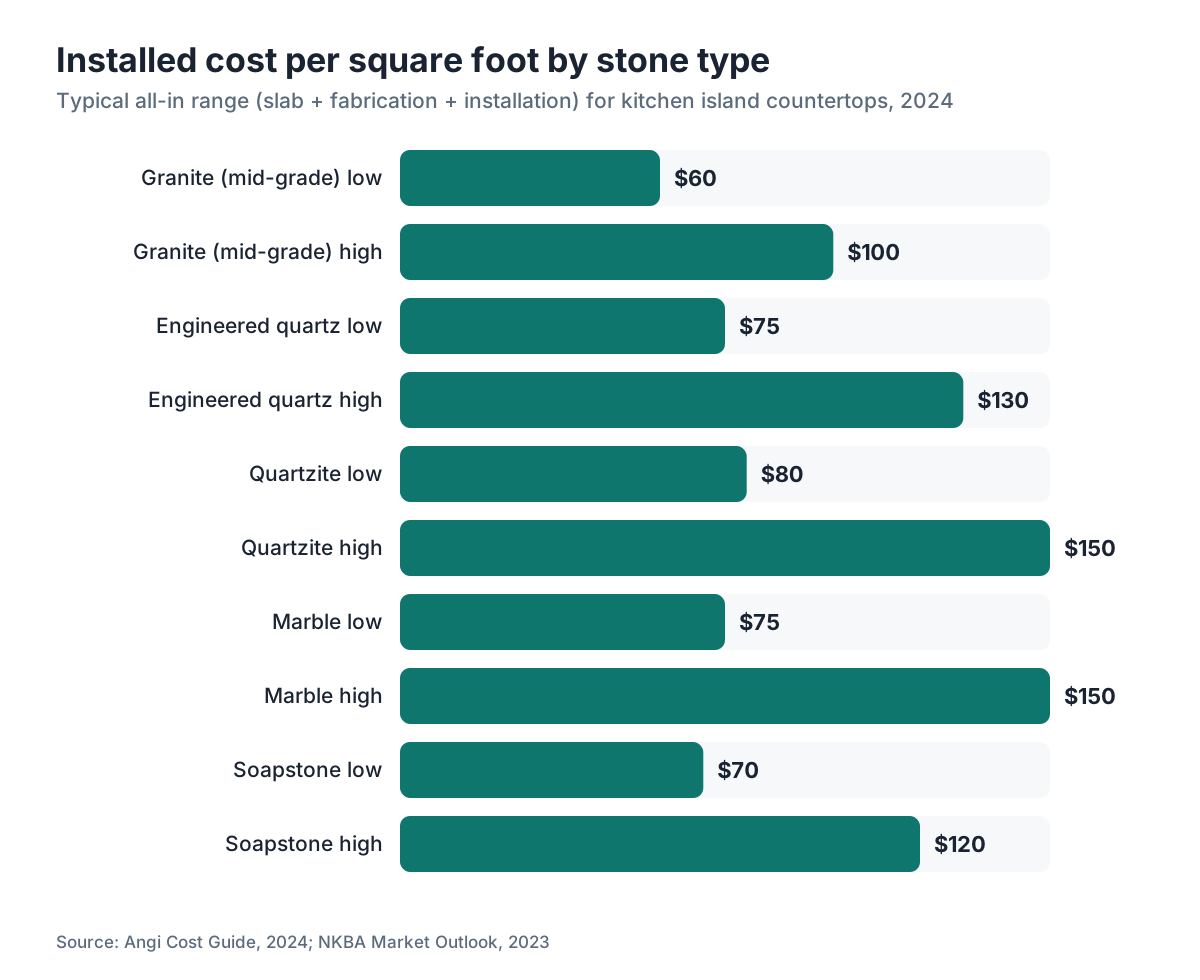
- Expect to pay $60 to $150 per square foot installed for granite or quartz.
What actually happens when a fabricator makes a stone island countertop?
Most homeowners picture a fabricator cutting a slab with a giant saw and calling it a day. The real process has six distinct stages, each with its own failure points, and skipping or rushing any of them is how you end up with a crooked seam or a cracked top.
The six stages are: (1) slab selection and inspection, (2) templating, (3) nesting and layout, (4) cutting and shaping, (5) edge profiling and surface finishing, and (6) delivery and installation. For an island specifically, stages 2 and 3 deserve extra attention because islands are freestanding slabs with no wall support, often larger than a single slab can cover, and visible from every angle in the kitchen.
The whole process, from the day you sign a contract to the day the top is in place, typically runs 1 to 3 weeks depending on shop backlog and material availability. The cutting and shaping itself usually takes one day. The rest is scheduling, material sourcing, and curing time for adhesive on laminated edges.
How do you choose the right slab for an island?
Slab selection matters more for an island than for perimeter runs because an island top is the focal point of the kitchen. People walk around it, sit at it, and stare at it from the living room. A vein that runs off-center or a flaw buried in the middle of the slab will be obvious.
Most fabricators buy from a local stone distributor or import directly. Common island materials include granite, quartzite, marble, and engineered quartz. Granite countertops are durable and come in large slab sizes, typically 55 to 65 inches wide and 100 to 130 inches long, which matters when you need to cover a 48-by-96-inch island without a seam. Marble countertops have more dramatic veining but are more porous and prone to etching. Cambria countertops and other engineered quartz surfaces are manufactured to consistent dimensions and require no sealing, which simplifies long-term care.
When selecting a slab, the fabricator looks for uniform thickness (most slabs run 3 cm, or about 1.18 inches, for countertop use), no fissures running through the area where the island will be cut, and a veining pattern that works with the intended orientation. You, as the homeowner, should be present for slab selection whenever possible. Some distributors let you mark the slab with chalk to indicate which section you want used. Ask for that option. [1]
Thickness matters mechanically too. A 2 cm slab (roughly 0.79 inches) needs a plywood substrate or a laminated edge to look substantial. A 3 cm slab is self-supporting across typical island spans and gives you a fuller edge profile without the lamination joint. Most fabricators default to 3 cm for islands.
What is digital templating and why does it matter for islands?
Templating is measuring your kitchen so the slab gets cut to exactly the right shape. Old-school fabricators used thin strips of cardboard or plywood, taped together on site. That method still works but introduces human error, especially on large islands where a quarter-inch mistake at one end compounds across six feet.
Digital templating uses a laser measurement device, the most common brand being Proliner by Prodim, to capture the island's exact perimeter, locate any sink cutouts or cooktop openings, and record the precise position of support structures underneath. The Prodim Proliner measures to within about 0.5 mm accuracy across a large room [2]. That data goes directly into the shop's CNC software as a digital file, skipping the manual transfer step where errors creep in.
For an island, the template also has to account for whether the island is perfectly square (it rarely is) and whether the floor is level, which matters if the cabinets aren't shimmed evenly, since that affects overhang consistency. A good templater notes every anomaly and flags it before cutting starts.
Digital templating adds $50 to $150 to the job in some shops, and some fold it into their base price. It's worth it on any island over 40 square feet or any job with complex cutouts.
How does the fabricator lay out cuts on the slab (nesting)?
Once the template file exists, the fabricator imports it into nesting software to figure out how to cut the island piece, and any other pieces for the job, out of the raw slab with minimal waste. This is called nesting, and it's a real optimization problem: natural stone slabs have flaws, veining directions, and bookmatching requirements that constrain where each piece can come from.
For an island wider than about 40 inches or longer than about 80 inches, the fabricator has to check whether it fits in a single slab. Standard slab dimensions from most quarries run roughly 55 by 120 inches for granite and quartzite, sometimes larger for certain quarries [1]. If the island is 48 by 96 inches, that's 32 square feet, and it fits in a single slab. If the island is 48 by 110 inches, the fabricator either sources an oversized slab or plans a seam.
Nesting software (including tools like the nesting module in SlabWise) can model multiple layout options and calculate yield percentages so the fabricator knows the material cost before the saw touches the stone. A well-nested job on a $900 slab might use 78 percent of the material. A poorly planned one might use 55 percent, meaning the customer effectively paid for 45 percent of scrap. [3]
Veining orientation is a design decision made at this stage. Most homeowners want the dominant vein running lengthwise on the island. Some want it centered, matching each end symmetrically. These choices lock in during nesting and can't be changed after cutting.
What machines cut the stone and how long does cutting take?
The actual cutting happens on a CNC bridge saw or a waterjet cutter, or both in sequence. The bridge saw is a large gantry-mounted diamond blade that runs on water coolant. It makes straight cuts and basic curves. The waterjet uses high-pressure water mixed with abrasive garnet to cut complex shapes, radiused corners, sink cutouts, and cooktop openings without generating heat that could crack the stone.
For a standard rectangular island with a single sink cutout, the sequence goes like this: bridge saw cuts the perimeter to rough dimensions, then the CNC router (or waterjet) makes the sink cutout and refines the edges. A shop with modern CNC equipment can cut a straightforward island piece in 30 to 90 minutes of machine time [4]. Complex shapes with multiple cutouts, sharp radius corners, or integral drainboard grooves take longer.
Diamond tooling is the standard across the industry. The Marble Institute of America's technical guidelines note that blade selection (grit, bond type) should match the specific stone hardness to prevent chipping and ensure a clean kerf [4]. Harder stones like quartzite need slower feed rates and softer-bond blades than softer materials like soapstone.
After the bridge saw, the piece moves to an edge polishing machine or a CNC router with edge profile tooling. This is where the edge style you chose, eased, beveled, ogee, waterfall mitered, gets cut and polished.
One more thing worth knowing: cutting stone dry throws respirable silica dust into the air, which is why shops run water on every blade. OSHA's silica rule for construction (29 CFR 1926.1153) sets the enforceable limit and requires wet cutting or equivalent dust controls in fabrication shops [10].
What edge profiles are available and which work best for islands?
Edge profile is mostly aesthetic, but a few profiles have practical tradeoffs worth knowing.
The most common profiles and their characteristics:
| Profile | Description | Relative cost | Island notes |
|---|---|---|---|
| Eased (flat with slight break) | Square top, softened corner | Base price | Clean, modern look; shows chips if stone is brittle |
| Beveled | Angled top cut, usually 45 degrees | Low add-on | Good for busy kitchens, hides small chips |
| Bullnose | Fully rounded, half-circle cross-section | Low to mid add-on | Classic; comfortable for seated bar areas |
| Ogee | S-curve, traditional profile | Mid add-on | Detailed, works with traditional cabinet styles |
| Waterfall mitered | Stone continues vertically down the island sides | High add-on | Dramatic; requires extra material and precise miter cuts |
| Leathered or honed finish | Surface texture, not edge shape | Mid add-on | Changes the whole look; fingerprints show less |
For island seating edges specifically, bullnose is the most comfortable for arms resting on the counter. Eased and beveled look cleaner in modern kitchens. Waterfall mitered edges are popular but add a lot to material cost because you're cutting and polishing two or three extra panels of stone.
Edge profiling on a large island takes 1 to 3 hours of machine time. The more complex the profile, the more polishing passes required.
How are seams handled when the island is too big for one slab?
Seams are unavoidable on large islands and on any L-shaped or U-shaped top. A well-made seam in granite or quartz, with proper adhesive and tight tolerance, is nearly invisible at arm's length. A poorly made seam is a permanent defect.
The fabricator positions seams based on three things: where the slab material runs out, where structural support exists underneath, and where the seam will be least visible (typically not in the center of the island, and never over an unsupported span). The Marble Institute of America recommends seams be placed over cabinet supports, not over open spans, and that seam gaps not exceed 1/8 inch before filling [4].
Adhesive is a two-part color-matched epoxy, tinted to match the stone as closely as possible. Some fabricators use UV-cure adhesive for faster setup. The two pieces get clamped together with seam clamps (sometimes called seam suckers) that draw the surfaces flush while the epoxy cures, which takes 15 to 45 minutes for most products. After cure, excess epoxy is scraped, the seam is lapped flat with a hand grinder, and the area is polished to match the surrounding surface.
For veined stones like marble or quartzite, seam placement requires matching the vein pattern across the joint. This is called vein matching and it affects material yield a lot, because you can't just cut anywhere. Some fabricators book-match slabs (flip one slab like a mirror image) for dramatic veined islands, but that requires buying two matching slabs from the same quarry lot.
How is the surface finished and sealed?
After cutting and edge profiling, the top surface goes through a polishing sequence. For granite and quartzite, this means running progressively finer diamond polishing pads, typically from 50-grit through 3,000-grit or higher, across the surface with a wet polisher. Each pass removes the scratches from the previous grit. The result is the mirror-like finish you see on most stone countertops.
Alternative finishes include honed (matte, stopped at around 400-grit), leathered or brushed (textured with wire brushes or specialized tooling after initial honing), and sandblasted (rarely used on countertops). Honed finishes need less machine time but show fingerprints and water spots more readily on darker stones.
Sealing is separate from polishing. Granite and natural quartzite are porous and benefit from a penetrating sealer. The Natural Stone Institute recommends testing stone absorbency with a water drop test: if water soaks in within 4 minutes, seal the stone [11]. Most fabricators apply one coat of impregnating sealer before installation and recommend resealing every 1 to 3 years depending on use and stone density. Engineered quartz (like Cambria or Silestone) doesn't need sealing. It's non-porous. [5]
For more on caring for stone after installation, the how to clean stone countertops and how to clean quartzite countertops guides cover daily maintenance and what products to avoid.
How much does it cost to fabricate a stone island countertop?
Cost depends on material, island size, edge complexity, and your local market. The numbers below are for fabrication plus installation. Material (slab) cost is separate unless you're quoting an all-in price.
Typical all-in installed price ranges for a 30-to-40 square foot island:
| Material | Installed cost per sq ft | Notes |
|---|---|---|
| Granite (mid-grade) | $60 to $100 | Wide range based on stone origin and color |
| Engineered quartz | $75 to $130 | More consistent pricing; no sealing required |
| Quartzite | $80 to $150 | Premium natural stone; harder than granite |
| Marble | $75 to $150 | Beautiful but requires careful maintenance |
| Soapstone | $70 to $120 | Softer; develops patina over time |
For a typical 35 square foot island in granite, all-in cost runs $2,100 to $3,500. Add waterfall mitered edges on two sides and that number can jump $800 to $2,000 depending on the shop and slab thickness.
The National Kitchen and Bath Association publishes survey data on kitchen remodel costs, and countertop material typically represents 10 to 15 percent of a full kitchen remodel budget [6]. The NKBA's 2023 Kitchen & Bath Market Outlook reported median countertop spend per project of $3,500 to $6,000 including cabinetry islands [6].
Fabrication labor, separate from material, typically runs $30 to $60 per square foot depending on region and shop overhead. Shops in coastal metros charge more. Midwest and rural shops charge less. [7]
What happens during installation of a stone island countertop?
Installation day is when the fabricated pieces come off the shop floor and land in your kitchen. It takes a crew of 2 to 4 people because island pieces are heavy. Granite at 3 cm thickness weighs 18 to 20 pounds per square foot, and those pieces are awkward to maneuver through doorways [4].
The crew starts by checking that the island base cabinets are level and square. If they're not, they shim. They dry-fit the top before applying any adhesive to confirm the template was accurate. Cutouts for sinks and cooktops get verified against the actual appliances.
Silicone adhesive goes on the top of the cabinet frames, not on every surface. Stone needs a few small dots or beads of silicone rather than full coverage, partly because full coverage can trap moisture and partly because the stone needs to stay removable for future plumbing work without destroying the cabinet. Some fabricators also use epoxy for seams if two pieces meet on the island.
Sink undermounts get clipped to the underside of the stone with epoxy clips and plumber's putty or silicone, per the sink manufacturer's spec. The Uniform Plumbing Code (UPC) doesn't specify countertop installation method directly, but it does govern how drain connections and supply lines attach below the deck [8].
After the top is set and the seams are finished, the crew cleans the surface, applies a final coat of sealer if specified in the contract, and runs through a punch list with you. Full silicone cure takes 24 to 48 hours. Most fabricators recommend keeping water off the stone for the first day.
For a broader look at what to expect on installation day, the countertop installation guide covers both stone and non-stone tops.
What are the most common mistakes fabricators make on island countertops?
Four mistakes show up repeatedly in warranty claims and online complaints, and knowing them helps you ask the right questions before signing a contract.
First: seam placement over open spans. If the island has a seam directly over an open base cabinet with no support rail beneath it, the seam is under constant stress and will eventually crack. Ask the fabricator to show you the seam placement on the template and confirm there's a support structure below each seam location.
Second: inadequate overhang support. The standard unsupported stone overhang limit is about 8 to 10 inches for 3 cm stone, per MIA guidelines [4]. Bar-height or seating areas that overhang more than that need steel corbels or brackets anchored to the cabinet frame. Skipping corbels to save money is a structural failure waiting to happen, especially on brittle materials like marble.
Third: poor seam color matching. Epoxy tinting is part art, part chemistry. A lazy color match leaves a seam that looks like a crack from across the room. Ask to see examples of the shop's seam work on similar stone before committing.
Fourth: skipping the dry fit. Shops under scheduling pressure sometimes skip the dry fit on site and trust the template. When the template has a half-inch error, you find out after the adhesive is set. Insist on a dry fit as part of your contract terms.
How long does the full fabrication process take from start to finish?
The timeline from contract signing to installed top breaks down roughly like this:
| Stage | Typical time |
|---|---|
| Slab selection and purchase | 1 to 3 days (depends on distributor availability) |
| Scheduling and template appointment | 1 to 5 days (depends on shop backlog) |
| Digital templating appointment | 1 to 2 hours on site |
| Template to cut (shop production) | 3 to 7 business days |
| Cutting and edge profiling | 4 to 8 hours of machine time |
| Polishing and sealing | 2 to 4 hours |
| Delivery and installation | 2 to 5 hours on site |
Total elapsed time: 1 to 3 weeks for most jobs at a mid-volume shop. High-end boutique shops with longer backlogs sometimes quote 4 to 6 weeks. Rush fabrication, if the shop offers it, typically adds 20 to 35 percent to the fabrication labor cost.
The MIA's residential installation guidelines suggest homeowners finish any plumbing rough-in, cabinet installation, and drywall work before scheduling the template appointment, since any change after templating may require a re-template fee [4]. Coordinate with your GC so the island base is fully installed and level before the fabricator shows up to measure.
How do fabricators price island countertop jobs and can you negotiate?
Most shops price countertop jobs by the square foot, all-in (slab plus fabrication plus installation), or as separate line items. Square foot pricing is the most common for straightforward island jobs. Complex jobs with waterfall edges, multiple cutouts, or unusual shapes often get priced as an itemized quote.
Typical add-on line items you'll see on a countertop quote:
- Sink cutout: $100 to $250 per cutout
- Cooktop cutout: $100 to $250 per cutout
- Edge profile upgrade (from eased to ogee or waterfall): $15 to $60 per linear foot
- Corbel fabrication and installation: $50 to $150 per corbel
- Seam (each): $100 to $300
- Waterfall mitered panels: $300 to $800 per panel
- Re-template fee: $75 to $150
Shops that use software like SlabWise can generate itemized quotes within minutes and show you exactly what each option adds to the total, which makes comparison shopping more straightforward than getting three rough verbal estimates.
Negotiation is real but limited. Fabricators can't change their material cost much, but they can sometimes offer a discount on fabrication labor for jobs scheduled during slow periods (winter, just after the holidays) or for large multi-piece kitchen jobs where the island is one of several pieces being cut from the same slab. Ask directly. The worst answer is no.
Frequently asked questions
What size slab do I need for a kitchen island?
A standard 48-by-84-inch island (28 square feet) fits in one standard slab, which typically runs 55 to 65 inches wide and 100 to 130 inches long. If your island is wider or longer than the slab dimensions, the fabricator will plan a seam or source an oversized slab. Always measure your island base and compare against the specific slab dimensions at the stone yard before purchasing.
How thick should a stone island countertop be?
3 cm (about 1.18 inches) is the standard for island countertops. It's self-supporting across most spans without a plywood substrate and gives you a substantial-looking edge without a laminated buildup. 2 cm stone is available and costs slightly less, but it needs a full plywood underlayment and a laminated edge to look right, which often erases the cost savings.
Can a stone island countertop be installed in one piece?
Usually yes, if the island is under roughly 55 inches wide and under 100 to 120 inches long. Pieces larger than a single slab require a seam. Even pieces that technically fit in one slab are sometimes split into two for transport safety, since an 8-foot stone panel is easy to crack in a truck if it's not supported correctly. Ask your fabricator what their transport limit is.
How do fabricators match the veins across a seam?
The fabricator lays the two pieces side by side during the nesting stage and positions them so the veining pattern continues from one piece to the next. On heavily veined stone like marble or quartzite, this requires careful slab layout and may increase material waste. Some shops also book-match, flipping one piece like an open book so the veins mirror each other across the seam. That technique requires two matching slabs.
How much overhang can a stone island have without support?
The Marble Institute of America's guidelines allow roughly 8 to 10 inches of unsupported overhang for 3 cm stone. Beyond that, you need steel corbels or brackets anchored to the cabinet frame. Most seating overhangs for bar stools run 12 to 15 inches, so corbels are almost always required for seating islands. Budget $50 to $150 per corbel installed.
What is the difference between honed and polished finish for an island?
Polished is the mirror-like surface most people picture. It shows the stone's color vividly and is fairly easy to wipe clean. Honed is matte, stopped at a lower grit during polishing. It looks more casual and hides fingerprints better on dark stones, but it's more absorbent on natural stone and needs more frequent sealing. On an island where people lean and touch constantly, honed is popular but requires more sealing attention.
Do I need to be home for the countertop template appointment?
Yes, or have a trusted adult there who can make decisions. The templater will confirm sink and cooktop placement, note any cabinet irregularities, and may ask about edge profile preferences or seam locations. Any mistake or miscommunication during templating results in a re-template fee and delays production. It's 1 to 2 hours. Make time for it.
How soon after installation can I use my stone island countertop?
Light use, setting items on the surface, is fine within a few hours. Avoid getting the silicone adhesive wet for 24 to 48 hours. Don't have heavy impact on the surface the first day. If a sink was installed, most fabricators and plumbers recommend waiting 24 hours before running water, to let the undermount epoxy clips fully cure. Check your fabricator's specific product recommendations.
What causes a stone countertop to crack during or after fabrication?
Cracks during fabrication usually come from blade binding, thermal shock from inadequate cooling water, or moving an unsupported piece. Post-installation cracks usually happen at seams placed over unsupported spans, at sink cutout corners (which concentrate stress), or from impact. Fissures that look like cracks are sometimes naturally occurring in the stone and were there before fabrication. A good fabricator inspects the slab for fissures before cutting and avoids placing cutouts near them.
Is engineered quartz fabricated the same way as natural stone?
Mostly yes. The same CNC bridge saws and routers cut engineered quartz, and the same edge profiling machines finish it. The main differences: quartz is more consistent in thickness and has no fissures to work around, so layout is simpler. It also doesn't need sealing. Some very hard engineered quartz blends wear tooling faster than softer granite. Installation is essentially identical to natural stone.
Can I buy my own slab and have a fabricator cut it?
Yes, and some homeowners save money by sourcing their own slab at auction or directly from an importer. The tradeoff is that most fabricators won't warranty a customer-supplied slab for fissures or hidden flaws. You also take responsibility for transport to the shop. Make sure the slab dimensions and thickness match what your fabricator requires before you buy, and confirm they accept customer-supplied material upfront.
How do waterfall island edges work and what do they cost?
A waterfall edge runs the stone vertically down the side of the island cabinet, from countertop height to the floor. The fabricator cuts two additional stone panels and miters them at 45 degrees to meet the top piece, creating a continuous corner with no visible joint. It requires precise mitering, extra polishing, and much more material. Expect to add $300 to $800 per waterfall panel, plus extra slab material, to the base quote.
What should I ask a fabricator before hiring them for an island countertop?
Ask to see photos of seam work on similar stone. Ask where seams will be located and what's below them structurally. Ask whether digital templating is included or extra. Ask about their process for checking overhang support requirements. Ask for an itemized quote, more than a per-square-foot number, so you can see exactly what edge profiles, cutouts, and seams cost. And ask what their re-do policy is if the template is wrong.
Sources
- Natural Stone Institute, Technical Bulletins and General Information: Standard granite and quartzite slab dimensions typically run 55 to 65 inches wide and 100 to 130 inches long; slab selection recommendations for countertop applications.
- Marble Institute of America, Dimension Stone Design Manual Vol. VIII: Nesting and yield planning for countertop fabrication, including material waste reduction and slab layout guidance.
- Marble Institute of America, Countertop Fabrication and Installation Technical Guidelines: Seam placement over cabinet supports, 8-10 inch unsupported overhang limit for 3 cm stone, blade selection by stone hardness, dry fit recommendations, seam gap maximum of 1/8 inch, and stone weight of 18 to 20 pounds per square foot for 3 cm granite.
- NSF International, NSF/ANSI 51 Food Equipment Materials standard: Engineered quartz surfaces are non-porous and do not require sealing, meeting food-contact surface standards.
- National Kitchen and Bath Association, 2023 Kitchen and Bath Market Outlook: Countertop material typically represents 10 to 15 percent of a full kitchen remodel budget; median countertop spend per project $3,500 to $6,000 including island tops.
- Angi, Countertop Installation Cost Guide 2024: Fabrication labor for stone countertops typically runs $30 to $60 per square foot depending on region and shop overhead.
- International Association of Plumbing and Mechanical Officials, Uniform Plumbing Code 2021: UPC governs drain connections and supply lines below the countertop deck but does not specify countertop material installation method.
- U.S. Geological Survey, National Minerals Information Center: Dimension stone (including granite and quartzite used for countertops) industry production and import statistics used in pricing context.
- Occupational Safety and Health Administration, Respirable Crystalline Silica standard (29 CFR 1926.1153): OSHA's respirable crystalline silica standard applies to stone fabrication shops cutting granite and engineered quartz, requiring wet cutting or equivalent dust controls during cutting operations.
- Natural Stone Institute, Sealing and Care Recommendations for Natural Stone: Water drop absorption test: if water soaks in within 4 minutes, stone should be sealed; resealing recommended every 1 to 3 years depending on use and stone density.
Last updated 2026-07-11