
TL;DR
- Templating an L-shaped countertop means capturing two legs, one inside corner, and all relevant wall offsets on a single rigid template or digital scan.
- The inside corner angle is almost never 90 degrees.
- Measure both legs independently from the corner out, mark the exact corner point, and confirm the diagonal before cutting any stone.
- Errors in the corner cost real money.
What does templating an L-shaped countertop actually involve?
A template is a physical or digital replica of your countertop footprint, precise enough that a fabricator can lay it on a slab and cut to it without guessing. For an L-shape that means recording two runs of countertop, one inside corner, and every wall irregularity that touches either run.
Physical templates are usually cut from 1/8-inch luan plywood, hardboard, or purpose-made cardboard templating strips. Digital templates come from laser-based devices like the Proliner or hand-held scanners that build a point-cloud model of the space. Both approaches work. The choice depends on what your shop runs and what the job demands.
The L-shape is the most common countertop layout in North American kitchens, and it's the one that trips up inexperienced templaters most often. The reason is always the same: the inside corner. Walls look square. They almost never are. A corner that measures 91.5 degrees instead of 90 translates to a visible gap at the wall or a slab that won't sit flat without force, either of which fails the install [1].
Before you touch a tape measure, clear the countertop area completely. Remove any existing countertop, check that base cabinets are level and shimmed if needed, and confirm that the cabinet run itself is plumb. A template taken over an out-of-level base will produce a perfectly accurate template of the wrong thing.
What tools do you need to template an L-shaped countertop?
You don't need expensive gear to get a good template. What you need is rigid, accurate, and consistent.
For a physical (stick) template:
- 1/8-inch luan plywood strips, roughly 4 inches wide, in 8-foot lengths
- A hot-glue gun with fresh sticks (the only adhesive that sets fast enough to hold position while you check it)
- A quality tape measure (25-foot, with a tight, non-wobbly hook)
- A combination square or large framing square
- A digital angle finder or bevel gauge (this is the tool most DIYers skip and then regret)
- A pencil and a paint pen for permanent labeling
- A long straightedge, at least 4 feet
- A utility knife and a pair of scissors
For digital templating:
- A Proliner 9 or equivalent laser templating unit runs around $8,000 to $15,000 new as of 2024 [2]. Rental is available in some markets from fabricator tool-rental programs.
- A tablet or laptop running the device's software
- A reference sticker set for the device's targets
One tool earns its cost on every L-job: the digital angle finder. A good one (Wixey or equivalent) costs under $40 and confirms your corner angle to a tenth of a degree. That number tells the fabricator exactly how to miter or cope the inside corner so it sits tight against both walls. Write it on the template in permanent marker. Do not rely on memory.
How do you measure an L-shaped countertop for a template?
Start at the inside corner and work outward. This sounds backward if you're used to measuring rooms, but the inside corner is the fixed point that both legs reference. Any error in measuring a leg compounds from that corner, so confirming the corner first bounds your error.
Step 1: Mark the corner point on the substrate (top of cabinet or existing deck) with a pencil. This is the theoretical inside corner where both wall lines intersect.
Step 2: Measure the overhang on each leg. Standard overhang on a base cabinet is 1.5 inches at the front and 0 inches at the wall (flush or scribed). If the client wants a different overhang, note it now on a job sheet, not in your head.
Step 3: Measure each leg's length from the corner mark to its far end. For an L-shape you'll have a long leg and a short leg (or two legs of similar length). Measure to the nearest 1/16 inch. Write down: long leg = X, short leg = Y.
Step 4: Measure the depth of each leg. Typical depth over a standard 24-inch base cabinet is 25.5 inches (24-inch cabinet + 1.5-inch overhang). But kitchens vary. Measure the actual cabinet depth at three points per leg: at the inside corner, at mid-run, and at the far end. If these three numbers differ by more than 1/4 inch, note every one of them. That wall bows, and the template has to capture it.
Step 5: Measure the diagonal. This is your verification number. The diagonal of a rectangle with sides A and B is the square root of (A squared + B squared). If your corner is truly 90 degrees, the diagonal from your inside corner to the far outside corner of the L's bounding rectangle will match that formula. If it doesn't match within 1/4 inch, your corner isn't square and your angle finder reading is more important than ever [3].
Step 6: Note all obstructions. Window sills that drop below the countertop plane, pipes, conduit, wall outlets inside the backsplash zone, and any bump-outs. Each one needs a measurement from the corner and from the near end of the leg.
How do you build the physical template for an L-shape?
Cut your luan strips to manageable lengths, roughly 4 to 6 feet. You'll overlap and hot-glue them into a rigid frame that mirrors the countertop footprint.
Start by placing a strip along the back wall of the long leg, butted snug to the wall. Glue a perpendicular strip at the inside corner. Then run strips along the front edge (cabinet front) of both legs. Fill in cross-members every 18 to 24 inches so the template won't rack when you pick it up. A template that flexes is a useless template.
At the inside corner, cut your strips so they form the actual angle of that corner, not an assumed 90 degrees. This is where the digital angle finder earns its keep again. Set the bevel gauge to your measured corner angle, transfer that angle to your strip cuts, and hot-glue them together at that angle. You can verify the fit by pressing the assembled corner tightly into the corner of the room and looking for gaps.
For the outside corner of each leg (the end that terminates at a wall or a range, for example), cut the strip to match that wall angle too. Straight cuts work if the wall is plumb and the end terminates cleanly. A scribe overhang (where the countertop meets a finished wall at an angle) needs a scribing measurement noted on the template.
Label everything on the template in permanent marker before you lift it off the countertop:
- Which side is up
- Direction of the grain or vein preference if specified
- Sink location (measure centerline of sink from each side wall and from the front edge)
- Cooktop cutout if any
- Seam location if required (mark a proposed seam line)
- The corner angle in degrees
- Job name, date, templater's initials
A template that leaves the job site without labels is a liability. If it gets mixed up with another job's template at the shop, no one can sort it out without going back to the job, which costs time and money.
Where should the seam go on an L-shaped countertop?
On a large L-shape you'll almost certainly need a seam. Stone slabs typically come in widths of 55 to 65 inches and lengths of 100 to 130 inches [4]. Both legs of a kitchen L-shape often exceed the single-slab dimension once you account for depth.
The industry standard for seam placement is simple: keep the seam out of the corner. A corner seam concentrates stress and is nearly impossible to clamp during install. It also shows more because it runs in two visual directions at once.
The preferred seam locations, in order of preference:
- On the long leg, roughly 6 to 12 inches away from the inside corner (toward the center of the long run). This keeps the corner as one piece, which is the strongest arrangement.
- At a natural break in the design, such as next to a range or between a sink and a cooktop where the eye expects a separation.
- On the short leg if the long leg can run as a single piece.
Never put a seam directly over a cabinet door gap, over a dishwasher, or at any unsupported span exceeding about 36 inches without a substrate underneath. Seams need continuous support from the cabinet carcass below [5].
Mark the proposed seam on the template as a straight line perpendicular to the front edge. Write the seam measurement from the inside corner on both sides of the line so the fabricator's nesting software (whether it's a shop spreadsheet or a purpose-built tool like SlabWise) can confirm the two resulting pieces fit the available slabs without waste.
How do you handle the inside corner on the template?
The inside corner of an L-shaped countertop is where templates fail and installs go wrong. Here's the mechanics of why.
Walls in residential construction are framed, drywalled, and finished to roughly square, but rarely to exactly square. A corner that looks perfect to the eye can be anywhere from 88 to 93 degrees. That 2-to-3-degree variation sounds small. Across a 25-inch-deep countertop it translates to over an inch of discrepancy at the front edge. The stone either won't fit into the corner at all, or it fits but sits off-square, which shows immediately.
On the template, the inside corner should be an exact physical replica of the actual corner angle. Luan strips cut to that angle and hot-glued in place capture it precisely. When the fabricator lays your template on the slab and traces it, the inside corner of the stone piece will come out of the saw matching your template corner exactly.
For the stone itself, the inside corner treatment has three options:
-
Square (90-degree) notch with a radius. Stone can't be cut to a perfectly sharp inside corner because the stress concentration causes cracking. The standard is a 3/16-inch or 1/4-inch radius at the inside corner, cut with a router or CNC. This is the default for most shops.
-
Clipped corner. Cut the inside corner at 45 degrees to relieve stress and make installation easier. This is less common on standard L-shapes but appears on thick material or quartzite where corner cracking is a higher risk.
-
Coped joint. If the two legs are separate pieces (they often are on large L-shapes), the end of one piece is notched to accept the edge profile of the other. This is time-consuming but produces the cleanest look at a corner seam.
For a homeowner, the main thing to tell your fabricator is whether you want a radius at the inside corner and how visible that corner will be. Most people never notice a 1/4-inch radius. It's the right default.
What are the most common templating mistakes on L-shaped countertops?
Templaters with years of experience still make these. The frequency just goes down.
Assuming the corner is 90 degrees. Already covered above, but worth repeating because it's the number one reason fabricators have to re-cut pieces. Measure the angle. Every time.
Not checking for cabinet level before templating. If the cabinets are out of level by more than 3/16 inch across a run, the countertop won't sit flat. The template captures that error and the fabricator can't fix it with stone alone. Level the cabinets first, then template.
Missing the soffit or overhead obstruction. Upper cabinets on an L-shape sometimes extend further down than the standard 18-inch clearance. If the countertop depth plus backsplash height would put the stone slab behind a soffit, you need to know that before cutting. Measure the clearance from the top of the base cabinet to the underside of any upper cabinet or soffit, and note it on the template.
Forgetting to mark the front-to-back depth at multiple points. A wall that bows outward 3/8 inch in the middle of a run is very common in older kitchens. If you measure depth only at the ends, the stone will collide with the wall at mid-run.
Not marking sink-to-wall dimensions. The sink cutout has to land in the right place. Measure the sink centerline from both the back wall and the side wall, then measure it from the front edge. Three dimensions, not one.
A poorly labeled template that arrives at the shop with no indication of which face is up, or which leg is which, causes real re-work. Label everything. Treat every template as if it will be handled by someone who has never seen the kitchen.
How does digital templating compare to stick templating for L-shapes?
Digital templating devices like the Leica Disto-based Proliner capture an L-shape in roughly 20 to 45 minutes, compared to 45 to 90 minutes for a thorough physical template. The output is a digital file (typically DXF) that goes directly to a CNC waterjet or saw without someone retracing a physical template. That kills one whole transfer step where errors can creep in [2].
The accuracy of a well-used Proliner is around plus or minus 1 millimeter over a full countertop run. A careful physical template with quality luan and a good hot-glue job is accurate to roughly plus or minus 2 to 3 millimeters. For most residential L-shapes, both are well within tolerance.
Where digital wins clearly: complex shapes, multiple cutouts, very long runs, or production environments where speed matters. A shop doing 30 or more jobs a week can easily justify the equipment cost.
Where physical still wins: simple jobs, field verification when a digital scan produces a suspicious measurement, and situations where the templater needs to physically mark something on-site (like a scribe line along a wavy wall) that is hard to capture digitally.
For a homeowner: you almost certainly have no control over which method your fabricator uses. What matters is confirming that whoever templates your countertop measures the corner angle explicitly, measures wall depth at multiple points, and documents the seam location in writing before stone gets cut. Those three things hold whether the method is digital or stick.
Many fabricators now offer their own quoting and layout tools. SlabWise is one piece of fabrication software that handles digital template import and nesting, so if your fabricator uses it, the file from the templater goes straight into the cutting workflow with no re-entry.
How do you calculate the square footage of an L-shaped countertop?
Square footage determines material cost and is where homeowners most often get surprised by a quote that seems high. The math is simple. The application has a catch.
Break the L into two rectangles. Measure each leg as its own rectangle: length times depth. Add them together. Subtract any area that's double-counted at the overlapping corner (the corner square where both legs meet). The result is the net countertop area.
Example: Long leg is 96 inches by 25.5 inches = 2,448 square inches. Short leg is 60 inches by 25.5 inches = 1,530 square inches. The overlapping corner square is 25.5 by 25.5 = 650 square inches. Net area = 2,448 + 1,530 - 650 = 3,328 square inches, which is 23.1 square feet.
Fabricators don't quote at net area. They quote at gross slab usage, which includes the layout waste around cutouts, seams, and slab edge loss. A rule of thumb from the Marble Institute of America is to add 15 to 20 percent to net area for a typical L-shape with one seam [6]. A job with a complex layout, large-format pattern matching, or an exotic grain direction that must run a specific way can push waste to 30 percent or more.
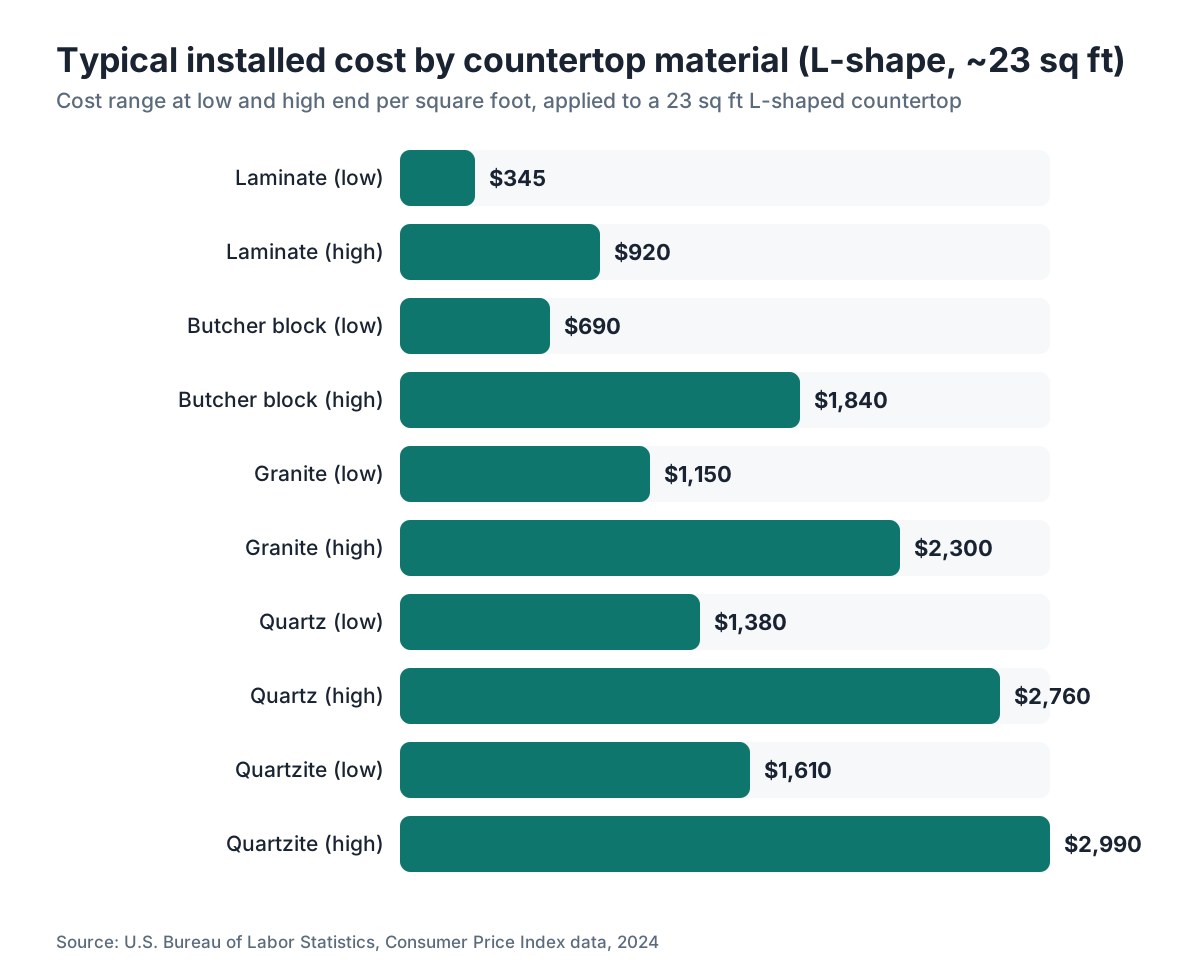
For a kitchen countertop in natural stone like granite or quartzite, typical installed cost in the U.S. runs from $50 to $120 per square foot as of 2024, with the wide range driven by stone type, edge profile, and regional labor [7]. An L-shape of 23 square feet might quote anywhere from $1,150 to $2,760 at net area, but the actual invoice will reflect gross slab usage. Ask your fabricator to show you the layout drawing.
| Material | Typical cost per sq ft installed (2024) | Seam visibility |
|---|---|---|
| Granite | $50 - $100 | Low to moderate |
| Quartz | $60 - $120 | Low |
| Quartzite | $70 - $130 | Moderate |
| Marble | $75 - $150 | Moderate to high |
| Laminate | $15 - $40 | Very low |
| Butcher block | $30 - $80 | Low |
| Solid surface (Corian) | $45 - $90 | Very low |
What should you tell your fabricator before they template?
Most disputes between homeowners and fabricators trace back to information that nobody wrote down before the template visit. A short pre-template checklist saves real grief.
Edge profile. Decide before templating, not after. A heavy ogee or waterfall edge affects how the fabricator handles the end caps and whether the template needs special notation at termination points.
Overhang at the island or peninsula end. If one end of your L-shape is a peninsula that overhangs open air (a breakfast bar, for example), you need to specify the overhang depth. Anything over 12 inches of unsupported overhang in stone typically requires corbel support or a steel rod reinforcement embedded in the stone [5]. The fabricator needs to know this before they template because the corbel locations go on the template.
Sink type and mounting method. Undermount sinks require the cut to happen at the fabricator's shop, not in the field. The sink dimensions and model number need to be confirmed before the template visit. Top-mount (drop-in) sinks can be cut later but it's better practice to confirm the dimensions anyway.
Backsplash material and height. If you're doing a full slab backsplash in the same stone, the fabricator needs to measure those pieces too. If you're doing a tile backsplash later, they need to know the countertop terminates at a height that leaves room for tile without interfering with outlets.
Stone selection. If you've already picked your slab, the fabricator can check that the slab dimensions actually accommodate your L-shape before templating. If you haven't picked yet, confirm the stone type because it affects edge, support, and seam recommendations. Granite countertops behave very differently from marble or marble countertops in terms of allowable span and edge fragility.
Can a homeowner do their own template for a fabricator?
Technically yes. In practice, most fabricators won't cut to a homeowner-supplied template because they carry liability for the finished installation. If the template is wrong and the stone is cut wrong, someone has to eat the cost of a replacement slab.
What a homeowner can productively do is create a detailed measured drawing, with all the dimensions discussed above, and bring it to the initial quote conversation. This isn't a template, but it's close enough for the fabricator to prepare an accurate estimate, select an appropriate slab, and plan the seam layout before committing to a template visit.
If you're doing a DIY install in a material that tolerates on-site adjustment, like laminate countertops, formica countertops, or butcher block countertops, a homeowner-made template is entirely reasonable. These materials can be scribed, trimmed, and re-cut in the field. Stone cannot.
For natural stone, engineered quartz, or porcelain, let the fabricator's templater do the template. Pay for the template visit if required (some shops charge $100 to $200 for a template visit on jobs that don't proceed; others roll it into the job cost). That fee is cheap insurance against a miscut slab.
The one thing homeowners should always do: be present during the template visit. Walk the templater through every preference, every obstruction, every detail you noted in your pre-template checklist. A good templater welcomes this. It's the moment everything that matters gets communicated.
What happens after the template is done?
Once the template leaves the job site, the fabrication workflow begins. The sequence is roughly the same at most shops, whether digital or physical.
-
Layout. The fabricator (or their layout software) places the template outlines on the chosen slab digitally or physically to find the best yield. On an L-shape this usually means deciding whether both legs can come from one slab or require two, and confirming that the proposed seam placement matches the slab's movement or veining in a way the homeowner approved.
-
Cutting. CNC waterjet or bridge saw follows the template dimensions. The inside corner radius, sink cutout, and cooktop cutout all happen at this stage.
-
Edge profiling. The chosen edge profile is routed on all exposed edges. This takes time. A simple eased edge is fast; an ogee or dupont edge on a thick slab takes real machine time and cost.
-
Polishing and QC. The shop checks the finished pieces against the template before scheduling delivery.
-
Installation. Pieces arrive and the installer checks level, dry-fits the pieces before applying adhesive, epoxies seams, and sets the sink. A good countertop installation on an L-shape takes one person roughly 3 to 5 hours on-site.
If the template was accurate, the install goes smoothly. If the template had errors, this is where they surface, sometimes as a gap at the wall, sometimes as a piece that won't fit at all. A template that has to be redone typically pushes the whole job back one to two weeks, which is the real cost of a bad template.
Frequently asked questions
How long does it take to template an L-shaped countertop?
A physical (stick) template on a standard L-shape takes roughly 45 to 90 minutes when done carefully. A digital laser template runs 20 to 45 minutes. Either way, budget extra time if the kitchen has multiple cutouts, a complex wall profile, or a peninsula with an open end. The template visit is not the place to rush.
How do you measure an L-shaped countertop for a quote?
Break the L into two rectangles, measure each leg's length and depth, and multiply for area. Add the two areas and subtract the overlapping corner square. This gives net square footage. Fabricators typically add 15 to 20 percent for layout waste, so expect your quoted material area to be higher than the net figure you calculated.
Does the corner of an L-shaped countertop have to be exactly 90 degrees?
No, and it almost never is. Walls in residential kitchens commonly range from 88 to 93 degrees at inside corners. The template must capture the actual corner angle, and the fabricator cuts the stone to match it. The stone will fit the walls correctly regardless of the angle, as long as the template is accurate.
What is the best seam location for an L-shaped countertop?
Keep the seam away from the inside corner itself. The preferred location is 6 to 12 inches from the inside corner along the longer leg, keeping the corner as a single solid piece. Never put a seam over a dishwasher opening or at an unsupported span. The seam should land over a cabinet rail or carcass panel for continuous support.
How do you account for a wall that isn't straight when templating?
Measure the countertop depth at three points per leg: at the inside corner, at mid-run, and at the far end. If those measurements differ by more than 1/4 inch, note each measurement on the template separately. The fabricator can scribe the back edge of the stone to follow the wall contour, but only if the wall deviation is captured on the template.
What is the inside corner radius on an L-shaped stone countertop?
Stone can't be cut to a perfectly sharp inside corner without cracking risk. The industry standard is a 3/16-inch to 1/4-inch radius at the inside corner, routed or CNC-cut. Some fabricators use up to a 1/2-inch radius on brittle stones like marble or quartzite. Ask your fabricator what they recommend for your specific stone.
How does a fabricator price an L-shaped countertop?
Pricing is based on gross slab area used, not net countertop area. Labor charges cover edge profiling, cutouts for sinks and appliances, and installation. An L-shape often requires two slab pieces and one seam, which adds labor cost. Expect to pay for the seam joining, any corbel reinforcement for overhangs, and the template visit itself in some markets.
Can an L-shaped countertop be one piece, or does it always need a seam?
On small L-shapes where both legs are short, a single piece is sometimes possible if the stone slab is large enough. Most standard slabs are 55 to 65 inches wide, so once the depth plus a leg's length approaches 65 inches you're likely beyond a single slab. The corner stress on a one-piece L is also a factor: very long one-piece L-shapes are heavy and fragile to transport.
Do you need a seam in the inside corner of an L-shaped countertop?
A seam directly in the inside corner is actually the worst location. A corner seam is hard to clamp, concentrates stress, and shows clearly. The preferred approach is to keep the corner as one solid piece and place any necessary seam on one of the legs, away from the corner. Some fabricators use a mitered or coped joint at the corner if two separate pieces must meet there.
What overhang is standard for an L-shaped countertop?
The standard front overhang over base cabinets is 1.5 inches. Peninsula ends that serve as a breakfast bar typically overhang 12 to 15 inches, but anything over 12 inches of unsupported overhang in stone requires corbel or bracket support. The back edge is typically flush to the wall or slightly scribed to follow it. Note your overhang preference clearly on the template.
How do you handle a sink cutout on an L-shaped countertop template?
Measure the sink centerline from the back wall, from the nearest side wall, and from the front edge. Record all three on the template, more than one. Confirm the sink model and mounting type before templating: undermount sinks are cut at the shop, top-mount sinks can be cut in the field, but the fabricator still needs to know which you're using to plan edge finishing inside the cutout.
How accurate does a countertop template need to be?
Within 1/8 inch (about 3 mm) is the working standard for most shops. Digital templates target plus or minus 1 mm. Physical luan templates done carefully land within 2 to 3 mm. Errors larger than 1/4 inch at any critical dimension (corner angle, sink location, or total leg length) will cause problems at install that require either field scribing or a recut.
What's the difference between templating for granite versus laminate on an L-shape?
Laminate and other sheet materials can be scribed and trimmed in the field, so template tolerances are more forgiving. Granite, quartz, and other stone materials are cut once at the shop and cannot be easily adjusted on-site. Stone templates must be more precise, must capture every wall deviation, and must include exact corner angles. Laminate templating forgives minor measurement errors.
Sources
- National Kitchen and Bath Association (NKBA), Kitchen & Bath Planning Guidelines: Wall corners in residential kitchens are rarely exactly 90 degrees; the NKBA planning guidelines address clearance and installation tolerances for countertop installations.
- OSHA / general construction mathematics for squareness verification: The 3-4-5 rule and Pythagorean theorem are standard field methods for verifying a 90-degree corner; any deviation in the diagonal confirms the corner is out of square.
- Marble Institute of America (MIA+BSI), Dimension Stone Design Manual: Standard stone slabs typically measure 55 to 65 inches in width and 100 to 130 inches in length; slab dimensions affect layout, seam placement, and yield calculations.
- Marble Institute of America (MIA+BSI), Dimension Stone Design Manual, fabrication and installation standards: Seams in stone countertops require continuous cabinet support below; unsupported spans should not exceed approximately 36 inches without substrate reinforcement, and overhangs beyond 12 inches require corbel or bracket support.
- Marble Institute of America (MIA+BSI), Dimension Stone Design Manual: Adding 15 to 20 percent to net countertop area is the industry rule of thumb for estimating gross slab usage on a typical L-shape with one seam.
- U.S. Bureau of Labor Statistics, Consumer Price Index for household furnishings and operations: Installed stone countertop costs in the U.S. ranged from approximately $50 to $150 per square foot depending on material, edge profile, and regional labor rates as of 2024.
- U.S. Census Bureau, American Housing Survey, kitchen renovation data: The L-shaped kitchen layout is one of the most common configurations in North American residential kitchens, confirmed by housing survey data on kitchen floor plan types.
- International Code Council, International Residential Code (IRC), interior finish provisions: Residential cabinet and countertop installation practices fall under general IRC guidelines for interior finish work; level and plumb requirements apply to base cabinet installation.
- NKBA, Kitchen Planning Guidelines with Access Standards: Standard countertop overhang over base cabinets is 1.5 inches; standard countertop height is 36 inches from finished floor; clearance between upper cabinets and countertop surface is typically 18 inches minimum.
Last updated 2026-07-11