TL;DR
- Templating a curved countertop correctly means capturing the true wall line with either a digital laser templater or a hand-cut bending lauan template, then transferring that curve to the slab so no gap exceeds 1/16 inch at the wall.
- The work takes 30 to 90 minutes longer than a straight layout.
- It decides whether a $2,000 slab piece survives fabrication or becomes scrap.
Why do curved countertops fail more often than straight ones?
A curve punishes every mistake a straight run would forgive. Off by 3/16 of an inch on a straight edge? Caulk hides it. That same error on a 90-degree radius compounds around the arc and shows up as a wedge-shaped gap by the midpoint.
Stone gives you one cut. If a fabricator cuts a $1,800 quartzite piece to a bad template, that piece is scrap. And the redo costs more than the material. You pay for the reslab fee, re-templating, re-cutting, re-polishing, and usually a second trip to the house. That runs $500 to $1,500 in extra labor depending on shop rates and travel.
Most curved-countertop failures trace back to one thing: a template that did not capture what the wall or cabinet face actually does. Walls bow. Radius cabinets are rarely a true geometric arc. Island curves are often freehand shapes a carpenter built by eye. If your template assumes a perfect circle and the cabinet is not one, the stone will not fit. Simple as that.
The fix lives entirely in the template stage. Get the template right and the fabrication follows on its own.
What tools do you need to template a curved countertop?
You have two paths: digital templating and physical (analog) templating. Most shops run one or the other, and a few use both on complex jobs.
Digital templating tools
A laser templating system like a Prodim Proliner or an LT-2D3D captures points along the curve by touching a probe tip to the surface at intervals, then generates a DXF file you send straight to your CNC waterjet or bridge saw. These systems run $15,000 to $60,000 depending on the model. They are standard equipment at larger fabrication shops. Accuracy typically holds within 1/32 of an inch or better, far tighter than hand methods on complex curves.
No laser templater? A photogrammetry approach using a calibrated camera and software like Slabsmith can also work, though photogrammetry suits whole-slab layout better than fine edge geometry.
Analog templating tools
- Bending lauan (1/8-inch luan plywood), cut into 3- to 4-inch strips, is the classic curved template material. It bends without snapping and holds its shape well enough to transfer.
- A jigsaw or oscillating saw to cut your template pieces.
- A high-temp hot glue gun or small screws to join template sections.
- A quality pencil and a fine-tip Sharpie for tracing.
- A long flexible ruler or ship curve set.
- Compass or radius jig for true circular arcs.
- Laser level for reference lines on the wall.
- A tape measure and a framing square.
For a true radius (a segment of a perfect circle), a trammel point or a scratch-built compass arm from a stick and a routed pivot hole beats bending lauan. Swing the arc directly on the template material. Faster, and more accurate.
How do you physically template a curved countertop by hand?
Step 1: Establish your reference baseline. Snap a chalk line or shoot a laser line along the front of the cabinets at the height the countertop will sit. Now you have something to measure from when you check how the curved edge relates to the rest of the kitchen.
Step 2: Secure your template substrate to the cabinet tops. Tack your luan strips or full template sheet down with low-tack tape or small nails so nothing shifts while you work. Any movement during tracing moves your curve with it, and you will never know it happened.
Step 3: Scribe the wall line. On the wall side, a scribing tool (a compass held at a constant gap) traces the actual wall surface onto your template. Do not assume the wall is straight or that it matches the drywall return. Run the scribe along every inch of wall contact. On a curved wall like a rounded breakfast nook, scribe in short overlapping passes and check the result with your eye from several angles.
Step 4: Capture the front curve. For a radius cabinet, find the center point of the arc first. Measure from each cabinet leg or panel to locate where the radius originates, then set a trammel arm to the radius distance and sweep the arc onto your template. For a freeform curve, bend a luan strip to follow the cabinet face exactly, hot-glue it in place, and trace its inside edge. Confirm the strip sits flush to the cabinet at every inch, not only at the ends.
Step 5: Mark all critical features. Every sink cutout, cooktop, faucet hole, and seam location gets marked on the template now, in the field, measured from fixed reference points. A seam on a curve is tricky: mark the seam line, note which side belongs to which piece, and confirm the seam lands where you can get a good joint.
Step 6: Label everything. Write the room orientation ("north wall", "island front"), the material, the edge profile, and the thickness on the template before it leaves the site. Templates that show up at the shop with ambiguous labels cause expensive mistakes.
Step 7: Check the template before you leave. Set a straightedge across it and verify there are no humps or dips in the curve. Try a scrap piece at the wall joint to confirm the scribe reads correctly.
How does digital laser templating work for curved surfaces?
A laser templater like the Prodim Proliner touches a probe tip to points along any surface and records X-Y (and sometimes Z) coordinates with high precision. On a curved countertop, you probe the wall every 2 to 4 inches along the arc, probe the front curve at similar intervals, mark sink and faucet centers with the probe, and the software stitches those points into a smooth vector outline.
The resulting DXF or DWG file drops straight into your CAD/CAM software. The CNC machine cuts to that file with no human redraw in between. That missing redraw step is where laser templating earns its keep on complex curves. No drafter misreads a curved line. No radius gets rounded off by a few millimeters.
Run the math for a shop doing more than a handful of curved pieces a month. If one redo costs $800 in material and labor and the tool prevents two redos a year, it pays for itself over its life several times over. Shops report near-total elimination of stone scrap from template error on radius work, though independent published data on that specific claim is thin.
One limitation: laser systems capture discrete points. A very irregular organic curve, like a hand-sculpted edge on a concrete countertop form, still needs dense probing at 1-inch intervals or closer so the software does not over-smooth a feature you wanted to keep.
Shops that manage templates digitally track revisions more easily when a homeowner asks for a last-minute change to the curve. If you run quoting and shop workflows in software like SlabWise, digital template files feed directly into nesting and pricing, which matters when curved pieces eat more slab than a straight cut would.
What is the right overhang on a curved countertop edge?
Standard overhang on a straight run is 1 to 1.5 inches from the face of the cabinet door, per NKBA planning guidelines. Curved countertops follow the same rule, but you measure the overhang radially, perpendicular to the curve at each point, not from fixed endpoints.
Here is where templates go wrong. The fabricator measures overhang at the two ends of a curved section and assumes the arc stays consistent in between. If the cabinet curve is not a perfect geometric arc (and it usually is not), the overhang drifts. On a convex curve like an island nose, the overhang can read correct at the ends and be too small or too large at the midpoint.
The fix is dull and it works. After you lay the template down, measure the overhang from cabinet face to template edge at multiple points around the curve, roughly every 6 inches. Mark any discrepancy on the template and adjust before you finalize. On a 48-inch radius island nose, checking at 8 to 10 points is not overkill. It is the floor.
For cantilever overhangs where the top projects more than 10 to 12 inches without support, thickness decides the limit. A 3/4-inch slab cannot reach as far as 1.25-inch (3 cm) material. The Marble Institute of America recommends a maximum unsupported overhang of 10 inches for 3/4-inch stone and 12 inches for 3 cm stone, with corbels or a steel sub-frame required beyond those distances.
How do you handle seams on a curved countertop?
Seams on curves are harder to hide and harder to align than on straight runs. Put the seam where the eye does not linger: never at the apex of a curve, never at an inside corner where two curves meet, and ideally away from a focal point like the center of an island.
For fabrication, both pieces of a curved seam must be cut on the same reference arc so the joint stays consistent across the full depth of the stone. Cut one piece on a slightly different radius and the seam goes tight at one edge and open at the other. No amount of clamping closes both gaps at once.
The template approach for curved seams is one line. Mark the seam as a single line that spans both pieces. At the shop, the drafter or CNC operator uses that one line to define the cut for both adjacent pieces. Cutting from the same line guarantees the two edges are mirror images.
Epoxy color matters more on a curve because the joint shows from more angles. Mix the epoxy to the stone body color, not the vein color. On a strong-veined material like marble, land the seam where a natural vein runs so the joint disappears into it. Our guide on marble countertops covers matching veins across seams in more detail.
What tolerances should a finished curved countertop template hold?
Tolerance standards for natural stone fabrication come from the Marble Institute of America (MIA) in its Dimension Stone Design Manual. For finished countertops:
- Maximum gap between countertop and wall: 1/8 inch (before caulk)
- Thickness variation along a run: plus or minus 1/16 inch
- Seam gap: 1/16 inch maximum before epoxy fill, targeting 1/32 inch
- Overhang variation along a straight run: plus or minus 1/8 inch
On curved sections, the wall-gap tolerance is the hardest to hold because the wall itself often wanders by more than 1/8 inch. That is the whole argument for scribing. You are fitting the stone to the real wall, not to a theoretical straight line.
A template off by more than 1/8 inch on the wall side forces one of two bad options: grind the stone at the wall (workable on the back edge if you catch it early) or leave a gap caulk cannot bridge cleanly. On a curve, grinding a relief is harder than on a straight piece because the grinder has to follow the arc.
| Dimension | Target | Max acceptable |
|---|---|---|
| Wall gap | 0 to 1/16 in. | 1/8 in. |
| Seam gap | 1/32 in. | 1/16 in. |
| Overhang variation | uniform | +/- 1/8 in. |
| Thickness variation | uniform | +/- 1/16 in. |
| Radius deviation | 0 | 1/16 in. per 12 in. of arc |
What materials are easiest and hardest to template and fabricate in a curve?
Not every material handles a curve the same way. Some need CNC for a clean result. Others shape by hand.
Easiest to curve
Laminate like Formica forgives the most. Postform laminate gets bent with heat and a forming jig. Template the curve, cut the substrate on a jigsaw, and heat-bend the laminate face around it. Tight radii under 4 inches need special flexible laminate grades. The laminate countertops guide covers substrate requirements.
Solid surface like Corian is thermoformable. Heat it to 300 to 325 degrees Fahrenheit (exact temperature depends on color and thickness per DuPont's fabrication guidelines) and it bends to a form without cracking. Seams can vanish because the material bonds to itself with the manufacturer's adhesive. The Corian countertops page covers thermoforming limits.
Moderate difficulty
Engineered quartz (Cambria and similar brands) is brittle and will not thermoform. Every curve gets cut from a larger slab, which wastes material and raises cost. Tighter radius, more sacrificed stone. A 12-inch radius on a 1.25-inch quartz piece is doable on CNC but demands a precise template and a skilled operator. See the Cambria countertops page for brand-specific notes.
Hardest to curve
Natural stone (granite, marble, quartzite) is the toughest. No thermoforming. Every curve is a subtraction cut. Tight radii under 6 to 8 inches on an inside curve risk cracking during cutting or transport because the stone goes structurally narrow at the inside of the arc. For inside curves tighter than about 4 inches, most fabricators will steer you to a different design or a different material.
Butcher block takes curves fine with a jigsaw and a good template, though end-grain butcher block cracks more readily on inside curves than edge-grain does. More at butcher block countertops.
How do curved countertop templates affect material waste and cost?
Curved pieces waste more slab than rectangular ones because stone sells by the slab and cuts by the shape. A curved island nose measuring 18 by 48 inches at its bounding box needs a rectangular slab area at least that large, even if only 60% of that rectangle lands in the finished piece. The rest is scrap.
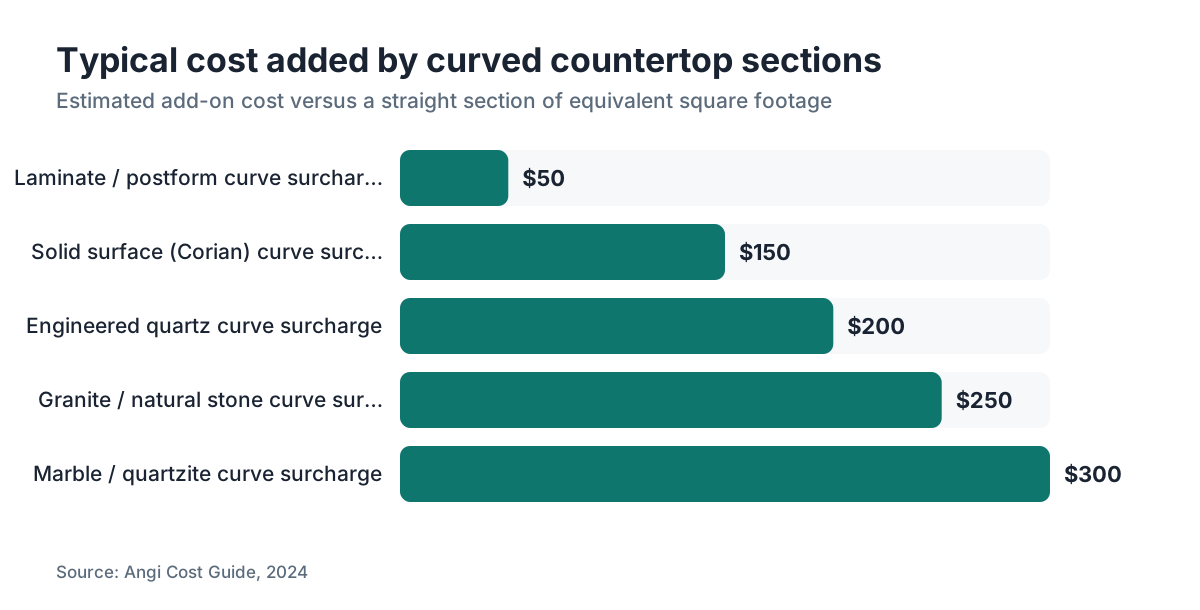
Most fabricators price by the square foot of finished countertop, but they bury the waste factor in the per-square-foot rate when they quote complex curves. Some shops add a flat curve surcharge of $50 to $200 per curved section on top of material, covering the extra template time, CNC programming, and higher polish labor.
Nesting software earns its money here. A skilled shop rotates and positions curved template pieces across the slab to spare stone, sometimes tucking a curved remnant into a tight corridor a rectangular piece cannot use. Shops running digital nesting report better yield on complex jobs than shops laying out by hand. The gap can be 10 to 20 percent less waste on a curved piece, though it swings hard by job complexity.
A note for homeowners. Ask whether the shop quotes by the square foot of finished surface or by the square foot of slab consumed. A fabricator quoting finished square feet builds the waste in invisibly. One quoting slab consumption tells you where your money actually goes.
For reference, countertops for a typical U-shaped kitchen run $2,000 to $4,500 installed for granite or quartz. A curved island or peninsula section usually adds $300 to $800, mostly in labor and template time. The broader kitchen countertops guide has full cost breakdowns.
What are the most common mistakes when templating curves, and how do you avoid them?
Assuming the cabinet radius is a true arc. It usually is not. A radius cabinet built by a carpenter to a 24-inch radius can vary from 22 to 26 inches across its face. Probe or scribe the actual surface, never the theoretical geometry.
Templating on a cabinet that is not yet level. Level your cabinets first. A cabinet sitting 1/4 inch low on one end produces a countertop that rocks or gaps at the wall after installation. Check level in both directions before any template material touches the cabinet top.
Using template material that shifts. Cheap poster board and thin cardboard creep. Luan does not. No luan on hand? Use 1/4-inch MDF or a rigid plastic sheet. Anything that flexes under your hand as you trace feeds error into the line.
Not marking the seam location at the site. Seam placement on a curve is a decision that involves the homeowner and gets made with the actual slab visible, or at least the slab layout planned. A seam dropped in the wrong place on a curve is nearly impossible to hide. Mark it on the template with a permanent marker and confirm it in writing.
Skipping the final check. Before the template leaves the site, hold it against the wall and cabinet one more time. Wiggle it. Any gap larger than 1/8 inch on the wall side means you re-scribe before you go. Ten minutes at the site. Saves a $600 redo.
Shops running fabrication management software (SlabWise is one option; others exist) often require a digital sign-off on template dimensions before a CNC job queues, which catches gaps between the template file and the original measure before stone gets cut.
How do you template a curved countertop for an island versus a wall run?
Island curves and wall-run curves are different problems.
An island curve is usually convex: the nose rounds outward. You fit the top to a cabinet face reachable from all sides, and there is no wall to scribe. The measurements that matter are the overhang (consistent around the arc), the depth from cabinet face to the back of the island top, and any seam locations.
For an island nose, the most reliable analog method is the trammel arc (if the curve is a true radius) or a bent-luan trace (if it is freeform). Measure the overhang at a minimum of 8 points around the arc and confirm the back side of the island template sits square to your reference line.
A wall-run curve (a curved wall, a rounded breakfast nook, a curved peninsula against a wall) adds the scribing problem. The wall is your reference surface and it is imperfect. Set a compass to the desired reveal (usually 0 to 1/16 inch) and run it continuously along the wall. Do not stop and restart the scribe or you leave a jog in the line.
For both types, photograph the finished template in place before you remove it. That photo has bailed out fabricators plenty of times when a seam mark or edge note turns ambiguous later.
If the island curves on all four sides (a fully round or oval island), split it into two problems: the curve itself, and the depth/width relationship. Measure the maximum length and width first, confirm they fit within the available slab size, then template the perimeter curve. An oval island 60 by 36 inches needs a slab at least that size in its rectangular bounding box, which is a large slab and may force a seam on some stone species.
When should a homeowner be present for templating, and what should they check?
A homeowner does not run the template, but the first 10 minutes matter. Confirm these before the templater starts:
First, confirm the cabinet installation is done and all upper cabinets are hung. Template before the uppers are in and you do not know where the backsplash ends or where the window sill sits relative to the countertop line.
Second, verify the sink is on-site and physically present. The templater traces the actual sink for a cutout, not a spec sheet. Sink dimensions vary by manufacturer even within a stated nominal size, per NAHB's residential performance guidelines, so the real fixture has to be in the room.
Third, confirm appliance locations. A cooktop cutout has to match the exact model, and the location has to match the final plan. A curved section near a cooktop is sensitive because moving the curve even 2 inches can change how the cooktop fits.
Fourth, discuss seam placement for any curved sections. The templater should show you where seams fall on the curve, and you should approve them before anything gets finalized. Ask to see where the seam line sits relative to the curve's visual center.
Fifth, ask for a copy of the template dimensions or a photo of the template labeled with measurements. Some fabricators do this automatically. Others hand it over only when asked. That document is your record if a dispute comes up about what was measured.
The countertop installation guide covers the sequencing from template to set day.
Frequently asked questions
How accurate does a curved countertop template need to be?
The Marble Institute of America sets the wall-gap tolerance for finished countertops at 1/8 inch maximum before caulk, and seam gaps at 1/16 inch maximum. Aim tighter on the template itself: 1/16 inch or less at the wall scribe line so you keep margin for minor variation during cutting and installation. Any deviation larger than 1/8 inch on a curved wall section shows after caulk.
Can I template a curved countertop myself as a homeowner?
You can capture an approximate template with bending luan and a compass for the wall scribe, but most fabricators will not cut stone to a homeowner-made template because any error becomes their liability. What helps: provide a drawing with your desired radius and key measurements, then ask the fabricator to confirm with their own template at the site. Some shops charge separately for templating, typically $75 to $200, and it is worth paying.
What radius is too tight to cut in granite or quartz?
Inside curves (concave) tighter than about 4 inches get structurally risky in 3 cm stone because the material goes very thin at the inside of the arc. Outside curves (convex) can go tighter, down to about 1.5 to 2 inches for a bullnose or ogee edge on a nose piece, but the narrower the remaining stone, the higher the breakage risk in transport. Most fabricators set a practical minimum inside radius of 4 to 6 inches for granite, quartzite, and engineered quartz.
How long does templating a curved countertop take compared to a straight one?
A straightforward straight kitchen layout takes 30 to 60 minutes. Add a single curved section and expect 30 to 45 minutes more, partly for the careful wall scribe and partly for checking the arc at multiple points. A fully curved island or an irregular organic shape can add 90 to 120 minutes. Digital laser templating cuts field time a lot but adds office time to process the file.
Does a curved countertop cost more than a straight one?
Yes, reliably. Most fabricators add $50 to $200 per curved section as a labor surcharge, and the curved pieces waste more slab than equivalent straight pieces, which raises the effective material cost. On a typical granite or quartz kitchen, a curved island or peninsula adds $300 to $800 to the installed total. Thermoformable materials like solid surface and laminate add less because their curves waste less.
What is a trammel, and when should you use one for curved templates?
A trammel is a compass-like arm with a pivot at one end and a pencil or scribe tip at the other, set to a fixed radius. Use it when the curve is (or should be) a true geometric arc, like the nose of a radius cabinet with a specified radius in the drawings. Sweep the trammel on your template material to draw the arc. Faster and more accurate than bending luan for true circular arcs, but useless for freeform or organic curves.
How do you find the center point of a radius cabinet to template it accurately?
Measure from the outer corners of the curved cabinet section toward the center of the room. The radius center sits at a distance equal to the cabinet's stated radius, perpendicular to the tangent of the curve at its midpoint. You can also use two intersecting chord lines: draw a chord from one end of the arc to the other, find its midpoint, drop a perpendicular, and the center lies on that perpendicular. Standard drafting geometry, no special tools.
What is the difference between a convex and concave curved countertop for templating purposes?
A convex curve bends outward, like an island nose. The overhang stays consistent around the outside of the arc and the cabinet face is your reference surface. A concave curve bends inward, like a curved nook or a bay. The wall behind it is the scribing surface and it usually holds the most irregularity. Concave curves are generally harder to template because you fit into a corner rather than define an edge in open space.
Do I need a special edge profile on a curved countertop?
Most edge profiles work on a curve, but profiles with multiple layers of relief like a full ogee are harder to hand-polish around a tight radius and cost more in labor. A simple eased or bullnose edge polishes much more easily around a curve. Profiles with sharp inside coves force the polisher into short passes around the arc, which takes time. Ask your fabricator which profiles they can machine on CNC versus which need hand work on your specific radius.
Can you seam a curved countertop in the middle of the curve?
Technically yes, but it is not ideal. A seam at the apex of a visible curve catches the eye because it interrupts the line at its most prominent point. Better spots: near the transition where the curve meets a straight run, or where a natural vein or color shift in the stone provides cover. If slab size forces a seam mid-curve, both pieces must be cut from the same radius line on the template so the joint closes evenly.
What is luan and why do fabricators use it for curved templates?
Luan (sometimes spelled lauan) is a thin tropical hardwood plywood, usually 1/8 inch thick, sold in 4x8-foot sheets at lumber yards. It bends around curves without splitting, holds its shape once the hot glue or fasteners set, and stays stiff enough that it does not creep or sag under its own weight on a cabinet top. It is cheap, roughly $20 to $30 per sheet, and one sheet covers most residential curved template jobs.
How do curved countertops affect the stone grain or pattern layout?
Curved pieces eat a larger footprint of slab than their finished area suggests, which leaves less slab to match veining across the rest of the kitchen. On highly veined materials like marble or quartzite, settle with your fabricator on where the curved piece sits on the slab before templating is finalized. Moving the curve a few inches on the layout can be the difference between a natural vein continuation and a jarring break in the pattern.
What should I do if my curved countertop does not fit after installation?
Do not force it. A consistent gap at the wall can sometimes be fixed by grinding a relief on the back edge, provided the gap is under 1/4 inch and the wall accepts the reveal. If the front curve does not match the cabinet face and the overhang is uneven, that is a template error and the piece usually needs a recut. Document the gap with photos and measurements before you call the shop. Resolution depends on whether the fault is the template, the cutting, or the cabinet installation.
Sources
- National Kitchen and Bath Association, NKBA Planning Guidelines: Standard countertop overhang from the face of the cabinet door is 1 to 1.5 inches per NKBA planning guidelines.
- Marble Institute of America, Dimension Stone Design Manual: MIA recommends a maximum unsupported overhang of 10 inches for 3/4-inch stone and 12 inches for 3 cm stone; wall-gap tolerance for finished countertops is 1/8 inch maximum.
- DuPont, Corian Solid Surface Fabrication Guide: Corian solid surface is thermoformable at 300 to 325 degrees Fahrenheit depending on color and thickness, allowing it to be bent to curved forms.
- Angi, Countertop Installation Cost Guide: Typical kitchen countertops for a U-shaped kitchen run $2,000 to $4,500 installed for granite or quartz; curved sections add $300 to $800 to the total.
- National Association of Home Builders, Residential Construction Performance Guidelines: Sink dimensions vary by manufacturer even within a stated nominal size, requiring the physical sink to be present at templating for accurate cutout dimensions.
- U.S. Consumer Product Safety Commission, Home Improvement Safety: Structural requirements for countertop support, including corbels or sub-frames for overhanging sections, fall under general home improvement safety guidance.
- U.S. Occupational Safety and Health Administration, Workplace Safety Standards: Stone fabrication and cutting operations, including dust control and safe material handling during CNC and hand fabrication, are governed by OSHA workplace safety standards.
- Natural Stone Institute, Stone Fabrication Best Practices: Seam gap tolerance for stone countertops is 1/16 inch maximum before epoxy fill, targeting 1/32 inch for high-quality finished work.
- APA - The Engineered Wood Association, Plywood Product Guide: Luan (lauan) plywood at 1/8-inch thickness bends around curves without splitting and is widely used as template material in countertop fabrication.
Last updated 2026-07-11