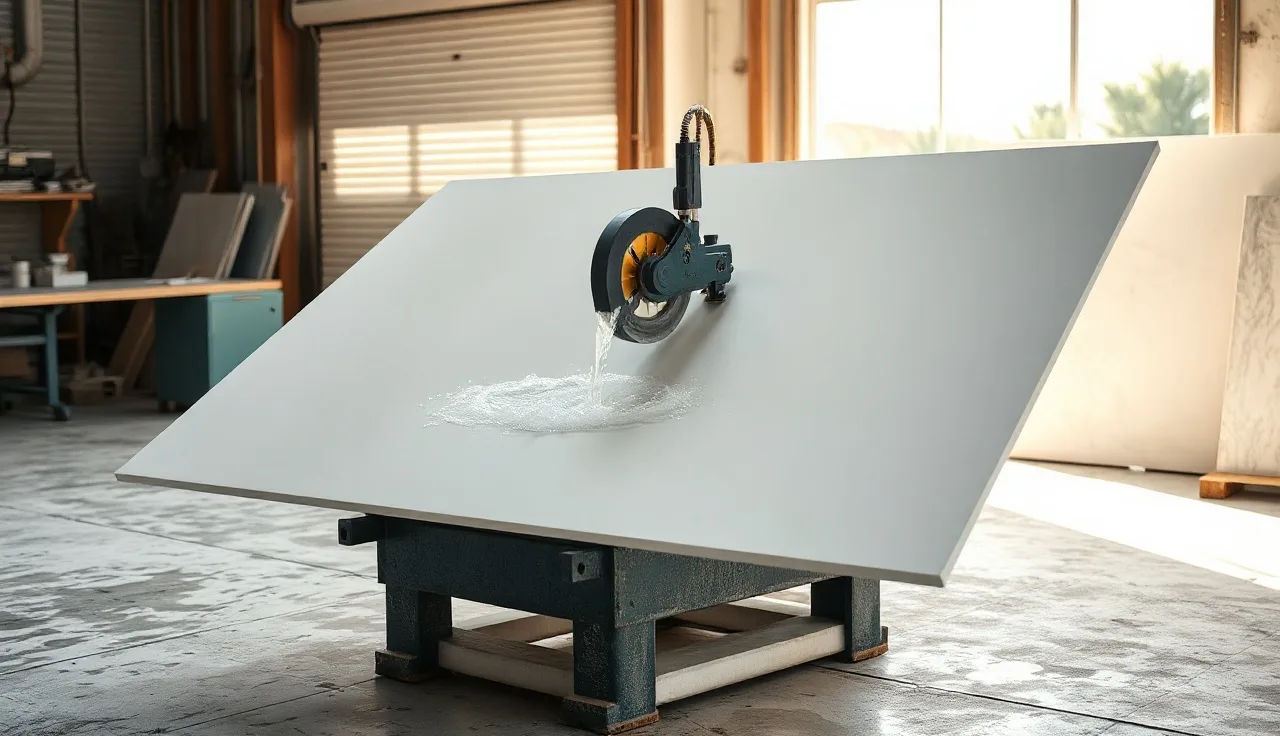
TL;DR
- Porcelain slab chips because the material is glass-hard and brittle.
- Preventing it takes a continuous-rim diamond blade rated for porcelain, cutting face-down on a wet saw (or tape plus score-and-snap on thin sheets), a slow steady feed of 1 to 2 inches per second, and a blade that never wanders.
- Most chips happen in the first two minutes from the wrong blade or too fast a start.
Why does porcelain slab chip so badly compared to other countertop materials?
Porcelain chips because it has almost no give. It gets sintered above 1200°C (roughly 2200°F), which fuses the clay body into a material with a Mohs hardness of 6 to 7 and a vitreous, near-zero-porosity structure [1]. When a blade exits the cut, the material can't deflect. The surface layer and the body separate instead of bending, and you get a chip.
Granite chips too. But granite is a natural crystalline material with micro-fractures that absorb some blade shock. Porcelain has none of that cushion, so exit-point energy has nowhere to go. It punishes the wrong blade or sloppy technique faster and harder than most other stone products.
The decorative layer on many large-format porcelain slabs is only 3 to 6 mm thick total, and the glaze or surface texture is thinner still. A chip 2 mm deep on a 12 mm slab is structurally minor and visually catastrophic. That gap between how a chip looks and what it actually does is the whole reason chip prevention gets treated as job one in any porcelain workflow.
Compare that to laminate countertops or Corian countertops, where a router or a fine-tooth carbide blade handles most cuts without drama. Porcelain gives you one shot per cut.
What blade type actually prevents chipping on porcelain slab?
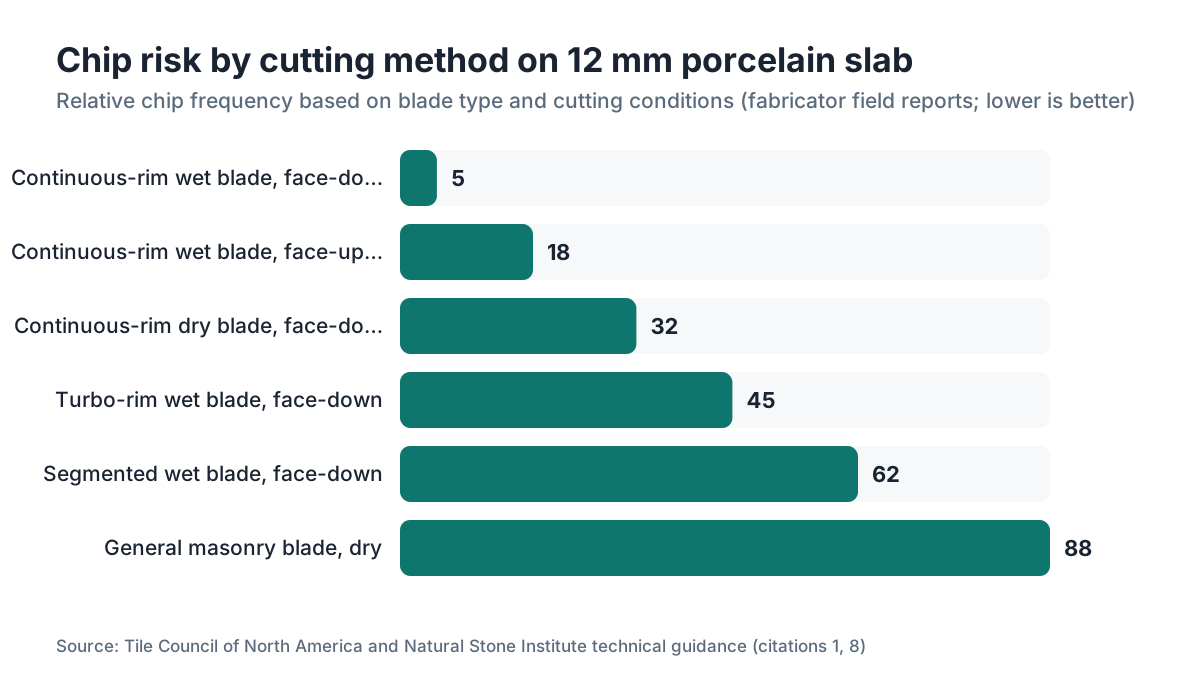
The only blade worth using on full-slab porcelain is a continuous-rim sintered diamond blade rated for porcelain or glass tile. Segmented blades, turbo-rim blades, and general stone blades all hammer the edge. The gaps between segments let the rim bounce micro-fractions at the exit, and that bounce is where chips start [8].
Rim type and diamond concentration matter more than diameter. A 4-inch continuous-rim blade on an angle grinder will beat a 10-inch segmented blade on a table saw for chip control. Most shops still run a 10- or 14-inch continuous-rim wet blade on a wet saw or bridge saw, because a larger diameter means slower rim speed at a given RPM, and slower rim speed cuts cleaner.
Grit size gets underweighted. Finer grit (higher grit number, smaller diamonds) gives a cleaner exit, which is why blades marketed as "porcelain" run finer than standard stone blades. Expect $60 to $150 for a good 10-inch continuous-rim porcelain blade versus $20 to $40 for a basic masonry blade. The blade cost is a rounding error on a countertop job. A chipped edge is not.
One thing people miss: a worn continuous-rim blade is worse than a fresh segmented one. Once a blade has run 150 to 200 linear feet of porcelain without dressing, replace it or dress it with a dressing stick. A glazed blade rides on its bond instead of its diamonds, and it makes heat and vibration that chip the edge even when your technique is perfect.
Does wet cutting vs. dry cutting make a difference for chip prevention?
Wet cutting wins, and it isn't close. Water does two jobs: it cools the blade and it flushes the kerf as you go. Heat softens the diamond bond early and lets the blade wander, and both of those chip the edge. Water also damps resonance in the kerf, which cuts the micro-vibration at the rim [3].
Dry cutting with an angle grinder is sometimes unavoidable for sink cutouts or field cuts after install. When you're stuck with it, keep cuts short, take several shallow passes instead of one deep plunge, and run painter's tape along the cut line to hold the surface as the blade exits. Some fabricators also score the line lightly with a utility knife or diamond scribe first, giving the blade a defined exit path.
Any real volume of porcelain work needs a wet saw or bridge saw with a water feed. That's the equipment that makes chip-free production cuts possible at scale. OSHA also requires wet cutting or local exhaust ventilation for silica-bearing materials to keep airborne respirable silica below 50 micrograms per cubic meter as an 8-hour time-weighted average [4]. Porcelain carries plenty of silica. Wet cutting solves the chip problem and the dust problem in one move.
What is the correct feed rate and technique for a chip-free straight cut?
Feed rate is the variable most people get wrong. Push too fast and you're forcing the blade, which loads the edge sideways and chips the exit. Go too slow and you build heat even with water on it. The sweet spot is roughly 1 to 2 inches per second on a wet saw for a 12 mm slab. You should hear a steady tone, not a laboring motor or a high whine.
Bring the blade to full speed before it touches the slab. Never plunge a spinning blade into the middle of a sheet. First contact is the highest-risk moment for an entry chip, and full RPM at contact keeps that risk down.
Cut face-down on a table saw or wet saw. The teeth exit through the back of the slab, so any chipping lands on the hidden side and your decorative face stays clean. It's the same trick woodworkers use cutting veneer face-down. If your saw forces a face-up cut, lay down two layers of painter's tape across the full line. Two minutes of tape saves the edge.
For straight cuts over 24 inches, clamp a fence or straightedge to the slab. Even small lateral wobble chips the edge because the blade binds and releases as it drifts. A clamped aluminum straightedge costs almost nothing and takes that variable off the table entirely.
How do you make curved or radius cuts without chipping?
Radius cuts are the hardest thing you'll do in porcelain. A jigsaw with a diamond blade works for gentle curves but chips on tight radii because the narrow blade wanders. An angle grinder with a continuous-rim cup wheel, or a router with a diamond-tipped bit running a template, gives you real control.
The standard move for an inside corner or sink cutout is a relief hole. Drill one with a diamond core bit, usually 1/2 inch to 1 inch diameter, at each corner of the cutout [9]. The hole gives the blade a place to stop instead of forcing it to turn a corner under load. Turning a corner under load is exactly how you chip a radius.
For sink cutouts, the sequence is fixed: drill relief holes at each corner, make the straight cuts connecting them, then ease the edges with a wet-polishing pad or a 400-grit diamond hand pad. That pad removes small chips and softens the edge so nothing shows from standing height.
Some shops run complex radius work on a CNC bridge saw or a waterjet. A waterjet cuts porcelain with no mechanical blade contact, so chipping on the cut face is near zero. The edge still needs polishing, but the chip risk basically disappears. Waterjet access runs roughly $15 to $50 per linear foot of cut depending on shop and region. For a visible island with a fancy edge profile, that's often money well spent.
Does the thickness of the porcelain slab affect how much it chips?
Yes, and not in a straight line. Thin porcelain (3 mm to 6 mm, sometimes sold as "thin porcelain") chips more easily than 12 mm or 20 mm slabs because there's less material holding the edge during the cut. The blade flexes the thin sheet a hair, and that flex at the exit tears the surface.
For thin sheets, many fabricators laminate the panel to a backer (MDF or foam) and cut through both layers at once. The backer kills the flex and gives the blade a solid exit substrate, which drops the chip rate hard.
Thicker slabs (20 mm and up) forgive small technique errors but need more passes on curves and more cooling, since the blade stays in contact longer per cut. On very thick porcelain, a single full-depth pass at the wrong feed rate builds enough heat to cause thermal-shock chipping, which shows up as a jagged exit line instead of the clean pullout you get from a mechanical error on thin stock.
The forgiving window is 12 mm to 16 mm. Most large-format porcelain countertop slabs land right there. If you're picking a product and worried about chip risk during fab, 12 mm is a sensible default.
What role does blade RPM play in chipping?
Blade RPM sets the energy at the rim. Too high and you're grinding, not cutting, which builds heat and micro-fractures. Too low and the blade drags, binding and releasing in ways that chip the exit edge.
Most manufacturers print a maximum RPM for each blade diameter, and running 10 to 20% under that maximum is often best for porcelain. A 10-inch blade rated at 4,500 RPM, for example, tends to cut cleanest around 3,600 to 4,000 RPM. The right number also shifts with diamond concentration: denser blades cut cleanly at lower speeds [3].
Angle grinders make RPM control harder, since most consumer models run at a fixed speed. Variable-speed grinders cost more (roughly $80 to $200 versus $30 to $80 for fixed-speed) but give you real say over cut quality. On a dedicated wet saw, motor speed is baked into the saw, so feed rate is your main lever.
Here's a quick read on the cut itself. Lots of powdery dust coming off even with water on it means you're running too fast or the blade is glazed, so slow down or dress it. Coarser chunks coming off mean the blade is dragging, so nudge the feed rate up.
How do you handle edge polishing after cutting to fix small chips?
Even a clean cut leaves a sharp, slightly rough edge. A diamond hand-pad sequence from 200 grit through 400, 800, and 1500 grit removes small chips (under 1 mm) and eases the edge smooth. Figure 10 to 20 minutes per linear foot by hand.
For production, a variable-speed angle grinder with diamond polishing pads does the same work in 2 to 4 minutes per linear foot. Run the grinder low (1,500 to 2,500 RPM) and keep the pad moving. Dwell in one spot and you overheat the edge and can seed new micro-cracks.
Chips bigger than 1 to 2 mm won't polish out. Your real options are three: trim the affected edge back if the layout has room, fill with a color-matched epoxy and polish it flush, or replace the piece. Epoxy fills vanish on matte or textured porcelain but show on high-gloss surfaces under raking light. Tell your client straight which repair fits their slab.
Shop software like SlabWise lets you log cut sequences and edge profiles per job, which earns its keep when a piece needs a re-cut or a claim comes in. Keeping that record isn't glamorous. It matters a lot when a homeowner calls three weeks after install.
What safety precautions apply specifically to cutting porcelain slab?
Porcelain carries crystalline silica, the same compound regulated in granite and engineered stone work. OSHA's silica standards, for construction (29 CFR 1926.1153) and general industry (29 CFR 1910.1053), set the permissible exposure limit at 50 micrograms per cubic meter as an 8-hour time-weighted average, with an action level of 25 [4]. Dry-cutting any silica material without dust controls almost certainly blows past those limits.
Wet cutting with enough water flow (at least 1 to 2 liters per minute at the blade) is OSHA's Table 1 engineering control for common cutting operations, which means it satisfies the rule without air monitoring when you do it right [10]. If you dry-cut, you need a HEPA-filtered vacuum shroud on the tool plus a NIOSH-approved half-face respirator with N95 or P100 filters at minimum.
Past silica, porcelain chips are sharp and they fly. Eye protection (side-shield safety glasses, or a full face shield for grinder work) is non-negotiable. Porcelain shards have caused serious eye injuries. Gloves help with sharp cut edges but can catch a spinning blade, so keep loose gloves away from the blade on a wet saw.
For a homeowner making one DIY cut: rent a wet saw, keep the water running, wear safety glasses and a P100 half-mask, and cut outdoors or somewhere with real airflow. One cut won't build OSHA-level chronic exposure. The acute dust cloud from a single dry cut is still something you don't want in your lungs, and silica exposure causes silicosis, a permanent progressive lung disease [7].
What are the most common mistakes that cause chipping and how do you avoid them?
The number one mistake is the wrong blade. A general-purpose diamond blade or a turbo-rim blade on porcelain chips the edge on nearly every cut. The price gap to the right blade is $40 to $100. There's no scenario where the wrong blade pays off.
Second: not securing the slab. Porcelain is heavy (a 12 mm slab runs roughly 7 to 9 pounds per square foot) but a poorly supported overhang still vibrates during a cut [11]. Use sawhorses and foam padding, and support the off-cut right up to the blade. If the off-cut drops even a little as the cut finishes, it levers against the blade and chips both edges.
Third: stopping mid-cut. If you halt the feed with the blade still touching the material, even for a second, the blade heats the kerf walls and can burn or micro-fracture them. If you have to stop, back the blade fully out of the kerf first, then restart from the beginning of the cut. It's awkward. It also saves the slab.
Fourth: starting a cut on an unsupported edge. Always start from the body of the slab and work inward, not off a thin unsupported edge. A thin edge snaps or chips the instant the blade hits it. If you must start from an edge, back it from below with a board.
For homeowners sizing up porcelain against other materials, know this: granite countertops and marble countertops forgive things porcelain won't. Porcelain's hardness and brittleness put it in a tougher class for fabrication.
Should a homeowner attempt to cut porcelain slab themselves?
For simple straight cuts on a rented wet saw, a careful homeowner can do fine work. Tile stores and home centers rent wet saws for roughly $40 to $80 a day [5]. The keys are a continuous-rim porcelain blade (buy your own for $30 to $60 instead of trusting the rental's generic blade), water running the whole time, and a slow feed.
Sink cutouts and radius cuts are another animal. Inside corners, tight curves, and drilling relief holes with a diamond core bit are genuinely hard, and a mistake on a slab that cost $500 to $2,000 is an expensive lesson. If you're not solid with the tool and the process, paying a fabricator for a day of shop time almost always beats replacing a chipped slab.
Honest answer: most homeowners asking this should not cut their own sink cutouts. A straight run with no cutouts? Maybe. Anything with a curve or an inside corner? Hire it out. The material-cost-to-skill math doesn't favor DIY on the complex cuts.
For the fuller picture of what goes into countertop installation, including how fabricators sequence cuts and why, that context helps you see what you're taking on before you commit to DIY.
How do professional fabricators handle chip prevention in production settings?
Production shops treat chip prevention as a workflow problem more than a technique problem. Blade choice and water cooling are table stakes. The real discipline lives in how cuts get sequenced and how pieces get handled between cuts.
Bridge saws with digital readouts and fence stops take the hand-steadying variable out of straight cuts. The operator sets the fence, runs the cut, and gets a consistent edge with no lateral drift. For shops where porcelain is a real chunk of the work, that equipment pays back fast in lower scrap.
Nesting software matters here too. Nest pieces well and cuts can start from the factory edge of the slab (already polished) instead of a previously cut raw edge. Starting from a finished factory edge lowers chip risk and cuts down polishing afterward. Shops that use software like SlabWise to plan porcelain layouts report fewer re-cuts, because good layouts steer cuts away from interior zones where support is hard to control.
High-volume porcelain shops also track blade mileage. A simple log on the saw, noting which blade ran and how many linear feet it's cut, catches the slow blade degradation behind chip rates that creep up over a few weeks. When the chip rate climbs and you have no log, you're guessing.
Frequently asked questions
What is the best blade for cutting porcelain countertop slabs without chipping?
A continuous-rim sintered diamond blade rated for porcelain or glass. Avoid segmented or turbo-rim blades. A quality 10-inch continuous-rim porcelain blade costs $60 to $150 and gives a far cleaner exit edge than general stone blades. Keep the blade dressed and replace it after 150 to 200 linear feet of cuts to hold performance.
Can I use a regular tile saw to cut a full porcelain countertop slab?
A standard tile wet saw can handle porcelain slab if it's big enough to support the material and you use the right blade. Most tile saws max out at 12-inch tiles, too small for a countertop run. You need a saw with a sliding table or a bridge saw for slabs. The blade requirements stay the same: continuous-rim, porcelain-rated, wet cut.
How slow should I feed the blade when cutting porcelain slab?
About 1 to 2 inches per second on a wet saw for 12 mm porcelain. Listen to the motor: a steady tone means it's cutting clean. A laboring sound means you're too fast. A high whine means the blade is dragging or glazed. Adjust until the tone stays consistent, and never stop the feed mid-cut with the blade in the kerf.
Does painter's tape really help prevent chipping when cutting porcelain?
It helps on dry cuts or when a wet saw isn't available. Lay two overlapping layers across the full cut line on the face. The tape holds surface material and the glaze in place as the blade exits, cutting pullout. It's no substitute for the right blade and wet cutting, but it's a real marginal gain when conditions aren't ideal.
Why does my porcelain countertop chip only at the end of each cut?
That's exit chipping, the most common chip location. As the blade leaves the material, the unsupported edge breaks away instead of cutting clean. Fixes: flip the slab and cut face-down so the decorative face is the entry side, support the off-cut right up to the blade, ease off the feed slightly as you near the exit, and use a continuous-rim blade.
How do you make a sink cutout in a porcelain countertop without chipping the corners?
Drill a 1/2-inch to 1-inch diameter relief hole at each inside corner with a diamond core bit and plenty of water for cooling. Make the straight cuts connecting the holes. The relief hole gives the blade a place to stop at each corner instead of turning under load, which is what chips inside corners. Finish the edges with a diamond hand pad starting at 200 grit.
Is porcelain harder to cut than granite or quartz?
For chip risk during fabrication, yes. Porcelain's fired vitreous body has almost no internal flex, so blade exit energy chips the edge instead of dissipating through the material. Granite is harder by some measures but has natural grain and micro-fractures that absorb shock. Engineered quartz sits in between. Most fabricators call porcelain the most demanding material to cut cleanly.
What causes thermal cracking when cutting porcelain slab?
Heat buildup in the kerf, almost always from too little water, a glazed blade, or a feed so slow the blade stays in contact too long. Thermal cracks show as jagged lines running off the cut edge rather than clean chip pullout. Run adequate water (at least 1 liter per minute at the blade), dress the blade often, and keep a consistent feed rate to hold heat down.
Can small chips on a porcelain countertop edge be repaired?
Chips under 1 mm usually polish out with a diamond hand pad from 200 to 1500 grit. Bigger chips can be filled with color-matched epoxy and polished flush. Epoxy repairs are hard to spot on matte or textured porcelain but show on high-gloss surfaces under raking light. If the chip is on a visible finished edge and tops 2 to 3 mm, cutting the piece back or replacing it is usually the cleaner outcome.
Do I need silica dust protection when cutting porcelain slab?
Yes. Porcelain contains crystalline silica. OSHA's permissible exposure limit is 50 micrograms per cubic meter over 8 hours. Wet cutting with adequate water flow satisfies OSHA's Table 1 engineering control for most cutting operations. If you dry-cut for any reason, use a HEPA-vacuum dust shroud on the tool and a NIOSH-approved P100 half-face respirator. Silica exposure causes silicosis, a permanent progressive lung disease.
What is the difference between a porcelain slab and a ceramic tile for cutting purposes?
Porcelain fires at higher temperatures than standard ceramic, giving a denser, harder, less porous body. It chips more easily than most ceramic tile on exit cuts. Full porcelain slabs also run much larger (often 60 by 120 inches or more), so cut support becomes critical in ways it isn't for small tiles. The blade type is the same, but slabs need a larger diameter.
How much does it cost to have a fabricator cut porcelain countertops professionally?
Fabrication labor for porcelain typically runs $30 to $80 per linear foot for straight cuts and edge profiling, with sink cutouts adding $150 to $350 each depending on complexity and region. Waterjet cutting for complex curves adds $15 to $50 per linear foot of cut. These are rough market figures; actual prices vary a lot by region, shop volume, and slab complexity.
Should I score a porcelain slab before cutting it with a wet saw?
On a wet saw with the right blade, a pre-score isn't necessary and doesn't meaningfully improve chip outcomes. Pre-scoring with a glass cutter or diamond scribe matters more for thin porcelain (3 to 6 mm) on a score-and-snap approach, or for defining the exit path on dry angle grinder cuts. On a proper wet saw, blade quality and feed rate matter far more than any pre-score.
What RPM should I run when cutting porcelain slab with an angle grinder?
Follow the blade maker's maximum RPM rating, then run 10 to 20% below it for cleaner cuts. On a 4-inch blade rated at 13,300 RPM, aim for 10,500 to 12,000 RPM. Most fixed-speed angle grinders run 11,000 to 12,000 RPM, fine for most 4- to 4.5-inch porcelain blades. Variable-speed grinders give you real control and earn the extra cost for regular porcelain work.
Sources
- Tile Council of North America (TCNA), Handbook for Ceramic, Glass, and Stone Tile Installation: Porcelain tile is fired at temperatures above 1200°C producing a vitreous body with Mohs hardness of 6 to 7 and water absorption below 0.5%
- Norton Abrasives (Saint-Gobain), Diamond Blade Technical Reference: Water cooling reduces blade rim temperature and damping of kerf resonance improves cut edge quality on dense ceramic materials
- OSHA, Respirable Crystalline Silica Standard for Construction (29 CFR 1926.1153): OSHA sets the permissible exposure limit for respirable crystalline silica at 50 micrograms per cubic meter as an 8-hour TWA, with an action level of 25 micrograms per cubic meter
- The Home Depot Tool & Equipment Rental: Wet tile saws are available for daily rental at home improvement centers, typically in the $40 to $80 per day range
- National Institute for Occupational Safety and Health (NIOSH), Silica page: Crystalline silica exposure causes silicosis, a permanent progressive fibrotic lung disease; wet cutting and respiratory protection reduce exposure
- Natural Stone Institute, Technical Bulletins on Fabrication of Sintered and Ultracompact Surfaces: Continuous-rim diamond blades produce cleaner exit edges on porcelain than segmented or turbo-rim blades, which introduce edge impact at the segment gaps
- Natural Stone Institute (formerly MIA+BSI), Dimension Stone Design Manual: Inside corner relief holes drilled at radius before blade cuts are standard practice to prevent stress fractures and chipping at corners
- OSHA, Table 1 Engineering and Work Practice Controls for Crystalline Silica in Construction: Wet cutting with water flow to the blade is listed as an engineering control in OSHA Table 1 that satisfies the silica standard without air monitoring for covered cutting operations
- Tile Council of North America (TCNA), Technical Data on Gauged Porcelain Tile Panels/Slabs: Sintered porcelain products have high bulk density and weigh approximately 7 to 9 pounds per square foot at 12 mm thickness
Last updated 2026-07-10