TL;DR
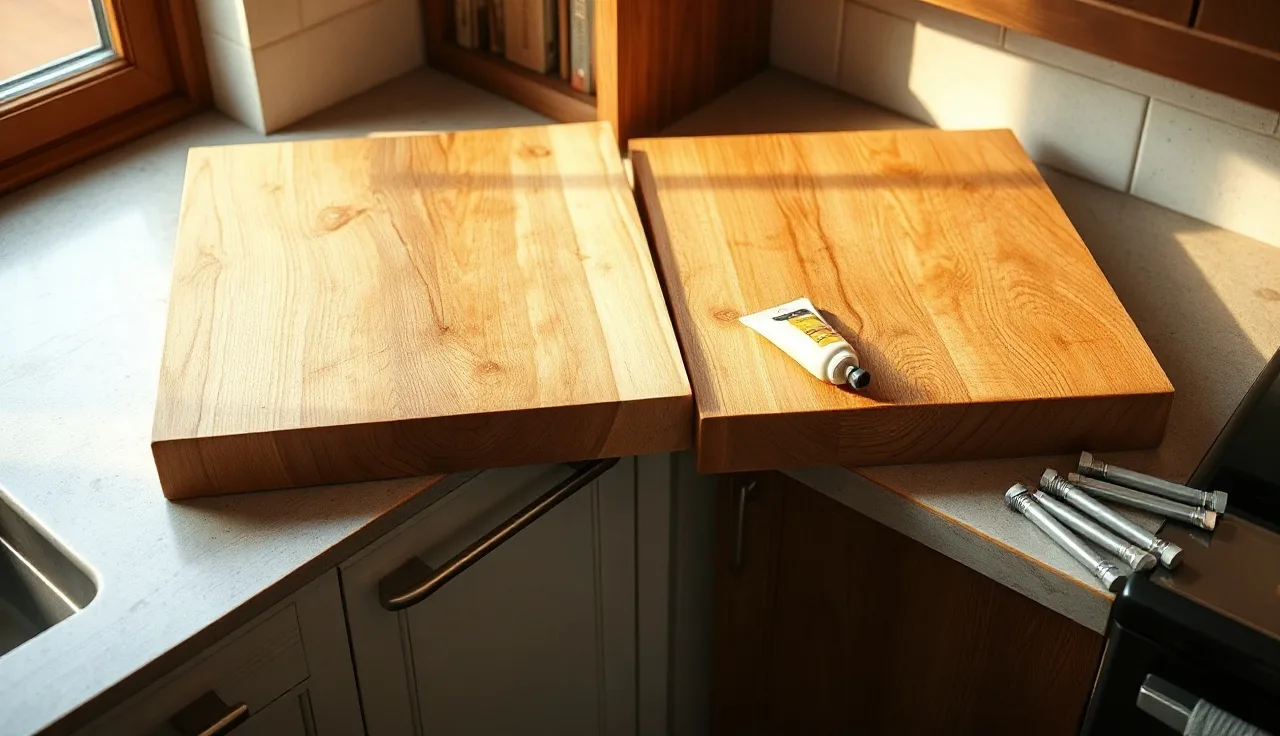
- Corner joints in butcher block get made three ways: a 45-degree miter, a square butt joint, or an L-shaped scarf.
- Miters look best and cut hardest.
- Butt joints are the standard DIY pick.
- Whichever you choose, glue both faces with waterproof Titebond III, pull them tight with connector bolts, and seal the end grain the same day you cut it or the joint swells and opens.
What are the main ways to join butcher block countertops at a corner?
Three joints do almost all the work: the miter (two 45-degree cuts meeting at the corner), the butt joint (one slab runs full length, the other pushes flat against its side), and the scarf or ship-lap (a stepped rabbet that overlaps). Each looks different, cuts differently, and ages differently.
The butt joint wins on volume. Homeowners use it, and so do most small shops. You set one slab, then push the second piece into its side. The seam shows as a thin line on top and a full end-grain face on the shorter piece. It's not as clean as a miter. It's stable, it cuts accurately with a circular saw or jigsaw, and it sands flush without much drama.
The 45-degree miter is what you cut when you want the joint to vanish. Both pieces need exact 45-degree cuts and matching thickness. Half a degree of error opens a gap at the top surface or the underside, right where the light catches it. Butcher block usually runs 1.5 inches thick, so a good miter wants a track saw, a table saw with a long fence, or a CNC. [1] Cutting it flat and square by hand is genuinely hard.
The scarf (or ship-lap) joint is a pro move. Fabricators use it when the top gets glued down and grain continuity matters on a thick slab. You rout a rabbet on each piece so they overlap an inch or two at the corner. It eats time. For most residential jobs, it's overkill.
For two pieces of butcher block countertops in an L-shaped or U-shaped kitchen, a well-cut butt joint is the right call. Start there and only reach for a miter if the exposed corner is on display.
What tools and materials do you need before you start?
For a butt joint, the short list: a circular saw with a fine-tooth blade (60-tooth or higher for hardwood), a straightedge or track saw guide, a belt sander or random-orbit sander, and a square. For a miter, add a track saw or table saw that cuts a reliable 45-degree bevel.
Materials:
- Titebond III waterproof wood glue, or an equivalent exterior-grade PVA. [2] Titebond Original is not rated for a wet kitchen.
- Waterproof butcher block sealer or food-safe mineral oil. Seal end grain the same day you cut it.
- Stainless steel figure-8 fasteners or Z-clips, so the slab attaches to the cabinet without fighting wood movement.
- Countertop connector bolts (draw bolts, the Ikea-style ones) to pull the two slabs tight from underneath.
- 120, 150, and 220-grit sandpaper.
- Painter's tape to protect the finished surface around the joint.
One tool people skip and regret: a moisture meter. Butcher block from a home center can arrive at 8 to 12 percent moisture content. [3] If it dries to 6 or 7 percent after install, it shrinks, and that shrink opens a joint that looked tight on install day. Check the wood, let it sit in the actual kitchen at least 72 hours before cutting, and check it again. A basic pinless meter runs about $30 and pays for itself the first time it stops you from cutting wet stock.
How do you cut a butt joint for a corner countertop?
Pick which slab runs full length into the corner and which one butts into its side. Run the longer piece full length and notch the shorter one around obstacles. If both runs are equal, run the piece along the main work wall full length.
Step 1: Measure the full width of the long piece, overhang included (usually 1.5 inches past the cabinet face). Cut the short piece so its end lands flush with the outer face of the long piece after the long piece is set. The short piece ends up shorter than its cabinet run by exactly the thickness of the long piece.
Step 2: Clamp a straightedge or track saw guide to the short piece. Score the cut line with a utility knife first, then cut. A 60-tooth carbide blade leaves the top surface clean.
Step 3: Sand the cut face flat. Lay a belt sander on its back, belt facing up, and run the cut end across it. Check with a square. The face has to sit fully flush against the side of the long piece with no rocking.
Step 4: Dry-fit both pieces on the cabinets before any glue comes out. The joint should close without force. A gap at the back with a closed front means the long piece's side isn't square. Take another pass.
Step 5: Brush Titebond III on both mating faces, press them together, and pull the joint tight with connector bolts from underneath. Don't clamp the top surface, it marks the wood. Wipe squeeze-out right away with a damp cloth. Let it cure at least 24 hours before you sand the seam flush. [2]
How do you cut a 45-degree miter joint for butcher block?
A miter needs two things: a reliable 45-degree cut and a dead-flat face on both pieces. The joint pulls apart at the outside corner and squeezes at the inside, so any hollow in the cut face opens a gap right where you can see it.
With a track saw, set the bevel to 45 degrees and ride the track for a straight line. Cut in one pass. Multiple passes leave ridges that stop a tight fit. A table saw works too if the slab is short enough to handle safely. A contractor saw with a 52-inch rip capacity covers most countertop widths.
Hold the cut faces up to a light. Any light peeking through means a visible gap. A hand plane or a router with a straight bit trues them up.
The glue-up matches a butt joint: Titebond III, connector bolts from below, wipe squeeze-out, wait 24 hours. A miter has less glue surface than a butt joint, so it leans harder on the fasteners. Run at least two connector bolts per joint. [2]
One headache to watch: slabs from different boards often differ in thickness. Even 1/16 of an inch reads as a step at the seam. Belt-sand the high side down to match before glue touches anything. Once it's glued, a card scraper and 150-grit blend the seam so it reads as one surface.
How much gap do you leave for wood movement at a corner joint?
None in the glue joint itself. This trips people up. The two pieces get glued tight, wood to wood. The room for movement lives between the slab and the wall and in how you fasten the slab to the cabinet, not in the seam.
Wood moves across the grain, not along it. A typical edge-grain or face-grain slab at 25 inches deep moves roughly 1/8 to 3/16 of an inch across its width over a season in a conditioned kitchen. [3] End-grain blocks move less because the growth rings run vertically.
Leave about 1/8 inch between the slab and the back wall, hidden by the backsplash. Never screw through a hole that's too tight, and never glue the whole underside of the slab to the cabinet rail. Use figure-8 fasteners or Z-clips seated in a routed groove in the rail. The screw holds the slab down; the clip slides in the groove as the wood moves. [4]
At the corner, the two slabs run perpendicular to each other. The long piece moves along the short piece's grain direction, and the reverse. That puts differential stress right at the junction. Glue the joint with waterproof adhesive and let the joined unit float off the cabinets, and it handles that stress fine. Screw both slabs down hard at the corner and you're fighting the wood. It cracks, usually inside a year or two.
What is the right way to seal the joint after cutting?
End grain is where an unsealed butcher block dies. Cut a piece of oak or maple, leave the end face bare, and it wicks moisture 10 to 20 times faster than the face grain. [5] In a kitchen that means the joint face swells, crowns, and eventually the glue line opens.
On a dry-fit day, seal the cut faces before you close up for the night. One coat of mineral oil or butcher block conditioner on the end grain, let it soak 20 minutes, wipe. Then before glue-up, hit the mating surface lightly with 120-grit to take the oil back off. Titebond will not bond to an oiled surface, so the glue face has to be bare wood. [2]
After the joint is glued, cured, and sanded flush, put your full finish across the whole top, joint line included. Mineral oil is the cheapest and most forgiving choice, and it meets the food-contact expectations covered by NSF protocols. [6] Want harder, more water-resistant protection? A food-safe oil/wax blend or a water-based polyurethane made for cutting surfaces holds up better.
Give the joint line extra attention on the first pass. Work finish into the seam with a small brush before you roll or wipe the rest of the top. Do it every time you refinish, which in a busy kitchen means about once a year for an oiled finish.
Do you need to worry about food safety at the joint?
Yes, and most guides breeze past it. A glued wood joint can harbor bacteria if the glue line opens even a hairline. The FDA Food Code requires food-contact surfaces to be "smooth, durable, and easily cleanable." [7] A tight glued joint clears that bar. A joint with a visible gap does not.
Titebond III and other Type I and Type II waterproof wood glues are considered safe for incidental food contact once fully cured. Titebond's own technical data sheet says so. [2] None of them are meant for surfaces sitting in standing water all day.
Here's the practical version. If the joint line starts to open, sand the area, oil it, and if needed inject thin CA glue or a food-safe wood filler to close the gap. A tight joint is a food-safe joint. An open one is a bacteria trap.
Got real food-safety stakes at home, like an immunocompromised family member or heavy raw-meat prep? Run a polyurethane finish over the whole top, joint and all. The film seals any micro-gaps, and the finish itself becomes the food-contact surface instead of the bare wood. NSF/ANSI 51 covers food equipment materials, and some polyurethanes carry that certification. [6]
How do you handle an inside corner versus an outside corner?
An L-shaped kitchen has one inside corner (the concave spot where the two cabinet runs meet) and often one exposed outside corner at the end of a run. Most butcher block joints deal with the inside corner, and that's the easy one.
For the inside corner, the butt joint is standard. The movement gap barely matters because the two slabs plus the backsplash cover everything.
The exposed outside corner is a different animal. That's the corner your hip finds walking past. A raw butt joint there leaves a 90-degree end-grain edge that's sharp, fragile, and ugly. Three fixes:
- Round it with a router and a roundover bit (3/8 inch radius is common), run across both slabs after they're joined and sanded flush.
- Cut a 45-degree chamfer across the corner to knock off the sharp point and give it an intentional look.
- On a miter-joined corner, the miter already carries a continuous grain line around the outside, so it needs only light sanding and finish.
The roundover is fastest and hardest to botch. Use a bearing-guided bit, take multiple shallow passes instead of one deep cut, then finish with 150 and 220 grit by hand. Blend the router profile into the flat slab surface smoothly. A hard transition catches your eye every single time you look at the counter.
What are the most common mistakes people make joining butcher block at a corner?
The number-one mistake is not acclimating the wood. Home-center butcher block often shows up wetter than the inside of a conditioned house. It shrinks after install, the joint opens, and the homeowner blames the glue. The glue didn't fail. The wood moved. Seventy-two hours minimum in the actual kitchen before you cut. [3]
Second: regular wood glue instead of waterproof. Kitchens have steam, spills, and humidity swings. Titebond Original and other non-waterproof PVAs can creep and soften in that. Use Type II or Type III.
Third: rigid fastening. Screw both slabs hard to the cabinet frame at the corner and you lock out movement, which cracks the wood. Use float-mount hardware.
Fourth: skipping the end-grain seal. Cut faces drink moisture. Seal them the same day.
Fifth: sanding the seam before the glue fully cures. Twenty-four hours is the floor, 48 is better. Sand a green joint and you tear wood fibers off the bond line, leaving a slight hollow that shows as a line under raking light.
Fabricators running multiple butcher block jobs catch most of this with a checklist baked into the workflow. Shop tools like SlabWise can attach job-specific checklists to each quote so the acclimation window and the end-grain seal don't get skipped at install.
Can you join butcher block to a stone or quartz countertop at a corner?
Yes, and it's a popular look right now: butcher block on the island or prep zone, stone or quartz on the perimeter. The joint between them is a different beast from wood-to-wood.
You can't glue stone to wood and expect it to survive. Wood moves with humidity, stone doesn't, and any rigid adhesive between them cracks the stone or breaks the bond within a season or two. Run the two surfaces to within 1/16 to 1/8 of an inch of each other and fill the gap with flexible silicone caulk, color-matched to the stone or the wood.
Where the two meet at a 90-degree corner, one piece wraps the corner (usually the stone, since it's pricier and usually the main surface) and the wood butts into it with a silicone joint. That joint works: no rigid bond, water stays out, and the wood can move.
Height is the other issue. Granite countertops and engineered stone run 3/4 inch thick, or 1-1/4 inch with a built-up edge. Standard butcher block is 1.5 inches. To land them flush, either recess the wood into a deeper cabinet or use a 3/4-inch butcher block panel for the butting piece. Some designers leave a 1/4-inch step as a deliberate reveal, which also keeps water off the wood.
The countertop installation guide has more on mixing materials in one kitchen.
How long does a properly done corner joint last, and when does it need refinishing?
A glued butt or miter joint on acclimated wood, made with waterproof adhesive, fastened with float-mount hardware, and sealed within 24 hours of cutting should last the life of the counter. That's roughly 10 to 20 years for a well-maintained residential top. [8]
What fails first is the finish, not the joint. The seam is slightly more porous than the surrounding surface because end grain sits exposed on at least one piece. With an oiled finish, the joint dulls first, then the wood dries, the grain rises, and you start to feel a line under your hand.
Annual mineral oil handles that before it turns structural. If it's past cosmetic and the seam is open or raised, sand the area with 80-grit on a random-orbit sander, working with the grain, until it's level. Re-seal right away.
A good joint shouldn't need structural repair for the life of the kitchen. If the same joint keeps opening, the cause is almost always moisture imbalance: wood that wasn't acclimated, a cabinet cavity pulling damp air from a cold crawl space, or a sink run keeping one side wetter than the other. Fix the moisture source before you touch the joint again.
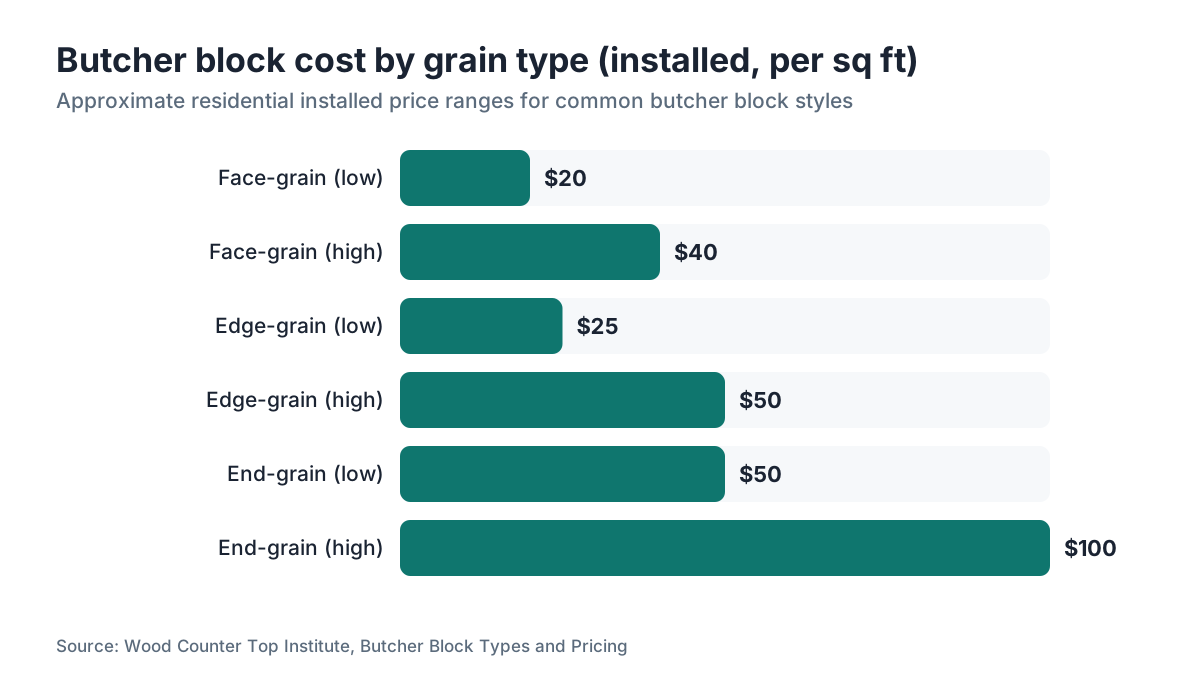
One more note. End-grain butcher block (the checkerboard kind) holds joints better than edge-grain or face-grain because the vertical growth rings resist cupping. [10] Building a high-use kitchen where joint life matters? End-grain is worth the premium, which runs about $50 to $100 per square foot installed versus $20 to $50 for edge-grain. [9]
Step-by-step summary: how to join butcher block countertops at a corner
The full process, in order, nothing skipped.
-
Acclimate the wood. Bring both slabs into the kitchen and let them sit flat (or on edge if flat isn't possible) at least 72 hours. Check moisture with a meter if you have one, targeting below 9 percent for a conditioned kitchen. [3]
-
Measure and mark. For a butt joint, mark the short piece to land flush with the outer face of the long piece. For a miter, mark 45 degrees on both pieces at the inside corner.
-
Cut clean. Fine-tooth blade. Score the line with a utility knife to stop tear-out on top. One pass.
-
Dry-fit. Set both pieces on the cabinets. The joint should close with hand pressure and no rocking. Sand or plane the faces until it does.
-
Seal end grain. Mineral oil on every exposed end-grain face. Soak, wipe, let it sit 20 minutes.
-
Sand the mating faces. 120-grit to strip the oil and give the glue bare wood.
-
Glue up. Titebond III on both mating faces, brushed even. Thin coats on both faces beat one thick coat. [2]
-
Bring the pieces together and set connector bolts from below. Hand-tight, then a quarter turn with a wrench. Over-tighten and you split the wood.
-
Wipe all squeeze-out immediately with a damp rag. Top, underside, and the seam itself.
-
Install float-mount hardware (figure-8 fasteners or Z-clips) on the cabinet rails. Don't rigidly fasten the slab at the corner. [4]
-
Cure 24 to 48 hours before sanding the seam flush.
-
Sand the joint starting at 80 or 100 grit, with the grain, until the two surfaces are level. Move up to 150, then 220.
-
Finish the whole top, joint line included, with extra attention at the seam. Wipe, let it absorb, wipe the excess. Repeat per the manufacturer's directions. [5]
That's the job. About three hours of hands-on work spread across two days, most of it waiting on glue.
Frequently asked questions
Do I need to glue the joint or can I just push the two pieces together?
Glue it. Two pieces set together dry will drift as the wood moves through the seasons, and you end up with a visible, unhygienic gap. Use Titebond III or an equivalent Type II or III waterproof PVA on both mating faces. The glue line also makes the two pieces act as one unit, which cuts down on differential movement right at the corner.
What is the difference between a butt joint and a miter joint for butcher block?
A butt joint runs one slab full length and presses the second piece flat against its side, leaving a visible end-grain line on top. A miter cuts both pieces at 45 degrees so they meet with no end grain showing on the surface. Miters look cleaner but demand precise cuts and are hard to nail by hand. Butt joints cut accurately with basic tools and are the standard DIY choice.
How do I stop the joint from opening up after installation?
Acclimate the wood in the kitchen at least 72 hours before cutting, use waterproof glue, fasten with float-mount hardware so the slab can move, seal the end grain the same day you cut it, and refinish annually if you run an oil finish. Joint failure almost always traces back to wood that moved after install because it wasn't acclimated, or because someone screwed it rigidly to the cabinet.
Can I use regular Elmer's wood glue or regular Titebond for a kitchen countertop joint?
No. Standard Elmer's and Titebond Original aren't rated for high moisture and can soften or creep under sustained humidity. Use Titebond II (Type II, water-resistant) at a minimum, and Titebond III (Type III, waterproof) for any joint near a sink. The price difference is a few dollars. The performance difference in a wet kitchen is not.
How far apart should the connector bolts be on a corner joint?
Space connector bolts about 12 to 16 inches apart along the joint, with the first one 4 to 6 inches from the front edge and another 4 to 6 inches from the back edge. On a standard 25-inch-deep counter, two bolts per joint usually does it. For joints longer than 36 inches, use three. Snug plus a quarter turn is plenty. Over-torque and you crack the wood.
Do I need to use a router for a butcher block corner joint?
Not for a basic butt joint. A circular saw with a fine-tooth blade and a straightedge guide handles most butt-joint cuts. A router earns its keep cutting connector-bolt pockets from below and rounding or chamfering an exposed outside corner. For a miter, a track saw or table saw beats a router because of the slab's thickness and length.
How long should I let the glue dry before sanding the joint flush?
Titebond III hits handling strength in about 30 minutes but needs 24 hours for full cure before you sand. Sand it early and you pull wood fibers off the bond line, leaving a slight dip that shows as a line under raking light. If you can wait 48 hours, wait. The joint isn't going anywhere while it cures.
Is a butcher block corner joint food safe?
A tight, fully cured glue joint sealed with food-safe mineral oil or a food-contact-rated finish meets the FDA Food Code standard for smooth, easily cleanable surfaces. Titebond III is considered safe for incidental food contact once cured. The joint only becomes a problem if it opens and creates a gap, which can harbor bacteria. Keep it sealed and refinish annually.
Can I join butcher block to quartz or granite at a corner?
Yes, but not with wood glue. Stone doesn't move with humidity, wood does, and gluing them rigidly cracks the stone or breaks the bond within a season. Run the two surfaces to within 1/16 to 1/8 of an inch and fill the gap with flexible silicone caulk. One surface wraps the outside corner and the other butts into it with a caulked expansion joint.
What grit sandpaper should I use to sand the joint flush?
Start at 80 grit if the two slabs sit at noticeably different heights at the joint, or 100 grit if they're nearly flush. Work with the grain using a random-orbit or belt sander. Move up to 120, then 150, then 220 before any finish. Don't skip grits. Each one removes the scratches from the last, and skipping leaves marks that show through the finish.
How do I handle a corner joint in a U-shaped kitchen with two inside corners?
Each inside corner gets its own butt joint, handled like a single L-shaped corner. Decide grain direction first, since the center slab in a U-shape runs one way and the two side slabs run perpendicular to it. Acclimate all three slabs together. Cut, glue, and bolt each joint separately, letting each cure before you stress the next one.
How much does it cost to have a fabricator join butcher block corners professionally?
Professional fabrication and installation, corner joints included, typically runs $40 to $100 per linear foot depending on region, species, and joint type, on top of material at $20 to $100 per square foot depending on grain style and species. A miter adds shop time and can cost $50 to $150 more per corner than a butt joint, based on typical shop labor rates reported by the Wood Counter Top Institute.
Should I seal the joint before or after installation?
Seal the cut end-grain faces before glue-up, then lightly sand the mating surfaces to take the oil off before the glue goes on. Once the joint is glued, cured, and sanded flush, finish the whole surface in one pass. Don't finish the slabs separately before joining. You'll get finish buildup at the seam and the glue won't bond to the oiled wood.
What wood species are easiest to join at a corner?
Maple and beech are the most common and the most forgiving. Their fine, consistent grain sands and finishes evenly across a seam. Walnut looks great but has variable grain direction that can tear out when you sand across a joint. Teak is oily and needs a solvent wipe on the mating faces or the glue won't grab. Acacia, common in budget block, has wild grain that can look mismatched at a joint.
Sources
- Franklin International, Titebond III Technical Data Sheet: Titebond III is a Type III waterproof wood glue considered safe for incidental food contact once fully cured; requires bare wood surfaces for bonding
- USDA Forest Products Laboratory, Wood Handbook (2021), Chapter 4: Moisture Relations: Wood moisture content in a conditioned interior reaches equilibrium around 6-9%; acclimation before installation reduces post-installation movement
- This Old House, Countertop Installation Guides: Float-mount hardware for solid wood: Figure-8 fasteners and Z-clips allow solid wood countertops to move seasonally without stress; rigid fastening causes cracking
- USDA Forest Products Laboratory, Wood Handbook (2021), Chapter 16: Finishing: End grain absorbs finishes and moisture at a significantly higher rate than face grain due to the open cell structure of the wood
- NSF International, NSF/ANSI 51: Food Equipment Materials: NSF/ANSI 51 establishes safety requirements for materials used in food equipment, including food-contact surface finishes
- FDA Food Code 2022, Section 4-101: Materials for Food-Contact Surfaces: FDA Food Code requires food-contact surfaces to be smooth, durable, and easily cleanable
- National Kitchen and Bath Association (NKBA), Kitchen and Bath Design Guidelines 2023: Well-maintained solid wood countertops have a typical service life of 10-20 years in residential kitchens
- USDA Forest Products Laboratory, Wood Handbook (2021), Chapter 3: Structure and Function of Wood: Wood moves primarily across the grain; end-grain surfaces are more dimensionally stable than face-grain in response to humidity changes
Last updated 2026-07-09