TL;DR
- A cope on a post-form countertop is a scribed inside-corner joint.
- One section runs straight through the corner with a square end.
- The mating section gets shaped to wrap over it, tracing that section's exact profile.
- Cut it right with a jigsaw or a template-guided router, add a slight back-bevel, and the seam closes tight enough to fill and nearly disappear.
What is a cope cut, and why does post-form need one?
A cope is a profile-matched joint. Instead of mitering two pieces at 45 degrees, you cut one piece square and shape the mating piece to wrap over it, tracing the exact profile of the first piece. The joint stays tight even when the wall shifts a little over the years, because the overlapping piece isn't depending on a perfect 45-degree angle to close the gap.
Post-form countertops need this because of their shape. They have a built-up, radiused front edge and a backsplash that curves up at the rear. Try to miter that curved front edge and you'll fight it forever. It won't clamp tight and it'll gap. A cope fixes the whole problem by letting one countertop run continuously through the corner while the mating piece is undercut to receive it.
This is the standard method for any inside L-shaped or U-shaped kitchen using laminate countertops. It's also how most box-store post-form tops are built to go in. They ship with one end factory-coped or router-templated, and the installer copes the opposite end in the field.
Know the difference before you touch a saw. A miter splits the angle evenly between two pieces. A cope has one dominant piece and one piece shaped to receive it. On post-form, the dominant piece almost always runs the longer wall, and the cope lands on the shorter return.
What tools do you need to cut a cope on post-form?
You can get through this with a jigsaw and a belt sander. Add a router and your results get a lot cleaner.
Core tools:
- Jigsaw with a fine-tooth, downstroke (reverse) blade, or a flush-cut laminate blade. A standard upstroke blade chips the laminate surface badly.
- Router with a flush-trim or pattern bit. A 1/2-inch shank runs steadier.
- Cope template or scribing tool. Many countertop distributors sell plastic router templates sized to a specific post-form profile. Confirm the template matches your top's radius before buying.
- Belt sander with 80-grit and 120-grit belts for final fitting.
- Clamps, at least four.
- A sharp pencil or marking knife.
- Safety glasses and hearing protection. Non-negotiable [7].
Nice to have:
- An oscillating multi-tool for tight corners a jigsaw can't reach cleanly.
- A block plane for hand-fitting the curve when the router leaves the profile slightly off.
- Laminate contact cement and color-matched seam filler.
Skip the table saw. It can't follow the curve of the post-form profile. People try to make it work anyway. They're usually disappointed.
Running a shop? Tracking which jobs need a field cope at install versus a shop-cut cope is the kind of detail that slips through the cracks without organized job notes. SlabWise has a demo worth a look for how that install-detail tracking sits inside a quoting workflow. A disciplined job folder system will keep you straight too.
How do you lay out and mark the cope cut?
Layout is where this job is won or lost. Here's the sequence most experienced installers follow.
Dry-fit both sections in the kitchen first, nothing fastened. The section running the long wall (the dominant piece) sits against the wall. The return piece that will get the cope butts up against it at 90 degrees, overlapping it slightly.
Mark the return from the dominant piece. Hold the return in position, lapping it over the end of the dominant piece by about 3/4 inch. Trace the exact profile of the dominant piece (front edge, built-up edge, backsplash) onto the face of the return piece with a sharp pencil. That trace is your cope line.
For the backsplash portion, a compass or scribing tool beats freehand tracing when the wall isn't square. Set it to the exact overlap distance, run the tool along the face of the dominant piece, and let the pencil leg draw the mirrored line on the return.
Mark your waste side with an X. You're cutting away the material on the dominant-piece side of the line, leaving the profile that wraps over. Mark it clearly so there's no second-guessing when you pick up the saw.
Check that your line captures all three profile zones: the front bullnose or waterfall edge, the flat deck, and the backsplash curve. Each zone has its own radius. Miss one and the assembled joint rocks or gaps.
How do you actually make the cope cut, step by step?
Step 1: Secure the piece. Clamp the return face-up on sawhorses or a bench. Support the section you're cutting fully so it doesn't flex or vibrate.
Step 2: Rough-cut with the jigsaw. Stay about 1/16 inch outside your pencil line. Use a fine-tooth, reverse-tooth blade (teeth pointing down) to keep the laminate surface from chipping. Go slow. The jigsaw is a rough-cutting tool here, not a finisher.
Step 3: Template-route if you have a template. Clamp it to the piece, lined up to your profile marks, and run a flush-trim bit along it to bring the cut to the final line. This gives a far cleaner edge than jigsawing to the line directly. Many post-form brands publish template dimensions for their profile, and aftermarket plastic templates are available through Wilsonart's installer network and most laminate distributors [1].
Step 4: No template? Bring the cut to the line with the belt sander. Work gradually and check the fit against the dominant piece often. Don't sand past the line.
Step 5: Test-fit, then refine. Slide the coped piece over the end of the dominant piece. Look at the joint from the front and from above. Light gaps at the back of the curve are fine and will get sealed. Any gap visible from the front or along the deck needs more work. A block plane or rasp shaves material precisely in tight spots.
Step 6: Undercut slightly. Most experienced fabricators tilt the jigsaw or sand a 1 to 2 degree back-bevel into the cope profile. The face of the cope then contacts the dominant piece tightly while the back is relieved. The front joint closes without a gap even when the overall profile isn't a perfect mirror.
Step 7: Clean up. Once the fit is tight, sand any torn laminate edges with 220-grit on a sanding block. Hold off on seam filler. That comes after installation.
How do you join and seal the cope after cutting?
Once both pieces fit clean, you glue the joint. Most installers use a two-part color-matched seam filler made for laminate countertops, like the systems from Wilsonart or Formica. These fillers harden and sand flush [2][9].
Apply the seam filler to the mating surfaces of the cope. Don't rely on wood glue or construction adhesive as the joiner. They don't fill well and they'll show.
Bolt the joint with countertop connector bolts (draw bolts or miter bolts), which pull the two pieces together from under the deck. Pre-drill the bolt pockets in the underside of each piece before final assembly. Space them 4 to 6 inches back from the front edge, one in the middle of the deck, and one near the backsplash.
Tighten the bolts evenly so the joint pulls together without one piece riding up over the other. Wipe excess filler right away with a damp cloth.
Most two-part fillers cure in 30 to 60 minutes. After that, scrape any proud filler with a sharp scraper, then sand the deck flush with 120-grit, working with the direction of the laminate pattern. You want a flat seam, not a visible bead.
Caulk the backsplash-to-wall joint with a color-matched or clear silicone after installation. Don't caulk the cope joint itself. That gets the seam filler, not caulk.
What are the most common mistakes when cutting a cope on post-form?
Chipping the laminate surface. Almost always blade choice or cutting direction. Use a reverse-tooth jigsaw blade, or if you're using a circular saw, cut from the bottom face up. Masking tape over the cut line helps too.
Cutting straight to the line on the first pass. You can't add material back. Stay 1/16 inch proud on the rough cut. Always.
Ignoring wall irregularities. If the wall behind the dominant piece bows out, the joint may not meet square even with a perfect cut. Check the wall for plumb and square before you lay out. Scribe the backsplash to the wall separately, after the cope is done.
Mitering the front edge instead of coping it. Some installers miter the front bullnose and cope only the backsplash. The front miter almost always opens up over time. Both cut faces are exposed laminate on an outside corner, and contact cement won't hold them together forever. A full cope lasts.
Skipping the back-bevel. Without a slight undercut, the cope rocks and gaps at the face even when it looks fine from above.
Forgetting to seal the substrate. The particleboard core of most post-form tops swells if water reaches the cope joint [8]. Once the filler is scraped and sanded, run a thin bead of clear silicone around the underside where the two pieces meet. Nobody sees it, and it keeps the core dry for years.
Can a homeowner cut a cope, or should you hire a professional?
A careful homeowner can absolutely do this. The cut isn't technically demanding next to other woodworking joints, and post-form is forgiving compared to stone or solid surface.
Here's the real skill bar: you need to be comfortable running a jigsaw freehand, and you need patience for the fit-and-check cycle. Any trim carpentry experience puts you in good shape.
Where homeowners get burned is tool selection. They grab an upstroke blade, chip the laminate, then try to save the piece and make it worse. Buy the right blade before you start.
The case for hiring out: multiple inside corners, walls badly out of square (more than 1/4 inch over 8 feet), or a non-standard profile (some higher-end post-form tops have deeper or steeper curves than standard). Any of those and the fitting work gets a lot harder. An experienced installer template-routes a clean cope in about 20 minutes once the top is dry-fitted. That's worth paying for if the alternative is a botched joint on a $400 countertop run.
Straightforward single-corner layout in a standard 25-inch-deep post-form top with a 4-inch backsplash and a basic waterfall or ogee edge? Do it yourself. Take your time on the layout, rough-cut proud, and fit patiently.
For how the whole job runs start to finish, the countertop installation guide covers what to expect from a pro versus a DIY install across material types.
How is a cope different from a miter on a post-form countertop?
Short version: a miter splits the corner angle evenly between both pieces. A cope lets one piece run through and shapes the other to fit over it.
On a post-form top, a miter means cutting both the long piece and the return at 45 degrees, then trying to draw those two profiled faces together at the corner. Problem is, the front edge has a radius, a waterfall or bullnose curve that isn't a flat surface. Two 45-degree cuts on a curved profile leave you with two convex faces that won't pull tight without voids.
A cope dodges all of that. The dominant piece has a square end, dead simple to cut. The return is shaped to fit around that square end, so the complexity sits on one piece. It's a compression joint, not a tension joint.
Miters show up on post-form only at outside corners (a peninsula end cap, say), where the profile wraps around a convex corner. Inside corners are almost always coped.
Copes also age better. Laminate joints that lean on a thin glue line between two mitered faces tend to open a little as the house settles and humidity swings through the seasons. A coped joint's mechanical interlock keeps the face tight even when bolt tension relaxes a bit [10].
This is one of those cases where the right technique is also the easier one, once you see why it works.
What if the cope joint has a gap after installation?
Small gaps (under 1/16 inch) filled with seam filler and sanded flush are normal and fine. Nobody's walls are perfect. Home inspectors typically flag visible cope gaps over 1/16 inch as a defect, so that's the line to aim under [10].
Gaps bigger than 1/16 inch at the face mean the cope doesn't fully match the dominant piece's profile. If you haven't applied filler yet, pull the return back out, mark where it's proud or gapping, and sand or rasp the high spots. Retest. Repeat until the face closes.
Already applied filler and the gap still shows after sanding? Two real options. One: pack the gap with more filler, cure it fully, sand again. This works up to about 1/8 inch. Beyond that, the filler won't cure right in the deep void and it'll shrink. Two: cut a new return piece. Frustrating, but sometimes it's the right call.
Never fill a cope gap on the deck with caulk alone. Caulk is flexible, collects dirt, yellows, and peels. Seam filler is the correct material.
On the backsplash portion of the cope, a small bead of color-matched caulk is fine at the wall junction, since the backsplash is vertical and movement is expected there.
If you're mid-renovation and weighing materials that skip this joint entirely, quartz slabs and solid surface can sometimes be templated and fabricated as a one-piece L-shape, killing the field joint. The comparison in kitchen countertops has the full material breakdown.
Are post-form countertop profiles standardized, and does the cope method change by profile?
Post-form profiles aren't universally standardized across manufacturers, though a few dimensions run close to industry norms. The most common deck depth is 25 inches (including the backsplash), and the most common backsplash height is 4 inches [3]. Front edge profiles vary a lot: the basic waterfall (a simple coved front edge), the No. 2 or "Cove and Butt" profile, the bullnose, and deeper ogee profiles all get made by different manufacturers at slightly different radii.
That matters for cope cuts. A router template sized for a standard waterfall won't track a deeper ogee. If you're using a template, confirm the template number against your countertop brand and profile before you route.
Wilsonart, Formica, and Pionite are among the major laminate sheet suppliers in the U.S., but the post-form tops you buy at a home center are made by regional shops that bond laminate to particleboard over a shaped form. The profile comes from the form, not the sheet supplier. Home Depot and Lowe's house-brand post-form tops usually use one of two or three standard profiles tied to their supplier contract, which is why templates from those retailers' installation guides work for that brand but may not for another [4].
Can't find the spec sheet for your top? Trace a paper template off the actual end of the countertop before you cut anything. Cut the paper template, test it against the dominant piece, then use it to make a hardboard router guide.
How long does it take to cut a cope, and what does professional installation cost?
A practiced installer cuts, fits, and bolts a single cope in 30 to 45 minutes once the tops are dry-fitted in place. First-timers should budget 2 to 3 hours for the same joint, including setup, the fit-and-check cycle, and cleanup.
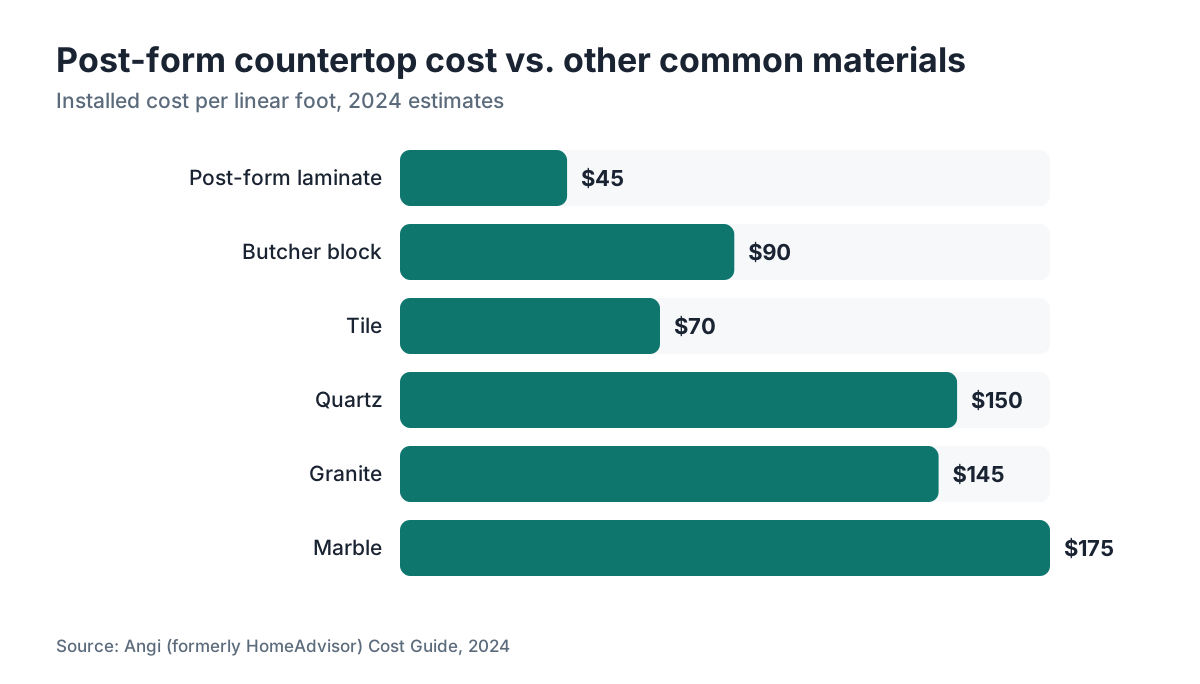
Professional installation of post-form countertops with field cope joints runs most homeowners $150 to $400 in labor on a standard L-shaped kitchen, depending on region and cutout count [5]. The post-form material itself typically runs $30 to $60 per linear foot at home centers as of 2024, though profile and finish move that number [6].
Buy your tops at a home center and some stores will cut and cope in-store or through their installation contractor, roughly $50 to $100 per cut. Worth asking about if the cope cut is your only real obstacle.
For fabricators, cope cuts on laminate post-form usually land in the installation scope, not the fabrication scope. Break them out in your quotes so the installer doesn't assume the shop already did it. Missing that line is one of the more common sources of job-site disputes on laminate installs.
If you run a shop and want to tighten how installation scope items get quoted and tracked, the SlabWise demo shows what that workflow looks like in practice.
Frequently asked questions
What blade should I use to cut post-form laminate without chipping?
Use a reverse-tooth (downstroke) jigsaw blade, sometimes labeled a laminate blade or a clean-cut blade. The teeth point down, so they cut on the downstroke and push chips away from the visible face. Applying masking tape over the cut line before marking it helps too, and it dramatically cuts surface chipping on its own. Bosch and Diablo both make laminate jigsaw blades that work well.
Which piece gets the cope cut, the long wall piece or the short return?
The return piece (shorter side) almost always gets the cope. The long-wall piece runs continuously through the corner with a square end. Coping the return lets it wrap over that square end. You end up with one simple square cut on one piece and one complex cope on the other. The joint stays mechanically stable because the dominant piece supports the return.
Can I use a router alone to cut the cope, without a jigsaw first?
Yes, with a proper cope template and a plunge router. Clamp the template to the return piece, plunge the bit in at the start of the profile, and follow the template. It's actually cleaner than jigsawing first because you skip the rough-cut step. The catch is that templates are profile-specific, so you need the right one for your exact countertop profile. Without it, jigsaw-plus-sanding is the safer route.
Do I need to seal the particleboard core after cutting the cope?
Yes. The cope exposes raw particleboard end grain, which drinks water and swells. After fitting and bolting the joint, apply clear silicone or a penetrating wood sealer to all exposed core surfaces, especially at the seam underneath the deck. This is one of the most skipped steps in DIY post-form installs and one of the most common reasons countertop ends swell and delaminate within a few years.
What is a countertop connector bolt and how many do I need?
Connector bolts, also called draw bolts or miter bolts, are two-piece metal fasteners that pull two countertop sections together from below the deck. You rout a slot-and-pocket into the underside of each piece, drop both halves in, and tighten a nut that draws them together. For a standard 25-inch post-form top, use three bolts at a cope joint: one about 4 inches from the front edge, one centered in the deck, and one near the backsplash.
Can I cope a post-form countertop at an angle other than 90 degrees?
In theory, yes, but it gets complicated fast. Most post-form tops are built for 90-degree inside corners. If your corner isn't square (common in older kitchens), you either adjust the dominant piece's position and scribe it to the wall, or cut a slight compound angle into the cope. Most experienced installers shim the dominant piece square and scribe the backsplash separately rather than modify the cope angle.
How do I fill the cope joint seam after installation?
Use a two-part color-matched laminate seam filler, not caulk and not wood filler. Mix the two parts per the manufacturer's instructions, pack it into the seam, and let it cure at least 30 minutes. Scrape the cured filler flush with a sharp scraper, then sand with 120-grit. You want a flush, flat surface. Most laminate suppliers sell filler matched to their top patterns and colors.
Is post-form countertop a good choice compared to other materials?
Post-form is the cheapest countertop option, typically $30 to $60 per linear foot installed, and the cope method makes inside-corner layouts straightforward. It scratches and chips more easily than stone and can't be repaired the way solid wood can. For renters, budget kitchens, or laundry rooms, it's a sensible pick. For a full comparison, see the kitchen countertops guide. For premium finishes, stone and solid surface have real advantages.
What seam filler brands work best on laminate post-form?
Wilsonart and Formica both make two-part color-matched seam fillers formulated for their laminate surfaces, and those are the most reliable when the top uses their sheet. For generic post-form tops, ColorFill is a widely used option with a large color range. Match the filler to the laminate color and pattern as closely as you can. A truly invisible seam is rare, but a close match makes it unobtrusive.
How do I cope a post-form countertop if the wall is out of square?
Measure the actual inside-corner angle with a digital angle finder, or lay a framing square and measure the gap. If the corner is under 90 degrees, pull the dominant piece slightly away from one wall to square up the mating angle, then scribe the backsplash to the wall after the cope is done. If the corner is over 90 degrees, you may need to trim the end of the dominant piece at a slight angle before coping the return.
How do I cope a post-form countertop at an outside corner, like on a peninsula?
Outside corners use a miter, not a cope. Miter both pieces at 45 degrees (or half the actual corner angle if it isn't 90 degrees), apply contact cement to both mitered faces, and join them with connector bolts from below. If the outside corner is visible from the room, wrap the exposed end with a strip of matching laminate applied with contact cement to hide the substrate.
Can I cut a cope on a post-form countertop that already has a sink cutout?
Yes, but sequence matters. Cut the cope first, before the sink opening. Cope cuts sit at the end of the return, well away from the sink in most layouts. Coping first gives you a stable, full-length piece to clamp and work. Cut the sink first and you weaken the piece and make it harder to clamp for the cope. Mark the sink, cut the cope, install and bolt the joint, then cut the sink opening.
What is the difference between a cope cut and scribing a countertop to the wall?
They're different operations often done on the same install. A cope joins two countertop pieces at an inside corner, shaping one to fit over the other. Scribing traces and cuts a countertop or backsplash so its back edge follows the contour of an irregular wall, closing the gap between the top and the wall. You cope the corner joint first, then scribe the backsplash to the wall separately.
Sources
- Wilsonart, Installation Guidelines for Post-Form Countertops: Wilsonart and similar laminate distributors publish profile-specific router template dimensions for installer use.
- Formica Group, Fabrication and Installation Guide: Two-part color-matched seam fillers are the specified method for filling laminate countertop cope and seam joints.
- National Kitchen and Bath Association, NKBA Professional Resource Library: Standard post-form countertop depth is 25 inches; backsplash height is commonly 4 inches, with front profiles varying by manufacturer.
- The Home Depot, Countertop Installation Resource Center: Home center post-form tops use supplier-specific profiles; templates from their installation guides are matched to those specific profiles.
- Angi (formerly HomeAdvisor), Countertop Installation Cost Guide 2024: Professional installation of post-form laminate countertops with field cope joints typically costs $150 to $400 for labor on a standard L-shaped kitchen.
- Lowe's, Countertop Buying Guide: Post-form laminate countertops retail for approximately $30 to $60 per linear foot at home centers as of 2024.
- U.S. Consumer Product Safety Commission, Power Tool Safety: Eye and hearing protection are recommended when operating power tools such as jigsaws and routers.
- Oregon State University Extension Service, Wood Products publications: Particleboard core material in post-form countertops absorbs water at exposed end grain and is susceptible to swelling without sealing.
- Forest Products Laboratory, USDA, Wood Handbook (Adhesives chapter): Filled adhesive systems outperform simple contact cement on butt-joint assemblies where gap-filling is needed.
- International Association of Certified Home Inspectors (InterNACHI): Visible seam gaps over 1/16 inch at countertop joints are commonly flagged as a defect in home inspection reports.
Last updated 2026-07-10