TL;DR
- Most stone countertop chips happen at corners, during the last lift from truck to kitchen, or when slabs ride flat instead of upright.
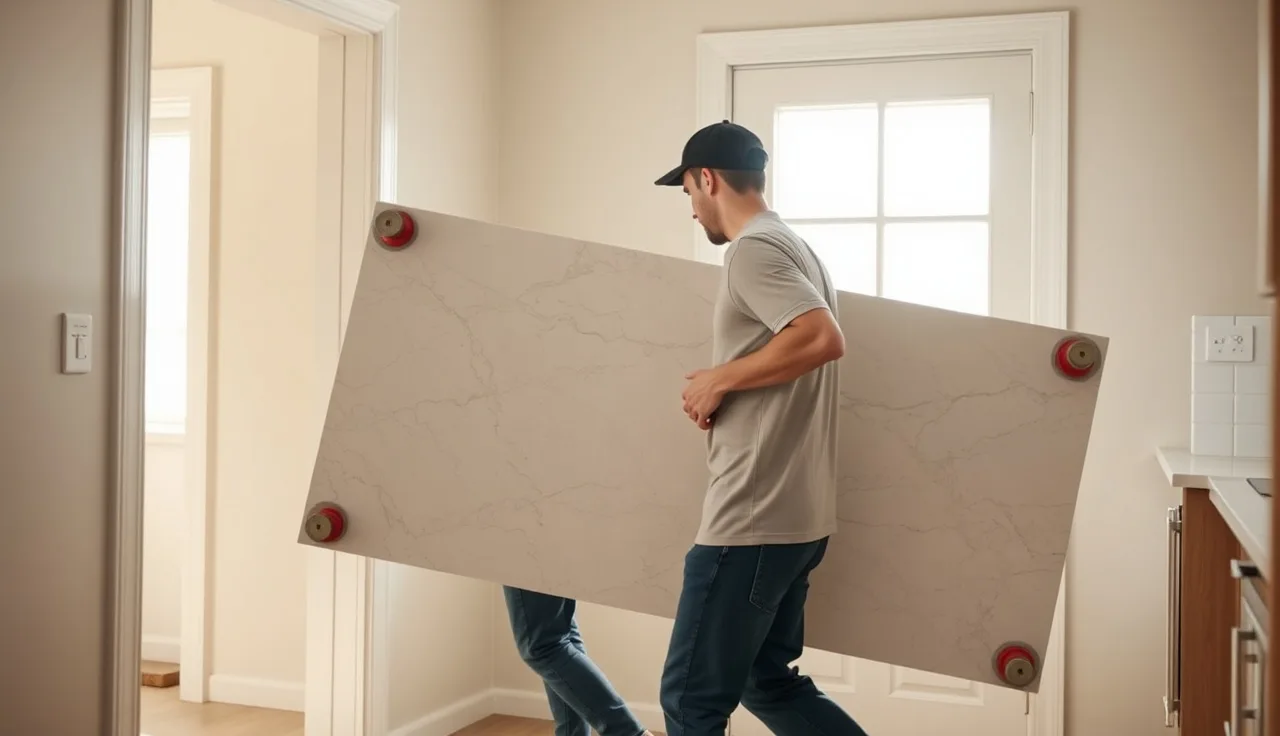
- Prevent them by wrapping corners in foam, hauling slabs vertically at 15 degrees, using suction cup lifters for the final carry, and inspecting under good light before the crew leaves.
- Delivery day is the only day you hold any real cards.
Why do stone countertops chip during delivery?
Stone is hard but brittle. Granite, quartzite, and marble all score 6 to 7 on the Mohs hardness scale, which means they resist scratching but shatter under point loads. A slab that weighs 18 pounds per square foot can crack or chip from a single corner tap against a door frame at walking speed.
The physics are simple. Natural stone has almost no flex before it fractures. Materials researchers call this low fracture toughness: granite's fracture toughness (K1C) runs roughly 1.0 to 2.0 MPa√m, compared to 50 to 100 MPa√m for structural steel. A bump that would dent a steel counter chips stone instead. [1]
Most damage happens in three moments. When the piece is loaded onto or off the truck. When it is carried through a door frame or around a corner. When it is set down on the cabinets. Each one combines the full weight of the slab with a sudden stop or twist, and corners go first because they carry the highest stress concentration during any impact.
What wrapping materials actually protect stone corners and edges?
Foam is the industry standard, and for good reason. Closed-cell polyethylene foam (the gray or blue material sold in 1/8-inch to 1/2-inch sheets) hugs edge profiles, absorbs shock, and does not soak up moisture that could stain polished surfaces. Open-cell foam works in a pinch but crushes flat after one hard hit, so treat it as single-use.
The four materials fabricators reach for most:
| Material | Best use | Limitation |
|---|---|---|
| Closed-cell PE foam sheet | Wrapping full slab edges | Slips if not taped securely |
| Foam corner guards (pre-formed L-channel) | Protecting 90-degree countertop corners | Only fits square profiles |
| Moving blankets | Padding slab faces in transit | Heavy, adds bulk in vehicle |
| Cardboard L-channel | Budget corner protection for short moves | Compresses in rain or humidity |
For corners, pre-formed foam L-channel guards (packaging suppliers sell them in 2-inch and 3-inch widths) are the most reliable choice. Tape them on with stretch wrap, not masking tape, because masking tape leaves adhesive residue on honed or matte finishes. Use blue painter's tape only if you have to tape directly to a polished face, and pull it within two hours.
Edge profiles change the math. An eased or flat edge is more vulnerable than a bullnose because that crisp 90-degree corner concentrates stress at a razor-thin point. Ogee and waterfall edges carry the highest risk, since their thin top arris can snap from a glancing blow. Wrap those twice.
How should slabs and finished countertops be positioned in the vehicle?
Vertical transport is the rule, not the preference. Every major stone industry training resource says finished pieces should ride on edge, angled 10 to 15 degrees from vertical, resting against padded A-frame racks. [2] Flat transport lets the slab flex and vibrate across its whole span with every road bump, which is exactly the loading that cracks a piece along a vein or seam.
A-frame racks need rubber or carpet padding on every contact surface. Bare steel or bare wood creates hard point contact that concentrates stress. The slab should touch the rack at two or more support points along its lower edge, never balanced on a single midpoint.
Strap the pieces with ratchet straps running over moving blankets so the strap never touches the polished surface. [9] Two straps minimum for any piece longer than 36 inches. For oversized work (L-shapes, waterfall edges, full kitchen runs), some shops weld carpet-covered pipe saddles to the truck bed. That is the professional answer for high-value jobs.
Here is the mistake shops keep making: stacking pieces face to face with one blanket between them on a flat truck bed. Every piece on the bottom carries the weight of everything above it over a long vibrating span. A blanket does not change the physics. Use A-frames, or limit flat stacking to pieces under 18 inches in the short dimension.
What steps should fabricators take before loading the truck?
Pre-load inspection is where you catch problems you did not cause and record the condition before anyone's hands touch the piece in transit. Do it under bright light, ideally with a flashlight held at a low raking angle across the surface. That angle reveals chips, micro-cracks, and tooling marks that overhead shop lighting hides completely.
Photograph every corner and every edge before loading. It takes about three minutes per piece and has saved shops from paying for damage that happened at the quarry or on the slab's trip into the shop. Your delivery invoice should carry a photo timestamp. Some shops attach these photos to the work order in job management software so they travel with the record. SlabWise, for example, lets fabricators pin pre-load photos to each job, so there is a clean chain of custody from shop to install.
Check cutouts before loading. Sink and cooktop cutouts pull material from the center of a slab, which leaves two cantilevered wings. Those wings are the highest-fracture-risk parts of any finished piece. Make sure sink cutout corners have a relieved radius (most fabricators use 3/8 inch or larger at inside corners) because a square inside corner is a stress concentrator that cracks in transit the moment the piece flexes. [3]
Confirm every piece is fully cured if any epoxy repairs or seaming happened. Most stone epoxies reach handling strength in 30 to 60 minutes but full cure in 24 hours. Load a fresh seam into a van before full cure and you risk reopening it.
How do you carry a stone countertop safely through a house?
Measure twice, carry once. Before the crew lifts a single piece, walk the route from truck to final position with a tape measure. Note every door width, every turn radius, every overhead obstacle. Most residential door frames run 32 to 36 inches in the clear. A standard 24-inch deep countertop with an overhang plus foam wrap plus suction handles lands close to 26 to 28 inches. Know where you have margin and where you do not.
Suction cup lifters are not optional for pieces over 50 pounds. [10] Two-cup lifters rated 150 to 200 pounds each are the minimum for most residential slabs. The cups give the crew real control and keep hands off the edges, which is where finger injuries and edge damage tend to happen at the same time. Vacuum cup lifters (with a pump gauge showing held suction) are the step up from passive cups for slabs over 100 pounds. OSHA manual-handling guidance points shops toward mechanical assists whenever grip or control on a load is limited, which describes a polished slab exactly. [8]
For the carry itself: keep the slab vertical. Tilting it horizontal increases the bending moment across the span and is the single biggest cause of cracking during the final carry. If you truly must go horizontal under a low doorway, put a third person under the center of the piece, not the ends.
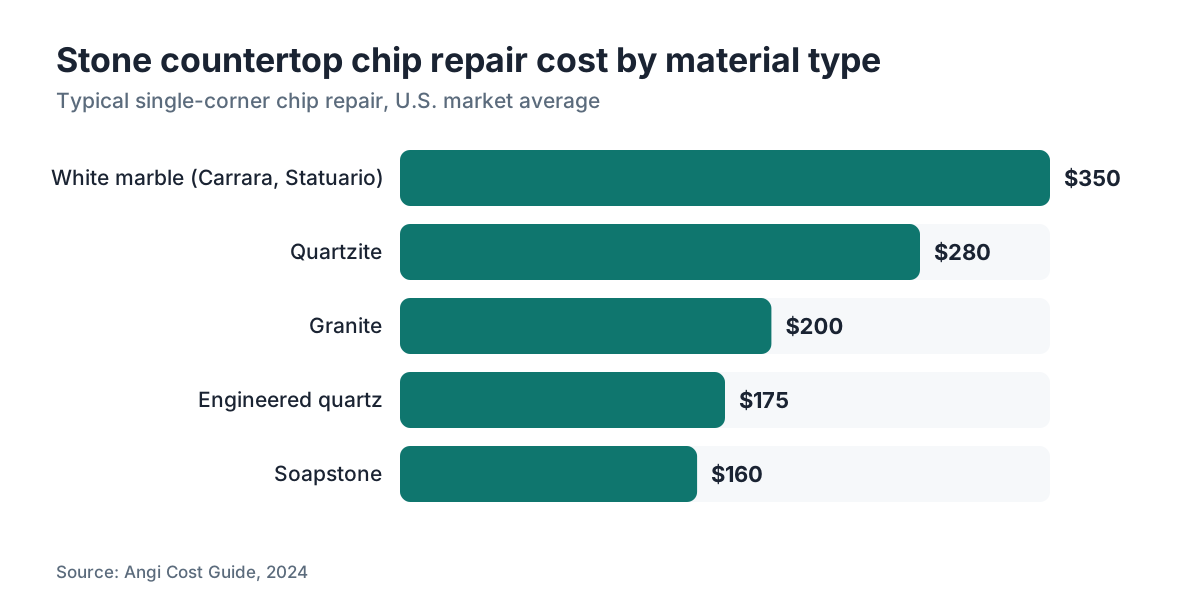
Corner turns are where door frames get hit. Put one crew member at the leading corner calling the clearance while the others move. Slow is fast here. A chip repair on a polished granite edge runs $150 to $400 and usually shows. [4] A ten-second pause to reset your grip costs nothing.
What are the riskiest moments during countertop installation and how do you handle them?
Setting down is the riskiest moment in the whole job. The crew goes from full control of a carried slab to resting it on whatever surface exists, sometimes unevenly. If one corner drops a half-inch before the rest of the piece lands, that corner eats the full impact load.
Level the cabinets and shim the high spots before the crew arrives. A countertop resting on a cabinet that rocks will crack eventually, but the bigger problem on install day is that an uneven base means uneven set-down load. Crews carry plastic shims to level as they go, but base work done ahead of delivery saves time and cuts the number of lifts.
Sink cutout areas stay fragile until the undermount sink is clipped in. Until those clips go on, the two cantilevered wings have nothing under them. Do not walk away from an installed counter with an unsupported cutout and let someone lean on it. A lot of field chips happen in exactly that window between set and clip-up.
The final check: press on every corner and every edge with your hand and watch for any rock or flex. If the piece rocks, it needs another shim before you leave. A piece that rocks chips at whatever corner carries the cyclic load every time someone leans on the counter.
Does stone type affect chip risk during delivery?
Yes, a lot. Stones do not behave the same under impact, and knowing each material's risk profile tells you how much extra protection is worth buying.
Marble is the most vulnerable common countertop stone. Its calcite crystal structure cleaves along natural planes, so an impact can run a crack far past the point of contact. [5] White marbles with tight veining (Carrara, Statuario) are more chip-prone than heavily veined marbles, because in some cases the veins act as crack arrestors. Marble edges get two layers of foam, no exceptions.
Granite varies by grain. Fine-grained granites (Absolute Black is the classic example) are more brittle at edges than coarse-grained ones, because there is less interlocking crystal to stop a crack. Every granite corner is still vulnerable.
Quartzite gets assumed to be as tough as engineered quartz. It is not. Natural quartzite is a metamorphic rock and shares marble's cleavage-plane risk at its recrystallized grain boundaries. Handle it like marble.
Engineered quartz (Silestone, Cambria) is more forgiving in transit, because the polymer binder adds some flex and toughness. Cambria countertops still need corner protection, but the catastrophic mid-span fracture risk sits below natural stone.
For the full material picture beyond delivery risk, the guides on granite countertops and marble countertops go deeper on what each stone handles in daily use.
How should homeowners inspect a countertop delivery before the crew leaves?
You get one realistic window to flag damage: while the install crew is still in your house. Once they leave and you sign off, proving when the damage happened becomes your problem, not theirs.
Inspect before the sink and appliances go back in, because those pieces can hide edge chips along the front of the cutout. Use your phone flashlight at a raking angle across every visible surface. Run a fingertip slowly along every edge and every corner. Your fingertip finds a 3-millimeter chip that your eye slides right past.
Look hard at four things: all four corners of each piece, the leading edge of any sink cutout, both ends of any peninsula or island where the edge is fully exposed, and every seam.
Find damage? Photograph it right then with something for scale (a coin works), and show it to the crew leader before they leave. Get a written note on your invoice or a text acknowledgment. A verbal "we'll take care of it" from a departing crew is nearly impossible to enforce two weeks later.
For care after the install, the guide on how to clean stone countertops covers the products and habits that keep your surface in the condition it arrived in.
What should a fabricator's delivery checklist include?
A written checklist is the difference between consistent delivery quality and quality that depends on which crew clocked in that morning. Here is what it should cover.
Pre-load (at the shop):
- Photograph all edges and corners of each piece under raking light
- Verify sink cutout corners have a minimum 3/8-inch radius
- Confirm epoxy repairs and seams are fully cured (24-hour rule)
- Apply foam L-channel guards to all 90-degree corners, secured with stretch wrap
- Wrap all slab faces in moving blankets for face-to-face contact in the vehicle
- Set pieces on a padded A-frame rack at 10 to 15 degrees from vertical
- Secure with two ratchet straps over blankets per piece
At the job site (before the final carry):
- Walk the route from truck to install location, measure the tight spots
- Confirm cabinets are level and shimmed
- Assign one crew member to call clearance on corners
- Deploy suction cup lifters rated for the piece weight
- Keep pieces vertical throughout the carry
After installation:
- Shim any rocking pieces before leaving
- Install sink clips before leaving if the sink is on site
- Inspect with the homeowner present, under raking light
- Document any pre-existing conditions on the work order
Shops tracking job details digitally can build this checklist straight into the workflow. That kind of structured delivery process is worth formalizing, especially as crew size grows. The countertop installation guide covers the install side in more detail.
Can chips be repaired, and how much does it cost?
Yes, most chips can be repaired, but the result rides on the stone type, the chip location, and who does the work. A skilled restoration tech can make a corner chip nearly invisible on granite. The same chip on white Carrara may always show a slight tonal difference, because marble's recrystallized calcite does not bond to epoxy fillers the way granite does.
Repair costs swing by region and scope. Based on pricing reported by stone restoration contractors and fabricators across the U.S., corner chip repairs run about $150 to $250 for a single corner on granite or quartz, and $200 to $400 on marble where color-matching is harder. [4] A cracked piece (as opposed to a chipped corner) may need full replacement if the crack crosses more than a third of the span.
The method: colored epoxy or acrylic fills mixed to match the stone's background color, applied, cured under UV light, then ground flush and polished back to the surrounding sheen. The color match is the limiting factor, not the mechanical repair.
One honest note. If a chip happens during delivery and it is the fabricator's fault, the repair or replacement cost comes from the fabricator, not you. Get that in writing before any repair work starts. Some fabricators carry inland marine or installer's floater coverage for transit damage. Ask before you hire. [6]
What insurance and documentation protect both parties if damage happens?
Fabricators should carry two kinds of coverage tied to delivery damage. General liability covers damage to the customer's home during installation (a dropped piece cracking a tile floor, say). Inland marine insurance (sometimes called a contractor's floater or installation floater) covers the stone piece itself while it is in transit or being installed, before it becomes part of the real property. [6]
The coverage limit matters. Many inland marine policies cap per-item value at $5,000 to $25,000. A full kitchen in quartzite can blow past that. Ask your fabricator whether the policy covers the replacement cost of your specific job, more than a generic per-piece limit.
For homeowners: your own policy usually does not cover contractor-caused damage during an active renovation. The contractor's insurance is the right coverage to call on. Get the fabricator's certificate of insurance (COI) before work starts, naming you as an additional insured if you can.
Documentation is the other half. The delivery photos described earlier create a timestamped chain of custody. Pair them with a signed delivery receipt noting each piece's condition, and you have what you need to settle disputes without a lawyer. The National Association of Home Builders reports that construction defect and damage claims rank among the most common contractor disputes homeowners face, with documentation as the primary factor in how they resolve. [7]
Shops that want tighter operations across all of this, from quote to delivery documentation, can see how SlabWise handles job-level photo attachments and delivery checklists at the link in the site navigation.
Frequently asked questions
How do fabricators transport large stone slabs without breaking them?
Large slabs ride upright on padded A-frame racks at 10 to 15 degrees from vertical. Flat transport lets the slab flex across its full span with every road bump, which creates exactly the bending stress that cracks stone. Finished pieces get foam corner guards, moving blankets on the faces, and two ratchet straps per piece run over the blankets so the straps never touch polished surfaces.
What are the most common places a countertop chips during delivery?
Corners chip most often, followed by the edges of sink and cooktop cutouts. These are the points of highest stress concentration during any impact. Edge profiles with a sharp top arris, like eased edges and ogee profiles, chip more easily than bullnose edges because that thin arris takes the full impact of even a glancing contact with a door frame.
Should I be home for my countertop delivery and installation?
Yes. Being there lets you inspect the pieces under good light before the crew leaves, which is your only real window to flag transit damage and keep the fabricator responsible for it. A signed delivery receipt noting each piece's condition is far easier to get while the crew is still in your house than after they have packed up and driven off.
Can a chipped granite countertop be repaired so the damage is invisible?
Skilled restoration techs can make corner chips on granite nearly invisible using color-matched UV-cure epoxy, but 'nearly' is the honest word. The repair gets ground flush and polished, and in normal light it is usually very hard to spot. Under raking light or strong direct sun, a repaired corner may show a slight texture or color difference. Marble repairs hide worse because of marble's variable coloring.
How long should epoxy repairs cure before a countertop is delivered?
Most stone epoxies reach handling strength in 30 to 60 minutes but full mechanical cure in 24 hours. Shops should wait the full 24 hours before moving any piece with an epoxy repair or a fresh seam. Move it too early and you risk reopening the seam, which then needs re-clamping and re-curing on-site, usually with worse results than a proper shop seam.
What should I do if the countertop crew chips my stone during installation?
Photograph the damage right away with something for scale, show it to the crew leader before they leave, and get written acknowledgment on your invoice or by text. Then call the fabricator's office to discuss repair or replacement. If the fabricator disputes responsibility, their inland marine or general liability insurance is the mechanism for coverage. Timestamped photos from before and after delivery are the key evidence.
Is engineered quartz harder to chip than granite during delivery?
Engineered quartz is somewhat more forgiving in transit because the polymer binder adds a little flex and toughness that pure stone lacks. The risk of catastrophic mid-span fracture sits below natural granite or marble. But quartz corners still chip from door-frame impacts or drops, so the same foam corner protection and vertical transport rules apply.
Do sink cutouts make a countertop more likely to crack in transit?
Yes, a lot. A sink cutout pulls material from the center of a slab, leaving two cantilevered wings that flex independently in transport. The inside corners of that cutout are stress concentrators. Proper fabrication rounds inside corners to at least a 3/8-inch radius to spread the stress. Vertical transport on A-frames also cuts the bending load on those wings compared to flat transport.
What is the minimum number of people needed to carry a kitchen countertop safely?
Two people with suction cup lifters handle most standard pieces under 80 pounds. For pieces over 80 pounds or over 60 inches long, three people are safer: two on suction cups and one under the center span. L-shaped or U-shaped pieces, usually delivered in sections, still need at least two people per section plus a coordinator calling clearances through door frames.
Should countertops be wrapped before or after loading onto the truck?
Wrap before loading. Apply foam corner guards and face blankets in the shop where you have room and good light to confirm nothing is missed. Wrapping on a truck bed or in a driveway usually means skipped steps because the crew is rushed. The pre-load inspection and photography also belong in the shop, not at the job site.
How do I check if cabinets are level enough before countertop delivery?
Run a 4-foot level across the top of your cabinet run in both directions. Any gap under the level greater than 1/8 inch is enough to create a rocking point when the countertop sets down. Shim low spots with plastic cabinet shims before the crew arrives. Unlevel cabinets do more than cause rocking; they create uneven bearing that concentrates stress at corners and can crack the stone over time.
Does marble need more protection during delivery than granite?
Yes. Marble's calcite crystal structure cleaves along natural planes, so an impact can run a crack far past the initial contact zone. Marble edges need at least two layers of closed-cell foam, and tight-veined white marbles like Carrara are the most vulnerable of all. Budget the extra wrap time, and consider foam L-channel along all edges, more than corners, for marble pieces.
What type of truck or vehicle is best for transporting stone countertops?
A cargo van or box truck with a welded or bolted A-frame rack is the professional standard. Pickups with flat beds work for smaller pieces but lack the vertical support that stops mid-span flexing. Whatever the vehicle, the rack needs rubber or carpet padding on every contact surface, and pieces need to travel at 10 to 15 degrees from vertical, not flat. Air-ride suspension is a real upgrade for long hauls or fragile material.
Sources
- Encyclopaedia Britannica, fracture mechanics and Mohs hardness scale references: Granite fracture toughness (K1C) runs roughly 1.0 to 2.0 MPa√m, far below structural steel, explaining brittleness under point loads
- Natural Stone Institute, transport and slab vehicle guidance: Finished stone pieces should be transported on edge on padded A-frame racks, angled 10 to 15 degrees from vertical
- Natural Stone Institute, dimension stone fabrication standards: Inside corners of sink cutouts require a minimum radius (commonly 3/8 inch) to reduce stress concentration and fracture risk
- Angi, countertop chip repair cost guide: Corner chip repairs on stone countertops typically cost $150 to $400 depending on stone type and repair complexity
- U.S. Geological Survey, carbonate rock and marble properties: Marble's calcite crystal structure has natural cleavage planes that allow crack propagation beyond the initial impact point
- Insurance Information Institute, inland marine insurance overview: Inland marine (installation floater) insurance covers materials in transit or being installed before they become part of real property
- National Association of Home Builders (NAHB), construction defect and dispute resources: Construction defect and damage claims are among the most common contractor disputes homeowners face; documentation is the primary factor in resolution
- Occupational Safety and Health Administration (OSHA), ergonomics and manual material handling guidance: OSHA guidance on manual material handling recommends mechanical assists (suction lifters) for loads where grip or control is limited
- Natural Stone Institute, safe handling and installation of stone: Ratchet straps used to secure stone in transport should be padded to avoid direct strap-to-polished-surface contact
- International Masonry Institute, stone material handling practices: Suction cup lifters rated at 150 to 200 pounds per cup are recommended minimum for residential stone slab carries
Last updated 2026-07-11