TL;DR
- Cutting a farmhouse sink opening in granite takes a diamond blade wet saw or angle grinder, careful layout, relief cuts at corners, and slow feed rates.
- The job takes 1 to 3 hours for an experienced fabricator.
- Homeowners should hire a pro: one crack through the wrong grain line can split a $2,000+ slab.
- This guide covers every step, tool, and failure mode.
What makes a farmhouse sink cut different from a standard sink cutout?
A standard drop-in or undermount cutout sits inside a field of granite with a few inches of stone on every side. A farmhouse (apron-front) cut breaks that pattern in two ways that matter: the opening often sits very close to the front edge, and the apron sometimes replaces the front cabinet face entirely, which leaves almost no granite lip at the front of the slab.
That proximity to the edge changes everything. Cut near an edge and the unsupported granite can flex and crack before the blade even finishes the pass. You also have to work around the corbels or support ledge the apron sits on, which changes how the slab is held during the cut.
Farmhouse openings also tend to be large. A standard 33-inch apron sink needs a rough opening around 30.5 to 32.5 inches wide (check your specific manufacturer template), and that's a long, unsupported span the moment you free the interior piece. That freed piece can weigh 15 to 30 pounds depending on slab thickness and opening size. If it drops or twists as the last cut finishes, it can lever a crack back into the countertop.
Edge proximity and heavy cutout weight. Those two things are why farmhouse sink cutouts carry more risk than any other common stone cutout job.
What tools do you actually need to cut granite for a farmhouse sink?
You have two real options. A continuous-rim diamond blade wet saw (or a bridge saw in a shop), or a 4-inch or 4.5-inch angle grinder fitted with a turbo-rim diamond blade and a water attachment. Each has tradeoffs.
A bridge saw or track-guided wet saw gives the most control. Feed rate stays consistent, water cooling runs automatically, and the blade holds perpendicular to the surface. This is what fabrication shops use. If you have access to one, use it.
An angle grinder handles most field cuts. It's portable and fast enough, but it demands a steady hand, the right blade, and water. Run a diamond blade on granite dry and it overheats, glazes over, and either stops cutting or shatters. OSHA's silica rule (29 CFR 1926.1153) requires wet methods or equivalent engineering controls for dry-cutting stone that generates respirable crystalline silica dust [1]. That's not a technicality. Granite dust causes silicosis. Wet cutting or an N95-rated respirator plus HEPA vacuum is non-negotiable.
Beyond the saw, you need:
- Sink manufacturer's template (paper or cardboard, comes with the sink)
- Masking tape to protect the surface and mark the cut line
- A felt-tip marker
- Two or three bar clamps or suction-cup handles to support the cutout piece
- A straightedge or clamped guide rail for the grinder
- Eye protection and a face shield
- Hearing protection
- Diamond blade rated for granite (continuous-rim for plunge cuts, turbo-rim for straight runs)
Do not use a standard tile blade. The bond matrix and diamond grit on a tile blade aren't built for the hardness of granite, which runs 6 to 7 on the Mohs scale [2].
Blade life matters here. A quality 4-inch turbo diamond blade costs $20 to $60 and should be dedicated to this job, not a worn shop blade. Worn blades overheat and wander.
How do you lay out the cut line correctly?
Use the template that came with your sink. Lost it? Most manufacturers publish dimensional drawings online, and you can re-create a template from those numbers on cardboard. The opening is almost always smaller than the sink's outer dimensions, because the apron ledge or lip needs something to rest on.
Once the slab is in position (or at least shimmed in its final orientation), tape the top surface with masking tape across the entire cutout zone. The tape protects the polished surface from saw scratches and gives the marker something to show up on.
Set the template on the tape and trace the cut line carefully. Double-check the overhang at the front: most farmhouse installs leave 0 to 3/8 inch of granite overhanging the apron face, so the apron sits flush or just proud of the stone. Verify that measurement against your sink specs before you draw a single line.
Mark the four corners clearly. This is where your relief cuts go. The relief cut (also called a plunge or pocket cut) at each corner stops the blade from overrunning and cracking the stone. Plan the corner radius too. Most fabricators run a 1/4-inch radius at each interior corner minimum, because a perfectly square interior corner is a stress point that can crack later from thermal cycling or vibration. Some sink templates already call for a small radius.
Before any cutting, dry-fit the sink into the planned opening on a flat surface if you can. Measure twice.
What is the step-by-step cutting process?
Here is the sequence used in professional stone shops and on job-site field cuts. The steps apply whether you're running a bridge saw in the shop or an angle grinder on-site.
Step 1: Support the cutout piece. Clamp two bar clamps or suction handles across the cutout area before you start cutting. The goal is to hold the freed piece so it doesn't drop or twist on the last cut. If the piece falls, it can lever a fracture back into the slab or land on the cabinet below and break. Have a helper hold the suction cups as you finish the final pass.
Step 2: Cut the long straight sides first. Set a clamped straightedge guide along the cut line and make the two long side cuts, stopping about 1/2 inch short of each corner. Do not go all the way to the corner yet. This leaves four stub-ends that keep the interior piece connected while you work.
Step 3: Cut the front and back straight sections. Same approach: run the cut, stop 1/2 inch short of each corner.
Step 4: Complete the corner cuts. This is the most delicate step. Use an angle grinder freehand or a small oscillating diamond tool to connect each corner, either by plunging carefully or by running a short arc. Some fabricators drill a 1/4-inch or 3/8-inch pilot hole at each corner with a diamond core bit before starting any saw cuts. The pilot hole gives the blade somewhere to start and stop without overrunning. If you do this, drill before step 2.
Step 5: Control the drop. As the last corner connects, have your helper take the weight with the suction handles. Lower the cutout piece slowly, straight down. Do not let it swing.
Step 6: Grind and polish the edges. The raw cut edge inside the opening will be rough. For an undermount-style farmhouse install, that interior edge usually gets a basic eased edge or a simple bullnose. Run through 60, 120, 220, 400, and 800 grit diamond polishing pads wet to finish the edge to match the rest of the stone.
Total time in a shop with a bridge saw: 45 to 90 minutes including edge work. On-site with an angle grinder: 2 to 3 hours. Do not rush.
How do you avoid cracking the granite during the cut?
Cracking happens three ways: the cutout piece drops and levers a fracture back into the slab, the blade overruns a corner, or the slab flexes because it's unsupported during the cut.
Slab support is the biggest variable. If the slab is sitting on the cabinet carcass before the cut (which it often is for field cuts), make sure the cabinet has solid corner blocks under the areas near the cut. A slab spanning open cabinet space with no support underneath is going to flex when you remove the cutout piece. A 3-centimeter (1.25-inch) granite slab is stiff but not infinitely so.
Feed rate matters enormously. Push a diamond blade through granite faster than it wants to go and you get two problems: blade deflection (the blade bows sideways in the cut, producing a curved kerf) and chipping on the surface. Let the blade do the work. On an angle grinder, that means moving slowly enough that you hear consistent motor rpm, not the motor bogging down.
Water cooling is not optional. Diamond blades cut by exposing fresh diamond grit as the bond matrix wears. Overheating glazes the bond and fuses the grit, stopping the cut. Granite conducts heat poorly, so heat builds up fast. Wet cutting flushes heat and carries away swarf. A water ring attachment for an angle grinder costs about $15 to $30 and connects to a garden hose.
Veins and fissures in the stone are the wild card nobody can fully control. Natural granite sometimes has hairline fissures that stay invisible until a cut runs across them and the vibration propagates a crack. Inspect the slab under raking light before you mark the template. Look for fissures running through the planned cut zone, and if you find them, consider repositioning the sink or reinforcing with epoxy before cutting.
Reinforcing mesh or fiberglass backing on some imported slabs can complicate the cut by gumming the blade. Cut through it the same way, just expect more friction.
Should a homeowner do this themselves or hire a fabricator?
Honest answer: hire a fabricator.
The cost to have a professional shop cut a farmhouse sink opening in an existing installed countertop runs roughly $150 to $400 depending on region, complexity, and whether the countertop needs to be removed and re-set [3]. That price is low relative to the cost of the slab. A 40-square-foot granite countertop at $60 to $100 per square foot installed is a $2,400 to $4,000 countertop [4]. A crack through the wrong spot means buying a new slab.
The tools alone run $200 to $500 for a competent angle grinder setup with proper blades, water attachment, and diamond polishing pads. If you don't already own them, you're not saving money doing it yourself.
Some homeowners and general contractors are comfortable with the process if they've cut stone before. The non-negotiables for a DIY attempt:
- Wet cutting only. No exceptions on a finished slab.
- A good diamond blade, not a budget tile blade.
- A clamped guide for straight cuts.
- A helper to support the cutout piece.
- Silica dust controls (wet cutting handles most of this, but wear a half-face respirator with P100 cartridges anyway).
If the slab has any visible fissures in the cut zone, or if the sink placement puts the cut within 3 inches of any edge, those are fabricator jobs. Full stop.
Fabricators who use estimating software like SlabWise can often quote a field cut job in minutes, so getting a price before deciding is easy. Call two local shops and compare.
What are the most common mistakes that ruin farmhouse sink cuts?
Skipping the pilot hole at corners. It's the most common mistake and the source of most cracked corners. The blade can't stop perfectly at a corner. It needs somewhere to go. A 1/4-inch diamond core drill hole at each corner takes five minutes and prevents corner blowout.
Using the wrong blade for plunge cuts. A turbo-rim blade is designed for straight running cuts. Making a plunge cut (starting in the middle of a surface, not from an edge) with a turbo-rim blade can cause the blade to grab and kick. For plunge starts, a continuous-rim blade or a dedicated plunge-cut blade is safer.
Letting the cutout piece move before the last pass is done. This one is operator error. The piece should be supported from above with suction handles the entire time, more than at the end. Once three sides are cut, the piece wants to move on the fourth pass. Support it.
Cutting dry because 'it's just one cut'. Granite is roughly 68% silica by mass [5]. The Occupational Safety and Health Administration's crystalline silica standard for construction (29 CFR 1926.1153) specifically lists dry cutting and grinding stone as a high-exposure task requiring engineering controls [1]. Fifteen minutes of dry cutting can produce silica exposures hundreds of times the permissible exposure limit.
Using a dull or wrong-spec blade. A blade that isn't cutting efficiently makes the operator push harder, which causes blade flex and chipping. A fresh, correctly spec'd diamond blade on a 4-inch grinder cuts granite in a controlled, almost effortless way when the feed rate is right.
Not checking the template against the actual sink. Templates get mixed up in shipping, and field-cut versions homeowners make from online specs sometimes carry errors. Hold the actual sink over the marked cut line before you cut. Every time.
How do you finish the inside edges of the cut?
The interior edge of a farmhouse sink opening doesn't need to be fancy, but it does need to be smooth and stable. A rough, chipped edge can harbor bacteria, and a sharp feathered edge can chip further under the weight of the sink or from dish-washing vibration.
For most undermount farmhouse installs, the interior cut edge gets an eased or slightly rounded profile. You can do this with a diamond polishing hand pad or with a 4-inch angle grinder and a set of Velcro-backed diamond polishing pads. Start at 50 or 60 grit to remove saw marks and square up any chip-outs, then step through 100, 200, 400, and 800 grit wet. Finish with 1,500 or 3,000 grit if you want a semi-polished edge. The whole process takes 20 to 40 minutes.
If there are small chip-outs at a corner (common even on professional cuts), fill them with color-matched epoxy or clear granite adhesive before polishing. Stone epoxy kits made for this sell at most tile supply houses and online for $15 to $40. Let the epoxy cure fully (typically 24 hours), then sand flush and polish.
After all polishing is done, apply a penetrating sealer to the cut edges. The raw cut edge exposes the porous interior of the stone, which soaks up water and cleaning chemicals faster than the polished face. Use the same sealer rated for the countertop's granite type. Most penetrating sealers need reapplication every 1 to 3 years depending on use [6].
How do you install the farmhouse sink after the cut is complete?
Granite farmhouse sink installs fall into two setups. Either the sink apron carries its own weight on corbels or a support ledge inside the cabinet, or the countertop hangs over the apron and the weight transfers to the cabinet walls.
In almost every residential install, the sink sits on a support ledge or corbels inside the cabinet opening. The countertop's front edge aligns flush with or slightly proud of the apron face and does not bear the sink's weight. A standard single-basin farmhouse sink in cast iron weighs 130 to 200 pounds empty [7]. That weight goes to the cabinet, not the granite.
Silicone is the standard adhesive for the countertop-to-sink joint. Use a 100% neutral-cure silicone rated for stone and ceramic. Acid-cure silicone (the kind that smells like vinegar) can react with stone sealers and some granite minerals. Apply a thin bead around the perimeter of the sink rim where it meets the underside of the granite. Don't over-apply. You want a waterproof seal, not a structural bond.
After setting the sink and letting the silicone cure (typically 24 hours), reconnect plumbing and check for gaps at the front seam. A small gap between the apron face and the granite edge is normal and intentional. Caulk it with a color-matched silicone or grout to keep water out.
For help choosing the right granite for your kitchen, the granite countertops guide covers material selection and surface finish options in detail. General countertop installation considerations, including leveling, shimming, and seam placement, apply to farmhouse installs as well.
How much does it cost to cut a farmhouse sink opening in granite?
Cost depends on whether the cut happens in the shop before installation or as a field cut on an already-installed countertop.
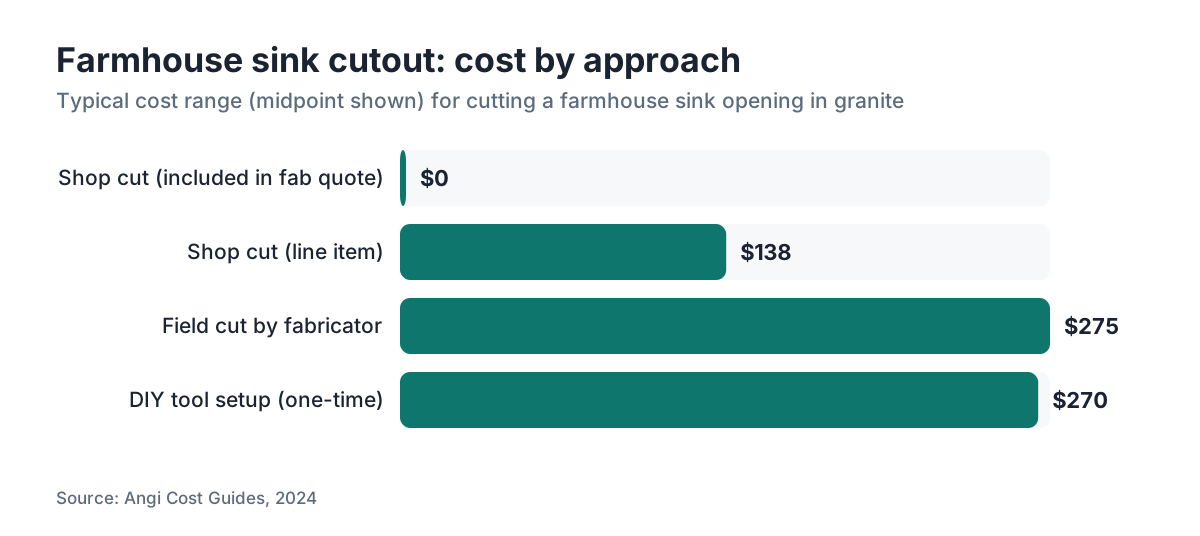
Shop cut (slab cut before install): Usually included in the fabrication quote, but if priced separately, expect $75 to $200 for the cutout as a line item. Shop cuts are easier because the slab lies flat on the saw table with no cabinet interference.
Field cut (on an installed countertop): $150 to $400, sometimes more if the countertop has to be partially removed for access, or if the job is in a high cost-of-living area. Some shops charge a minimum truck-roll fee of $100 to $150 before the cutting price.
DIY tool cost: A competent angle grinder setup including a good variable-speed grinder ($80 to $150), a turbo diamond blade ($25 to $60), a continuous-rim blade for plunge cuts ($20 to $50), a water attachment ($15 to $30), and a set of polishing pads ($30 to $80) runs $170 to $370 before consumables.
The table below summarizes typical costs for different approaches.
| Approach | Typical Cost | Blade/Tool Cost | Who Does It |
|---|---|---|---|
| Shop cut (included in fabrication) | $0 additional | Shop's equipment | Fabricator |
| Shop cut (line item) | $75-$200 | Shop's equipment | Fabricator |
| Field cut by fabricator | $150-$400 | Shop's equipment | Fabricator |
| DIY with angle grinder | $0-$50 labor | $170-$370 setup | Homeowner |
The real cost risk for DIY is a cracked slab. Replacing a granite countertop section runs $500 to $1,500+ for material and labor depending on size and stone [4]. That's the number to weigh against the $150 to $400 professional field cut.
Fabricators quoting these jobs can track blade costs, labor time, and job profitability per cut. Shops that use digital quoting tools like SlabWise can price field cuts as add-on line items in the same quote as the countertop installation, which makes it easier to give homeowners an all-in price upfront.
Are there differences between cutting 2 cm and 3 cm granite for a farmhouse sink?
Yes, and they matter.
3-centimeter (about 1.25-inch) granite is the current residential standard in the United States. It's stiffer and heavier, which means less flex during the cut but more weight in the cutout piece. A 30 x 20 inch cutout from 3 cm granite weighs roughly 25 to 35 pounds.
2-centimeter (about 3/4-inch) granite was common before the late 1990s and still shows up in older kitchens and some imported stone. It's more flexible and therefore more prone to flexing-related cracking during a cut, especially on a large farmhouse opening. Field-cutting an older 2 cm slab? Add extra support and cut more slowly.
The blade depth setting changes too. On an angle grinder, you're cutting freehand and depth is controlled by angle and pressure. On a bridge saw with an adjustable blade height, set the blade to clear the full thickness of the slab by about 1/8 inch extra, not more.
Edge finishing also differs slightly. The thinner edge on 2 cm granite takes less time to polish but is more fragile. A sharp rap from a hard object chips a 2 cm edge much more easily than a 3 cm edge. That's one reason 3 cm became the standard.
For very thick material (some imported quartzite or marble runs to 3.5 cm or even 4 cm), make sure your blade has enough exposure to clear the full thickness in one pass. Partial cuts that require repositioning multiply your corner blowout risk.
What silica safety rules apply to cutting granite?
Granite contains respirable crystalline silica, and cutting it generates fine dust that causes silicosis, an irreversible and potentially fatal lung disease. The regulatory framework in the United States is clear.
OSHA's silica standard for construction (29 CFR 1926.1153), effective June 2017, covers any worker who cuts, grinds, or drills stone with a silica content above 0.1%. Granite typically runs 25% to 30% quartz by volume (some sources put total silica higher) [5], well above that threshold. The standard requires engineering controls, and wet cutting is the primary listed control for this type of task.
OSHA's Table 1 guidance for stone cutting lists wet cutting with water flow as a specified engineering and work practice control that, used properly, requires no additional respiratory protection for most cutting tasks [1]. When wet methods are not feasible, a supplied-air respirator or a NIOSH-approved respirator with P100 filters must be worn.
For homeowners doing a single DIY cut: wet cut, wear a half-face P100 respirator anyway, cut outdoors or in a well-ventilated space, and keep bystanders away from the work area.
For fabricators doing this daily: your exposure is cumulative. A workplace with no silica controls program for stone cutting is out of compliance with federal law. The National Institute for Occupational Safety and Health (NIOSH) maintains guidance on silica exposure control for stone fabrication shops [8].
State plans in California (Cal/OSHA), Washington (L&I), and others have adopted silica rules that are in some respects more stringent than the federal standard. Check your state's occupational safety agency for local requirements.
Frequently asked questions
Can I cut a farmhouse sink opening in granite after it's already installed?
Yes, but it's harder than a shop cut. The slab is constrained by the cabinet, access is awkward, and you can't use a bridge saw. An experienced fabricator with an angle grinder and a water attachment can do it in 2 to 3 hours. Homeowners can attempt it, but the risk of cracking an installed slab is real. Get at least one professional quote before deciding.
What diamond blade is best for cutting granite?
A turbo-rim continuous diamond blade rated for hard stone (granite, quartzite) in the 4-inch or 4.5-inch diameter for an angle grinder. Look for a blade with a 'hard bond' matrix, which wears at the right rate for dense stone. Expect to spend $25 to $60 for a quality blade. Do not use a segmented demolition blade or a standard tile blade on finished granite.
How long does a farmhouse sink cutout take?
A fabricator with a bridge saw and edge polishing equipment typically finishes in 45 to 90 minutes including edge work. An angle grinder field cut takes 2 to 3 hours. Rushing causes cracking. Budget extra time for layout, blade changes, and cleanup, especially if this is your first granite cutout.
Do I need to remove the countertop to cut the sink opening?
Usually no. Field cuts are done in place. Removing and resetting a countertop adds $200 to $500 in labor and increases the risk of cracking during transport. Fabricators prefer cutting in place for an installed slab. The exception is if the cabinet opening needs modification first, or if the slab is 2 cm and unusually fragile.
What happens if the granite cracks during the cut?
Small crack-outs at corners can usually be repaired with color-matched epoxy and polishing. A crack running back into the field of the countertop is more serious. Short cracks (under 3 inches) can sometimes be stabilized with two-part stone epoxy and reinforced from below with fiberglass mesh. Longer cracks or cracks through a seam typically require slab replacement. This is why professional installation is the safer choice.
How close to the front edge can the cut be for an apron front sink?
Most farmhouse sink installations bring the cut within 1/4 inch to 1 inch of the front edge of the granite, or the front edge is removed entirely and replaced by the apron. Any remaining granite lip thinner than 1/2 inch at the front is fragile and should be reinforced with stone epoxy from below or eliminated by adjusting the sink position. Check the sink manufacturer's template for the minimum front lip dimension.
What is a relief cut and why does it matter for granite?
A relief cut is a short cut made at each interior corner of the cutout before the main cuts, or a pilot hole drilled at each corner. Granite is brittle, and a blade running past a corner creates a stress point that can crack the stone. Relief cuts or corner holes give the blade a place to start and stop safely. Skipping this step causes most of the corner blowouts seen on DIY farmhouse sink cuts.
Do I need to seal the cut edges after finishing?
Yes. The raw interior cut edge exposes the porous interior of the granite, which absorbs water and cleaning products faster than the polished surface. After polishing the edge through 800 grit or higher, apply a penetrating stone sealer to the edge. Use the same sealer rated for the rest of the countertop. Most sealers need reapplication every 1 to 3 years depending on traffic and cleaning habits.
Can I use a jigsaw or circular saw to cut granite?
A standard jigsaw or circular saw blade will not cut granite effectively. You need a diamond blade rated for hard stone. Some circular saws accept diamond blade attachments and can work with a water feed, but control is worse than an angle grinder. Jigsaws lack the torque and blade rigidity for stone cutting. Do not attempt granite cuts with carbide or abrasive-wheel blades not rated for stone.
What is the correct size of the opening for a 33-inch farmhouse sink?
Opening dimensions vary by manufacturer and model. For most 33-inch farmhouse sinks, the rough opening in the countertop runs approximately 30 to 32 inches wide and 18 to 20 inches front-to-back, but these are not universal. Always use the template or dimensional drawing supplied with the specific sink. Cutting to a generic dimension without checking the actual sink specs is one of the most common and costly mistakes.
How do you support the cutout piece so it doesn't crack the countertop when it drops?
Use two suction-cup handles (the kind tile setters use) or bar clamps bridging the cutout area, attached before you start cutting. A helper should hold the suction cups throughout the final pass. The goal is to keep the cutout piece from dropping or twisting as the last corner connects. Even a few inches of uncontrolled drop can lever enough force back into the slab to crack it.
Is silica dust from cutting granite actually dangerous for a single DIY job?
Yes, even one exposure at high concentrations matters. A single cutting session without wet controls can produce silica dust concentrations far above OSHA's permissible exposure limit of 50 micrograms per cubic meter for general industry [9]. Silicosis is a cumulative disease, but acute high-dose exposure (called accelerated silicosis) has been documented in stone countertop workers. Wet cutting and a P100 respirator are the minimum for a single DIY cut.
What granite colors or types are most prone to cracking during a farmhouse sink cut?
Granites with pronounced linear veining (like Baltic Brown or some Blue Bahia varieties) can crack along the vein plane if the cut crosses a weak vein at a shallow angle. Very large-crystal granites (coarse-grained pegmatites) have more micro-fracture risk at crystal boundaries. Fine-grained, uniform granites like Absolute Black are generally the most forgiving to cut. Inspect any slab under raking light before cutting, regardless of color.
Sources
- OSHA, 29 CFR 1926.1153 Respirable Crystalline Silica Standard for Construction: Wet cutting is the listed engineering control for stone cutting tasks; Table 1 specifies required controls by task type including cutting stone with handheld or walk-behind saws.
- USGS, National Minerals Information Center: Granite registers 6 to 7 on the Mohs hardness scale, requiring diamond or carbide tooling for cutting and shaping.
- Angi, Countertop Cost Guide: Field cut sink opening costs in granite typically range from $150 to $400 depending on region and complexity.
- Angi, Granite Countertop Cost Guide: Installed granite countertop costs range from $60 to $100 per square foot, making a 40-square-foot countertop a $2,400 to $4,000 investment.
- USGS, Mineral Resources Program: Granite is composed of approximately 25 to 30 percent quartz by volume, with total silica (SiO2) content commonly cited at 68 to 72 percent by mass.
- Natural Stone Institute, Stone Care and Maintenance: Penetrating sealers for granite typically require reapplication every 1 to 3 years depending on stone porosity, sealer type, and use conditions.
- Kohler Co., Farmhouse Sink Product Specifications: Cast iron farmhouse sinks in typical residential sizes (33-inch single basin) weigh 130 to 200 pounds empty, requiring cabinet corbel or ledge support independent of the countertop.
- NIOSH, National Institute for Occupational Safety and Health: NIOSH identifies dry cutting and grinding stone as high-exposure silica tasks for fabrication shop workers and recommends wet methods as the primary engineering control.
- OSHA, Crystalline Silica Rule FAQs: OSHA's permissible exposure limit for respirable crystalline silica is 50 micrograms per cubic meter of air, averaged over an 8-hour shift.
- Tile Council of North America (TCNA): Interior corner radius of at least 1/4 inch is recommended in stone cutouts to reduce stress concentration and cracking risk.
Last updated 2026-07-10