TL;DR
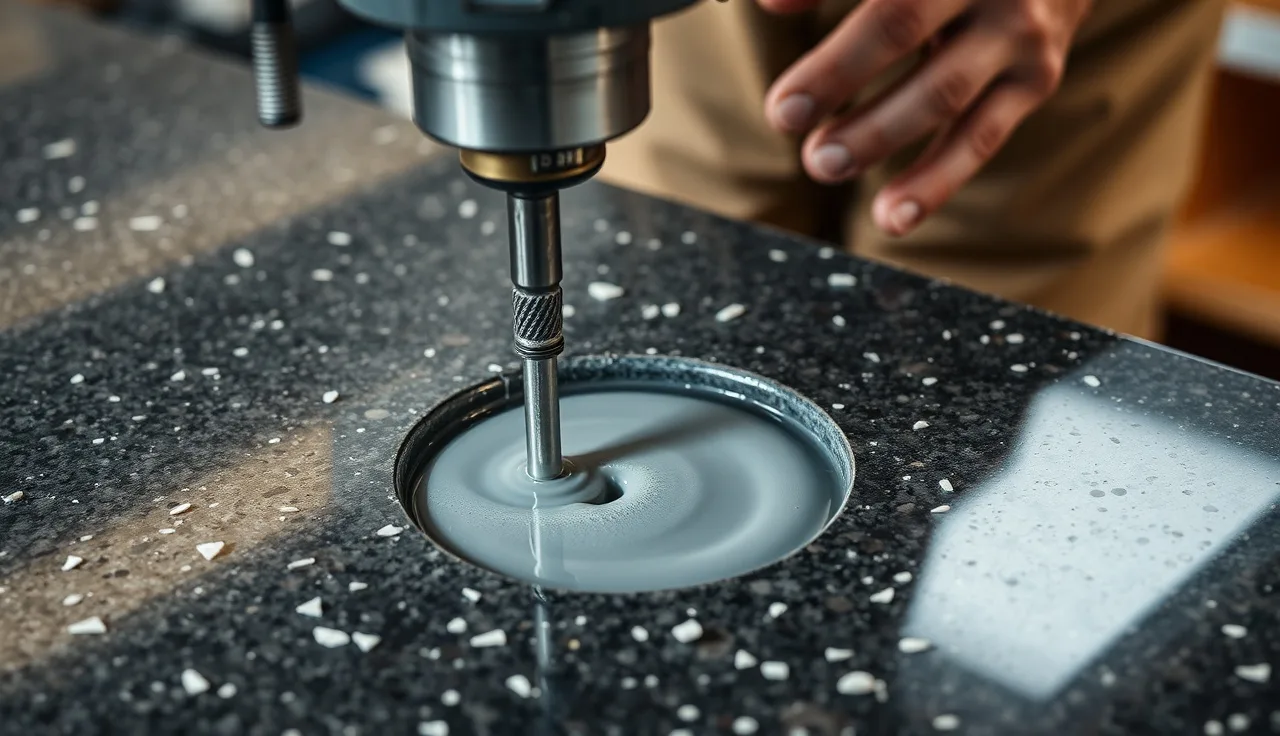
- Adding an air switch hole to granite takes a diamond core bit (usually 1-3/8" diameter), a variable-speed drill run at 300 to 600 RPM, and water flowing on the cut the whole time.
- A fabricator drills it in about 20 minutes and charges $50 to $150 on-site.
- DIY works if you have the right bit and a water dam.
- The mistake that cracks the stone is dry cutting.
What is an air switch and why does it need its own hole?
An air switch is a pneumatic button that turns a garbage disposal on and off with no electricity at the countertop at all. You press the button, it pushes a puff of air down a small tube, and that air pulse trips a remote actuator wired to the disposal's power. Because there's no current at the surface, you can put it right next to a wet sink with no code trouble.
The button mounts through the stone, so it needs a clean round hole all the way through. Standard air switch buttons are 1-3/8" in diameter (about 35mm), though brands vary, so measure yours before you buy a bit. The hole passes through the full thickness of the slab, which is 3/4" to 1-1/4" for most residential granite [1].
A regular bit won't touch it. Granite rates 6 to 7 on the Mohs hardness scale [2], hard enough to wreck a masonry bit in seconds. You need a diamond-tipped core bit and running water. Skip either one and you'll either crack the stone or burn out the bit before you break through.
Can I drill a granite countertop myself, or should I hire a fabricator?
It depends on whether you own the right bit and how calm you stay doing slow, careful power tool work. A fabricator with a wet-core drill does this every day and almost never cracks anything. DIY is real, but the downside is a slab you might have to replace.
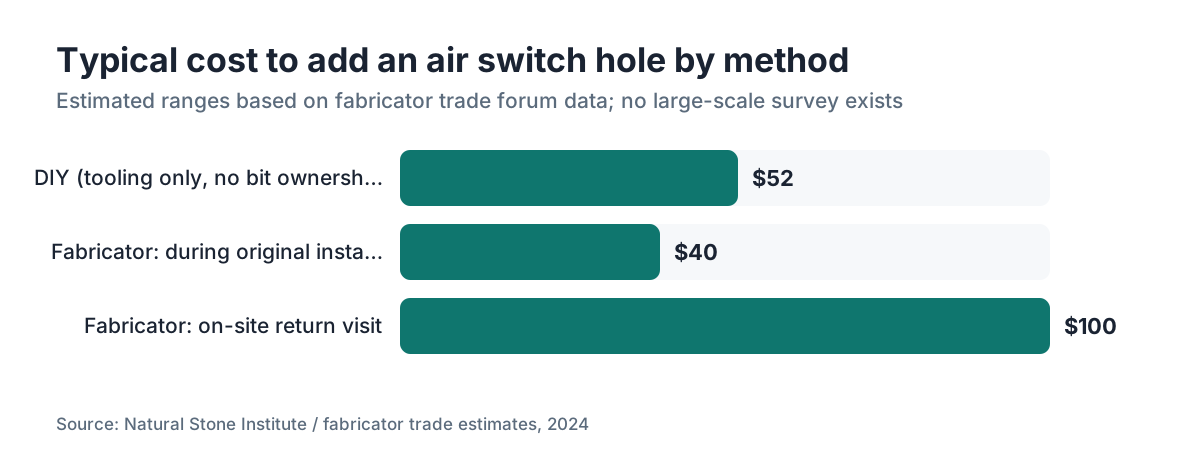
Most fabricators will come out and drill a single hole on an installed top as a small job. Expect $50 to $150, based on rates reported across fabricator trade forums, with the spread coming from local labor rates and whether a trip fee applies.
DIY makes sense only if all four of these are true: you own or can rent a good diamond core bit in the right size, you can rig a water dam around the spot, you have a variable-speed drill that runs slow, and the location is open enough to work vertically. If any one of those is shaky, call the fabricator. A cracked slab from a bad attempt runs hundreds to thousands of dollars to fix or replace [3].
The clearest case for DIY: you already have stone tooling from a tile job and the bit is sitting on the shelf. Then the extra cost is almost nothing and the technique is learnable in one hole.
What tools and materials do you need?
Lay everything out before the bit touches stone. Missing one item halfway through is how holes go wrong.
Diamond core bit: A continuous-rim or segmented diamond core bit sized to your button. Most air switches (InSinkErator, KES, Waste King, and the like) use a 1-3/8" hole [4]. Some trim rings want a little more clearance, so read the box. Bits from Bosch, Hilti, or a stone-supply house run $15 to $60 by size and quality. Cheap no-name bits off a marketplace are not worth it on finished granite.
Variable-speed drill: Corded beats cordless here because the job wants sustained low-speed torque. Hold 300 to 600 RPM. Faster than that just makes heat that eats the diamond matrix.
Water cooling: This is the part DIYers underrate. Water has to reach the cut the entire time. Your options:
- A suction-cup water dam (a rubber ring you stick down and fill with water, sold for stone drilling, $10 to $20)
- A helper drizzling water from a squeeze bottle without stopping
- A wet-core drill with a built-in water feed
Run it dry and heat spikes in seconds. Microcracks form around the hole, and sometimes you won't see them for days.
Painter's tape: Two or three layers over the spot before you mark center. It keeps the bit from walking and cuts down chipping on the top face.
Center punch or sharp pencil: For marking exact center.
Shop vac: Granite slurry (wet dust) is abrasive and stains grout and wood if it dries.
Safety glasses and gloves: Not optional. OSHA requires eye protection when tools throw particles like this [6], and granite chips are sharp.
Where exactly should the air switch hole be located?
Air switches go one of three places: the countertop deck near the sink, a knockout in the sink rim, or the cabinet apron below the counter. Most people pick the deck because it puts the button at a natural hand height and keeps it easy to reach.
For deck placement, keep the hole center at least 2 inches from any edge and at least 2 inches from the sink cutout or any other hole. Too close to an edge and there's not enough stone supporting the cut, which is where cracks start. Some fabricators use 3 inches as their rule.
Think about how the button sits in real use. You want to reach it standing, without leaning over the sink. Most installs land 3 to 6 inches back from the front edge and 4 to 8 inches to one side of the sink.
Look underneath before you commit. Shine a flashlight and confirm you're not over a cabinet frame, a crosspiece, or a pipe. The air tube is only about 1/4" wide and routes easily, but you still need a clear path down to the actuator at the disposal.
Mark center on the tape, set the button trim ring in place, and step back a few feet to eyeball it. Moving a pencil mark is free. Filling a bad hole in granite is not.
How do you drill the hole step by step?
This is the whole job. Read all eight steps before you start one of them.
Step 1: Prep the surface. Clean and dry the counter. Lay three or four layers of painter's tape over and around the spot. Mark center clearly on the tape.
Step 2: Set the water dam. Wet the suction ring slightly and press it firmly around center. Fill it with about 1/2" of water. If a helper is running a squeeze bottle instead, do a dry run so they know where to aim.
Step 3: Start at an angle. Core bits love to wander at the start. Tip the bit to about 30 to 45 degrees off vertical and run it gently at the edge of your center mark to cut a shallow groove. Once you have that notch, bring the bit straight up to vertical. A scrap-wood guide block with a pre-drilled hole holds the bit vertical and works even better.
Step 4: Drill slow with light pressure. Light, steady downward pressure beats leaning on it. Let the diamonds cut. Hold 300 to 500 RPM. If you're pushing hard and going nowhere, the bit is dull or the RPM is too high. It's almost never too little pressure.
Step 5: Keep water on it. If the dam runs low or the slurry turns chalky gray-white, stop and top it off. The slurry should look like thin gray milk the whole time. That's the sign the diamonds are cutting and the water is carrying the swarf away.
Step 6: Ease off near the bottom. Around 80 percent through you'll feel the resistance change. Slow down and lighten up. The core slug can pop free all at once, and a bit that drops through can chip the far edge. On an installed top, tape the underside directly below the hole to catch the plug.
Step 7: Clear the core and rinse. Pull the dam, rinse the area, and shop vac the slurry out of the cabinet. Check the edges. A little chipping on the underside is normal and hides under the trim ring. Chipping on the visible top face means you started too fast or the tape was too thin.
Step 8: Dress the edge. A diamond hand pad (60 to 200 grit, from a stone supply house) smooths and lightly bevels the hole edge before the trim ring goes on.
Setup to cleanup, a single hole runs 20 to 45 minutes.
What drill speed and pressure should you use on granite?
Hold 300 to 600 RPM and keep pressure light to moderate. Speed is what kills diamond bits on hard stone [5]. Many drills hit 3,000 RPM at full trigger, so use the low gear if you have two speeds and feather the trigger to stay down.
Leaning hard on the drill to go faster does the opposite. All it makes is heat and glazed diamonds (the cutting face polishes smooth and quits cutting). If you're moving through the stone at maybe 1 minute per 3mm of depth, your speed and pressure are right. If you're stuck, the fix is lower RPM or a fresh bit, not more muscle.
For 3/4" granite, actual cutting time runs 5 to 10 minutes once you're set up. For 1-1/4" stone or a hard variety like absolute black, budget 15 minutes of cutting.
If the bit gets hot to the touch even with water running, stop and let it cool all the way down. Heat loosens the diamond segments, and a cooked bit never cuts clean again.
How do you avoid cracking the granite while drilling?
Cracks almost always trace to one of four things: too much speed, too much pressure, too little water, or starting too close to an edge. Water is the one that matters most.
Diamond bits cut by grinding, and grinding makes heat. Water cools the cut and flushes away particles so fresh diamond keeps meeting fresh stone. Run dry for even 15 to 20 seconds on granite and you can start a thermal crack that runs well past the hole.
Edge distance is the next one. Get closer than 1.5 to 2 inches to any edge and you're loading a thin web of stone. Granite's compressive strength is high, roughly 17,000 to 27,000 psi [2], but its tensile strength is much lower. Drilling pulls the stone in tension around the hole, and a narrow edge strip can split clean off.
Old damage bites too. Scan the slab for hairline cracks before you pick a location. Drill near an existing crack and you'll likely run it.
If a small chip does happen, chips on the underside usually hide under the button's trim ring and are cosmetic only. Chips on the visible top are the real problem. A fabricator can fill tiny ones with color-matched epoxy, but a big chip is hard to hide well.
Can this be done on an already-installed countertop, or does the slab need to be off the cabinet?
You can drill an installed granite top, and that's the usual case. Air switches mostly come up when someone adds or upgrades a disposal after the kitchen is already done, so the counter is bolted down and staying put.
The practical headache is water. Your cooling water has to go somewhere, and it dumps straight through the hole into the cabinet the moment you break through. Line the cabinet with towels or plastic sheeting first. If you can, have a second person waiting with a shop vac near the bottom opening.
An installed top is actually safer for the stone than a slab balanced on sawhorses. The cabinet gives it a stable, vibration-damping base, so cracks are less likely, not more.
Space gets tight under a cabinet overhang. Check that the drill fits vertically over the spot. Against a wall you may need a right-angle drill adapter to get straight down.
For fabricators drilling on-site, a portable Makita or Bosch wet-core drill with a built-in water feed is the standard tool. Some carry a small compressor to blow out slurry, though a wet shop vac does the same job.
What size hole does an air switch need, and does it vary by brand?
Almost every residential air switch uses a 1-3/8" (35mm) mounting hole. That covers the common home-center brands: InSinkErator, which calls out 1-3/8" in its installation guides [4], plus Waste King, KES, and most generic kits.
A handful of European and premium decorative units use 1-1/2", and a few compact designs fit a 1" hole. Read the installation sheet in the box before you order a bit.
The trim ring or button cap that sits on top of the granite usually has a bigger outer diameter, often 1-3/4" to 2". That overhang covers minor roughness around the hole, so it forgives a slightly off-center hole or a small edge chip.
Not sure on size? Put a ruler on the button's threaded shank. That shank diameter is what has to clear the stone. Add 1/16" to 1/8" so it drops in without forcing.
How do you install the air switch button after the hole is drilled?
Once the hole is drilled and the slurry is cleaned up, the button goes in fast.
Dry the hole completely. Trapped moisture under the button base can leave a mineral stain ring on the stone over a few months. A minute or two with a hair dryer or a heat gun on low clears it.
Run a thin bead of clear silicone around the underside of the trim ring, then press it into the hole from the top. That's your surface water seal. Don't overdo the silicone, or it oozes into the cabinet and glues up the nut you have to tighten from below.
Thread the mounting nut up onto the shank from underneath. Snug it hand-tight plus a quarter turn. Overtighten and you can crack the stone or strip the plastic threads on the button body. Most makers just call for snug hand-tight.
Route the air tube from the button through the cabinet to the actuator at the disposal. Zip-tie it to a cabinet edge so it doesn't kink or get pinched by shifting pans and cleaners.
Wire the actuator to the disposal's power circuit per the actuator's diagram. This step is real electrical work under the sink, usually a simple 120V connection. If wiring isn't your thing, hire an electrician for just this part. The drilling and mounting stay purely mechanical.
Test it. Press the button firmly. You should hear a soft click and the disposal should spin up. If nothing happens, check the tube for a kink and the actuator's power connection.
What does it cost to have a fabricator drill an air switch hole?
A single accessory hole drilled on-site runs $50 to $150, based on estimates across fabricator trade groups and stone forums. The spread is wide because it rides on local labor rates, trip charges, and whether the hole is bundled with other work.
Bring the slab to the shop before install and you'll pay near the low end, since setup is faster and nobody drives out. Most shops skip the trip fee when the drilling is part of a larger install quote.
Here's the smart move if you're buying new countertops: ask the fabricator to drill every accessory hole, air switch included, before or during install. Adding a hole at template or fabrication is far cheaper than a return trip. Many shops fold the first one or two accessory holes into the base install price, so ask specifically when you get your quote.
If you use an online quoting tool like SlabWise, ask about accessory holes when you enter your project. The add-on cost shows up upfront instead of landing as a surprise line item after the slab arrives.
DIY, the main cost is the bit: $15 to $60 by size and quality. A water dam adds $10 to $20. If you already own a variable-speed drill, total DIY cost stays well under $100.
| Approach | Typical cost | Time | Crack risk |
|---|---|---|---|
| Fabricator on-site (single hole) | $50-$150 | 1-2 hrs including travel | Very low |
| Fabricator at shop (pre-install) | $20-$60 | During fabrication | Very low |
| DIY with proper bit and water dam | $25-$80 (tooling) | 30-60 min setup + drilling | Low to moderate |
| DIY with wrong bit or no water | $0 tooling cost | Varies | High |
These ranges come from industry forum estimates. No large-scale pricing survey exists for single-hole drilling specifically.
Are there alternatives if drilling granite yourself feels too risky?
Yes, three of them, and they're worth knowing before you commit to drilling stone.
Sink rim placement: Many stainless sinks ship with pre-drilled holes or thin knockouts for accessories. If yours has an unused knockout (often front-right or front-left of the deck), mount the button there and never touch the granite. It sits a little lower than a counter-height button, but it works and it's far easier.
Cabinet apron mounting: Some kits include a bracket that hangs the button on the front face of the sink cabinet, below the counter. Easiest option going, zero stone drilling. The trade-off is looks and reach, since the button is tucked out of the way.
Hire just the drilling: Even if you want to do the full install yourself, pay a fabricator to drill only the hole and handle the rest yourself. The hole is the one genuinely risky step.
And if your counter is laminate, solid surface, or butcher block instead of granite, the hole is much easier. Laminate countertops and Corian countertops drill with a standard hole saw. Butcher block countertops drill like wood. Only natural stone (granite, quartzite, marble) needs diamond tooling.
How do fabricators track accessory holes in their quoting process?
For the fabricators reading: accessory holes are the small line item that's easy to forget in a quote and painful to eat on the job. A 1-3/8" hole runs 20 to 30 minutes of labor with setup and cleanup on an installed top, so it should never go unpriced.
Line-item every hole type: sink cutout, faucet holes, soap dispenser holes, air switch holes, and any customer cutout for outlets or a cutting board insert. Each one has its own tooling, labor time, and risk. Lump them together and you under-price.
Fabrication software like SlabWise lets you set up accessory hole types with fixed or labor-based pricing and attach them to quotes. The line item drops in automatically when the salesperson builds the quote instead of getting remembered (or forgotten) at the end.
One process change beats all the others: flag accessory hole locations at template, not the day of install. Ask the homeowner at template where the air switch and soap dispenser go, mark it on the digital template, and drill it in the shop under controlled conditions. That's how you stop paying for return trips.
Wet cutting also keeps your crew out of a silica problem. OSHA's construction silica standard, 29 CFR 1926.1153, requires engineering controls like water suppression when cutting silica-bearing material such as granite [10], and the water dam you're already using for crack prevention does double duty here.
Frequently asked questions
What size diamond core bit do I need for an air switch hole in granite?
Most air switches, including InSinkErator and Waste King models, need a 1-3/8" (35mm) hole. A few decorative or European models use 1-1/2". Measure the shank diameter of your specific button and add 1/16" for clearance before buying the bit. Buying the wrong size is an expensive lesson once you've already cut the stone.
Can I use a regular drill bit on granite instead of a diamond bit?
No. Twist bits, spade bits, and even concrete-rated masonry bits fail almost instantly on granite. Granite rates 6 to 7 on the Mohs scale, harder than most metals. You need a diamond-tipped core bit with water cooling. Anything else wrecks the bit and risks cracking the stone.
How long does it take to drill a hole in granite for an air switch?
Active cutting for a 1-3/8" hole through 3/4" granite is 5 to 10 minutes with the right gear. Setup, water dam, and cleanup add 15 to 30 minutes. A fabricator on-site including travel is a 1 to 2 hour visit. First-time DIYers usually spend 45 to 90 minutes start to finish.
Do I need to seal the granite after drilling the hole?
You don't need to re-seal the whole counter, but wiping a little granite sealer around the inside edge of the new hole is smart. The fresh cut is unpolished and slightly more porous than the finished surface. A quick wipe with your usual sealer and a 10-minute wait is enough before the button goes on.
What happens if I crack the granite while drilling?
A hairline crack at the hole edge can sometimes be stabilized with low-viscosity stone epoxy and hidden under the trim ring. A crack that runs into the slab is serious. A fabricator may fill and color-match small damage, but a large crack often means replacing the affected section, which runs several hundred dollars or more depending on the stone.
Can an air switch hole be drilled in any location on the countertop?
Almost anywhere, but keep the hole center at least 2 inches from any edge, cutout, or other hole. Closer than that and you're drilling into a thin sliver that can fracture under the load. Check underneath for cabinet framing or plumbing before you mark. The air tube needs a clear path down into the cabinet to reach the disposal actuator.
Is drilling granite a job I can do without a helper?
Solo works if you use a suction-cup water dam that holds water without anyone holding it. If you're relying on hand-poured cooling, you need a second person, because one hand is on the drill and the other is steadying it. Going solo with bottle-fed water usually ends with the drill wandering or the water running dry.
Will the drilling void my granite countertop warranty?
Most fabricator warranties cover stone defects and installation workmanship, not changes made after install. If the granite came with a material warranty, drilling it yourself probably won't affect that, since a failure at a drilled hole is a workmanship issue, not a stone defect. Read your specific contract language if you're unsure.
How do I clean up granite dust and slurry after drilling?
Wet shop vac it right away, before anything dries. Granite slurry is a fine abrasive that scratches cabinet interiors and stains grout if it sets. Wipe the counter with a damp cloth, then dry it. Rinse the bit under running water and let it dry before storing, since slurry left on the tool can corrode metal parts.
Can the same technique be used to add a soap dispenser hole or faucet hole to granite?
Yes, the technique is identical. Soap dispenser holes are usually 1-3/8" too. Faucet holes run 1-3/8" to 1-3/4" depending on the brand and whether a deck plate is used. Same diamond core bit, same water cooling, same low RPM. Drilling several holes in one session? Cool the bit all the way down between them.
Is there a way to add an air switch without drilling the granite at all?
Yes. Many sinks have unused pre-drilled knockouts on the deck that take a standard 1-3/8" accessory. You can also mount the button on the cabinet apron below the counter, which needs no stone drilling. Both options remove the risk of cracking the granite, at the cost of a less convenient or less clean-looking spot.
What RPM should I drill granite at?
300 to 600 RPM is the accepted range for diamond core drilling in granite. High speed makes heat that degrades the diamond matrix fast, even with water. Use a variable-speed drill on its lowest setting and feather the trigger. If your drill has one speed and it runs above 1,000 RPM, it's the wrong tool for this.
How much does it cost to have a fabricator drill an air switch hole on an already-installed countertop?
Typically $50 to $150, depending on regional labor rates and whether a trip fee applies. If the hole is added during the original countertop install, most fabricators include one or two accessory holes in the base price or charge a small $20 to $60 add-on. Doing it during install is almost always cheaper than a return visit.
Sources
- Natural Stone Institute (formerly Marble Institute of America), Dimension Stone Design Manual: Residential granite countertop slabs are typically 3/4" (2cm) to 1-1/4" (3cm) thick
- U.S. Geological Survey, Mohs Hardness Scale and Mineral Properties: Granite rates 6 to 7 on the Mohs hardness scale; granite compressive strength ranges from approximately 17,000 to 27,000 psi
- National Kitchen and Bath Association: Granite countertop replacement costs vary widely; cracked slabs often require full section replacement at significant cost
- InSinkErator, Air Switch Installation Guide (product documentation): InSinkErator air switches require a 1-3/8-inch diameter mounting hole in the countertop or sink deck
- Bosch Tools, Diamond Core Bit Application Guide: Recommended drill speed for diamond core bits in granite and natural stone is 300 to 600 RPM with continuous water cooling
- OSHA, Eye and Face Protection Standard 29 CFR 1910.133: OSHA requires appropriate eye protection when working with tools that generate flying particles, including stone cutting
- U.S. Geological Survey, National Minerals Information Center (dimension stone statistics): Granite is one of the most commonly used dimension stones in residential construction in the United States
- EPA, Silica Dust and Construction Worker Health: Granite dust contains crystalline silica; wet cutting methods significantly reduce airborne silica particle generation compared to dry cutting
- OSHA, Silica Standard for Construction, 29 CFR 1926.1153: OSHA's silica standard for construction requires engineering controls including water suppression when cutting silica-containing materials such as granite
Last updated 2026-07-11