TL;DR
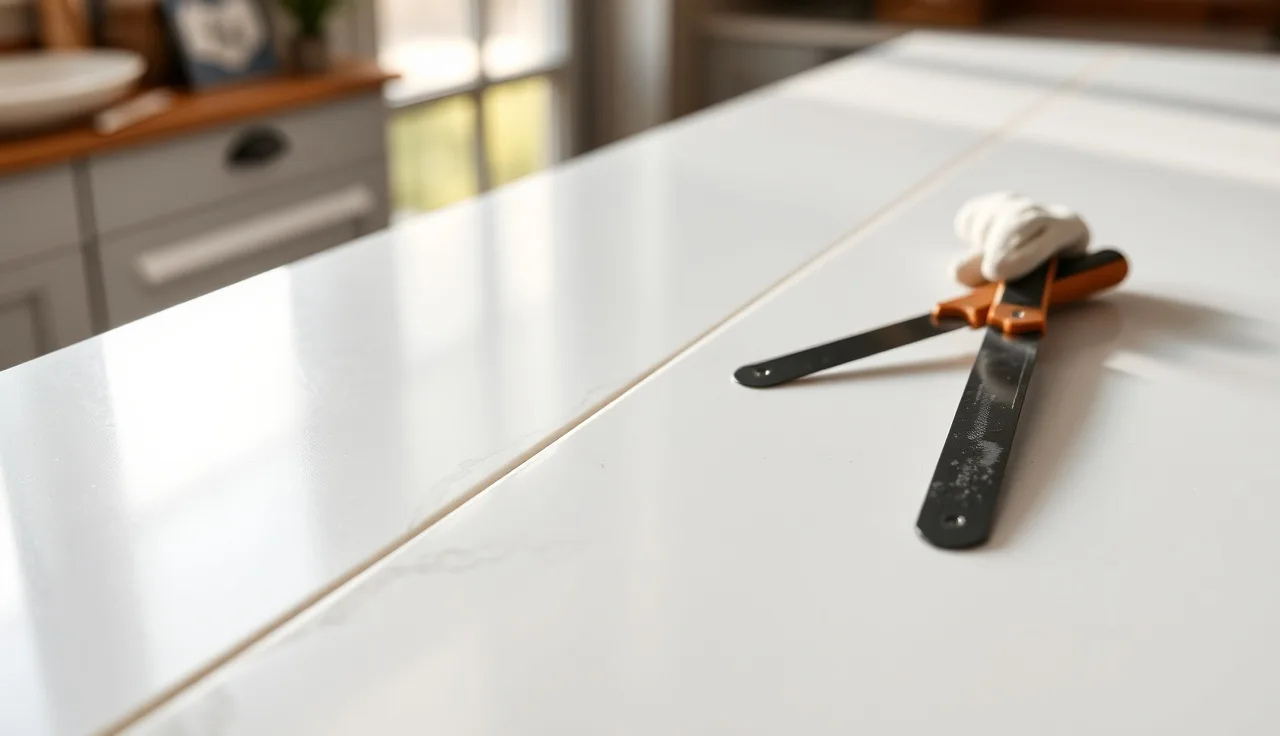
- A seam phantom is a discolored shadow or halo that appears along a quartz countertop seam after installation.
- It comes from epoxy squeeze-out, resin contamination, or polishing compound trapped under the surface.
- You can't scrub it off.
- Preventing it takes correct adhesive color-matching, clean seam prep, and pulling squeeze-out before the epoxy cures.
What exactly is a seam phantom?
A seam phantom is a visible discoloration that runs along the length of a quartz seam. It looks like a faint shadow, a milky halo, or a darker stripe depending on the color of the slab. It sits at or just below the surface, so wiping it down does nothing. It's not dirt. It's not residue you forgot to clean. It's a permanent optical defect from something that went wrong during the seam itself.
The term is informal. Fabricators use it constantly even though no trade standards body has ever formally defined it. You'll hear it on shop floors, in fabrication forums, and from installers who've had to explain an unhappy homeowner call-back.
Phantoms show up most often on quartz, especially on solid-color or lightly patterned slabs where a shadow has nowhere to hide. Dark slabs like black or charcoal are brutal. Bright whites with uniform veining show them badly too, because the contrast is high. Heavily veined quartz sometimes masks a mild phantom entirely.
What causes a seam phantom on quartz?
Three main causes, and they overlap. You can have all three happening at once.
The most common is adhesive squeeze-out that didn't get cleaned up right. When you apply epoxy to a quartz seam and clamp the pieces together, some adhesive pushes out from the joint. If that squeeze-out isn't removed while it's still wet, or if it's smeared across the surface with a razor blade and pressed into the open microstructure of the resin-composite material, it leaves a stain. Quartz isn't porous like granite, but the surface isn't perfectly inert either, and the binders in the epoxy can leave a residue that bonds with the polymer in the slab.
The second cause is an incorrect adhesive color. Quartz seam epoxy needs to match the specific slab. Fabricators typically use a two-part epoxy with pigment additives. If the ratio is wrong, or if the shop grabs a close-enough color that reads differently under kitchen lighting, the seam itself looks like a phantom even when the adhesive went in clean. This happens a lot when a new batch of adhesive shifts color slightly from the last job.
The third cause is polishing compound contamination. After the seam is made, fabricators polish the surface flat. If polishing compound gets pushed into the seam line, or if a low-quality epoxy micro-crazes during polishing, the result looks like a phantom under raking light or from a low angle. Some fabricators also over-polish the seam area, stripping the factory finish and leaving a texture difference the eye reads as a shadow.
Is a seam phantom the same as a seam line or seam shadow?
Not exactly, though the terms overlap. A seam line is the physical joint itself, the thin gap where two pieces meet. On a properly done quartz seam, that line is filled with color-matched epoxy and should be barely visible. A seam line is not a defect. A seam is always going to be there.
Seam shadow gets used interchangeably with seam phantom, and in casual talk they mean the same thing. If there's a distinction some shops draw, it's this: a seam shadow is the optical effect from a height difference between the two slabs (one piece sits slightly higher or lower, casting a literal shadow), while a seam phantom is the chemical or adhesive-related discoloration around the joint. Both are call-back problems. Both are avoidable with careful work.
The distinction matters for troubleshooting. If a homeowner photos the seam under raking light and sees a shadow, that could be a height mismatch a careful re-polish might help. If the phantom persists under every lighting angle, including direct overhead, it's almost certainly adhesive or compound contamination.
Why does quartz show seam phantoms more than natural stone?
Granite is genuinely porous. That sounds like a disadvantage, but it means adhesive squeeze-out doesn't bond to the surface as aggressively. The stone's texture also gives the eye something else to look at. You see the granite's grain and movement before you see a slight discoloration at the seam. [1]
Quartz is engineered from roughly 90 to 94 percent crushed quartz bound with polymer resins, usually polyester or acrylic. [2] That polymer matrix gives quartz its non-porous surface, which is why it's marketed as low-maintenance. But that same polymer surface is chemically closer to the epoxy adhesives used to make seams. When an epoxy bonds to a polymer surface under pressure and cures, the junction can be visually apparent in a way it isn't on granite or marble countertops.
Solid-color quartz, popular in modern kitchens, offers no visual camouflage at all. A single-color slab like crisp white or matte charcoal is a perfect background for revealing any surface anomaly. Fabricators who know this warn customers upfront that seams on solid colors will be more visible than on heavily patterned material, and that's true even when the seam is done perfectly.
This doesn't make quartz a bad material. It means seam location and seam quality matter more on quartz than on natural stone.
How do fabricators minimize seam phantoms before and during installation?
Prevention is the whole game. Once a phantom cures into a quartz seam, your options are limited. The work that prevents phantoms happens in four phases: slab selection and layout, adhesive prep, seam execution, and post-seam cleanup.
Slab selection and layout: Good fabricators plan seam placement before they cut. Put seams where they're least likely to be noticed and where structural requirements allow. Under a sink, near a wall, or in a corner all beat a seam across an open island. [3] For pattern-matched quartz, the seam location also decides whether the pattern reads as continuous. Layout and nesting software, like what SlabWise produces for fabrication shops, helps visualize seam positions on the actual slab before cutting starts, which cuts the odds of a seam landing in an awkward, high-visibility spot. That kind of planning is worth more than any product you can buy for cleanup.
Adhesive prep: The adhesive has to match the slab in color, sheen, and translucency. Most quartz fabricators use a two-part pigmented epoxy. The pigment gets mixed from a color kit, and getting the ratio right takes practice and a sample chip from the actual slab, not a chip from the manufacturer's standard color card. Color cards fade and shift. Mix adhesive against the real material you're seaming, every time.
Seam execution: The edges of both pieces need to be clean, dry, and free of stone dust before adhesive goes in. Compressed air helps. Some fabricators wipe edges with denatured alcohol and let them flash dry before applying adhesive. The pieces go together with steady pressure, ideally held with seam clamps or suction cups while the epoxy sets.
Post-seam cleanup: This is where most phantoms are created or avoided. Squeeze-out needs to come off while it's still in a gel state, firm enough to peel but not yet hard. The standard tool is a sharp razor blade held nearly flat, taking the bead off in one clean pass without dragging adhesive across the surface. After the gel is removed, a final wipe with a clean cloth and a little acetone cleans the immediate zone. Acetone on quartz is a quick wipe only, never a soak, and dry it right away.
What can you do if a seam phantom has already appeared?
The options are limited and none are guaranteed. That's the uncomfortable truth fabricators don't always lead with when a homeowner calls.
If the phantom comes from surface residue (polishing compound or a light adhesive smear that never fully bonded), a careful pass with acetone or isopropyl alcohol may reduce it. That only works on surface contamination. It does nothing for cured epoxy that has bonded into the polymer matrix of the slab.
If the phantom comes from an adhesive color mismatch, the seam can sometimes be redone. That means cutting out the existing epoxy with a very thin oscillating blade, re-prepping the edges, and re-seaming with correctly color-matched adhesive. This is skilled work and it risks damaging the slab if done carelessly. Not every shop will take it on, and not every situation allows it structurally.
If the phantom is a height mismatch creating a step that catches light, careful polishing can sometimes blend the transition. That means matching the factory finish, which is harder than it sounds. Quartz manufacturers apply a specific surface polish that varies by brand. [4] Replicating it in the field with a hand polisher gets close but rarely identical, and on a solid-color slab the texture difference can be as visible as the original seam shadow.
Some fabricators have had luck laying a very thin bead of correctly color-matched caulk over a cured phantom seam, then tooling it smooth. That's a cosmetic patch, not a structural fix, and it takes careful execution or it looks worse than the phantom. Silicone-based caulks can yellow over time under UV near windows.
The most effective remedy is often full replacement of one or both affected pieces. It's expensive and disruptive. That's the real argument for getting the seam right the first time.
Does the quartz brand or product line affect how visible seams are?
Yes, meaningfully. Different quartz manufacturers make slabs with different surface textures, finish levels, and resin formulations, and all of it affects seam visibility.
Highly polished, mirror-finish quartz shows every seam variation because the reflective surface amplifies height differences. Matte or honed quartz is a little more forgiving of minor height mismatches but still shows adhesive contamination clearly.
Brands like Cambria countertops make quartz in the United States and have a reputation for consistent slab thickness, which matters for seam alignment. Thickness variation within a slab, or between two slabs in the same color, forces the fabricator to compensate for height differences at the seam. Inconsistent thickness turns up more in some imported quartz lines.
Pattern density matters too. Jumbo veining that runs the full slab is beautiful, but it demands precise pattern-matching at seams, which constrains seam placement. A poorly placed seam in a continuous-vein pattern looks like a break in the pattern on top of any phantom discoloration.
If you're picking material specifically to minimize seam visibility: favor mid-range movement patterns over solid colors or highly directional veining, choose polished over honed if you're worried about height steps, and ask to see seam samples the fabricator has done in your specific color before you commit.
How should homeowners inspect a seam before accepting the installation?
Inspect the seam under multiple lighting conditions before the installers leave. This isn't optional, and most reputable fabricators expect it.
Start with the kitchen's own lighting, whatever overhead fixtures are installed. Then use a phone flashlight held at a very low angle, almost parallel to the countertop surface. That raking light reveals height differences and surface texture changes that overhead lighting hides. Move the light along the seam from one end to the other.
Look for four things: discoloration in a band wider than the seam line itself (that's a phantom), a ridge or depression at the joint (height mismatch), color difference in the epoxy fill (adhesive color mismatch), and any spot where the seam line is wider than about 1/16 inch (poor joint fit-up).
The Marble Institute of America, now the Natural Stone Institute, has long held that a seam gap of 1/16 inch or less is the standard for acceptable stone and quartz installation. [5] A gap wider than that is worth questioning.
If something looks off, take a photo with raking light and ask the fabricator to look before they leave. It's far easier to address concerns with the installer present and the equipment still in the truck than after a signed acceptance.
A reasonable seam on quartz should be visible on close inspection. It should not be invisible. If a fabricator promises an invisible seam, that's an oversell. What they can promise is a seam that doesn't call attention to itself from standing height under normal kitchen lighting.
Are some kitchen layouts more prone to phantom seams than others?
Large islands are the highest-risk layout for visible seams. Most quartz slabs come in standard sizes, commonly 55 by 120 inches or 63 by 126 inches, though sizes vary by manufacturer and product line. [6] Any island longer than about 10 feet almost always needs a seam, and that seam sits in a high-visibility, high-traffic area with no cabinetry or backsplash nearby to pull the eye away.
L-shaped countertops need a seam at the inside corner. That corner seam is less exposed visually than an island seam, but it's structurally important and harder to execute cleanly because of the angle.
Galley kitchens with long straight runs on one wall often need seams too, and those land in open sight lines the length of the kitchen. Placement matters here: a seam over a cabinet wall or near a sink cutout is less exposed than one in the open middle of a run.
For reference, kitchen countertops in a typical U.S. kitchen cover about 30 to 40 square feet, and fabricators routinely need two or three pieces to cover it depending on layout. Each joint is a seam opportunity. Good layout planning cuts the count and puts the seams in the right places.
Some homeowners lean toward granite countertops specifically because the natural variation gives seams more visual cover, or they look at alternatives like laminate countertops where budget is the main constraint and seams aren't an issue because the material wraps corners.
What questions should you ask a fabricator about seams before hiring them?
Ask these directly. A fabricator who has done this work for years answers without hesitation.
"Where will the seams land, and can you show me on a drawing?" A good shop has a layout they can show you before cutting starts. Seam placement should be a deliberate decision, not an afterthought.
"What adhesive system do you use, and how do you color-match it?" You want to hear that they mix pigment to match the actual slab, not a stock color. Some shops use pre-tinted single-color adhesives for certain colors, which is fine if the match gets verified against the slab in shop light and daylight.
"Can I see examples of seams you've done in this color?" This is the most direct quality check. A fabricator who does clean work has photos or an in-person reference job to point you to.
"What's your process if I'm not happy with a seam after installation?" This tells you whether they stand behind their work. A warranty that covers call-backs for visible seam defects is worth more than a verbal assurance.
"Do you use seam clamps during installation?" Pressure during cure is standard practice and keeps the pieces from shifting before the epoxy sets. A shop that freehands seams without clamps is a flag.
Fabricators who use quoting and layout tools, including software like SlabWise that generates seam placement diagrams as part of the shop process, can often show you a job layout before any stone is touched. That kind of pre-job transparency is a good sign.
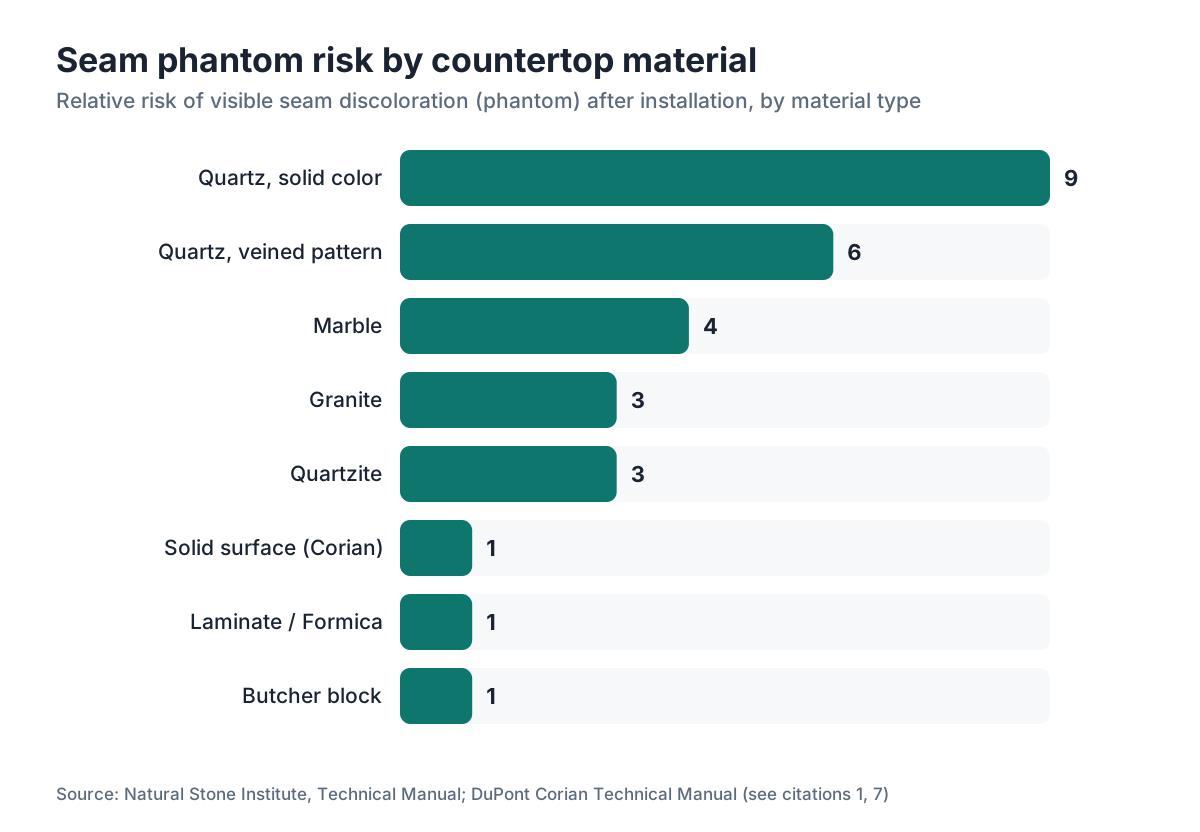
How do seam phantoms compare across different countertop materials?
The problem is basically unique to quartz and solid-surface materials. Here's how it stacks up across the common options.
| Material | Seam visibility | Phantom risk | Notes |
|---|---|---|---|
| Quartz (engineered) | Moderate to high | High | Polymer surface bonds with epoxy residue; solid colors worst |
| Granite (natural) | Low to moderate | Low | Porous surface and natural variation mask seam issues |
| Marble | Moderate | Low to moderate | Natural variation helps; white marbles reveal more |
| Laminate | Low | Very low | Seams are at edges; no adhesive phantom risk |
| Solid surface (Corian, etc.) | Very low | Very low | Seams can be sanded and buffed nearly invisible |
| Butcher block | Low | None | Seams glued with wood glue; grain hides joint |
| Quartzite (natural) | Low to moderate | Low | Behaves like granite; natural movement camouflages seams |
Solid surface materials like Corian countertops stand apart: they can be seamed to near-invisibility because the same material runs all the way through and the seam can be sanded flush and buffed to match. Quartz can't do that, because the factory finish isn't reproducible in the field with a hand tool. [7]
Butcher block countertops have seams that disappear into the wood grain. Laminate countertops and Formica countertops typically seam at edges where the material terminates, not across a field of countertop, so phantoms aren't an issue the same way.
Does seam phantom risk affect resale value or home inspections?
A badly visible seam phantom comes up in a home staging conversation long before it shows up in a formal inspection. Home inspectors generally don't flag seam appearance as a defect unless there's structural separation or evidence that water is getting into the joint. Cosmetic seam appearance is a quality issue, not a structural one. [8]
Still, buyers notice. A phantom seam on a premium quartz island in a freshly renovated kitchen is the kind of thing that lands during a showing and sticks in a buyer's mind. In a competitive market, it's a small negative. In a slow market, it becomes a negotiating point.
If you're selling with a seam phantom, the practical moves are: disclose it honestly (the right thing to do), get a fabricator to assess whether re-seaming is feasible before listing, or price the kitchen into the offering in a way that reflects the condition. Hiding it by staging items over the seam usually doesn't survive the buyer's own walkthrough.
From a fabricator's side, a call-back for a seam phantom that ends in remediation or replacement is a job cost that rarely gets recovered. Industry lore puts re-seam call-backs at two to four hours of unbilled labor plus adhesive and sometimes a slab credit. Nobody has published solid data on the frequency of quartz seam call-backs specifically, but fabrication forums consistently name seam issues among the top three sources of customer complaints after installation.
Frequently asked questions
Can a seam phantom appear weeks or months after installation?
Yes. Some phantoms aren't visible right after installation, especially in certain lighting. As the kitchen's ambient light changes with the seasons, or as overhead lighting gets added, a phantom that was invisible on install day becomes apparent. The defect was there from day one, but the lighting angle that reveals it wasn't part of the initial walkthrough. That's one reason fabricators recommend inspecting seams under raking light before accepting the job.
Will acetone remove a seam phantom on quartz?
Sometimes, if the phantom is surface residue from polishing compound or a light smear of uncured adhesive. Apply acetone briefly with a clean cloth, don't soak, and dry immediately. If the phantom doesn't lighten after one or two careful passes, it has bonded into the surface and acetone won't help. Too much acetone for too long risks dulling the quartz finish, which creates a different visible problem.
Is a seam phantom covered under a quartz manufacturer warranty?
Typically no. Quartz manufacturer warranties, including those from Cambria, Silestone, and Caesarstone, generally cover manufacturing defects in the slab itself, not installation defects. A seam phantom comes from installation practice: adhesive handling, color matching, and cleanup. It falls to the fabricator, not the manufacturer, to remedy. Always check the fabricator's installation warranty separately from the product warranty. [9]
What's the best adhesive for quartz seams to prevent phantoms?
Two-part pigmented epoxy, color-matched to the specific slab, is the standard. Polyester-based adhesives get used too, particularly for some brands. The brand of adhesive matters less than the color match and the application technique. Phantom risk drops sharply when the adhesive is mixed against an actual sample from the job slab in shop lighting and daylight, not against a manufacturer color chip from a catalog.
How wide should a quartz seam be?
A properly executed quartz seam should be 1/16 inch or less in gap width. The Natural Stone Institute cites this as the accepted standard for stone and engineered stone installation. A seam wider than 1/16 inch signals a fit-up problem, either a poor cut or pieces that shifted during cure. Wider gaps hold more adhesive and are more likely to show color mismatch or read as a line from standing height.
Can you move a seam location after the countertop is already templated?
After templating but before cutting, yes. A fabricator who hasn't cut the slab yet can adjust seam placement if you raise a concern. Once the slab is cut, moving a seam means cutting a new piece, which may take more material. That's why reviewing the layout drawing, including seam positions, during templating is the right time to ask questions. Don't wait until installation day.
Do phantom seams get worse over time?
A cured adhesive-based phantom typically doesn't worsen with normal use. It's stable once the epoxy fully cures. But if the seam wasn't cleaned properly and adhesive residue is still partially uncured or sitting on the surface, it can darken or yellow over time, especially with UV exposure near windows. Silicone patches used as cosmetic fixes can yellow too. A true phantom from bonded adhesive stays roughly the same.
Does lighting type in the kitchen affect how visible a seam phantom looks?
A lot. Raking light at a low angle, like under-cabinet lighting pointed toward the countertop, reveals phantoms and height mismatches that overhead recessed lighting hides. Warm incandescent or LED light can soften the contrast of certain phantom colors. Cool, bright LED light sharpens it. That's why a phantom invisible during the installer's walkthrough turns obvious once the homeowner's kitchen lighting is fully set up.
How do I tell the difference between a seam phantom and a crack in quartz?
A phantom is a discoloration within or alongside the seam line, with no structural separation. A crack is a fracture running through the slab body. Run a fingernail across the seam: if you feel a gap or step, there's a height mismatch or a crack forming. If the surface feels perfectly flat and smooth and the discoloration is only visual, it's a phantom. A crack tends to spread under stress; a phantom won't.
Is it normal for any seam to be visible on quartz?
Yes. A properly executed seam on quartz should be detectable on close inspection but not obvious from standing height under normal kitchen lighting. Completely invisible seams aren't realistic on quartz the way they are on solid-surface materials, because the factory finish can't be fully replicated in the field. What's not normal is a wide gap, a visible color difference in the adhesive, or a discolored band wider than the seam line itself.
Can a homeowner fix a seam phantom themselves?
For surface residue, a careful acetone wipe is worth trying. Beyond that, DIY remediation is risky. Re-seaming means cutting out the old epoxy without damaging the slab edges, which takes specialized tooling. Color-matching adhesive without experience and a sample kit usually makes the result worse. If the phantom is from bonded adhesive, professional re-seaming or slab replacement is the real fix. A homeowner's best move is inspection before accepting the installation.
Does the direction a quartz slab is cut affect seam phantom risk?
Indirectly. Some directional or continuous-vein quartz patterns need the slab oriented a specific way, which constrains where seams can land. A seam that cuts across a heavy vein pattern is more visible than one that follows a natural break in the pattern. Cutting direction also affects how cleanly the edge finishes. A polished, smooth edge bonds more uniformly with epoxy than a rougher cut edge.
What does a seam phantom look like in photos versus in person?
Phantoms are often harder to catch in a photo than they look in person, which frustrates homeowners trying to document them for a warranty claim. Raking-light photography with a phone flashlight held at roughly 10 to 20 degrees from the surface shows them most clearly. Straight-on flash photos often wash them out entirely. Video panning the flashlight along the seam is usually more convincing than a still photo for showing the defect to a fabricator or manufacturer.
Are certain quartz colors more likely to show seam phantoms?
Yes. Solid colors, especially white, black, and gray with no pattern movement, show phantoms most clearly because there's no visual distraction. Concrete-look and suede-finish quartz textures can also reveal phantoms because the texture highlights surface irregularities. Mid-tone colors with organic veining are generally the most forgiving. If minimizing seam visibility is a priority, ask your fabricator to show you seam examples in your specific color choice before you decide.
Sources
- Natural Stone Institute, Technical Manual Vol. 2: Natural stone porosity and surface texture differences compared to engineered stone affect how adhesives bond at seams
- USGS Minerals Yearbook: Silica and Quartz: Engineered quartz is composed of approximately 90 to 94 percent crushed quartz bound with polymer resins
- Natural Stone Institute, Fabrication and Installation Guidelines: Seam placement guidance recommends positioning seams near sinks, away from unsupported spans, and in low-visibility locations where possible
- Cambria USA, Care and Maintenance Technical Guide: Quartz manufacturers apply proprietary factory surface polishes that cannot be fully replicated in field polishing
- Natural Stone Institute, Dimension Stone Design Manual: A seam gap of 1/16 inch or less is the accepted standard for stone and engineered stone countertop installation
- Silestone by Cosentino, Technical Product Specifications: Standard quartz slab sizes commonly measure 55 by 120 inches or 63 by 126 inches depending on manufacturer and product line
- DuPont Corian Technical Manual, Fabrication and Installation: Solid surface materials can be seamed to near-invisibility because the seam area can be sanded flush and buffed to match the surrounding surface finish
- American Society of Home Inspectors, Standards of Practice: Home inspectors evaluate structural and functional conditions; cosmetic countertop seam appearance is not a reportable defect under standard inspection protocols
- Caesarstone USA, Installation and Fabrication Technical Guide: Manufacturer warranty covers defects in the slab itself and excludes installation-related defects including seam quality
- National Kitchen and Bath Association, Kitchen Planning Guidelines: Typical U.S. kitchen countertop area spans approximately 30 to 40 square feet, often requiring multiple slab pieces and seams
Last updated 2026-07-10