TL;DR
- A Laser Products Industries (LPI) system captures countertop dimensions with a tripod-mounted laser and retro-reflective targets instead of cardboard.
- You level the laser, stick targets at reference points, shoot each point with the controller, then export a DXF straight to your CNC saw or CAD software.
- A trained operator templates a full kitchen in 20 to 30 minutes.
What is the Laser Products Industries templating system and how does it work?
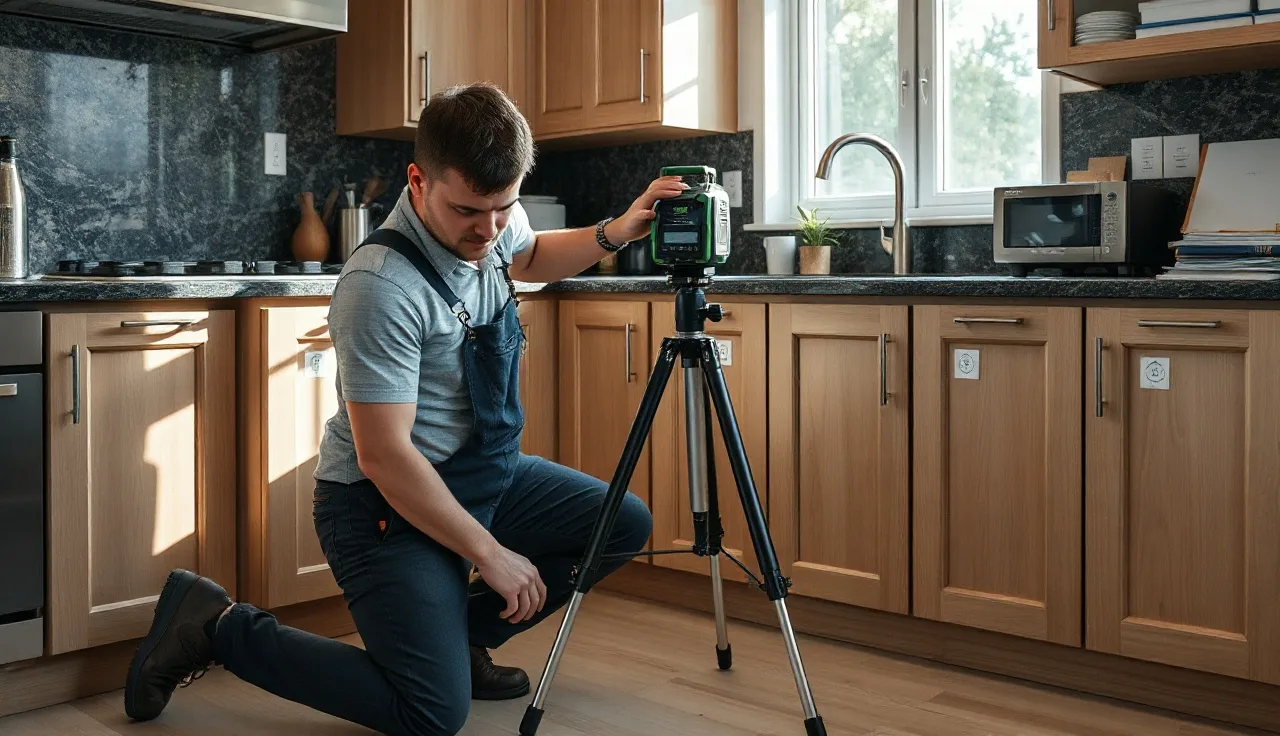
Laser Products Industries (LPI) makes digital templating gear that stone fabricators use to skip paper, cardboard, and plywood templates. The kit is a tripod-mounted laser transmitter, a roll of retro-reflective adhesive targets, and a handheld controller that records XY coordinates for every point you shoot. Those points turn into a CAD drawing. You export it as a DXF or LTP file and drop it straight into your CNC bridge saw or waterjet software.
The physics is simple. The laser sits on a tripod and rotates on a precision bearing. Aim the controller at a target, press the trigger, and the system records two things: the angular position of the laser arm and the distance to the target, measured by phase shift. Two or more reference targets stuck to a fixed surface give the system a coordinate origin. Every shot after that gets calculated relative to those anchors. LPI's published spec puts accuracy at plus or minus 1/32 inch (roughly 0.8 mm) over a 30-foot range [1].
The output is not a photo or a 3D scan. It is a vector drawing of the countertop perimeter, the sink and cooktop cutouts, and any scribe lines. That drawing goes to your CAD/CAM software for nesting and toolpaths. Nobody re-measures, re-draws, or re-interprets anything after the field capture. That is the whole point.
What equipment comes in an LPI kit and what does each piece do?
A standard LPI kit ships with a handful of parts. Know what each one does before you walk onto a jobsite and you avoid the rookie fumbling that eats your first ten templates.
The laser unit: A rotating head on a standard 5/8-inch tripod thread. It holds the laser diode and the encoder that tracks angular position. Keep the glass window clean. Never set it down on its head.
The retro-reflective targets: Small adhesive circles, usually 3/4 inch across, that bounce the laser back with almost no scatter. LPI sells them in rolls. A busy shop burns through several hundred a week. Stick them to walls, cabinet faces, or the existing substrate. Never stick them to anything that moves or flexes.
The controller: A ruggedized handheld computer running LPI's software. It shows a live list of captured points, lets you label each segment (countertop edge, wall scribe, sink, cooktop), and stores the job file. Newer units run Windows Embedded. Older ones used a proprietary OS.
USB cable or Bluetooth dongle: How the job file moves from the controller to your shop PC. Bluetooth is faster on newer kits. USB works on every generation.
Calibration target and case: A precisely made reference target you use to confirm the laser reads true before each session. Skip this and you find out about the drift when a 1/4-inch gap opens at the wall on a $4,000 slab.
Some shops also run LPI's companion software on a tablet for an on-site preview. Nice to have. The minimum workflow needs only the tripod unit, targets, and controller.
How do you set up the LPI laser unit on the job site?
Setup is where new operators fail most, and every mistake here poisons the measurements downstream. Get three things right: sightlines, level, and a locked coordinate origin.
First, pick a tripod spot with a clear line to every target you plan to shoot. A U-shaped kitchen may need two or three setups. The laser does not have to sit in the center of the room, but it cannot be blocked by cabinets, appliances, or the homeowner's dog. Here is the test: stand where the tripod will go and slowly scan the whole counter perimeter with your eyes. See every corner? That spot works.
Level the tripod. LPI units have a bull's-eye bubble in the base plate. Tilt on the laser axis creates cosine error that grows with distance, so center that bubble before you lock the head.
Run the calibration check. Set the calibration target at the distance your manual specifies (usually 6 to 10 feet) and shoot it three times. The controller should read inside the tolerance spec. If it doesn't, wipe the glass window, let the unit warm up two minutes, and try again. Still failing? The unit needs service before you shoot a single real point.
Place reference targets last, after the tripod is locked. Stick two of them to surfaces that will not budge for the whole shoot: wall tile above the backsplash, a cabinet stile, a base cabinet face frame. Skip the countertop substrate, the refrigerator, and anything that could flex. Shoot those two references first when you start the session. They set the coordinate origin for everything else.
How do you capture countertop points and edges accurately?
Once the system is live and your two references are shot, capture goes fast. Put a target at each corner of the run. Straight run with no features? Two endpoints do it. A radius corner or a diagonal cut needs targets at the start, the apex, and the end of the curve. LPI's software draws arcs through three-point sets on its own.
For sink and cooktop cutouts, target all four corners of the rough opening plus the center of the front edge. That gives the software enough geometry to rebuild the cutout and apply your reveal offset later in the shop. The controller prompts you to label the sink opening as a separate element so it doesn't merge into the perimeter.
Wall scribes are where operators bleed time. Run a target every 12 to 18 inches along a wavy wall, tighter at the corners. Walls lie. An old plaster wall wanders 3/8 inch over a 4-foot run, and if you shoot only the ends, your scribe line will miss that bow completely. More targets mean more points, and the scribe in the DXF actually matches the plaster.
Shoot each target twice and compare. LPI's controller flags any discrepancy over about 1/16 inch. When it flags one, check for a lifted target edge (partial adhesion scatters the beam), something that moved between shots, or a dirty laser window. Re-shoot until both readings agree.
Label as you go: left wall, right wall, front edge, back scribe, sink, cooktop, end splash. Clean field labels mean the CNC operator never calls you asking what "segment 7" is.
What happens to the data after you finish capturing points?
When every segment is shot, review the point list on the controller. Most LPI software versions show a rough preview drawing so you can confirm the shape looks like the kitchen you're standing in. A run that reads too short, or an angle that can't exist, usually means a kicked target or a mislabeled point. Fix it now. A second trip to the jobsite costs a half-day of labor and fuel.
Transfer the file to your shop PC over USB or Bluetooth. LPI's desktop software (called LPI Template, or DigiTemplate in earlier versions) opens the raw points and renders the full drawing. Here you add overhangs, apply standard sink reveals, note edge profiles, and set slab thickness. It exports DXF files that open directly in AutoCAD, Cabinet Vision, Slabsmith, or any CNC post-processor your saw manufacturer supports.
Shops running digital quoting and nesting software import the DXF straight in. If you use a tool like SlabWise to nest jobs against slab inventory, the LPI DXF drops into that workflow and kills one manual re-entry step in your quoting process.
Do not hand-edit the exported DXF dimensions unless you have a specific reason, like a confirmed field change after templating. A 1/16-inch manual tweak to a profile line can shift a cutout reveal or push a piece past a slab boundary. Trust the capture.
How long does digital templating with LPI take compared to traditional methods?
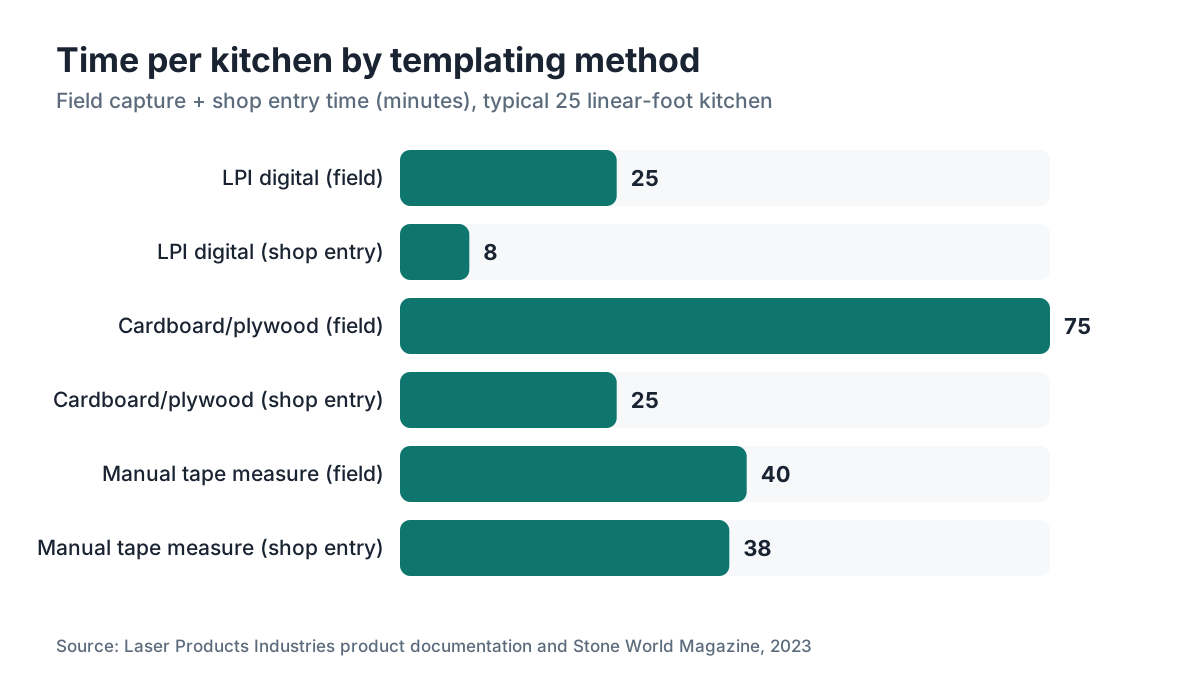
A trained LPI operator templates a standard 25-linear-foot kitchen in 20 to 30 minutes of field time, per LPI's training documentation and widely reported fabricator experience [1]. Cardboard or plywood templating on the same kitchen runs 60 to 90 minutes, and then you still have to drive the physical template back to the shop.
The savings are real, but they don't show up on day one. Most fabricators report a learning curve of 10 to 15 full kitchens before an operator beats cardboard for speed. The first jobs run long because labeling discipline, target-placement habits, and the file-transfer routine all have to be built from nothing.
The bigger win is killing template transport and re-entry. A physical template rides in a van, has to survive undamaged, gets traced onto a slab by hand, then gets measured a second time for the quote. A digital file emails in 30 seconds. For a shop running 20 or more kitchens a week, that is real labor coming off every job.
| Method | Field time (typical kitchen) | Shop entry time | Template transport | Error source |
|---|---|---|---|---|
| Cardboard/plywood | 60-90 min | 20-30 min (re-measure) | Physical van transport | Physical damage, measurement re-entry |
| LPI digital | 20-30 min | 5-10 min (DXF import) | None (email/USB) | Target placement, labeling errors |
| Manual measuring tape | 30-45 min | 30-45 min (re-draw) | None | Re-entry errors, wall bow misread |
What are the most common LPI templating mistakes and how do you fix them?
Skipping calibration is the number one error, hands down. Laser optics drift with temperature. A unit that baked in a hot van for two hours needs a two-minute warm-up and a calibration check before it shoots anything. Shops that skip that step find out when a $3,000 piece of granite doesn't fit the wall.
Poor target adhesion scatters your readings. The reflective circles want a clean, dry, non-porous surface. Grout lines, rough concrete, and dusty drywall all cut adhesion. Wipe the surface with a dry cloth first, then press the target firmly for five seconds. Stick one on tile with a slightly proud grout line and it tilts, and your readings go inconsistent.
Too few wall targets on a bowed wall produce a scribe that reads like a straight highway when the real wall meanders like a country road. Add targets. They cost pennies. Re-templating because the scribe won't fit costs a day.
Moving the tripod without starting a new session kills the job. Bump the tripod after shooting your references and the coordinate origin shifts, so every point after that is wrong. Re-shoot both reference targets any time the tripod moves, even an inch. The controller flags a mismatch on the re-shot references, and that flag is your safety net.
Bad field labels create chaos at the saw. "Left wall" and "right wall" have to be consistent from one point of view, either the homeowner's or the fabricator's. Pick one convention and write it down for the whole shop.
How do you handle complex features like radius corners, sinks, and irregular walls?
Radius corners need at least three targets: one at the start of the curve, one at the arc midpoint, one at the end. LPI's software fits a true arc through the three. On a large-radius corner (24-inch radius or more), add a fourth. The arc is only as good as the point spread, so three targets bunched close on a big radius give you a sloppy arc.
Farmhouse (apron-front) sinks take extra care because the opening sets back and the cabinet front is cut away. Shoot the front edge of the counter opening, both side walls of the cutout, and the back wall. Note the apron face distance from the front counter edge in the label field. Your shop needs that number to program the front edge cut.
Under-mount sinks are easier. Shoot the four corners of the rough cutout in the existing top (remodel) or shoot the cabinet opening (new install). Apply the reveal and polish treatment in the shop software. Most fabricators keep a saved reveal offset in their CAD software for each sink brand they see often.
Irregular walls, bump-outs, and columns all want extra targets around the irregularity. Treat every inflection point as a required target. A wall that jogs 2 inches over a 3-foot run needs targets at the start of the jog, the apex, and the return. Three points capture a two-segment offset. Miss the apex and the software draws a straight line through a corner that isn't there, and the counter fights the wall on install day.
What training and certification does LPI offer for their system?
LPI runs in-person training at their facility and on-site training at your shop. The standard course runs one to two days and covers calibration, field workflow, labeling conventions, file export, and common troubleshooting [2]. The classroom teaches the mechanics. Real repetition on real jobs is where the skill actually sets.
LPI does not publish a public certification exam or a nationally recognized credential. What you get is manufacturer training, which most shops log internally as part of onboarding. Plenty of shops require a new hire to ride along with an experienced operator for 10 to 15 jobs before templating solo.
LPI's phone and email support has a good reputation in the fabrication trade. Their tech line can talk an operator through most field problems in real time. Keep that number in the van.
Bringing the system into a shop for the first time? Negotiate on-site training into the purchase. LPI usually offers it, and a trainer watching your actual crew on an actual job catches habits that a two-day classroom never sees.
How much does an LPI digital templating system cost?
LPI does not post retail pricing, and it varies by kit configuration, software version, and whether training is bundled. Based on widely reported fabricator accounts in trade publications and forums, a complete LPI system (laser unit, controller, software license, targets, case, and initial training) runs roughly $8,000 to $15,000 as of 2024 [3]. Entry-level kits with older controllers sit at the low end. Newer units with Bluetooth, on-site preview tablets, and multi-user licenses push toward the top.
Annual software maintenance or support contracts, where they apply, add $500 to $1,200 a year. Replacement targets are a consumable, about $0.05 to $0.10 each depending on volume. A shop doing 15 kitchens a week burns roughly 300 to 500 targets a week.
The ROI usually pencils out for a shop running more than 8 to 10 kitchens a week. Time saved per template, fewer re-cuts from measurement error, and no physical template transport all stack up. Shops that track the numbers report cutting measurement-related re-cuts from roughly 2 to 3 a month down to near zero after the first 90 days on digital templating [3].
Homeowners: you are almost certainly not buying this yourself. You pay a fabricator who owns one, and it shows up in quoting accuracy, not a line item. A shop using digital templating is less likely to bill you for a re-cut caused by a bad measurement.
How does LPI templating connect to CNC fabrication and shop software?
The LPI DXF file is the bridge between the field measurement and the machine cut. CNC bridge saws and waterjets from Park Industries, Comandulli, and Breton all take DXF input, either directly or through a post-processor in the CAM software [7]. The DXF defines the cut paths. The CAM software turns those paths into machine-specific G-code or a proprietary format.
Before the DXF reaches the CNC, most shops run it through nesting. Nesting software lays the cut pieces on a virtual slab image to hold down waste. The money is real: a full slab of quartzite runs $1,200 to $3,000 or more depending on the material [4], and a bad nest can throw away 20 to 30 percent of the slab. Clean, labeled geometry from LPI feeds nesting software without a fight.
If your shop is shopping for software to manage quotes, slab inventory, and nesting alongside your LPI workflow, SlabWise is worth a look on the nesting and quoting side. The demo shows how LPI DXF files line up with slab images and customer quotes.
Shops that connect digital templating to CNC with zero paper re-entry anywhere in the chain report the biggest cut in labor time per piece and the lowest rate of measurement re-cuts. LPI is the field capture layer. The DXF, the CAD/CAM software, and the CNC are the layers downstream. Every layer has to speak the same file format, and that is exactly why DXF became the default exchange standard in countertop fabrication [8].
How do you maintain and troubleshoot an LPI laser unit?
The glass laser window is the part that needs the most attention. Dust, silicone overspray from sink work, and fingerprints all cut signal return and cause inconsistent readings. Wipe the window with a clean microfiber cloth before every session. No solvents, no gritty shop rags.
Check the tripod mounting thread monthly. A loose or cross-threaded connection lets the head tilt under its own weight, and a tilted laser on a precision bearing throws cosine error. Keep a spare 5/8-inch adapter in the kit.
The handheld controller runs on a rechargeable lithium pack. Keep a spare charged battery in the van. A dead controller mid-job is a lost day. Charge the controller every night, not when it finally warns you it's low.
If the unit reads 1/8 inch short or long across a whole session, the likely cause is a mis-calibrated distance measurement. Run the calibration target at three measured distances (use a good tape measure, not a laser pointer) and log the results. Consistently offset? The unit needs factory service. Do not paper over it with a manual offset in the field software. That hides the symptom and makes the error worse at long distances.
LPI's recommended service interval is annual for the rotating encoder. The bearing and encoder are precision parts, and they drift slowly with use. An annual check, even when nothing feels wrong, catches that drift before it turns into a countertop that doesn't fit.
Frequently asked questions
Can a homeowner use an LPI system to measure their own countertops?
Not practically. LPI systems cost $8,000 to $15,000, need calibration training, and the output is a DXF file that only means something if you're running a CNC saw. Homeowners benefit by hiring a fabricator who uses one. You get a more accurate quote and less risk of re-cut errors, but you never touch the hardware yourself.
How accurate is the LPI templating system?
LPI's published spec is plus or minus 1/32 inch (about 0.8 mm) over a 30-foot working range. In the field, most fabricators report real-world accuracy inside 1/16 inch when calibration and target placement are done right. Accuracy drops if targets sit on moving or flexing surfaces, or if the laser window is dirty.
What file format does LPI export, and which CNC saws accept it?
LPI exports DXF files, the standard vector format for CNC fabrication. Park Industries, Breton, Comandulli, and most other bridge saw makers accept DXF directly or through their CAM software. Some shops also use the LTP format inside LPI's own ecosystem before converting to DXF for the CNC step.
How many targets do you need for a typical kitchen?
A standard 25-linear-foot kitchen with one sink cutout uses roughly 30 to 50 targets: two references, corner targets on every run, wall-scribe targets every 12 to 18 inches along bowed walls, and sink cutout targets. Shops buy them in bulk rolls. At $0.05 to $0.10 per target, even 100 targets on one job costs under $10.
Can LPI handle multiple countertop levels or elevated bars?
Yes, with a caveat. The standard LPI system works in one horizontal plane. For a raised bar or a top at a different height, you either re-level the laser at the new height and start a new session, or account for the height difference in your CAD software. Advanced workflows stitch multiple setups together using shared reference targets.
How do you template a bathroom vanity with an LPI system?
Vanities are quick LPI jobs. The counter area is small, so one laser position usually covers it. Stick references on the wall or tile, shoot the perimeter, shoot the sink cutout corners, and label the wall scribes. A single-sink vanity takes 10 to 15 minutes in the field. The one headache is tight bathrooms with blocked sightlines, and a corner tripod position usually solves that.
What's the difference between LPI and other digital templating systems like Prodim or Laser Template?
LPI uses a rotating laser with retro-reflective targets. Prodim uses a mechanical arm with encoders that you physically trace around the counter. Both output DXF. LPI is faster on large, open layouts. Prodim wins in very tight spaces where laser sightlines get blocked. Both are mature systems. The choice usually comes down to what your CNC software already imports.
Does LPI work for outdoor kitchen countertops?
Yes. Bright sun cuts the contrast on the reflective targets, which bumps up the number of inconsistent readings. Shade the target with your body when shooting in direct sun, or use LPI's higher-visibility target variants. Outdoor concrete or stone substrate has to be clean and dry for the target adhesive to hold through the session.
How do you share LPI files between field and shop if there's no internet on the jobsite?
USB is the fallback. Connect the controller to a laptop in the van, pull the file, and email it or drop it on a cloud drive once you have cell signal. Most LPI controllers also pair over Bluetooth to a phone hotspot, which handles transfer where WiFi is weak but cell service holds. Rural shops keep a cellular hotspot in the van for exactly this.
What causes the LPI system to give inconsistent point readings?
Four usual suspects: a dirty laser window, a partially lifted target edge that tilts the reflective face, a target stuck to something that flexed between shots (a cabinet door versus a stile), and no warm-up after the unit sat in a cold or hot vehicle. The calibration check before every session catches most of these before they corrupt the job data.
How long does it take to train a new employee on the LPI system?
Most fabricators say 10 to 15 supervised jobs before a new hire templates solo with confidence. LPI's formal training runs one to two days. The course teaches the mechanics; supervised field jobs build the judgment around target placement, labeling discipline, and knowing when a reading needs a re-shot. Full competency usually lands around the 25 to 30 job mark.
Is digital templating worth it for a small shop doing five or fewer kitchens per week?
The break-even depends on your re-cut rate and labor cost, but most small shops find the ROI slower, not absent. At five kitchens a week you save roughly 5 to 7 hours of field time versus cardboard, plus you drop physical template transport. Kill even one re-cut a month and the savings add up. The harder question is whether you have the volume to keep the operator sharp.
Sources
- Laser Products Industries, LPI Digital Templating System Product Documentation: LPI system accuracy is plus or minus 1/32 inch over a 30-foot working range, and trained operators template a standard kitchen in 20 to 30 minutes
- Laser Products Industries, Training Programs: LPI offers one to two day in-person and on-site training covering calibration, field workflow, file export, and troubleshooting
- Stone World Magazine, Digital Templating Adoption Survey: Complete LPI systems typically cost $8,000 to $15,000; shops report near-elimination of measurement-related re-cuts after 90 days with digital templating
- Natural Stone Institute (formerly Marble Institute of America), Slab Pricing Reference: Full slabs of exotic quartzite or marble can cost $1,200 to $3,000 or more depending on material, making waste reduction through accurate nesting economically significant
- International Surface Fabricators Association (ISFA), Fabrication Best Practices: ISFA documents digital templating as a standard best practice for stone fabrication and covers DXF file workflow integration with CNC equipment
- Park Industries, CNC Bridge Saw Software Documentation: Park Industries CNC bridge saws accept DXF file input from digital templating systems including LPI for automated cut path generation
- Natural Stone Institute, Technical Manual on Stone Fabrication: Standard DXF format is the widely adopted file exchange protocol between digital templating systems and CNC fabrication equipment in stone shops
- U.S. Bureau of Labor Statistics, Occupational Outlook Handbook: Stone fabrication labor represents a significant cost center, reinforcing the value of time savings from digital vs. manual templating methods
Last updated 2026-07-10